Why install triple sockets
Connecting a triple socket is most often required by people who do not plan to carry out repairs in the near future, but want more convenience for using electronics and electrical equipment. Connecting such a device has advantages and disadvantages.
At the same time, you need to be prepared for the shortcomings:
Installing a triple outlet can greatly improve the functionality of a room's wiring without requiring additional cable costs or space.
Main varieties
The factory outlet is a device that provides safe contact closure for uninterrupted power supply to electrical appliances. Inside it there are terminals with springs attached to them and contacts. From the outside, the socket design consists of a plastic box (case) with a working part.
There are two main types of sockets:
Over time, the need to improve the functionality of outlets increases, especially when it comes to electrical appliances in the kitchen. According to modifications, sockets today can be divided into the following types:
Regardless of the type and modification, when installing a triple socket, the so-called block assembly method is used. It involves the installation of three separate sockets with a frame connecting them. If there is a need to purchase parts separately, then when selecting this frame, you need to pay attention to the correspondence of its shape and dimensions to the structure.
There are also triple sockets that connect to one socket box. They have a triangular shape, take up a little less space, but are not as convenient and safe to use.
Preparatory activities for installation
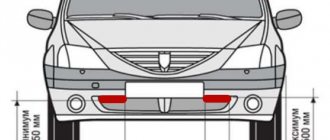
You should begin preparing for installation by choosing the installation location. The Euro standard involves fixing the device at a distance of about 20–40 cm from the floor. This is important in order to comply with basic safety and aesthetic rules.
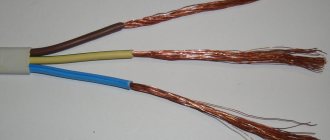
The second important activity is the calculation of current strength. It must be remembered that network elements are always designed for a given operating current. If this point is not observed, operational safety is sharply reduced, and there is a high probability of overloads and, as a consequence, overheating. The wire cross-section must also match the load. In this case, it should be at least 1 square. mm for copper and at least 2.5 sq. mm - for aluminum. The three-core option will be the most successful.
Parts and products for installing sockets should be selected based on the specified room parameters and operating current. It is also important to respect the aesthetic features of the apartment, to choose the safest and most suitable materials in color and appearance. Installation of hidden and external devices also has different requirements.
Installation of a socket box
If a solid socket with three sockets was selected for installation, only one socket box may be needed. A block with three separate mechanisms is fixed on single socket boxes. Difficulties may arise when installing the unit on a brick and concrete wall, since additional devices may be required. It is easier to make socket boxes with drywall.
Stages of placing socket boxes:
Working with drywall and brick requires compliance with basic safety rules. It is important to remember that such building materials are very fragile and often crumble when working with them.
In order for the socket boxes to stay in place well, they need to be secured with a thick aqueous solution of alabaster. Before installing a socket box in the wall, the hole made must be lubricated with the resulting mixture. The devices usually hold up well on a well-prepared mixture, but if they fail, more alabaster should be added to the solution. After electrical installation, the solution must be left to dry for two to three hours.
Do not forget about high-quality grounding - it is important not only for ease of use, but also for safety purposes.
Now we install the finished socket boxes.
Some without cable wire. It is pulled into the box after the fixing solution has dried. The reason is that in some circumstances the cable can knock the socket block away from the desired level. There is no right option - you should do what is most convenient.
Installation of socket boxes
The most rational installation path is a triple socket in one socket. The latter is a block with three slots on a common frame. The installation of a composite housing of three sockets and a whole module (triple at once) is identical.
Tools required for installation
:
- hammer drill or drill (depending on the wall material - concrete or brick, respectively);
- special attachment (crown with special incisors and a radius of 35 mm);
- hammer with chisel;
- screwdriver;
- spatula (preferably two - narrow and medium).
Stages of work
:
Drill a hole. Take a hammer drill (drill) and a crown. The drill bit of the tool is pressed against the designated centers and drilled until the bottom of the nozzle touches the wall. It is recommended to break the concrete remains (when the hole is already ready) with a chisel (built into a hammer drill or a hammer). Make a groove. This is a hole for routing cables. Holes should be pressed on the back panel of the socket box. Their number is similar to the number of cable cords (that is, three). Another groove is needed for the power cable. The diameter depends on the latter. Make holes for the wires. They are made between two cable holes. It is necessary that the diameter of the drill matches the diameter of the corrugation where the wiring will be inserted. You can resort to corrugated pipe, but this is not necessary. Fix the socket box in the wall. To do this, the box is secured with alabaster (it holds better and dries faster). The mixture is used to cover the inner walls of the opening. Then place the block there and keep it there for a while (for a strong fixation)
It is important to take care of the amount of mixture, otherwise it will seep out or the socket will hold weakly. The consistency should not be too thick or thin
Complete drying of the mixture will take from 1 to 2 hours.
Wiring
To connect the wires, you must use a parallel circuit. In this case, two of the additional wires are connected to each existing wire, which will be directed to the second and third sockets. Next, use the indicator to determine zero and phase, then turn off the power supply. After this, the wires are twisted, passing them one by one to other socket boxes through the holes in their rear walls.
Connecting a block of three sockets with one socket box requires the use of a cable. This installation option should be avoided, as it will be less safe and the product will wear out quickly.
Connection methods
Ways to connect sockets
Before connecting many power outlets in a row, it is important to understand the existing methods of connecting them. Depending on the order of switching of individual conductors, the following options are distinguished:
- Parallel connection, in which the sockets must be connected in a star.
- A serial connection, otherwise called a “loop”.
- Combined connection using a loop and a star.
- Ring connection.
Each of the listed methods is selected depending on the architecture of the room and considerations of saving on installation products. A parallel star connection is convenient when distributing the power supply network from a single center (distribution board, for example).
The sequential method (or loop) is used when a whole series of sockets installed one after another is turned on on a given line. The individual contacts (phase and neutral) are connected to each other in parallel; the method is called serial only because of the order in which the socket nodes are located.
When combined, in separate areas, the products are installed in a row, after which a “star” is built from one of them.
A “ring” connection is a sequential arrangement of sockets, the end of which is closed to its beginning. This connection method allows you to connect sockets at large facilities: at exhibitions, in workshops and sales areas.
Connecting a triple socket
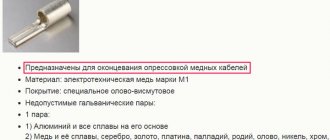
When connecting a triple socket with separate socket boxes, you must connect the wires to the terminals and press them with the terminals. Next, they should be twisted inside the device and the central part should be installed. Only after this can the decorative part, as well as the lid (if necessary), be secured.
Important! Installing a new socket in an existing lighting group may require replacing the machine. This must be checked before starting work.
The socket installation is complete. Now you can check its functionality by connecting the local power supply in the room. It is best not to use devices that consume a lot of energy when checking.
Triple socket design
The products are made on the basis of a housing and a working part - terminals with springs for the plug and contacts, a grounding device. Modern European sockets can withstand currents of up to 16 A, standard ones - up to 6 A. Sockets in one housing are distinguished by a large diameter of round holes for plug rods. The device cover is made of heat-resistant plastic, the core is made of ceramic. For installation, a special horizontal and vertical panel is used.
The modules are located on a common frame or on 3 autonomous ones connected by a common panel. Today, two modifications of the triple socket block are used:
Depending on the manufacturer, the triple module has a width from 212 to 220 mm, a height from 72 to 80 mm. The size of the device together with the overhead frame is 160 mm in height.
Installation of a block of several sockets
Single sockets and industrially manufactured multi-socket units are available with a rating of 10 or 16 A. Consequently, self-assembled blocks of several sockets are designed for the same currents.
Power wiring lines for a group of sockets are arranged from a conductor with a cross-section of 2.5 mm² and are connected on the panel through a circuit breaker with a rating of no more than 16 A.
A single 10 A socket can be used to connect equipment with a power of up to 2.2 kW, and a 16 A socket with a power of 3.5 kW. The total power of devices connected to the socket blocks should also not exceed these values.
The number of sockets in a self-installed unit is determined based on reasonable needs, with reference to restrictions on the duration of permissible currents. The minimum required number of consumers connected to the unit and their total power are calculated. If the obtained value is outside the acceptable range for the existing wiring, it is necessary to reduce the number of sockets in the block and compensate for this by laying additional socket lines.
Having calculated the required number of sockets in the assembly, choose the design of the block:
- invoice - located on the wall surface with preliminary installation of a flat socket box;
- built-in - installed in a module made of mounting boxes, for which a mounting socket is made in the wall.
Installing a surface-mounted socket block
Outdoor units are a collapsible box made of flame-retardant PVC plastic, in which 4-6 sockets are arranged in standard seats.
The front part of the box is attached to its base using latches and does not require special tools for removal. On the base of the box there are holes with a diameter of 20-32 mm, equipped with easily removable plugs for introducing cables into the box.
The cables are run into the box, after which it is applied to the wall and aligned horizontally, after which markings are made for drilling holes for fastening with self-tapping screws.
Once the box is attached, the front covers are removed from the sockets, in which holes for the wires to enter are cut out on the desired side with a knife, and the contacts are connected with jumpers.
The cross-section of the jumper wires must be no less than the cross-section of the incoming cable.
The installation of the grounding line must be carried out in strict accordance with the requirements of the PUE - the PE cable must be solid and reach the most distant outlet, having branches along the way separately for each point.
PUE-7 1.7.144
The connection of each open conductive part of the electrical installation to the neutral protective or protective grounding conductor must be made using a separate branch.
The series connection of exposed conductive parts into the protective conductor is not permitted.
Depending on the model, such multi-outlet blocks provide 1-2 seats designed to install sockets for a wired Internet connection or a landline telephone. Before installation, special landing supports are additionally inserted into these sockets. Partitions are provided in the cover of the box to separate the power wiring from the data cable.
After completing the electrical installation, the front cover of the unit snaps onto the base. If the connectors for the Internet or telephone cable were not installed, standard plugs are inserted into the holes - in the future, additional sockets can be mounted on these seats.
Installation of an internal socket block
The most common replacement for a single built-in socket is a multi-socket unit of no more than 6 devices connected in parallel - a cable. The connection of adjacent sockets in a cable is made with wires secured in socket terminals. That is, two wires are attached to the terminals of each socket, except the last one - incoming and outgoing. In this regard, parallel connection of sockets in this case also has the properties of serial:
- when a conductor burns out on one of the terminals of any device except the last one, all sockets following it become inoperable;
- Each connection of another consumer to any outlet significantly increases the current in the wiring section from the unit to the distribution box.
Don't miss: Velor upholstery fabric: properties, advantages, features
The PUE requirement for the continuity of the grounding cable is based precisely on the first property of the daisy chain connection.
Having decided on the number of sockets in the block, along with them you need to purchase socket boxes and an overhead front frame for the required number of places. It should be taken into account that incoming and outgoing wires will be connected to pass-through sockets (which is not only the last one), so the corresponding socket boxes to accommodate a larger volume of wiring must be chosen with a greater depth - 60 mm instead of the standard 45.
Installing a socket block in a concrete wall
Work begins with de-energizing the line by turning off the machine on the panel and checking with a tester that there is no voltage on it, after which the existing single socket is dismantled.
The mounting boxes assembled into a block are applied to the design location on the wall and the contour of the socket is marked - with a margin of a couple of centimeters in each direction. Depending on the base material, a landing socket is made in an appropriate way, which is partially filled with plastic cement mortar.
A cable is inserted into one of the socket boxes of the assembled section, after which it is recessed into a seat flush with the wall and fixed there until the solution hardens. Then the remaining gaps are rubbed and the base is finished.
When starting to install sockets, to connect them together, first cut the required number of jumper wires, clearing the ends of insulation and grouping them by color according to phasing.
The sockets are connected according to the above diagram, starting with the one closest to the incoming cable on the right. In the situation shown in the figure, after connecting the rightmost socket with short jumpers to the penultimate one, two long wires (phase and zero) will be drawn from it to the leftmost one - to connect another socket line.
If it is decided to replace several single sockets in a room with socket blocks, then one of the options for a daisy chain connection scheme may be as follows:
It should be remembered that each outlet must have a separate branch to the grounding cable.
To fulfill this requirement of the PUE for the integrity of the ground wire, you can use special clamps that make it easier to create branches for passing sockets.
The prepared jumpers are first laid out on the socket boxes, after which they begin to connect the sockets. Having secured the conductors in the terminals, the sockets are installed one by one in the mounting boxes, preventing the wires from getting under the spacer tabs.
Upon completion of the installation of the dielectric bases, a control tightening of the spacer screws is performed, installation of the front covers and switching on of the machine on the apartment panel. The installation of a socket assembly on drywall differs only in the type of sockets used - with external clamping feet and is simpler, since installing a socket in a gypsum plasterboard does not require professional skills or physical effort.
Replacing a single socket with a multi-socket block if there is no grounding cable in the wiring is performed identically. The work will take less time, but you should never neglect grounding, if any, and install two-pin sockets.
Option for connecting socket blocks to a network without grounding:
Installation of a socket box
Installation of the block begins after choosing the location of the structure:
After choosing the installation area, you will need to prepare tools - a level, tape measure, marker or pencil, a hammer drill with a crown attachment and an attachment for making grooves.
Carry out installation work before the room is finished.
Marking the wall surface
The geometry of the structure and the convenience of organizing wiring depend on the correctness of the markings. To mark installation points, start from the number of sockets in the block. When working, use a level - it will ensure that the device is level.
The distance of the socket from the floor is 20-40 cm. Between the centers of the socket boxes is 72 mm. Otherwise, it will not be possible to fit the decorative panel accurately. The groove is done strictly horizontally or vertically - it is better to draw the outline of the hole.
Drilling holes in the wall
You can make seats for the socket by punching with a hammer drill with different attachments. A hammer, chisel and several screwdrivers are used to refine areas.
Drilling is carried out in stages:
The permissible cross-section of the cable for the socket is not less than 2.5 mm2.
Fixing a socket box in a concrete wall
To ensure that the triple socket box sits tightly in the socket, white alabaster is used. Due to the rapid setting of the material, the mixture is prepared in small portions. Density is controlled visually.
The landing niche for the socket box is coated with the solution from the inside and its fastening is checked. The product will sit firmly on a dense mixture. If it fails, add more alabaster and reapply the composition. After installation, the solution should dry for 2-3 hours. The outer layer of the material is leveled with sandpaper.
Before placing the socket on the alabaster, check the horizontal and vertical position of the mounting screws.
How to install socket boxes for a triple socket
The installation process begins with determining the location of the block of three outlets. The functionality of the structure will directly depend on the correct location. For example, in the kitchen, it is convenient to install three sockets in one socket above the countertop. This way, you can simultaneously connect your microwave oven, multicooker and other household appliances without worrying about the length of the cord.
In a room, it is better to install such a unit behind the TV, skillfully masking all connected wires with a wide screen. It is possible to install such a block of sockets in bathrooms, but here it is important to comply with fire safety requirements. In particular:
- The minimum distance to flowing water is 60 centimeters (zone 3);
- The socket group must be sealed and moisture-resistant with an appropriate degree of IP protection.
Having decided on the installation location, you need to prepare the tool and you can start marking the walls. To install a triple socket in one socket box you will need:
- 1. Construction level;
- 2. Roulette;
- 3. Pencil or marker;
- 4. A hammer drill with an attachment for punching walls and a crown.
Please note that it is better to install a block of three sockets at the initial stages of repair work, until the finishing is applied to the walls.
Wall marking
Please note that this is a very important stage of work, on which the geometry of the sockets and the ease of connecting the wiring will depend. Therefore, marking walls must be approached with maximum responsibility. When marking, you need to be guided by the number of sockets combined into a block.
When carrying out work, be sure to use a building level: this way you will gain confidence that the structure will be perfectly level and there will be no problems with installation and connection. If a block of three sockets sits crookedly, the mistake made will immediately be evident.
There are certain requirements for marking walls for installing electrical outlets. For example, the distance between the centers of the socket boxes is exactly 72 mm. Take this into account when applying markings. Failure to comply with this parameter will lead to the fact that the decorative panel simply will not “sit” in its place.
In addition, the groove for laying wires must run strictly horizontally or vertically from the socket box. Only after meeting these requirements can you drill holes and tap the walls.
Drilling a hole in the wall
After the walls are marked, you need to make a mounting hole for the socket box. This is not difficult to do, the main thing is to have a good hammer drill with a special diamond bit for concrete on hand. Such “crowns” are used for drilling holes of a given diameter in brick walls and concrete floors.
The algorithm for working with a crown is simple and intuitive, so even a novice master usually has no problems. The nozzle is inserted into the chuck and drilling of a hole in the desired location begins. Drilling ends when the bottom of the bit touches the wall. The remaining concrete is knocked down with a chisel.
If you are installing socket boxes in a plasterboard wall, then you will need a special nozzle for plasterboard walls to drill holes. You can also use a utility knife.
Also, do not forget about the power cable; it is also necessary to make a groove for it. The width of the groove depends on the thickness of the cable that will be connected to the sockets (whether it will be corrugated or not). Our socket group will require a cable with a cross-section of at least 2.5 mm2.
We fix the socket box in the concrete wall
In order for a triple socket in one socket to be kept in the wall, it is necessary to fix the box with alabaster. Here it is important to correctly calculate the amount of mixture that will be applied to the back and side walls. If you overdo it, then the excess alabaster will stick out; an insufficient amount of the mixture will not be able to ensure reliable fixation of the socket box. The amount of alabaster is determined individually, depending on the type of partition.
The consistency of the alabaster mixture should not be too liquid, as it will spread when applied. But you also don’t need to make it too thick, otherwise it will be difficult to apply and smear (besides, the thick mixture will quickly set and dry). I always prepare the mixture by eye, in small portions.
Connecting triple sockets
The triple built-in socket and overhead device are connected according to the parallel principle:
After tightening the fixing screws, decorative overlays are installed.
Features of connection with and without grounding
A triple socket in one socket box with grounding is connected as follows:
The last step is to install the housing cover.
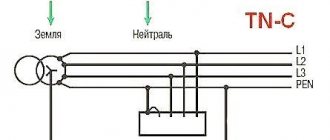
In old houses, two-wire TN-C wiring with a phase and neutral ground (PEN conductor) is installed. Connect sockets without grounding only after checking the voltage with a multimeter. Electric current is not supplied to the apartment at this moment. For installation, it is better to choose models equipped with a grounding mechanism. Complete safety will be ensured only by replacing the wiring.
Socket connection diagrams
When installing electrical wiring, it is important to choose the right scheme for connecting several outlets to each other. There are three ways in total:
- Parallel connection or star connections.
- Serial or loop.
- Mixed.
The concepts of “series” and “parallel” are arbitrary in this context, and they should not be perceived in the classical understanding of connections of electrical circuit elements.
The above methods can be supplemented with a ring connection, when all sockets in an apartment or house are powered from one wire. Such a scheme may include all three connection options. Each of them has its pros and cons. When choosing a connection method, it must be taken into account that the electrical connection is vulnerable at twist points. At the same time, increasing the number of distribution boxes reduces the service life of the wiring.
Let's look at each socket connection diagram in more detail.
Preparation
The ground wire is always yellow-green. Never use it for other purposes. Phase wire - white, red, brown; zero - blue, black.
Unfortunately, some electricians adhere to other traditions. In old Soviet houses, generally all the wires are white. It will be convenient for you if the neutral and phase wires are located equally on all sockets.
For example, the neutral wire is always below or to the left.
It is customary to place the socket so that the contacts are at the bottom. This makes some sense: in the event of a roof leak, water flowing down the wires will collect in the form of drops on the bend below and will not immediately reach the live contacts.
We begin connecting the outlet by preparing:
- tools (screwdriver, indicator screwdriver, long-nose pliers, wire cutters, possibly a crimping tool (crimper, press pliers), building level);
- consumables: suitable wires, terminal blocks, possibly sleeves or cable terminals;
- flashlight.
Turn off the main switch!
Select the exact location for attaching the socket. It is impossible to solve this scientifically, only for reasons of convenience and possible movements of the sofa, table, cabinet... We mark the places for the mounting screws. Construction level - to help.
However, you can get by with a modern smartphone with a suitable downloaded program.
In our case, we now need to cut the wire in the right place. We estimate the length for the bend and 1 cm for the terminal. Let's have a snack. (Measure seven times - cut once!) Strip the wire from the top braid, Strip the ends of the wires by 1 cm.
(The photo is incorrect - the ends are too short.) This is quite convenient to do with a stationery knife. You can extend the blade just the thickness of the insulation without damaging the wire.
A special tool is, of course, convenient, but it is only necessary for professionals for daily work.
Stripping the wire with a special tool
We bend. It is more convenient to work with a soft multi-core wire, and more reliable with a thick single-core wire. The example uses copper wire with a cross section of 2.5 square millimeters.
Series circuit
A daisy chain connection involves connecting several sockets in series in a row with each other. The connection is made without a distribution box, since the cores are fixed at the contacts of the sockets in the socket boxes. A phase and a neutral conductor are supplied to the main socket. Wires extend from it to other points.
This method is used when it is necessary to combine sockets into a single block. But such a circuit is not suitable for connecting power devices, such as electric and microwave ovens, washing machines, and air conditioners. If the load is exceeded, the contacts may burn out. And if the wire in the first socket burns out, those connected after it will not work.
It is also important to note that the ground wire cannot be run as a loop, it must be connected to each point, as shown in the diagram above.
Parallel connection
The parallel connection of sockets is also called a star connection. The essence of the method is that the circuit includes distribution boxes in which independent connections of sockets are made. One main power cable comes into the box. Wires are branched from it point by point. Outwardly, it resembles a star, which is why the method got its name.
An important advantage of this method is the autonomy of the outlet, that is, independence from the state of others. If one of the sockets fails, the others continue to function. But if the main cable burns out, then the voltage disappears in all. However, in such cases it is always known with certainty where to look for a break.
Another disadvantage of this connection scheme (in parallel) is the increased wiring consumption. To connect each outlet, you need to draw a separate line, which increases the cost of electrical installation work.
Mixed scheme
A mixed connection helps improve the reliability of the socket connection diagram. This method is often used when installing points using the daisy chain method. The essence of the method is to install a distribution box to which the power cable is connected. Then the electrical wiring is laid out for each outlet in the room. Branches are made from it to the remaining points, which are located between the box and the far connection point.
Don't miss: Door selection
Mixed connection provides reliability because the circuit includes independent power points. If one of them fails, the remaining sockets are not deprived of voltage and continue to function. Finding a break will also not be difficult, since the electrical points are connected independently of each other.
Ring connection
Connecting sockets with a ring is an unusual scheme, as it is rarely used. But this method has its own number of advantages. The meaning of the wiring is to lay the main power cable around the perimeter of the room. The wiring comes out of the distribution panel and goes into it at the other end.
The joints for branches into separate rooms are made in distribution boxes. The connection is made using a cable or star type.
The cross-section of the main cable is selected based on the total load of the room, when several devices are turned on simultaneously in each room. A ring connection is not inferior in reliability to a parallel connection, since the circuit maintains the autonomy of the points.
Examination
We screw the socket cover, checking the horizontal position using a building level. We turn on the main switch. We check first on a table lamp, then on an iron. If you hear at least some sounds from the socket when the iron is turned on, then double-check and re-tighten all connections after turning off the main switch!