A little background
The very idea of insulating floors, as well as walls, by laying hot water pipelines inside them is by no means new. Back in Soviet times, experimental projects of panel houses were created and implemented, in which hot water circulated inside the floor slabs and walls, thereby providing apartment heating without radiators. It was believed that the absence of batteries saves useful space in rooms and does not spoil their aesthetic appeal.
Connecting a heated floor to a heating system
It is quite natural that such buildings have not stood the test of time, due to the almost zero maintainability of heating systems and extremely low economic feasibility. Indeed, most of the heat was not spent on heating the interior, but went to heat the structural elements of buildings and the surrounding atmosphere.
Channels made of iron corroded very quickly due to constant contact with water under pressure and at high temperature.
This publication is devoted to a description of floor heating systems combined with heating communications, as well as consideration of the nuances of installing heated floors.
Why warm floor?
They returned to installing heated floors combined with a heating system due to the emergence of new materials, metal-plastic or polypropylene pipes, for example. The low maintainability of such floors does not play a decisive role due to the lack of need for repairs (frequent, in any case).
Modern pipes are practically not subject to corrosion and last for long periods of time. Therefore, water heated floors are now very relevant and popular.
As noted earlier, heated floors are necessary in children's rooms and bathrooms, where people walk on them barefoot. Indeed, an unreasonable child, poorly aware of the influence of temperature on his health, can crawl, lie and play on a cold surface.
An adult who gets hot in the bathroom also does not notice the cold coming from the floor and may get sick. Some, on the contrary, have very sensitive feet and for them ordinary discomfort turns into a test of will.
In fact, a warm floor with its natural convection, when heated air circulates throughout the entire area of the room, in accordance with the opinion of doctors, is the best option for heating any premises.
In addition, such a healthy microclimate is easier and more economically feasible to create and maintain with the help of heated floors. The uniform movement of heat flows over the entire area contributes to this. Due to these reasons, the question of how to connect a water heated floor is very relevant.
Diagram of different heating systems
Some experts argue that the heated floor design can be successfully used as a self-sufficient and only heating system. Here, probably, given the climate of Russia and heating costs, one can argue. It is recommended to combine both types of heating.
General statement of the problem
When considering the problem of how to connect a heated floor to a heating system, it is immediately worthwhile to clearly understand the difference between the device for heating it in a private and apartment building. In the first case, the owner is free to carry out landscaping without any restrictions, based only on the characteristics of the boiler and the layout of the premises. In high-rise buildings, connecting a water-heated floor to the heating system causes much more problems.
The main ones include the following:
- difference in hydraulic resistance in heating radiators and underfloor heating pipes;
- the quality of water in the central heating system leaves much to be desired and can have a significant impact on the operation of heated floors;
- Water hammer and pressure changes can lead to premature destruction of the underfloor heating system.
These are just basic issues that can be solved by using various tricks so that underfloor heating and radiators can function simultaneously. But simply bypassing administrative barriers will not work. It is extremely difficult to obtain permission to lay additional circuits connected to the building heating system.
Usually, only apartment owners who have the very end of the heating circuit can agree on this issue. In addition, do not forget that when connecting heated floors, the heating circuit will have to be opened, and thereby the pressure and temperature of the water in other apartments will change.
The way out of this situation is to connect a warm water floor to a boiler installed independently, which does not at all cancel the requirements of housing and communal services for the installation of water flow meters. This event is undoubtedly very expensive, but for people who want to feel comfortable, this is the only possible option. A gas boiler is much more economical, but there are frequent cases of using electric installations.
In addition, regardless of the type of heating system, the installation of a heated floor must solve the main problem, which is to couple the high- and low-temperature heating circuits. A hot floor connected directly to the heating system will burn your feet. Indeed, whether it is a supply from a boiler in a private apartment or a riser in a high-rise building, the temperature in the pipes reaches 85 °C.
In underfloor heating pipes, water should not heat up above 35 °C and at the same time be taken from the heating system. In this case, the heating circuit with heated floors, naturally, becomes somewhat more complicated and cannot be connected directly. There are several options for its implementation, using a heating boiler or connecting to a single-pipe heating system, which will be discussed in detail below.
Pipe connection methods
The diagram for connecting a heated floor to a heating system in a private house provides the following options:
- one channel;
- two channels;
- natural circulation.
The simplest and cheapest is the single-pipe scheme. Hot water circulates through a single channel. Such a design must have a sufficiently powerful pump. Even if this equipment is already included in the boiler configuration, another one is usually used. Correct connection of a water heated floor in this case requires installing a pump approximately in the middle of the line. The main circuit should be located after the unit, the return circuit - in front of it. The system is controlled by regulators installed on the water supply channel. The maximum length of the contour cannot exceed two to three tens of meters.
If you are deciding how to connect a heated floor to heating in a private house, it is better to go with the two-pipe option. In this case, separate lines are installed to supply hot water and collect cooled water, connecting them to the boiler. We will consider this option today. As for the gravity circuit, its main advantage is the absence of the need for a pump. The coolant moves naturally. The pipeline is installed at a certain slope. The arrangement of such structures requires the involvement of professionals who will clearly calculate the optimal layout of highways.
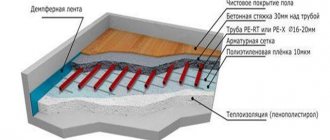
Heated floor design
First of all, you need to decide on a floor insulation project and transfer it to paper. At this stage, you need to take into account the layout of the premises, their location (possibly on different floors) and even the arrangement of furniture and structures that make up the interior.
There is no need in the bathroom, for example, to lay pipes under the container itself, which can occupy a significant area. The same applies to mezzanines and other stationary objects.
Here, you need to choose a pipe laying scheme. Usually the “snail” scheme or various derivatives of the “snake” are used.
Various laying schemes for heated floors
Double snake and snail patterns provide good uniform heating of the surface, and therefore are popular, despite the more complex installation process.
It must be remembered that the length of one circuit should not exceed 30 m. This means that to heat the floors in a large room you may need more than one snail or snake. In this case, each of them must enter and exit the underfloor heating manifold. The dual-circuit option is usually sufficient for most rooms.
Materials required for heated floors
The material of the pipes should also be determined during the design process. The quality, durability and cost of comfortable living largely depend on this. The most common options are the following:
- pipes made of polypropylene or steel, although suitable for underfloor heating, are not considered further due to obvious disadvantages;
- copper pipes;
- metal-plastic pipes;
- cross-linked polyethylene pipes;
- corrugated stainless steel pipes.
Copper, which has excellent performance in both thermal conductivity and durability, was abandoned long ago due to its high cost (although there are also wealthy individuals).
Warm floor made of copper pipes
Might be interesting
Thermal insulation
What are thermal insulation materials: comparative…
Thermal insulation
How to insulate a roof from the inside and not make mistakes?
Thermal insulation
Roofing and drainage: heating rules
Thermal insulation
Insulated Swedish stove: pros and cons
Metal-plastic gives excellent results, however, over time, the aluminum layer becomes brittle due to the effects of pressure and oxygen in the water. This, in turn, can significantly reduce the durability of underfloor heating, the repair of which is very labor-intensive and expensive.
Pipes for heated floors made of metal-plastic
Today, the use of pipes made of cross-linked polyethylene is considered optimal. Their manufacturing technology allows, along with flexibility, to achieve excellent strength and durability of the pipe. If an additional “EVON” layer is included in the pipe design, reducing oxygen diffusion to the limit, then it becomes almost eternal.
Polyethylene pipes for heated floors
Stainless steel is a worthy competitor to cross-linked polyethylene. Corrugated pipes made from it are flexible, durable and inexpensive. Their distinctive feature is such a reliable fitting system that they can be connected (extended) inside a concrete screed.
Stainless steel pipe
Under no circumstances should seamed pipes be used. This is especially important when it comes to a central heating system. A water hammer, even if not very strong, will destroy the pipe and lead to serious troubles.
The term “insulation” in relation to heated floors will not be entirely correct. It is more fair to talk about shielding heat, which should warm the upper surface, and not be spent on heating the neighbor’s ceiling or basement.
Materials for insulation are selected taking into account the possibility of raising the floor. In standard high-rise buildings this circumstance is especially critical. The total thickness of the floor consists of the actual thickness of the insulation and the thickness of the screed.
If there is a heated room under the apartment, then a 30 mm layer of insulation will be sufficient. If a plinth, basement, and especially soil is placed under the floor, this value can reach 50-100 mm. The thickness of the screed, based on the requirements for its strength, cannot be less than 50 mm. These simple calculations and estimates must be taken into account when starting to install a heated floor.
The thickness of the floor must be calculated already at the stage of its hydro- and sound insulation, creating a reserve for the heating layer.
Typically, thermal insulation mats specially designed for this purpose are used to insulate a heated floor when laying it. The bosses located on them make it possible to simply, quickly and reliably lay a pipe through them. The latter can also be attached to the reinforcing mesh while pouring the screed.
Thermal insulation mats
To reduce the overall thickness of the floor, sometimes they abandon the screed, laying the pipe in metal heat exchange plates, which, in turn, are mounted in slatted or finished wooden structures, as well as in thermal insulation mats.
Heat exchange plate
Connection conditions
Now let's talk about the conditions for a heated floor circuit connected to a radiator heating system. First, you need to understand that the installed radiator heating system is not rubber. Therefore, it has some limitations. And it must be done correctly. I very often see how people install radiator heating systems using, for example, a 25 mm PPR pipe. And in this case, how to connect heated floors to the system? This is why I always recommend installing pipes for a radiator heating system starting with a diameter of 32 mm and above
.
Now about the length of the heated floor contour. The length should not exceed 40-50 meters for a two-pipe system, depending on the above characteristics. It can be mounted either in a snake starting, for example, from the outer walls, or in a spiral.
The length of the heated floor contour for Leningradka with forced circulation should not exceed 20-30 meters. Moreover, if your contour is longer, then you need to divide it into equal parts
.
In this case, I recommend using a metal-plastic pipe for installing the heated floor circuit, 16-18 mm maximum. DM 20 mm is used for gravity systems. Typically, the coolant temperature in radiator heating systems is at least 70 degrees. At the same time, PEX-AL-PEX pipes can withstand temperatures of 90 degrees. There are also analogues of cross-linked polyethylene pipes with an oxygen-impermeable layer, which can also withstand temperatures of 90 degrees Celsius.
Types of connecting a heated floor to a heating system
Combined heating with radiators plus underfloor heating may be the only possible way to achieve comfortable indoor conditions. But for a number of reasons, it is impossible to connect a warm water floor with a simple “tie-in” into the riser or heating pipes, thus ensuring the supply of hot water and its return to the system (return).
The main ones are:
- independent circulation of water in thin and long pipes is impossible, which means that a pump is needed to connect to the heating;
- to match the pressure in the system, a pressure smoothing device is needed to prevent the effect of water hammer;
- it is necessary to remove air from the system;
- water filtration, which is especially important in central heating systems, implies the presence of dirt traps;
- the presence of a mixer is due to the need to mix water from the supply and return in certain proportions to achieve the required temperature in the heated floor circuit (lowering the water temperature relative to the heating system);
- devices for regulation and accounting (for housing and communal services) are objectively necessary.
Due to these factors, the scheme for connecting a heated floor to a heating system becomes significantly more complicated.
Sometimes the simple insertion method is still used, but this applies exclusively to small rooms, less than 10 sq.m., a bathroom, for example. This in no way cancels the coordination with housing and communal services and the installation of related meters.
Types (diagrams) of connecting water heated floors in the case of autonomous home heating or upon obtaining permission from housing and communal services, which involve inserting directly into the system pipes, are presented in the figure.
Connection diagram of a water heated floor to a heating system
The simplest, and therefore inexpensive, scheme for connecting a heated floor to boiler “a” works using a two-way tap connected to a thermostat. The heat is regulated by decreasing or increasing the flow using control valves (3 and 4). Bypass valve 8 serves to equalize the pressure.
Scheme “b” is in principle similar to the first, with the only exception that the collectors are connected directly by a jumper 8 together with a valve that shuts off the supply when the pressure exceeds the permissible value.
Circuit “c” combines high reliability and simplicity. Here, a three-way valve (11) is installed on the return line, which redirects the cooled water to the supply section.
More advanced than the previous one, circuit “d” is distinguished by more sensitive temperature control. This is explained by the presence of a three-way mixer (9) on the supply pipe, which mixes the water until it enters the circulation pump (1).
There is no limit to perfection. The validity of the statement is confirmed by diagram “d”. It uses a four-way valve mixer, which can be controlled manually and using a servo drive that responds to signals coming from the thermostat unit.
Diagram “e” describes the optimal connection of a heated floor in an apartment to the central heating system through a heat exchanger (14). This assumes that you have the appropriate permit to perform this procedure, as well as an air vent, pressure gauge, overpressure valve and expansion tank (13). These elements make up the safety group (12) when connecting a heated floor from a battery.
Trying to improve the aesthetics of the interior, the pumping and mixing unit can be “hidden” as far as you like. However, access to shut-off and control valves, as well as meters, pressure gauges and other monitoring and control elements must be quick and easy.
The assembled pumping and mixing unit, which ensures the inclusion and control of a warm water floor, should look something like the one shown in the figure:
Pumping and mixing unit
Floor connection
First of all, it is necessary to make all calculations related to the length of the pipes and the method of laying them. The lines must be able to withstand certain loads and be located in such a way that there are no cold spots. It is necessary to take into account the power of the heating system, the type of room, temperature requirements and many other factors. Special computer programs help determine what the connection diagram for a warm water floor to a heating system should be. If it’s not so important for you to do everything yourself, we recommend using the help of experts. Mistakes at this stage can lead to sad consequences.
The pipes can be arranged in a “snake” (simple, angular, double) or “snail”. The second option is more popular, as it provides more uniform heating. Depending on the heating load of the room, the pitch is usually from 15 to 30 cm. In some cases, the distance between the turns can be changed. Connecting a heated floor to heating in an apartment requires pipes with a diameter of no more than 18 mm. Usually 16 mm products are enough.
Collector installation and connection
Having laid out the lines, they begin to arrange the collector. The location of this node is determined by adhering to some rules:
- It is recommended to connect the heated floor to the heating system at the top point of the structure. Often, it is more convenient to place the equipment somewhere on the ground floor or basement. This is acceptable, but in this case you will have to seriously work on the arrangement of air valves. With classic wiring, everything is much simpler.
- The length of all contours should be approximately the same.
- Access to the cabinet with the collector must be free in order to respond in time in the event of an emergency.
- Before connecting a water heated floor to the heating system in a private house, be sure to install protection consisting of a bypass and an air valve. The latter is responsible for bleeding off excess air and normalizing pressure in the channels. A bypass is a device that shuts off the water supply in case of an emergency.
The next step is to connect the underfloor heating manifold to the heating system. The pipes are connected to the comb using fittings or in another way specified by the manufacturer. The quality of the joints is carefully checked. The system is tested before laying the floor covering.
Having connected the water heated floor, it is checked in every possible way at different temperature conditions. It is necessary to analyze the heating quality of each individual line, to inspect whether the joints are sufficiently sealed. This is a process that requires patience and care. If you are installing branded equipment, the heating connection diagram with heated floors must contain a balancing table. Correct configuration is the key to efficient and long-lasting operation of the system. If mistakes are made at this stage, they will have to be corrected by removing the floor covering. If there is a screed, this will not only be a costly, but also quite a labor-intensive procedure. Think about whether you are confident enough in your knowledge to take such a risk.