When installing cables, various fastening methods are used. It all depends on the specific conditions, financial capabilities and tastes of the owners of the premises. When performing this work, everything must be securely fixed, the insulation must not be damaged, and the appearance must be consistent with the surrounding environment and be favorable.
Types of fastening cables and wires to the wall
The materials from which walls and ceilings are made can have different densities and structures. The cable, depending on the task at hand, can be completely or partially “hidden” in grooves (groove recesses), plastic pipes, corrugations or special trays. And if this is not really necessary, you should secure it more carefully.
All this can be done using a wide variety of devices. Let's try to take a closer look at the most common types of fastening.
General rules for cable installation
When laying cables on walls or ceilings, it is recommended to follow the following rules:
- When using screws, dowels and self-tapping screws, try to tighten them all the way. Otherwise, the protruding cap may damage the insulation.
- The maximum distance between fastening points should not exceed 50 cm, and at bending points (turns) it can be reduced to 5 - 10 cm.
- Laying is carried out without humps, evenly and preferably in a straight line (horizontally or vertically).
- If a margin is provided, it should be made less noticeable.
- When laying cables hidden in a groove, they are laid so that they do not interfere with further finishing of the walls.
- If you have suspended or suspended ceilings, there is no need to make grooves under them.
- The main tools that should be used during installation are a drill, a hammer drill, a screwdriver, screwdrivers and a hammer.
All these recommendations are universal and easy to implement.
Concealed installation fastener
If cables are laid during the renovation stage, they increasingly resort to laying them inside walls, floors or ceilings. Since the result of the work is invisible, minimal attention is paid to aesthetics. But a lot of attention is paid to reliability and safety - access for alterations is very, very complicated. Therefore, when laying cables inside the wall, ceiling, or under the floor, reliable fasteners are chosen. It can be:
- Screeds of any type - with dowels, mounting platforms, etc.
- You can choose the appropriate size clip type.
- Make homemade fasteners.
If you are making a suspended ceiling from plasterboard, the wiring can be attached to hangers or laid inside profiles. Just when installing the cables, do not lay them close to the profile wall - so as not to damage them during operation
To lay large bundles of wires on the ceiling, it is more convenient and faster to use trays, but you can still use the same fasteners. The only bad thing is that you have to drill a lot of holes to install fasteners in concrete or brick. This is especially inconvenient when working on the ceiling. Below is how to best optimize work in this case.
If the presence of false walls or a finished floor is not expected, recesses are made for the wires - grooves. The wires are laid in them, then they are covered with a solution and then the finishing is done. From an aesthetic point of view, the option is ideal. From an operational point of view, it is problematic, since it is almost impossible to replace or repair wiring without breaking the walls.
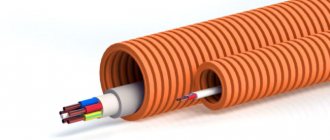
Laying and fastening wires in the groove
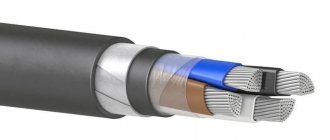
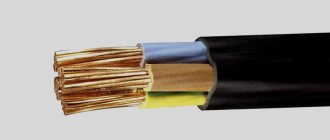
According to safety rules, in combustible walls (wooden, panel and frame) the cable is laid in a non-combustible sheath or in an all-metal tray. If we are talking about a non-flammable shell, then it is usually a corrugated pipe made of non-flammable plastic. In this case, the sheath itself is attached, inside which the cable is located. This does not particularly affect the choice of fastening type, but it does affect the selection of fastener sizes - it is simply necessary that the fasteners be able to cover the shell.
Laying cables inside combustible walls is difficult: the requirements are very stringent. They can be done in frame or panel houses, but in timber or log houses it is very difficult. It is necessary to lay all-metal trays in the walls. In this case, it is necessary to remove a large amount of wood, which does not improve the thermal characteristics and it is not possible to make the appearance ideal. Therefore, in wooden houses they often resort to an open installation method - on top of the walls.
Methods of fastening to walls made of various materials
Depending on the type of surface, the method of fastening is selected.
- Soft and thin . These include walls made of foam concrete, aerated concrete, fiberboard, plastic, plasterboard, etc. Simple fasteners will not hold here. More reliable and stable will be special devices in which the end or middle part is made wider. These can be butterfly dowels, umbrellas or dowels with a drill.
- Dense . These are wooden, gypsum, plastered surfaces, OSB and chipboard. In this case, use ordinary self-tapping screws or simple nails. If the screws are screwed in with great force, you can pre-drill holes with a smaller diameter.
- Solid . Brick and concrete walls are the most common materials in this category. Here, even screwing self-tapping screws into pre-drilled holes will be problematic. It is in this case that dowels should be used. Most often, they consist of a plastic cap and a screw. Holes are drilled in the wall. For walls made of concrete and brick, the diameter of the drill must match the diameter of the dowel (drill 6 mm - dowel 6 mm). For less dense surfaces, the drill should be 1 mm thinner (5 mm drill - 6 mm dowel). Caps are inserted into the holes, the end of which should not protrude from the surface. Then the fastener itself (clamp, plates, etc.) is attached to them using screws.
We fasten it in the groove
At the construction stage of premises, cables are often laid in special recesses or grooves.
The fastest fastening element for wires laid in a groove can be a construction plaster mixture. It secures the laid cables very firmly.
A dowel tie is another option for fastening in a fine. It is used where quick fastening is needed, since the gypsum needs time to harden.
The first option is a corrugated hose. Cut off a part slightly larger than the width of the groove. Insert into the channel.
The second option is more labor-intensive, but more reliable. Depending on the base, a nail or dowel is used. A telephone or similar cable is punched between the cores and secured in the hole. The edges of the punched wire are used to wrap the cable being laid.
Cable channels of various sizes
Cable duct is a very common method of fastening wires and cables in an open way. According to many electricians, this is the most convenient method of fastening. The cable channel is made of galvanized steel, flame retardant plastic, aluminum and is a simple U-shaped structure. Wires are placed in this technical box and covered with a one-sided or double-sided cover. They differ in manufacturing materials, colors, sizes, design (which cover), moisture protection, and also in design:
- floor;
- main lines;
- baseboard;
- parapet.
Types of cable channels
When installing a channel cable, first mark it on the wall, then fasten it using self-tapping screws, dowel nails or “liquid nails”. The video shows how to properly install a PVC box.
How and with what to fasten on ready-made foundations?
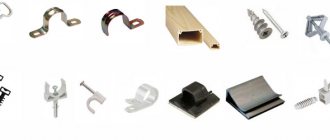
U-shaped brackets. This type of bracket is used for fastening cables of small diameter. Available in two sizes: 28 and 36.
Staples with plastic housing. Safer for insulation, but also cost accordingly.
Plastic staple with nail. This method of cable fastening can be done with your own hands without specialized tools.
Different sizes of brackets allow you to fasten wires of different sections.
These types of fasteners are applicable to low-voltage wires: Internet, telephone and others.
Fastening with clips
These fasteners are quite popular when laying open cables. The clips look pretty neat after installation. They can be of different sizes, shapes and be metal or plastic,
A simple version looks like a bow, on both sides of which there are holes for dowels or screws. A good and simple design, but there is a small drawback - for installation you need to drill two holes. This slightly increases installation time.
Metal clips
Made from metal strip. To install, first “wrap” the cable with it, align the holes and secure it to the surface. Can be used on the wall and ceiling. For the latter, they are inconvenient only because you need to drill a lot of holes.
Plastic clips
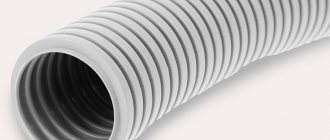
They are mainly used for installing corrugated cables for hidden and outdoor installation. Corresponding clip sizes are available for different pipe diameters. They are mounted on concrete walls using dowels, and on wooden surfaces using ordinary self-tapping screws.
The installation can be performed for one cable, or combine several pieces to secure a bundle of wiring. The design of the clips allows them to be assembled into a single block. Each side has locks (special grooves), which help securely connect the clips to each other. The layout using these elements is neat and even.
Self-adhesive clip
They are used for fastening cables or wires of various shapes; they can be made in plastic or metal form. The surface where it will be attached must be cleaned of all dust and dirt. The clip has a one-sided adhesive tape on the back. This type of fastener is used for attaching cables to plastic panels or furniture. There is no need to drill holes in expensive or brittle materials.
Clips with nail
They are made in the form of a plastic bracket, on the side of which there is a hole for a nail. They can be very different in shape. Used for open installation on wooden and similar density walls. In the photo above.
This fastening is very fast and convenient. It is often used when it is necessary to route telephone, television and other small cross-section cables along the baseboard.
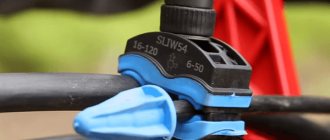
Structure of dowel clamps
Essentially, the product consists of two separate electrical components. The cable is attracted to the dowel installed in the wall using a clamp - an adjustable plastic bracket. Installation consists of two stages:
- At the first stage, the dowel is driven or screwed into the wall (where a hole of suitable size is made in advance).
- On the second, the clamp is threaded through the dowel and attracts the cable to the wall.
The simplest dowel-clamp consists of a curved plastic strip 7-9 mm wide with teeth.
Advantages and disadvantages
This method has many advantages, but we will list a few main ones:
- cost-effectiveness - for installation you need to buy one part (no need for a set of three separate ones - a screw, a dowel and a clamp);
- simplicity and ease of installation - you need to fix one part, and not three separate ones;
- for the production of the product, polyamide plastic is used, which can withstand extremely low and high temperatures (usually the range is from -45 to +85 degrees Celsius);
- protection from ultraviolet rays;
- free access to wires, if necessary, quick and timely repairs;
- high cable-carrying capacity.
The disadvantages include the following:
- despite the fact that plastic does not support combustion, when exposed to high temperatures, it deforms;
- not relevant for living rooms, apartments and private houses in general, since open cable routing is practically not used here.
Screeds with platform
It is a dowel with a thread and a platform (square or rectangular) to which a tie is attached. These fasteners (KSP) are convenient for quick installation. Made from non-flammable plastic.
KSP - screed with mounting platform for dowels
Initially, a dowel is installed, onto which the platform with the screed is screwed. After this, the wires are attached. Installation is suitable for wooden, brick and concrete walls and ceilings. With the help of such platforms you can attach several cables at once.
Dowel clamp
Used for quick fastening of one cable. The clamp is very easy to install. Using a hammer drill (if the wall is concrete), a hole of the required length and diameter is drilled. After this, the clamp is carefully opened, the cable is placed in it and the sharp end is inserted into the hole. The clamp will not fall out of it thanks to the double-sided notches on its sides.
The shape of the clamp must match the cross-sectional shape of the cable. Basically it is either round or rectangular. These installation elements are low cost and reliable in installation.
Types of products
Dowel clamps do not have a wide variety of categories and types, since they are highly specialized products. However, there are options for design features and materials of manufacture. For example, metal and plastic.
By design features
This criterion allows us to distinguish three main types of fastening:
- The staples are ordinary plastic strips with teeth to prevent backlash. Suitable for fastening wiring with a total diameter of 6-25 mm. The number of components depends on the weight of the cable. The technology can be used to fasten corrugated and smooth pipes of similar diameter.
- Mounting platform with clamp. When examining this product, you will find a plastic dowel with standard teeth, the end of which is equipped with a rectangular loop. The clamp must be threaded through the loop and the cable secured. The advantage of this method is the ability to tighten corrugations or bundles of wires of different diameters.
- Spacers or “helicopters”. The design involves the use of a dowel with a loop, inside of which you need to insert a plastic rod for a spacer. The maximum permissible load is 8 kg. You can attach cables, bundles of wires, corrugation with a diameter of up to 32 mm. Expansion dowel clamps are divided into two separate types. In the first case, the product is solid, the rod is installed in a dowel and driven into the wall along with it. The rigidity of the structure increases, but you must be careful when working with it, since first the cable or corrugation is threaded through the clamp, and only then the dowel is driven into the wall.
- The second type of spacer dowel clamps is an arched fastener without a loop. In this case, you can install a corrugation, wire or bundle of cables of a fixed diameter. That is, there is no suitable range, and the diameter of the cable must match the diameter of the arc. There are spacers with one or two arcs for parallel fastening of two corrugated pipes or wires.
Read also: DIY cold forging machines drawings video
According to screed materials
We are talking about the choice of material for making cable fasteners. Ties (clamps) can be made from nylon, polyethylene or polypropylene. Let's look at each of them separately:
- The most popular material is nylon. This is due to the increased strength and maximum load of polyamide components compared to polyester (which include the other two types of plastic). The material can be used at temperatures up to +85 degrees. Celsius. Higher temperatures lead to a reduction in the tensile strength of the nylon tie by 5-10 times. An excellent option for cables and wire bundles, but not suitable for fixing heating pipes.
- Polyethylene clamps are cheaper products with increased sensitivity to ultraviolet radiation, so they cannot be used outdoors. You can use dowel clamps made of stabilized polyethylene, but even in this case, over time, fragility increases and the load-bearing capacity of the products decreases.
- Polypropylene ties are durable and rigid products compared to polyethylene, but also sensitive to light. By adding a stabilizer, you can increase UV resistance, but this will increase the cost of the components. Since installation is often carried out inside buildings, sensitivity to ultraviolet radiation is not such a noticeable disadvantage.
Dowel type bases
The dowel-type (BD) base for screeds is made of plastic. “Two in one” - like a self-tapping screw and a dowel. There is a hole in the head into which a tie is inserted to tighten the cable.
Installation is very simple. A bandage is hammered into the prepared hole. The screed is installed and the wiring is laid in it. Then tighten.
Construction mixture
Used for hidden cable laying in wall and ceiling grooves. For this, gypsum mortar is often used. This type of installation has a special name - “freezing”. There is nothing complicated about this method. An alabaster mixture is made and the cable is tacked in the groove in places evenly spaced from each other. This should be done promptly, since the plaster sets quickly enough.
Plaster solution for fastening wiring
This “freezing” is well suited for installation of a single cable in a groove. But this method is also used as an additional fastening of several cables, to secure already installed brackets, dowels, clamps, etc. After all this, the groove channels are filled with plaster mortar.
If the laying volumes are large, frequent preparation of the solution and fixation of the cable significantly reduces the installation speed. But in many cases this is completely justified.
Insulators
In most cases, fastening wires to insulators is used for retro or decorative purposes. This open installation method is used for installing electrical wiring both in the house and in the bathhouse.
Retro wiring, mounting on insulators
The barrel is attached to the wall with a screw or nail and a pre-twisted wire is attached to it. You can twist it yourself or buy it already twisted.