Modern interior design technologies are so diverse that they allow the most daring creative ideas to be realized. And this process is irreversible - every year more and more new and unexpected trends appear.
One of the recent ones that has already gained popularity is flooring with a 3D effect - a multi-layer coating with a “built-in” graphic image that creates the effect of “presence”.
If all stages are followed correctly, the picture “comes to life”, becomes extremely realistic, and the floor itself becomes perfectly flat and smooth.
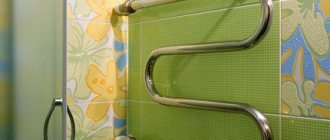
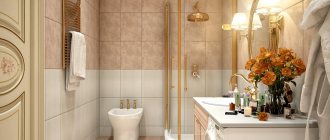
They are most often used in the bathroom - this is where this type of finish looks most organic.
Which 3D coatings are suitable for the bathroom?
The rear floors are a polymer coating that covers a decorative image laid on a prepared base with a dense but transparent layer. After hardening, the transparent solution forms a plastic lick, through which a visually voluminous bright picture can be clearly seen.
Limitless design options in the photo selection:
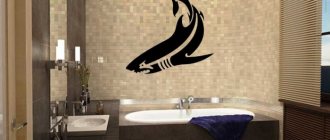
The theme of the volumetric covering in the bathroom is most often a marine theme. Images and decorative elements associated with the water element and relaxation look appropriate. The base layer can be:
- Plain glossy background with elements of stencil painting.
- Small decor around the perimeter of the room (coins, grains of sand, flowers).
- Flat painting applied to vinyl film.
- Three-dimensional image.
You can choose any three-dimensional image to your taste.
The main advantage of the coating is the ability to realize any ideas with its help. For example, complementing the floor image with dried exotic flowers brought from a trip or shells collected on the coast. But still, designers recommend choosing finishes in neutral colors.
It will not attract attention to itself, but will only help place accents on other interior items. In terms of technical characteristics, they are similar to conventional self-leveling coatings, the only difference being that they have a more spectacular design style and involve the use of more materials during installation.
3D bathroom floor design option
When choosing a coating, it is worth considering a number of factors:
- Resistance to mechanical stress. For rooms where large mechanical loads are expected, it is advisable to choose highly filled coatings.
- Ability to withstand temperature changes and exposure to aggressive compounds (acids, alkalis, oils).
- Good thermal conductivity. Thanks to this, the coating can be combined with a “warm floor” heating system.
Polyurethane, which acts as the starting material, makes the coating more elastic and allows the load to be distributed more evenly over the surface. The service life of a self-leveling bathtub coating is at least 10 years. But in any case, you should be prepared for the fact that in the event of strong mechanical impacts, for example, impacts on the surface with heavy and sharp objects, chips and other visible defects will still remain.
Despite their apparent fragility, 3D floors are impact-resistant
A significant disadvantage of this coating is its relatively high price. You can significantly reduce costs by installing them yourself. Self-leveling floors have a perfectly smooth surface, which is quite easy to care for.
To remove dirt, simply wipe the surface with a damp cloth. Installing 3D floors with your own hands is not an easy task. But if the installation technology is followed, this task can be accomplished by any owner who has basic repair skills.
Performance characteristics
To create a 3D floor in the bathroom, special materials are used to create a volume effect. The wide demand for such coatings is due to their following characteristics:
- High thermal conductivity. A heated floor system is installed under the decorative layer.
- Abrasion resistance and durability. The material has a large margin of strength, so even if you wash it thoroughly and regularly, it will not lose its decorative appeal.
- No joints or defects after installation. Since the covering is made of a continuous fabric, it is devoid of any irregularities or visible seams. This feature makes cleaning the floor easier.
- Unlimited number of design options. Everyone can choose their own individual design.
- Waterproof. The coating does not allow moisture to pass through, so it can be cleaned using any detergents or aromatic oils. If water gets on the surface while taking a bath, any problems or damage will be excluded. Wet marks can be removed with a simple rag or towel. Due to this feature, home owners do not need to carry out mandatory installation of waterproofing.
- Hypoallergenic. Even small children can walk on this surface.
In addition, the surface is non-slip, which makes it safe for the bathroom where humidity is high.
Negative characteristics include:
- High cost of materials and installation work. However, the advantages of such coverage justify all the costs.
- Long curing period. If there are no problems with time reserves, then you can choose a 3D floor. In other cases, you will need to find an alternative option.
- A number of difficulties when maintaining and wanting to dismantle the coating. In order for the surface to maintain its original appearance, it must be properly and regularly cared for, treated with special impregnations.
Dismantling the old coating
One of the prerequisites for installing self-leveling floors is a carefully prepared and leveled base, free from flaws and defects. First of all, prepare the base by removing the old floor covering (wooden boards, ceramic tiles, linoleum, mosaic...).
First stage: dismantling the old floor covering
To eliminate bulges and irregularities in the area where the floor and walls meet, it is also necessary to remove the baseboards and remove the door panels. The easiest way to eliminate minor surface defects is to use a cement repair compound, which can be purchased at a hardware store.
What interior styles are combined with?
The use of self-leveling floors does not create restrictions in the implementation of any design ideas and plans. If the room is made in a classic style, it is better to organize the flooring with hand-laid elements. Realistic prints are more suitable for high-tech and minimalism trends.
To design a modern bathroom design, you can use diagrams of any mechanisms, urban themes and graphics that create an imitation of space going down. The image of an elevator shaft or an observation deck on a skyscraper with a transparent floor looks original.
Installation of waterproofing
To mitigate deformation during thermal expansion of the supporting structures and the main screed, a deformation tape is laid around the perimeter of the room. When carrying out work, the humidity in the bathroom should not exceed 50%. If this value is slightly exceeded, it is worth taking care of waterproofing.
Second stage: waterproofing coating
This can be done by laying roofing material or polyethylene film with a density of 150 microns and higher. The insulating material is laid in two layers, placing them overlapping. Waterproofing is applied to the walls, covering them from the floor to a height of 8-10 cm. To insulate vertical surfaces, it is convenient to use edge tape.
Conclusion
3D flooring is a very practical and beautiful, but expensive coating. Is it worth the money? Definitely. Will it last long? Definitely, but with proper care.
Whether to make such a coating or not is, of course, everyone’s choice, but we can say for sure that if you make such a floor in your bathroom, you definitely won’t regret it.
Making a concrete screed
The concrete screed is applied either to the repaired base after dismantling the old coating, or on top of the waterproofing. To create a smooth and neat surface, a “zero level” is formed using beacons. Its height from the base is 1.5 cm.
Video guide to creating a screed
Cement marked M200 is optimal for screeding. The prepared mixture is poured onto the base and leveled with a toothed roller. The use of this tool allows you to eliminate small bubbles in the solution, which can cause a deterioration in the strength of the leveling layer.
Attention: The humidity of the cement base should not exceed 4%. It can be determined experimentally by covering the screed with plastic wrap overnight and securing it with masking tape. Drops of condensation that appear overnight indicate high humidity in the base.
Combining ventilation with heating the room using a special dehumidifier helps speed up drying.
Laying methods
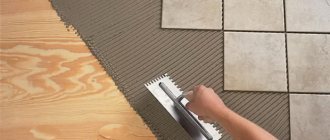
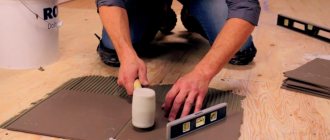
The process of laying 3D tiles is almost no different from covering surfaces with conventional ceramics. The base needs to be prepared and leveled in the same way, the tiles themselves are attached with glue, and the grouting is also standard. But the installation methods have certain nuances due to the presence of a three-dimensional image.
Most often, classic straight masonry is used, when the seams between the tiles coincide horizontally and vertically. This applies to those options when one large composition is assembled from tiles. Each fragment of the cladding has its own pattern, and even a slight displacement of the seams will lead to a distortion of the overall picture. The same applies to tiles with abstract and geometric patterns: straight laying makes it possible to create a single canvas with the illusion of a three-dimensional design. This method is also used for laying panels.
Bathroom tile layout: 3 main patterns
Diagonal laying can also be used for 3d tiles, as it involves the same alignment of seams as in straight laying. But the seams themselves do not run parallel to the walls, but at an angle of 45 degrees. This method requires very accurate measurements and calculations, as well as at least a little experience in such matters. The perimeter edges of the masonry deserve special attention. When using tiles with a gel filler, which cannot be cut, the voids between the outer fragments will have to be filled with regular tiles, matched to the tone and cut diagonally.
Floor tiles with 3D effect, standard installation is assumed
Checkerboard laying is the same as straight laying, but using tiles of different colors or textures. For 3D cladding it can be used, but the effect will be more decorative than three-dimensional. Of course, this method is not suitable for composite images, and tiles are chosen with the same patterns.
A clear example of checkerboard laying of ceramic tiles on the floor
Masonry with offset seams is the least common among 3D cladding options. This method involves laying each subsequent row offset from the previous one. Moreover, you can shift it both vertically and horizontally at the same time, this makes it more decorative. As a result of the double displacement, small square-shaped voids are formed between the tiles, into which small tiles are laid. It is advisable to choose contrasting colors.
The photo shows an example of diagonal laying of ceramic tiles with offset
Sanding the surface and priming the base
After the concrete has acquired sufficient strength, the surface is treated with a grinding machine or grinder with a diamond blade to obtain a perfectly smooth base. The treated surface is cleaned and re-inspected for chips and cracks. If necessary, all errors are covered with cement mortar, and cracks are sealed with epoxy resin or sealant.
Self-leveling floors are laid only on a perfectly flat and clean surface.
Tip: For high-quality removal of construction and other debris, it is better to have a household or industrial vacuum cleaner on hand.
The primer is designed to increase the adhesion of the floor to the base. When applied to a concrete base, the primer composition covers the pores of the screed, preventing the formation of air bubbles on the surface. Covering microcracks in floors, it acts as the final touch in leveling.
Surface treatment
When choosing a primer, preference should be given to materials whose composition is similar to that from which the 3D floor will be made. Apply the primer composition to the surface with a short-nap roller or a wide brush in two layers. Subsequent work can be performed after 12 hours.
Video tutorial for making a 3D floor:
How to choose a drawing
When choosing a 3D floor design, you should take into account the general concept of the interior style and the thematic load that the image carries. In addition, it should be combined with the main elements of the bathroom.
Filling the floor with an imitation of sea waves or sand looks especially original. Using the surf theme, you can delimit a small area in the room. It is allowed to install shells, starfish or other decorative objects above the three-dimensional picture.
In addition to marine ideas, you can choose a design of green grass or thematic abstractions. Original paintings created using computer technology are used as original decorations.
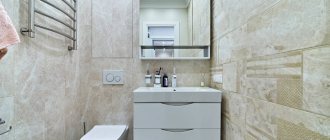
Design in neutral colors is especially popular. It combines optimally with both modern and classic interior styles.
Application of a polymer layer
To install a 3D floor, one- or two-component compositions are used:
- Polyurethane - one-component ones are sold ready-made;
- Epoxy - consist of epoxy resin and hardener. To be mixed immediately before pouring.
To increase the strength of the material, quartz sand is often mixed into the epoxy resin, and colored additives are used to obtain a decorative effect. When preparing a solution for self-leveling floors, the polymer and solvent are mixed in a wide container in a 2:1 ratio.
Application of polymer coating
To obtain a composition of uniform consistency, it is better to use a construction mixer for mixing the components. Since in the process of mixing the components a chemical reaction occurs, accompanied by the release of heat, for safety reasons it is better to place the container with the mixture in a low container with cold water.
Tip: The polymer solution can set quickly; it takes no more than 30-40 minutes to harden. Therefore, when treating a large area, it is better to dilute the solution in parts.
When planning to decorate a 3D floor with a bright pattern, you can print the image in a printing house, choosing a scale that matches the area of the room. The first layer is a film with a printed image. This work is done as carefully as possible, trying not to damage the contours of the drawing. After this, the finished composition is poured in small strips onto the prepared base, allowing it to spread over the surface. The thickness of the coating is about 1.5 mm. For uniform distribution over the surface, it is better to use a squeegee - a tool equipped with a gap, the adjustment of which allows you to adjust the thickness of the self-leveling floor.
Scheme: self-leveling floor device
A needle roller will help eliminate air bubbles formed when mixing components. It is rolled on the floor, moved around the room and buried in the solution for 15-20 minutes.
Attention: All work is carried out at a temperature not lower than 15°C with windows and doors tightly closed. Fluctuations in temperature can slow down the response of components, degrading the mechanical performance of the self-leveling floor. The drying period of the self-leveling floor depends on the polymer manufacturer. On average it is several days.
Approximate cost of work
The final cost will depend on the following factors:
- what brand of ready-made solution;
- how difficult the work is;
- what technique will be used to create the picture;
- qualifications of the craftsman performing the work.
If you plan to do everything yourself, then you will only have to pay for the materials. Then costs vary from $10 to $150 per square meter. If everything is done by the master, then the previous range must be multiplied by 1.5. This will be the final cost.
If you plan to do everything yourself, then you will only have to pay for the materials
The costs will be even higher if you use an artist. Imported mixtures are more expensive. The listed costs are approximate. But they will help you navigate the final cost.
The rear floor is a beautiful and durable coating. Excellent for baths due to their ability to keep liquid out and non-slip.
Coating with a protective layer
Final finishing
At the final stage, the deformation tape is cut out and the seams are filled with sealant. Only after this the floors are covered with polyurethane varnish. This treatment helps protect the surface from chemical and mechanical damage, as well as improve the performance characteristics of the coating. The protective layer is applied 12 hours after pouring. You can walk on this floor within a day.