Interior fashion changes every year. The materials with which designers’ ideas are brought to life are also changing.
But despite this, you always expect from a renovation that it will be done with high quality, especially in those rooms that the family uses very often.
That is why the most common bathroom decor is ceramic tiles. It is very practical, but, unfortunately, monotonous. Therefore, it is often combined with mosaic.
Mosaic in the bathroom is an interesting finishing material with which you can create a unique interior in a minimum amount of time. It has a wide variety of both texture and texture.
In contact with
Tile selection
Bathroom mosaics can be made from various materials, affecting both operational and decorative qualities. The most popular types are:
- Glass is one of the most popular options for bathroom cladding. Makes it possible to organize a live 3D effect. Low price, wide range of colors, the ability to create a surface with a gloss or matte effect, low probability of mold formation, resistance to humidity and high temperatures. In addition, good anti-slip properties make it possible to use glass mosaic not only for walls, but also as a floor covering.
- Ceramic is also a relatively inexpensive and unpretentious cladding option. Easy care, wide selection of colors and shades. It is best to use it only for wall cladding. It is not used on the floor due to the fact that when water gets in it becomes very thick.
- Metal – based on brass or stainless steel. Mosaic tiles are suitable for installation on bathroom walls and floors. Please note: an excess can be very rough, so it is used for certain interior combinations, in combination with furniture or other finishing elements.
- Smalt - produced according to the classical method that came from antiquity. The glass is ground into powder, melted and mixed with dye. Unlike modern analogues, it is produced in the form of individual square pixels, ranging in size from 10*10 to 60*60 mm.
- Stone - made from different rocks, from river pebbles to granite or marble. It brings rigor and richness to the interior, creating a presentable effect. It has good performance characteristics, but does not “like” chemically active detergents. It is advisable to wash such surfaces with plain soapy water.
Adhesives for mosaics
The choice of mosaic adhesive is influenced by several factors:
- thickness and dimensions of tesserae inside the mosaic module;
- material of mosaic elements and type of their assembly (mesh, paper);
- base material;
- curvature of the decorated surface.
Traditional tile adhesive containing a medium, coarse fraction of sand is not suitable for mosaics. The instructions included with the panels and mixes made of ceramics, smalt, natural stone, and metal must indicate which solution should be used to glue the mosaic inside the bathroom on your own, and which mixtures should be used at the last stage for grouting the joints.
The most popular adhesives are:
| Glue composition | Color | Base | Tesser material | Peculiarities |
| cement | white | mineral | ceramics, glass, porcelain stoneware | dry mixture |
| dispersive | standard tinting | metals, plaster, concrete, wood, brick | any materials | ready mix |
| reactive | two-component |
For wet rooms, the choice of adhesive depends on its water-repellent properties.
Choosing decor and installation method
The variety of materials, tones, shades and geometric shapes opens up wide possibilities for decoration. When choosing the optimal solution, you first need to rely on the area of the room. Mosaic can both visually narrow and expand a room, depending on the chosen finishing method (material, color).
Mosaic for the bathroom with a mirror effect Source mosaic-kafel.rf
Mosaic on the wall with a hanging mirror Source vestnikao.ru
A combination of white and black mosaics Source ukrsmeta.
Mosaic pattern on the bathroom wall Source plitkahelp.com
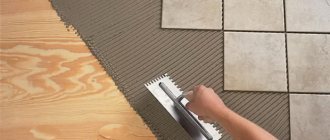
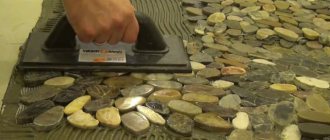
Mosaic material made from self-cut ceramic chips
This method of finishing, although it cannot compete on equal terms with the technology of cladding with mosaic blocks in terms of aesthetics, is perfect for renovating a bathroom or a bathroom in a country house. The material for such cladding is made by hand - chips of the required size and shape are cut with a tile cutter from ceramics left over after renovation or substandard tiles purchased at a reasonable price. The modest costs for this type of finishing make laying such mosaics popular among craftsmen, and if you have a sufficient assortment of homemade chips and skills in performing this work, the result can even exceed expectations.
Solution for a small room
The selection of mosaics for a small bathroom is carried out taking into account the need to visually expand the walls. This technique can be carried out in several ways:
- Finishing with glossy mosaic in light colors on the entire wall (from floor to ceiling). It is desirable that it be as free as possible from furniture and decorative elements. The required effect is achieved due to the mirror effect and reflection of light rays from each pixel of the tile.
- For minimal decor, you can use mosaics of the same color, but of different shapes. For example, if the main plane is faced with a square one, the ornament is made with a rectangular, hexagonal, or round insert.
- Adding color is acceptable at the bottom of the wall. It should become lighter towards the top.
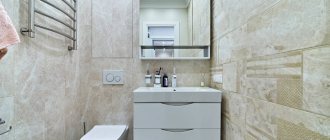
An example of using mosaics in the interior of a small bathroom Source vip-1gl.ru
A successful example of mosaic in a bathroom interior Source www.zastavki.com
Pixel mosaic made of smalt Source sidrons.com
Healthy! For a bathroom with a small area, shades of white, sand, blue, coffee, and pearl gray are suitable.
Features of laying mosaic tiles
Strength characteristics of mosaic tiles
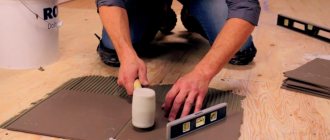
It is much more difficult to work with than with a regular one. Why? For ordinary tiles, a surface with a height difference of up to 4 mm is suitable; experienced tilers can level the base with tile adhesive without any problems. During laying, do not use a notched trowel, but an ordinary one; put a lot of glue in the corners and in the center of the tile. Then, by lightly tapping and constantly checking the position with a level, the height is leveled to the same level. This, of course, is a violation of generally accepted theoretical technology, but in practice, professionals often use this simplified method. The quality of tile laying is almost not affected, and the speed of work is significantly increased. We do not recommend using this method for beginners; their risk of making mistakes due to inexperience is too great.
The base for mosaic tiles must be perfectly flat, differences in height are prohibited. The small size of individual mosaics will never level them out; elevations or depressions will remain noticeable on the wall.
In addition, various types of glue can be used for ordinary tiles; this factor has almost no effect on the adhesion density. If it has come out, the excess can be easily removed from the seams, and the final color of the grout does not change. It is also not necessary to make a primer; the tiles have a large area and there will always be an area with sufficient adhesion. With a mosaic, such actions are unacceptable. The glue should only be white; it is almost impossible to remove excess gray from the gaps.
Mosaic adhesive
Another problem is that mosaic tiles can only be laid using a comb. It ensures the adhesion of each tile. If this is not adhered to, they will fall out (for mosaics glued to paper) or will wobble (for mosaics glued to reinforcing mesh).
Dispersion adhesive for ceramic tiles and mosaics
mosaic tiles for bathroom
Choice for a spacious bathroom
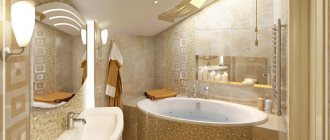
When decorating a large bathroom with mosaics, it should be taken into account that in this situation, space can lead to the loss of the feeling of comfort and homeliness. Therefore, the technique of visual narrowing is used here in order to make the environment more “domesticated”.
Do not use plain wall cladding. This will lead to the fact that you will get a dull interior, which even bright decorative elements cannot correct. It is best if only opposite walls are finished the same way.
Another option is to divide the room into functional areas: shower, sink, toilet. The main emphasis is on light colors, dark ones are used as cladding, to give an accent.
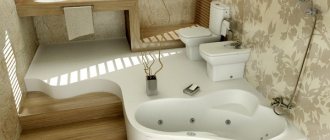
Example of smalt mosaic Source www.tileideaz.com
Metal mosaic in the bathroom interior Source dekoriko.ru
An example of laying mosaics in a large bathroom Source roomester.ru
Glass mosaic in the interior of a spacious bathroom Source plitkahelp.com
Advice! Monochrome or contrasting mosaic compositions, harmoniously combined with the overall style, will beneficially enliven the entire interior.
How to lay mosaic tiles on curved surfaces
The algorithm for working on such surfaces has its own characteristics. When the tile is pressed against curved planes, the glue is completely absent in the center of the ceramic tiles, and its thickness increases at the edges. Due to this redistribution of the glue, the center of the tiles does not stick at all, and the sides take a long time to dry. To minimize the negative effect, it is recommended to cover such surfaces with mosaic tiles with minimal element sizes.
Correct installation of mosaics
Another difficulty is grouting the seams. You need to do this very carefully, not to catch the tiles on sharp edges. Keep in mind that grouting will take much longer than on flat surfaces.
Choice of color, styling and decor
Let's look at some interesting solutions:
- Using the same shades. The effect is achieved if all surfaces are made using the predominant color. There are no contrasting inserts, but there is a background close to the main one.
- Contrasts. The opposite scheme. There are contrasting splashes against the background of a single color. The combination of tones can be different: black with white, red with white, gray with yellow, yellow with blue. The main factor is the combination of shades with each other. To avoid mistakes, it is recommended to use Itten’s color wheel or take one of the universal colors as a basis.
- The variety of mosaics allows you to recreate not only geometric shapes and compositions, but also full-fledged designs.
Color combination of mosaic tiles for the bathroom Source happymodern.ru
Mosaic color combination Source 2gis.com
Combination of mosaic shades in the bathroom Source vplate.ru
An original, but not practical method of interior decoration Source: mosaic-cafe.rf
Advice! An original solution would be a mosaic panel on one of the walls of the bathroom. The project is carried out by selecting pixels of different shades.
Bathroom design with mosaics and its features
The design of a mosaic bathroom begins with the selection of materials. There are several cladding concepts, among which the most popular are the combination of mosaics with tiles and the creation of ornaments without the use of tiles.
Mosaic and tiles are made for each other
Having decided on the room design project, you need to choose the shape, size and color of the mosaic. The main shapes of tiles are square, rectangle, rhombus and oval. As practice shows, it is most convenient to work with square mosaics with dimensions of 10*10, 20*20 or 50*50 millimeters.
Large beige mosaic tiles will make an excellent background for bathroom interior items
The design pattern can be varied. You can simply choose the color scheme you like in light or bright colors, imitation of marine patterns, various panels or ornaments covering the entire wall. If the plumbing unit of the apartment is combined, it is worth delineating the distinction between the toilet and the bathroom with a smooth transition of the pattern or color scheme of the mosaic tiles.
Ethnic ornament will give the bathroom interior a national flavor
Zoning, partial finishing
Mosaic in the bathroom looks impressive, but such an interior is not suitable for every room. It is quite difficult to create a beautiful pattern in the bathroom of a typical economy class apartment. Therefore, it is recommended to use the technique of partial cladding, the so-called zoning.
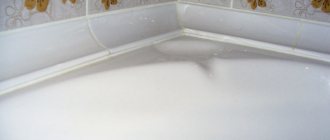
Plumbing finishing. One of the rarest but most successful techniques. Only an experienced craftsman can perform such work efficiently. Quite a stylish option for using mosaics in the interior of a bathroom. However, the joy of what you have done may disappear in the first days of operation: the seams between the pixels will have to be cleaned very often.
Shower tray lined with mosaic Source plitkahelp.com
Bathroom screen, shower tray. In most cases, the space is lined with the material remaining after finishing the walls. But a surface decorated with mosaics will look much more luxurious. Especially if it is not straight, but curved in a semicircle. It is not necessary to cover the entire area of the screen; even a narrow decorative strip will bring results.
Advice! The full effect is achieved by extending the screen onto part of the wall. For example, the mosaic used below may be present in the form of a small decorative insert.
Mosaic decoration of a bathroom niche Source sunrem.ru
Niche. This solution will be most relevant in bathrooms with ventilation ducts or other engineering structures that disrupt the even plane of the walls. Mosaic, as an option for facing such places, is not only an advantageous aesthetic step, but also the most acceptable from a practical point of view. Finishing these elements with other materials will require a lot of adjusting and trimming. Therefore, paper-based mosaic tiles will be one of the best cladding options.
Mosaic edging of the bathroom mirror Source vplate.ru
Mirror edging, door. The mosaic favorably accents the mirror located on a plain wall. This technique can be duplicated by similar installation around the doorway. The color of the edging does not have to differ from that used for finishing the main surface of the walls. Thanks to the small pixels, the difference will be visible due to the seams between them. This is what creates the effect of the intended accent.
Tabletop covered with mosaic Source interiorno.ru
Washbasin countertop. This is where you get the opportunity to save money. Resistant to moisture and mechanical damage, the mosaic will become an excellent “protector” of the tabletop. It, in turn, can be made not from high-quality moisture-resistant material, but from an ordinary moisture-resistant chipboard or OSB sheet. After assembling the structure, the surface is covered with tiles, which will take the main loads.
Healthy! When tiling the countertop of a bathroom sink, consider tiling the backsplash underneath at the same time. From a practicality point of view, this will be a beneficial solution.
Mosaic laying technology
The mosaic cladding technique is basically the same for straight, radius surfaces, and areas of complex shapes:
- leveling the base;
- waterproofing if necessary;
- markings for the size of modules, panels;
- preparation of adhesive composition;
- applying glue to the base;
- distribution with a notched trowel/trowel;
- laying mosaic maps;
- aligning them with each other and along the marking lines;
- grouting joints.
If you plan to cover the entire walls, then you must first lay the mosaic on the bathroom floor to adjust the level before marking the vertical structures. Decorative mosaic inserts that are not adjacent to the floor covering can be laid on the walls before tiling the floor.
Renovating a bathroom interior with mosaics is economically justified only when creating exclusive interiors. Or if it is impossible to decorate curved surfaces with other finishing materials.
Under 30x30 cm tiles, the tile adhesive is distributed evenly, the seams are filled 1/3 - 2/3 without additional effort. In mosaic maps, the size of tesserae is often 2.3x2.3 cm, and the number of seams increases by 24 times. If you accidentally press on a point, there is a high probability of excessively immersing the square in the solution and squeezing the glue out of the seam. If the grout is another material, the glue will have to be cleaned out of numerous seams, at least 1/3 of their depth.
Taking into account the high cost of cladding and the use of several materials with different properties for tesserae, not every master finisher is able to share the secrets of how mosaic tiles are glued to the bathroom walls of a typical apartment.
In places where enclosing structures covered with mosaics meet each other, with other finishing materials, and plumbing fixtures, the best technical solution is cutting at 45 degrees. Polymer corners and other additional elements are incompatible with small-format decorative elements.
Embedding the mosaic.
Unlike decorating walls/floors, laying mosaics on structures and parts of plumbing fixtures inside the bathroom is done as needed, and not just during cosmetic or major repairs. The main problems of tiling the floor/walls of a bathroom with mosaics are:
- the need to treat the seams with a special waterproof varnish when using white cement-based glue;
- pressing the mosaic modules with rubber-coated graters to ensure uniform distribution of force on all tesserae;
- rolling mosaic maps with rubber rollers for similar purposes;
- impossibility of using SVP (self-leveling tiles) systems;
- editing the relative position of the squares.
The height of the spatula or trowel tooth can be selected experimentally for the specific type of glue used. To do this, purchase an extra mosaic module to experiment with the thickness of the adhesive layer. In practice, you can immediately buy a spatula with a comb tooth height of 3 mm, tested on all types of mosaics and adhesives.
Tool
To cladding shower stalls, walls adjacent to bathtubs, sides of plumbing fixtures, floors and false panels/plasterboard boxes, you will need the following tools:
- a notched trowel or spatula with a comb profile height of 3 mm;
- tape measure, string, pencil;
- plumb line, level, square, preferably a laser plane builder;
- usually a rubber spatula;
- containers for preparing mixtures;
- polyurethane grater;
- rubber mallet;
- knife, rubber roller.
It is impossible to cut mosaic modules with a tile cutter; you will need an angle grinder with a diamond blade. Elements that accidentally fly out of the cards - tesserae - are installed back with tweezers.
Preparing the base
Before decorating enclosing structures with mosaic modules, wall surfaces must comply with the requirements of SNiP and SP:
- perfectly flat smooth surface;
- the strength of the base is higher than that of the cladding;
- surface treatment with waterproofing material (not always necessary).
The algorithm for preparing the base for a mosaic is extremely simple:
- grinding the surface of an angle grinder with a stone disc or diamond equipment for unevenness less than 3 mm;
- leveling the surface with putty with plane differences of 3 – 5 mm;
- plastering along beacons with “blocked” corners, a winding line where walls meet floors;
- installation of gypsum plasterboard systems for covert wiring of communications, installation of suspended plumbing with installation systems.
Ordinary primer does not belong to the category of waterproofing materials. Primer can reduce glue consumption, increase adhesion to the base, nothing more.
Rolled bitumen waterproofing is incompatible with mosaic. Typically, painting and coating materials are used that provide a continuous film layer over the entire surface of the wall/floor without breaks. It is better to use cement-based coating waterproofing, because... its adhesion is similar to tile adhesive.
Laying
The most difficult option is to decorate the floor and walls with mosaics from top to bottom. In this case, the mosaic inside the bathroom should be laid out in a certain sequence:
- floor – marking from the front door, the most significant left/right wall, laying in the reverse order from the far corner to the opening, starting with trimming the tesserae;
- walls - first you should lay out the mosaic above the bathtub, then tile the lower level to avoid trimming in the most visible areas;
- radius surfaces, niches - when tiling a bathroom with your own hands, the adhesive composition is distributed with a “comb” over curved surfaces, the modules are rolled out with a roller.
Depending on the qualifications of the home craftsman and the quality of fastening the tesserae inside the mosaic modules, the cladding can be glued in several ways:
- in a row or ledge from the corner;
- diagonally or horizontally;
- from below or from above.
It is possible to properly glue small-format cladding indoors in winter only after 24 hours of adaptation of the brought materials to the microclimate of the room. Work at temperatures below +5°C is not economically viable, since the mosaic will fall off and everything will have to be redone.
For trimming, the matrix is clamped between two pieces of rigid sheet material (fibreboard, OSB, GVL) in order to simultaneously fix all the squares motionless along the cutting line.
We place accents
If a small budget has been allocated for the renovation of a bathroom or toilet, but you would like to use mosaic tiles in the decoration of certain surfaces, there is an option to decorate only one wall (or part of it) with the help of this expensive material - an accent wall. In this case, you get an expressive and practical interior with low renovation costs.
In a bathroom or washroom, the most common option for decorating an accent wall is to tile the surfaces above the work area of the sink. This is a practical way to make it easier for yourself to care for surfaces that are most exposed to moisture and more.
Covering the wall above the bathtub with bright mosaics with a mother-of-pearl tint can bring your interior to the highest level of color. An original, contrasting color scheme dictates the design concept of the entire room and acts as a focal point.
Another common design technique in the area of placing accents is to brightly decorate the wall opposite the sink with a mirror and repeat an element of the same color in the work area.
For tiling bathrooms located in asymmetrical attic rooms with sloping ceilings, mosaic tiles can be a very successful investment of money, time and effort. Considering how much ceramic tile would have to be cut to create a bevel, the presence of mosaics is economically justified.
This is an uncommon design solution, but a bathroom floor can become an accent surface lined with bright mosaics. Practical and functional choices become the basis for creating a room design.