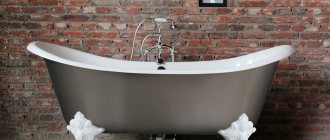
In order to get this type of coating you don’t need a roller or brush at all. The point of this method is to pour acrylic onto the surface of the bathroom to obtain a durable and reliable coating that will serve you for many years.
Liquid acrylic is natural and synthetic resins dissolved in a special solvent or water; when dried, they form a protective film, which, however, does not hide the surface structure. Most often used on wood products and surfaces.
Acrylic varnish is a varnish based on acrylic and a plastic dispersion, non-toxic, as it is mixed with water, creates a strong protective film that prevents the surface from being destroyed by microorganisms and other extraneous influences, as well as from ultraviolet radiation, that is, fading.
Compound . Acrylic varnish is necessary for processing wooden surfaces and products because it protects them from harmful external influences and preserves their original appearance, without changing the structure and color. This is all possible because of its composition, which includes:
- Acrylic dispersion , which is a liquid polymer.
- Various protective antiseptics for wood.
- Transparent and mechanically resistant plasticizer .
Peculiarities . Acrylic varnish is fluid and soluble in water, odorless, colorless, after drying it forms a hard film that protects the material from harmful mechanical and other influences and is insoluble in water.
It lasts a long time , can be combined with almost all paints that dissolve in water, after purchase it can not only be used immediately, but also diluted with water, can be used on brick surfaces, does not require special tools, you can get by with ordinary brushes or a roller.
Advantages of acrylic varnish. Acrylic varnish does not crack or melt due to temperature changes, is moisture resistant, conducts heat, does not burn, is environmentally friendly and safe to use, elastic and durable, looks aesthetically pleasing on the surface, is lightweight, does not fade and does not allow the surface to fade, protects against fungi and mold and other microorganisms.
Types of acrylic varnish. Acrylic varnish can be divided both by the number of components and by the final appearance.
- One-component - this varnish is based only on acrylic.
- Two-component - based on acrylic and urethane. This variety is distinguished not only by better quality compared to the one-component one, but also by a higher selling price.
- Matte – gives the surface a velvety feel, does not shine, has a pleasant texture, and hides unevenness.
- Glossy – adds shine to the surface, highlighting all the irregularities.
- Semi-matte is the result of mixing matte and glossy acrylic varnishes.
Application . Acrylic varnish has a long service life and resistance to external influences, which is why it is often chosen by specialists, offering it as a replacement for paint.
Advantages and disadvantages of the method
In any business there are both pros and cons. Repairing a bathtub with acrylic also has its strengths and weaknesses. Among the advantages:
- acrylic coating restores the bowl to any degree of damage: chips, rust, scratches;
- the work of reconstructing the enamel layer can be done by the apartment owner himself - there is nothing complicated in the technology;
- fluidity of the repair composition, which allows you to repair small cracks on the bottom or sides of plumbing fixtures;
- excellent adhesion to the bathtub material (cast iron, enamel);
- the opportunity to move away from white and use color to change the color of the coating, which transforms the bathroom, allowing designers to bring to life the most unusual ideas;
- speed of the process - a professional will need no more than 3 hours to restore the plumbing (this includes all preparatory work and applying acrylic to the surface of the bathtub). The “home handyman” will naturally need more time, but he can do it in a day;
- repairability of the coating - a similar composition (sold in a smaller package for repairs) can be used to repair scratches that appear.
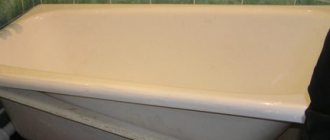
Cast iron bath before renovation.
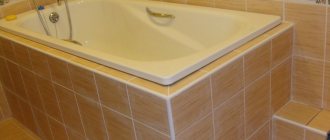
Renovated bath.
The applied coating greatly changes the characteristics of the cast iron bathtub. She has additional advantages :
- fast warming up;
- retaining heat for a long time - a fully filled bath gives off heat very slowly: in about half an hour, the water temperature drops by 1.0-1.5oC;
- the sound of drawing water disappears - the new coating absorbs noise from the flow of water;
- a smooth, pleasant surface appears upon contact;
- slipperiness disappears (wet bath enamel has caused more than one injury);
- ability to maintain shine almost all the time of use.
Disadvantages of the method:
- the coating has low resistance to mechanical damage: it can crack if a medium-heavy object accidentally falls into the bowl from a low height;
- a through cut or scratch to the cast iron leads to the coating peeling off from the base;
- Acrylic, unlike enamel, cannot hide factory defects in cast iron (convex and concave). They are clearly visible against the background of a shiny surface;
- a hot object or cigarette butt causes burn-through of the applied layer;
- difficult care: special detergents and soft cleaning materials are needed. Liquid substances containing alcohols, ammonia, chlorine, acids and alkalis, as well as powders and brushes lead to the appearance of yellowness and loss of shine;
- the restored bowl is afraid of hot water (85-90oC) - it softens and begins to flow to the bottom of the bath. Therefore, first you need to draw a little cold water and only then bring the bath to the desired temperature;
- You should not wash your hair immediately after dyeing your hair - even a small amount of dye can change the color of the coating.
Method number 1. Applying new enamel
Despite the growing popularity of modern polymer compositions, steel and cast iron plumbing fixtures with enamel coating are often found in modern houses and apartments. Metal is a strong and reliable material, but the enamel coating wears out quite quickly. Restoring an enamel coating is a fairly simple process that does not require special knowledge or skills.
True, this method of restoring the appearance of bathtubs has one significant drawback. Cracks that appear on the surface grow very quickly, the enamel begins to peel off, water accumulates underneath it, which leads to the appearance of an unpleasant odor, dampness and mold. In addition, this method is not suitable for bathtubs with a large number of small defects - they can be noticeable even after applying the coating.
How to choose a composition for restoring enamel?
In order for the new coating to be strong and reliable, you need to choose a composition for restoring bathtubs. There are not many options, so to make the right choice you need to know the basic characteristics and properties of the compositions.
| Name | Manufacturer | Durability of the coating | Features of work |
Epoksin 51 and 51C | Russia, Germany | On average 5 years (subject to the conditions of application and operation, the figure can reach 7-9 years) | A two-component enamel with a hardener that hardens completely in 48 hours. Fills all minor defects of the bathtub surface well. It is quite difficult to work with the solution, since it is very thick and “sets” in about 60 minutes |
Stakryl | Russia | 6-8 years | Two-component mortar with epoxy resin. It can be used when there are no noticeable defects or damage on the bathroom. Requires quick work as it hardens in about 70 minutes. In liquid form it is toxic and can cause allergies |
Reflex-50 | (Russia, Finland) | 10-15 years | One of the highest quality but most expensive compounds for restoring plumbing fixtures. Working with the solution is quite simple, but the bath will be able to be used for its intended purpose in at least a week |
"Fantasy", "Svetlana" | , Russia | 6-8 years | Bathtub restoration kits, which include a two-component bowl coating, hardener and surface preparation products |
Stakryl
reflex 50
Materials and tools
Restoring a bathtub with liquid acrylic requires the purchase of basic and auxiliary materials, as well as a set of tools. Materials you will need:
- liquid acrylic;
- degreaser (“White spirit”, “Thinner No. 646”, acetone, kerosene, etc.);
- rust converter (“Tsinkar”, “Ferum-3”);
- sandpaper P60 - 5 pcs.;
- masking tape (paper);
- scotch.
Tools and equipment needed:
- electric drill or screwdriver with a grinding attachment;
Electric drill with a special attachment for grinding.
- a small square or rectangular container for pouring acrylic (you can use a cut-off bottle of detergent);
When pouring acrylic, it is better to work with a small rectangular container.
- container for mixing acrylic components;
- wooden or plastic spatula for stirring the composition;
- metal spatula, about 10 cm wide, new, free of dirt and rust;
- rubber spatula - used to adjust the poured coating;
- construction knife for adhesive tape and masking tape;
- screwdrivers: Phillips and slotted - necessary for disassembling the siphon;
- gas key;
- soft rags for working with solvent and rust converter;
- a wide brush or roller, if you plan not to pour liquid acrylic, but to apply it with painting tools;
- tweezers from a cosmetic set for removing brush hairs or roller lint caught in the applied acrylic.
You also need to stock up on special clothing. You will need:
- headdress (scarf) - to prevent hair from getting on the treated surface;
- trousers with a shirt to protect the body from acrylic splashes. The substance is safe, but is washed off with great difficulty;
- respirator - necessary when carrying out grinding work (lots of fine dust);
- disposable gloves.
Application of self-leveling acrylic
Restoring a bathtub using self-leveling acrylic is perhaps the easiest way to update it (although not the cheapest), you just need to know a few subtleties.
The first point concerns the thickness and temperature of the material. For a normal polymerization process, a temperature of 22-26°C is required. In order for liquid acrylic to spread normally, it must stand in a warm room for at least a day. During this time, the composition will reach the required temperature. There is another option - put it in a bucket or basin with warm water (not hot, but warm). Only in this case is there a chance of overheating. Then it will be too fluid, the layer on the bathtub will be much thinner than required. So we try to bring it exactly to the required temperature.
The second point is the absence of any drafts. Good craftsmen work indoors. They even sand the enamel with a grinder or treat it with acid. They do this in respirators, which is what we advise you to do. But they need to hurry, because for them time is money, and the owner has nowhere to rush. If you are doing the restoration of the bathroom coating for yourself, you can do all the dusty or “smelly” work with the doors open and the ventilation turned on, then close the doors and wait until the temperature reaches the desired limit of 22°C or slightly higher.
We wrap the taps with film or bags
The third point is to prevent the ingress of water droplets and dust. While the room is heating up, you need to wrap all the taps with polyethylene, completely eliminating the possibility of water getting in. In addition, it is necessary to wrap the shelves, heated towel rail or other devices and objects that are located above the bathtub with fabric. This is necessary to prevent the formation of condensation, drops of which can damage the surface of the uncured filling bath. Also: during work and polymerization (from two to five days), the doors must be kept closed. This way you maintain the required temperature and also reduce the possibility of dust, debris and insects getting onto the surface. It’s very disappointing when a midge or fly lands on a beautiful white surface. It is almost impossible to remove it without leaving traces. After complete hardening, you will have to sand it and fill it again, but the mark usually remains - there is not enough qualifications.
When the temperature in the bathroom has risen to 22°C, film or paper is placed under the outer edge of the bathroom, and a clean container is placed under the drain hole into which excess material will be drained. If the edge of the bathroom is tiled, so as not to get dirty, it is covered with masking tape, making sure that the edge is smooth.
For further work, you will need a regular or rubber spatula about 10 cm wide, a plastic container with a volume of 500-600 ml (a beer glass will do). Open the jar with the acrylic heated to the desired temperature, carefully remove the remaining acrylic from the lid with a spatula and place it in the jar. Then the material is also cleaned from the walls. All walls must be clean so that there is no acrylic left on them that is not mixed with the hardener.
The hardener that comes with the acrylic is poured into the jar and mixed for 15 minutes. You can stir with a planed wooden stick or a drill attachment at low speed. It’s safer to use a stick - you’re guaranteed not to damage the can or splash the material. If you decide to use a drill, the nozzle should not have burrs or sharp protrusions, and the speed should be as low as possible. When stirring, work the bottom and edges well.
It is better to stir liquid acrylic with a stick.
Leave the stirred naive bath acrylic for 10 minutes, then stir again for 5 minutes. You must work either without a shirt or in clothes that will not touch the edges of the bathtub.
We put the jar in the bath, take a container, pour the composition into it from the jar. We start pouring from the glass onto the side from the far edge of the bathtub, going around it on three sides. The composition slowly flows down, enveloping the surface, and is distributed in an even layer.
Pour onto the side along the wall
It is impossible to pour onto the side exactly under the wall, and the edge looks ugly. Take a spatula and carefully distribute the composition, covering the entire surface. It will level itself out.
Correct it against the wall using a spatula
Having poured three sides along the side, we begin to pour just above the place where the old coating is visible. We pass again on three sides. Usually two or three passes are enough to cover the entire surface; in some places you can make slight adjustments with a spatula, directing the material to the desired place.
Pour the second portion slightly above the place where the old bathtub coating is visible.
Fill the near side last. It starts to drip, so work carefully. The process is the same. First at the top, then a couple of times a little lower.
The finishing touches. We move the corner of the spatula along the bottom of the bathtub in a zigzag motion. This will help distribute the composition evenly and avoid sagging. Finally, use a spatula to remove any drops that have hung there from the outer edge of the edge (just run the spatula blade along the edge).
Removing drops from the side
The bath is left for 48 hours. After this, you can remove the tape, film, paper that was placed around. That's it, the restoration of the bathtub with your own hands is completed, but you can use it in another three days.
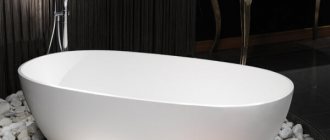
This is a bathtub “before” and “after” restoration with poured acrylic
Which acrylic to choose
For high-quality restoration of bathtubs with liquid acrylic, you need to buy a two-component composition:
- base based on acrylates - sold in buckets weighing 3.4-3.5 kg;
- hardener (0.5 l) - gives the layer strength and accelerates the polymerization process of the composition.
Glasscryl.
All brands of acrylic enamels cost approximately the same - from 1375 to 1525 rubles. per bucket. Therefore, the choice should be made not according to the cost criterion, but according to who will do the repairs. If professional builders, then any brand will do: “Plastol”, “Stakril”, “Finnacril”, “TIKKURILA”, “Ekovanna”, “Standard”.
If you plan to update your plumbing with your own hands, it is better to use Stakryl - it hardens quickly. Preference should be given to the Plastol or TIKKURILA brands. All the nuances of choosing acrylic enamel are discussed in the article “How to choose acrylic for bathtub renovation.”
Flow calculation
Painting a bathtub with acrylic is one of the few types of repair work where there is no need to calculate the material requirements. Manufacturers pack acrylic components in containers, the volume of which allows you to restore the surface of a bowl with a standard length of 170 cm (3.4-3.5 kg).
If the font is slightly larger, you will have to buy two sets. Trying to get by with one bucket by adding a thinner to the composition does not bode well, since the consistency of the composition changes - it becomes more fluid. And this is a thinner film, which, firstly, will last several times less than the period declared by the manufacturer, and secondly, it will shine through, showing places where the enamel has been removed.
Advantages of liquid acrylic
Restoring a bathtub by applying acrylic enamel is considered one of the most popular and simplest methods. Acrylic has many positive properties in comparison with other finishing materials, the price of which is often unreasonably high:
- If operating conditions are properly observed, the service life will be up to 15 years.
- The complete hardening time of 3 days is not so long, considering that complete hardening will occur without any defects.
- Covering the bathtub with acrylic ensures no stains.
- Acrylic enamel has virtually no odor, so all work can be carried out without burdening yourself with additional protection.
- Air bubbles, drops, smudges and lumps do not form in the uncured material.
Preparatory work
Restoring a bathtub with acrylic consists of several stages:
- preparing the bowl;
- preparation of the repair composition (liquid acrylate and hardener are mixed);
- covering the bathtub with acrylic;
- drying the restored layer.
In turn, the preparatory work consists of several steps:
- bringing the bathroom into working order;
- cleaning (polishing) old enamel;
- washing of restored plumbing fixtures;
- dismantling the drain and overflow;
- degreasing and drying the bath;
- protection of walls and floors from acrylic drops.
Preparing the premises
During work, there should be nothing in the bathroom that could fall, spill, or leave a speck of dust or lint on the surface of the poured acrylic. Therefore, toothbrushes, towels, personal hygiene items, cosmetics and detergents are taken out. The curtain and the crossbar under it are removed.
The washing machine and the sink cabinet are moved to a distance of 10 cm - they should not touch the side of the bowl.
The ventilation hole is sealed with paper and tape. This prevents dust from the hallway from entering the bathroom using natural draft, as well as the spread of enamel and rust particles to other rooms when it is necessary to sand off the rust and swollen enamel.
If the bathtub is located in a combined bathroom, all metering devices are covered with plastic wrap or newspapers using tape.
Plumbing cleaning
The acrylic coating must be applied to clean and dry cast iron or enamel. Therefore, peeled pieces of coating, accumulated dirt in microcracks, and rust are removed from the surface of the bowl. Dirt and peeling are removed manually or using a power tool: an electric drill with a grinding attachment or an angle grinder with an emery wheel.
Rusty areas can be polished until pure metal appears (to a shine), or they can be treated with a rust converter and then sanded with sandpaper.
Rusty areas are treated with anti-rust.
Manual work involves the difficulty of holding sandpaper in your hands. A special device for holding the abrasive or a wooden block of a suitable size around which the paper is wrapped can help.
Cleaning must be carried out over the entire surface of the sanitary ware, paying special attention to the bottom, transitions (bends) from the bottom to the walls of the font. Stripping should begin and end with circular movements.
Between them it is imperative to wedge horizontal passages with sandpaper. This technology allows you to remove dirt and rust, form irregularities on the surface up to 0.5 mm deep, which will provide additional adhesion of the acrylic to the bathtub.
Attention: there is no need to completely remove the factory enamel. But the previously applied bleaching layer is completely removed.
The cleaning work is considered completed if the inner surface and sides are clean and slightly rough, without chips or protruding factory enamel.
Bathtub washing
After cleaning is completed, the walls of the room and the walls of the bowl are very dusty, especially when using power tools. You can remove dirt with hot water from a shower hose. In this case, there is no need to dilute hot water with cold water - the hotter the streams, the better and faster the dust is washed off.
In this case, you need to wash everything: walls, washing machine, sink, faucet, floor, etc. After all, the slightest draft can raise a dust cloud and land it on plumbing fixtures treated with liquid acrylic. After this, the bath itself is washed with liquid detergents.
Removing the siphon and overflow
After completing the washing process, the drain and overflow are dismantled. The work is performed in the following sequence:
- close the taps on the mixer, and then, to be on the safe side, it is advisable to turn off the risers with cold and hot water for a while. If there are shut-off valves, it is better to turn them off. If this is not possible, then leaking taps in the bathroom are repaired;
- the shower hose is removed - not a single drop of water should fall into the bath until the acrylic has completely hardened;
- You need to dismantle the drain and overflow carefully - you will have to put it back. A container with a volume of up to 0.5 liters for flowing acrylic is placed under the drain hole. The elbow of the sewer pipe from which the drain is removed is plugged with a rag. Otherwise, it will be difficult to breathe in the room due to the stench from the sewer.
The drain is removed.
If the screw does not unscrew, you have to act roughly.
The overflow is removed.
Degreasing the bowl
The process of preparing to fill the bathtub with acrylic is completed by sealing deep chips with quick-drying automotive putty and removing grease. To do this, a rag or soft, lint-free cloth is soaked in acetone or white spirit. Wipe the sides, walls and bottom of the bowl with a dampened rag.
This operation allows not only to remove fat deposits, but also to collect dust and lint remaining after previous operations. After this, everything is wiped dry, first with a rag or sponge, and then with a dry and clean palm. You need to walk along the sides and walls with your hand, pushing all the excess to the bottom, and then all the dirt along the bottom is sent into the drain hole.
To be on the safe side, the bowl is additionally dried with a construction or household hair dryer.
Protecting the room from liquid acrylic
You can paint a bowl with acrylic using two technologies: the pouring method and using a brush. In both cases, it will not be possible to avoid drops of the substance getting on the floor and walls. They are removed with great difficulty. Therefore, it is easier to protect the area next to the bathroom with packing cardboard or newspapers and tape.
To prevent smudges from the sides, the floor is covered with overlapping newspapers. In this case, it is advisable to secure them with tape so that they do not move. The walls next to the bowl are covered with masking tape. The mixer is closed with a plastic bag.
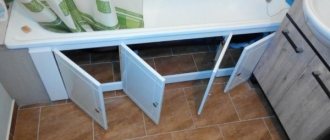
The walls and screen are covered with plastic film.
The screen under the bathtub is also covered.
Restoration with acrylic liner
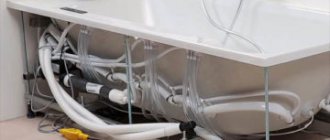
The fastest way to restore a bathtub yourself at home is to use an acrylic liner. The time for independent work with the insert is approximately 3 hours. You can use it the very next day.
A significant advantage is the fact that the liner reduces thermal conductivity, causing the water to cool longer.
The acrylic liner must be exactly the same size as the old bathtub. It is important to use high-quality adhesive, foam and sealant.
1 - Cleaning and stripping
First you need to remove all the strapping elements. To do this you need a screwdriver and sometimes a grinder.
Preparatory work includes cleaning the bathtub with sandpaper and a grinder, removing debris and degreasing the surface. It should be dry. The cleaner and drier the surface, the better the adhesion of the adhesive foam to it.
The acrylic liners are mixed together with the technological edge, which is carefully cut off with a grinder before work.
2 - Marking is done
The next step is to insert the liner into the bathtub and mark it with a marker. By putting your hand under the bathtub, you can mark circles that will indicate drainage and overflow.
3 — Holes are being drilled
Already according to the markings, holes are drilled. Two-component foam and sealant are applied to the bathtub. It is important to apply foam around the drain and overflow openings. A composition is injected into the foam with a syringe, which prevents the foam from swelling too much, after which the foam is applied from bottom to top in strips to the bottom, walls and sides.
4 — Installation of acrylic liner
Afterwards, you can carefully insert the acrylic liner and also gently press it with your hands, pressing and leveling its position. Excess sealant and foam must be removed.
Acrylic restoration technology
The instructions on how to cover a bathtub with acrylic have 3 sections:
- preparing the mixture;
- applying acrylic to the inner surface of plumbing fixtures;
- drying the coating.
Preparation of self-leveling acrylic
In order for the coating to be beautiful and last a long time, liquid acrylic must be prepared correctly. The difficulty lies in the fact that the composition is two-component, consisting of a base and a hardener, when mixed, the polymerization (hardening) process begins quite quickly. Therefore, the mixing algorithm is as follows:
- prepare a container for mixing the base with the hardener and a wooden or plastic stirring stick - the time from combining the hardener with the base to polarization is only 45-50 minutes. Therefore, you need to look for what to stir in advance;
- The base is poured from the packaging bucket into the mixing container. It is not advisable to scrape the residues from the walls and bottom. It is better to turn the container over and hold it at an angle of 45o above the container for several minutes - everything will drain by itself. Because the hardener has not yet been poured in, there is no need to be afraid of delays;
Attention: if the components are mixed in a factory container, the base is first mixed well, since with the hardener poured in it is quite difficult to lift thicker acrylic from the bottom of the bucket. This takes several important minutes, which may not be enough to complete the job.
- The hardener is poured into the base and stirring begins immediately;
- you need to mix the components manually or at very low speeds with a screwdriver - liquid acrylic splashes a lot;
- In the process of mixing acrylates with a hardener, you need to be especially careful when processing the walls of the container and the connecting joints between the wall and the bottom so that there is no base left there without the hardener.
“Plastol” is kneaded for 12 minutes, after which the composition should stand for 3 minutes, and then stir again for 3 minutes. “Stakryl” is mixed for 10 minutes, after which it is ready for use.
The result should be a substance that is absolutely homogeneous in consistency and fluid. Otherwise, there will be soft spots on the sides and walls of the bathtub (the base will not harden well).
The restorative composition can be tinted with special tinting additives developed for acrylic. There should not be a lot of them - 3 drops are enough. If this ratio is violated in the direction of increasing the volume of color, then acrylic loses mechanical strength and the level of adhesion to the surface being treated.
Important: it is strictly forbidden to add colors with a solvent - you will have to buy acrylic again.
Application of liquid acrylic
You can restore an old bathtub using the pouring method and using a paint brush.
Filling a bowl with acrylic
Restoring plumbing by pouring is carried out according to the following algorithm:
- the container with the mixed composition is placed on the bottom of the sanitary bowl - the risk of tipping over is reduced, and if it does happen, the spilled material can be partially collected, and part of it can be used to treat the bottom;
A container of acrylic is placed on the bottom of the bathtub. The drain hole is covered with a plastic cup.
- A little mixed acrylic is poured into a prepared small, rectangular container - it is more convenient to pour from it. It is better to do this above the bathtub - accidentally spilled paint does not disappear, but goes into use;
The acrylic is poured back into the working container.
- the composition is poured first of all onto the sides near the walls. This procedure prevents acrylic from getting on clothing when processing remote areas. The composition is poured slowly so that it begins to flow down the walls;
Work begins from the far side, where the repair composition is poured.
- Using a rubber spatula, remove excess composition in the corners. In this case, only the top layer is removed - the tool should not touch the base (enamel or cast iron) of the bowl. Removal is done by moving towards yourself so that the excess flows down the walls of the font to the bottom;
- Having completed the processing of the edges of the font adjacent to the walls, they proceed to pouring the composition onto the front side. A spatula will help to distribute the acrylic more evenly along the edge. Movements are also carried out towards yourself to close the outer side of the side. If you use only the pouring method, a large amount of paint will end up on the floor and there may not be enough enamel to finish the work;
Attention: as the repair composition is consumed, it is added.
The filling of the sides on the near wall is completed.
- After processing the top of the bowl, begin pouring the inner walls. They are covered in two passes. Start from the connection of the back of the bowl with the wall and go from left to right. You don’t have to skimp on the ingredients, because... the excess will end up at the bottom, where it will be used for processing. The first pass ends with painting the back. Here you need to apply more acrylic - the composition flows down it more slowly due to the fact that the back is not vertical, but sloping. During the first pass, the walls are not completely closed, but more than half closed. Therefore, the second approach (performed in the same way as the first) ensures their complete coverage;
Attention: to prevent acrylic from flowing into the drain hole, it must be regularly raked to the center with a spatula.
- the resulting bald spots are repaired with a spatula. Movements should be smooth, without pressure;
- In the same way, the coating is applied to the bottom of the sanitary ware. Here, as a rule, there is no need to pour anything - the acrylic that has flowed down from the walls is almost always enough to form a protective layer. However, the composition does not always lie in an even layer. You can level it with light movements of the spatula, driving the excess into the drain hole (there should be a container there if the work was carried out strictly according to the instructions). After this, use the corner of a spatula to draw a lattice along the bottom. After about 15 minutes it will tighten, forming an even coating.
Painting a bathtub with a brush or roller
You can also update your bathtub using a paint brush. The method is more complex: it requires applying 2 layers within 40-50 minutes, during which there is no hardening process. The work will also take longer to remove brush hairs from the painted surface. Otherwise there are many similarities:
- work begins with processing the far sides;
- continue on the near edge of the bathtub;
- after which they begin painting the walls. There is one passage, from top to bottom;
- The first stage ends with painting the bottom. After which a second layer of acrylic is applied.
After the work is completed, the lights in the bathroom are turned off, and the bathtub bowl is illuminated with a flashlight or smartphone. All irregularities will immediately become visible.
- If problem areas are detected, the applied layer is adjusted with a spatula. Work can only be performed before the polymerization of the composition begins. Otherwise, traces of the tool touching the acrylic will remain. Detected bubbles are removed with a light touch of the brush.
Remove bubbles with a plastic spatula.
Drying
The applied layer of paint must harden. This requires approximately 3 hours (the exact time is indicated on the packaging). However, this does not mean that the complete polymerization process is complete. For complete drying, you need from 72 to 96 hours, during which you cannot use the bath. The duration of the process mainly depends on the thickness of the applied layer. Naturally, the thicker it is, the longer the drying time.
During this process, experts do not recommend entering or simply opening the door to the bathroom, so as not to affect the chemical processes occurring inside the applied acrylic. It is believed that in this case the adhesion of the protective layer to the base of the bowl is stronger. In addition, dust along with hair, wool and splashes of water will not enter the room.
Work on the reconstruction of the enamel layer of the bathtub is being completed by installing a drain and overflow.
Important: do not clamp the connecting elements too tightly, as the acrylic may crack.
The hole for the drain grid is adjusted with sandpaper or a knife.
Bathtub restoration with epoxy enamel
The technology of restoring a bathtub coating using epoxy enamel cannot be called new, since it has been widely used for more than thirty years. The restoration process is somewhat reminiscent of painting, but the coating composition is significantly different from conventional paint.
There are two types of compositions on sale - professional, used by craftsmen working with special tools, and enamel, intended for independent work.
The mixtures differ in their consistency. Professional ones have a lower density, that is, they are liquid, since they are applied to surfaces in several layers using spray guns. This process is quite long, since each layer must dry thoroughly before applying the next one.
Do-it-yourself materials are thicker, so they are somewhat easier to work with.
In addition to the above options, you can find a reducing agent in aerosol cans on sale. These compounds are easy and quick to apply, but, unfortunately, the material is not particularly durable, and its service life is no more than one year.
"Epoksin" - enamel for restoring bathtubs.
Epoxy compositions, just like acrylic enamels, are two-component mixtures. For independent restoration work, they most often purchase “Epoksin” and “Epovin” - domestically produced kits. These compounds take quite a long time to harden, but are affordable.
"Reflex 50" for restoration of bathtub coverings
Another, more expensive version of the composition for the restoration of bathtubs is the development of the Finnish one, which is familiar to many for the high quality of its products. To restore bathtubs, this manufacturer presents the composition “Reflex 50”.
Features of working with epoxy enamel
The two-component epoxy composition has specific properties that differ significantly from the characteristics of acrylic materials. Therefore, they should be known and taken into account even at the stage of acquiring everything you need.
- It is very important to choose the right paint color and take into account that it should differ from the color of the old coating by more than one or two tones. If the bathtub is, for example, blue in color, and it is planned to give it a snow-white color, all operations, including preparation, will have to be performed several times until the old coating is completely covered. Otherwise, the coloring will simply look sloppy and uneven.
- Another point that must be taken into account when choosing epoxy compounds is that such a two-component mixture, after combining the two components, must be used for a fairly limited period of time. Therefore, when purchasing paint, you must carefully read the instructions from the manufacturer. The period of setting and beginning of hardening can vary from 30 minutes to four hours. Once the mixture begins to thicken, it will no longer lie evenly on the surface of the bath. Taking into account this property of the material and the existing experience in working with the epoxy mixture, it is necessary to mix such an amount that is guaranteed to be produced within the time specified by the manufacturer.
Instructions for using a specific composition and its characteristics are located on the original packaging.
- Different compositions have different drying times for each layer. For example, the first layer of Reflex 50 sets within the first hour after application to the surface if the room temperature is +23 degrees. However, all subsequent layers are applied only eight hours after applying the previous one.
Advantages and disadvantages of epoxy enamel for bathtubs
When choosing this restoration option, you need to have an idea of its “pros” and “cons.”
Its advantages include the following:
- Affordable cost of compositions, compared to analogues.
- The process of applying epoxy enamels is quite simple, so even an inexperienced craftsman can carry out the work by studying the instructions from the manufacturer located on the packaging.
- Due to the thickness and high adhesion of the enamel, it creates a uniform coating and fills cracks, shallow chips and pores of the base well.
- Resistance of the coating to mechanical, chemical and biological influences.
- Long service life of the coating. With intensive use of the bathtub, the epoxy enamel layer will last five to seven years.
- For self-application, you can find compositions on sale that set within 4 hours after mixing, which gives more time for work. If you decide to use an epoxy composition to restore the bathtub, you must choose this particular enamel option.
- This material is suitable for the restoration of both steel and cast iron bathtubs.
The disadvantages of epoxy-based paint include the following:
- A bathtub coated with epoxy enamel is ready for use only 7–8 days after applying the last layer of coating.
- After painting a container with this composition, it is not recommended to enter the bathroom for two or three days, so as not to raise dust in the room, which will settle on the undried coating.
- The longer the applied layer of enamel dries, the stronger the coating becomes and more resistant to various influences. Therefore, it is best to paint before leaving for the country or on vacation. In this case, the paint layer will have the opportunity to dry well and harden.
- The coating may turn yellow after a few years. Therefore, it is better to choose not white, but a colored version of the enamel, on which the color change will not be so noticeable.
- An unpleasant smell of paint, which, however, will disappear without a trace after a while.
Carrying out restoration work independently
Tools for working with epoxy enamel
The set of tools for working with epoxy-based composition is somewhat different from the kit for preparing and applying acrylic enamel. So, for the enameling process you will need:
- Professional craftsmen most often use a spray gun, and for self-application they use a roller and a flute brush.
- Tweezers for removing hairs from brushes and rollers.
In addition, you will need masking tape, a knife, newspapers or plastic film to protect surfaces from paint, as well as a degreaser - acetone or white spirit.
A few words need to be said about the peculiarities of working with tools when applying the epoxy mixture:
- Using a spray gun will ensure even coverage of the enamel on the surface. However, it should only be used if you have experience with it.
- If you use a roller for painting, you must have a brush on hand, which is used to level the paint in areas that are difficult for the roller to reach.
- It is best to pour a little paint onto the bottom of the bathtub, and then use a roller to distribute it over the walls and sides. Add paint to the bottom as needed.
- It is not recommended to use only a brush, as it will not provide even coverage. In addition, brush hairs will remain on the surface of the paint.
Restoration of a bathtub with epoxy composition
Now, knowing the basic nuances of working with epoxy enamel, you can move on to considering the process of updating the bathtub.
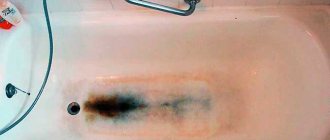
The appearance of the bathtub before preparing it for painting.
Preparing a bathtub for painting with this composition is no different from similar activities when using acrylic paint - this was discussed in detail above.
The process of applying epoxy enamel to an old coating is also somewhat similar to acrylic, but has some differences.
So, after the stage of preparation and degreasing of surfaces, they proceed to painting operations:
| Illustration | Brief description of the operations performed |
| In the example shown, Tikkurila Reaflex 50 paint was used to restore the bathtub. Mix the base composition with the hardener as specified by the manufacturer in the instructions. When mixing the two ingredients, we must not forget that the pot life of this paint is only 4 hours - this is not short, and there should be enough time for everything. However, it is better to be careful - do not combine the contents of the containers completely. The best option would be to take half of one and the other can. Mixing can be done in a plastic bucket that has been cleaned of used paint compounds. | |
| It is best to place the finished paint on the bottom of the bath - this will help you use it completely to the last drop. Another option, mentioned above, is to pour some of the paint into the bottom of the container, and then distribute it over the surfaces. Here, each master chooses the method that is more convenient for him in his work. In this case, a roller with a compact size was selected for painting, making it possible to dip it into a container of paint. If the roller is larger, you can use a special paint tray or pour paint directly into the bath. | |
| Painting begins from the walls of the bathtub, from the top, gradually descending to its bottom. It is very important to ensure that no smudges remain on the surfaces. If they appear, they must be picked up immediately, distributing the paint to nearby areas without allowing it to set. | |
| The color of the base may show through the first coat of paint applied. It will seem that the paint has applied unevenly - but there is no need to panic. When the bathtub is completely painted, you need to give it time - about two hours - for it to dry. In order for the junction of the paint color of the bathtub and the wall to be even, it is necessary to stick masking tape on the wall in advance, otherwise you will end up with a crooked border, as shown in this illustration. | |
| The second layer will overlap the first, and the coating will become more uniform. You can stop here, since even now the bathtub will differ significantly from its original state - both in appearance and in the smoothness of the walls. | |
| If you want to get a perfectly even color coating, then you should apply another, third layer of paint. However, this process can only be completed after a day, since the first two layers must set very well. After applying the third layer, the bathroom must be closed, preferably for a week, to allow the paint to dry completely. | |
| No earlier than seven days later, the fittings for the drainage system are installed in place. | |
| When finished, the bathtub will acquire a uniform white or other selected color, which will completely cover all the dark areas that appeared on the bathtub during its previous use. |
If there is no roller, the work can be done with a brush, starting from the sides, then moving to the walls and ending with the bottom of the container.
Painting a bathtub with a brush.
Using this tool, you must constantly monitor the hairs left on the surface, which should be immediately removed with tweezers.
Recommendations for further coating care
For some reason, it is generally accepted that caring for acrylic applied using the pouring method should be gentle. In other words, it is dangerous to breathe into such a cup. In fact, the voiced point of view is erroneous - you can and should clean a bathtub in the same way as a new one made of acrylic.
Let us recall the main provisions:
- You can care for the surface not only with laundry soap, but also with special products: Sanox, Akrilan, Domestos, Cif, Cillit, Sarma, etc.;
- It is prohibited to use various powders and pastes with abrasives;
- Do not wash freshly dyed hair in the bathroom, use hairspray to fix hair, cut varnished nails, soak laundry, etc. — the acrylic layer may turn yellow or change color;
- To wash the surface you need to use soft sponges, which a good housewife always has in her kitchen. Different brushes and cleaners leave scratches;
- After taking a bath, you must rinse it. You need to wash it 1-2 times a week, depending on the frequency of water treatments.
If during operation a part of the coating swells or a through hole appears, it is necessary to take urgent measures and repair the defect. For this you will need:
- liquid detergent;
- lemon juice or 9% vinegar;
- fine grain sandpaper (P60);
- paste or emulsion substance for polishing (polish);
- foam sponge or soft cloth.
The repair process is simple:
- Damaged areas are washed with a soft cloth or sponge. Difficult stains are treated with lemon juice or table vinegar;
- scratches and holes are sanded with sandpaper. The swellings are cut off with a knife and cleaned in the same way;
- degreasing of damaged areas is carried out;
- scratches and cracks are repaired with polish, and liquid acrylic prepared for use is applied to the cut areas.
More details about caring for an acrylic bathtub are described in the article “Care for an acrylic bathtub”, which provides not only the rules for cleaning the bowl, but also ways to get rid of stains that appear from various sources of pollution.
How to repair chips or minor restoration of damage to a bathtub
Sometimes small chips, cracks from fallen heavy objects, or scratches appear on the surface. And in this case, there is no need to carry out a complete restoration; it is enough to carry out minor repairs in the proper sequence.
Previously, such defects were eliminated by mixing glue with tooth powder or applying epoxy to the chip and sprinkling it with porcelain dust. But such methods are extremely unreliable and should be abandoned.
Chip on a cast iron bathtub
Chip on a cast iron bathtub
Step one. We are preparing the chip for repair. First, apply a rust converter to the chip, wait, and wash off the composition with water. Then we clean the chip with powder or dishwashing liquid. Rinse with water and wipe dry.
Step two. Using acetone or another solvent, degrease the defective area. Dry and heat the surface with a hairdryer.
Step three. Using automotive putty, we coat the chip. We wait for it to dry and sand it with sandpaper.
Step four. We cover the putty area with two-component acrylic or automotive enamel.
You can also use a ready-made bathtub repair kit for restoration, which includes acrylic paint, hardener, several sheets of sandpaper, epoxy putty, polish and detailed instructions. The approximate cost of such a kit ranges from 900 to 1300 rubles.
Repair kit
Other coating restoration methods
You can also restore a cast iron bathtub using epoxy enamel and liners. Enamel is applied using almost the same technology as liquid acrylic. All operations must be carried out in the following sequence:
- clean the surface of the bowl with sandpaper manually or using an electric drill;
- It is advisable not to clean rusty areas, but to treat them with Zinkar;
- after 30 minutes, remove the rust converter using coarse sandpaper;
- polish the bowl with fine-grained sandpaper (P60);
- repair cracks or chips with car putty (otherwise the enamel layer will turn out uneven);
- wipe the surface to be restored with a rag or lint-free cloth soaked in acetone or white spirit (this is how the bowl is degreased);
- warm the bowl with hot water;
- After 8-12 minutes, drain the water and remove the siphon;
- Dry the old enamel with a hairdryer and then wipe it gently - there should be no speck of dust or lint on the surface;
- dilute the enamel according to the instructions printed on the package;
- apply the first layer with a brush;
- After 10 minutes, repeat the operation (if the enamel hardens, the work will be ruined).
Important: the consistency of the enamel allows you to work with a spray bottle. But experienced specialists do not recommend doing this, because... the use of spray nozzles leads to the appearance of bubbles and drips. They can be easily removed, but very quickly the enamel in these places will begin to peel off.
The technology for carrying out the work, as well as the pros and cons of the method, are discussed in detail in the material “Restoring a Bathtub with Enamel.”
You can also restore the original appearance of the bathtub using a liner. They are available in silicone, plastic and acrylic. Each of them has its own advantages and disadvantages. For example, a silicone liner may burst under the weight of a person bathing. Therefore, a separate work is devoted to the “bathtub in a bathtub” repair method, where all the nuances of the technology are discussed in detail (you can see it here).
About the advantages of coating
The acrylic coating of a bathtub has many advantages, which is why this method of restoration is often used recently. The table below shows the main advantages of the material.
| Advantages | Conditions for these benefits |
| About liquid acrylic coating | |
| Preservation of protective properties and appearance for more than 14 years. | The main thing is to follow the operating rules, including washing on time and not hitting the enamel. |
| The material gains strength and hardens within 36 to 48 hours. | During the hardening period, there is no need to pour water or carry out any work to prevent defects from appearing. |
| It is not necessary to use a respirator when covering the base. | There are no emissions from chemically active substances. |
| The prepared mixture does not thicken, but spreads evenly over the surface. | It is necessary to prepare the coating material in the ratio specified in the instructions. |
| About Stakryl coating | |
| Snow-white bathtub during the entire period of use. | Wash with detergents in a timely manner. |
| There are no paint drips or bubbles. | The right combination of two components contributes to this. |
| The material will cover the surface flawlessly. | Perfect mixing, effortless. |
| When packaged in metal containers, the properties are preserved. | Pouring into plastic containers does not guarantee long-term storage. |
The acrylic layer will last a long time if the bath is used correctly. When choosing any material for painting, you should take into account its reliability, simplicity and, of course, financial capabilities. Can I do this work myself? Undoubtedly, even an inexperienced person can cope with this work.
In the video: what the factory packaging of Stakryl should look like.