As professionals in the field of interior decoration of apartments say, bathroom design is a compromise between aesthetics and practicality. It is very difficult to achieve a balance between these extremes, because the scales often tip to one side or the other. Nowadays there are so many current trends in bathroom interiors that it is difficult to single out just one.
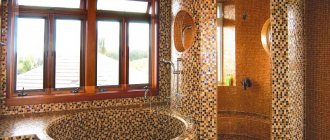
While some continue to use such traditional materials as tiles, artificial stone and plastic, other designers propose using a fundamentally different option - brick. A brick wall in the bathroom is a bold accent, a reference to the loft style, which has remained popular for several seasons.
Features of the design solution
Now that people are already accustomed to tiled bathrooms, brickwork in the bathroom interior looks bold, bold and relevant in an innovative way. Although, of course, this technique is far from new.
The brick walls inside the bathroom refer us to the now extremely popular loft style, which imitates industrial premises converted for housing. The advantages of such a design solution are considered:
- Practicality. Brick is a very practical material that is unpretentious in maintenance and care and has sufficient resistance to moisture. Moreover, the porous structure of the brick will allow it to absorb excess moisture contained in the air of the bathroom, regulating the humidity level.
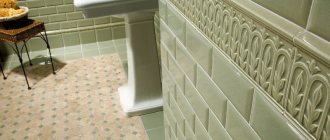
- High decorative potential . The design of a bathroom with a brick wall can be used in different stylistic directions: loft style, chateau style or rustic. This is a universal expressive tool that will help make a room more textured and distinctive in small ways.
- Availability . Unplastered brickwork or its imitation is much cheaper than it looks.
- Versatility . Brick can be finished in almost any way - painted, faced, plastered, if you get tired of the wall.
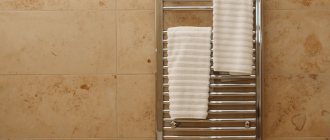
Marble tiles
Marble tiles for the bathroom remain popular; they are used in light and dark colors, depending on the owner’s preferences. It looks good in large and small spaces. It is based on clay and sand; the mixture, fired at the highest temperatures, is not at all dangerous to human health; in contact with water, steam, it does not absorb harmful substances.
Note
It is easy to care for such a surface; it does not fade, does not fade, and does not deteriorate from moisture.
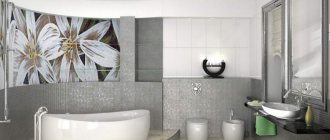
White glossy tiles decorate the bathroom; dark-colored veins look expressive. Marbled ceramic products are always relevant; designers surpass nature itself in their color design and texture.
1 of 3
Decorative tiles come with multi-colored veins, different patterns, and graceful lines. Beige, pink, terracotta shades create an atmosphere of comfort and warmth, green, gray and blue - calmness. On the surface of light colors stains from detergents are not visible. The distance between the bathtub and the wall is masked with a tile border; it can be stone, plastic, or ceramic.
Manufacturing methods
Even if you want to make a brick wall in the bathroom of a new building, it is quite possible to do this if you approach this issue with imagination and imagination. Designers note that it is absolutely not necessary to lay a partition out of real brick, because you can artificially imitate masonry.
There are the following options for implementing this idea:
- If you know for sure that the bathroom walls are made of brick, then you just need to remove their lining and then knock off the plaster. Such a wall will look authentic and harmonious. This option is suitable if the house has historical value.
Brickwork in the bathroom - Another option is to make a new wall out of brick. Moreover, you can artificially age the masonry so that it looks as if it has been there for a hundred years. It is important when laying not to adhere to too strict geometry. Achieve the effect of antiquity if you use old bricks left over from dismantling old houses.
- You can also imitate brickwork using special panels. This will cost almost the same as making a new wall, but the labor required to make it is much less.
Panels imitating brickwork - You can imitate masonry using moisture-resistant plaster, molar tape and a ruler. This is the cheapest, but most labor-intensive method.
Remember that for masonry you need to use not ordinary sand-lime brick, but red fired ceramic brick. It costs more, but it is more resistant to high humidity.
Brick look tiles
An interesting option is embossed ceramic tiles imitating brick. But you shouldn’t decorate all the walls with it, but you need to focus on one or some detail. It can be combined with glazed ones of the same but contrasting color, imitating old masonry showing through the plaster.
Before cladding, the wall is plastered with small fragments of brick-by-brick tiles, leveled and covered with putty, and painted with light paint. The harshness of brick can be smoothed out with plumbing fixtures (brass faucets and sink), glass shelves, lamps and other decorative elements.
Brick tiles in the bathroom
For installation, use a cement mortar or a special tile adhesive. The surface is carefully leveled so that it does not go into waves, treated with a primer and allowed to dry completely. Apply glue or mortar to the base or to the entire plane (take several tiles) with a thickness of no more than 1 cm, and use a special spatula to make notches for better subsidence of the mixture. Laying begins from the corner, pressed tightly to the surface, the excess is removed with a rubber spatula, and carefully joined to each other. The last stage is grouting the joints with the same spatula after the glue has partially dried.
Bathroom brickwork
A bathroom with a brick wall is a current solution for the interior, which immediately makes it noble and aristocratic. Many homeowners are afraid that the masonry will look rough, however, this will not happen if you follow these tips:
- Masonry is an active accent spot in the interior, so it is enough to highlight one wall in this way.
- Red brick without plaster makes the room visually darker, so intense lighting will be required inside the bathroom.
- If the brickwork is of dark shades, then you need to use as many light shades as possible for the interior to balance the color balance.
Please note! Brick is a strong, durable material, but it can collapse when exposed to moisture, so it must be protected from moisture, mold and mildew.
Installation of relief tiles
The surface is prepared before laying (primed, putty, dried), work with a level, use a metal profile for the lower level, and prepare the required number of tiles with a special cutter.
The mixture is applied to the wall, hog tiles are laid, crosses are used (removed after drying), and rubbed after drying. Most often, the hog is mounted “in a running motion”, creating the effect of a brick surface that looks quite noble. Sometimes they are laid “seam to seam” - this is the traditional way; the convex shapes of the boar tiles make the space voluminous.
Laying tiles for a hog bathroom
When decorating corners, difficulties may arise due to the convexity of the material, but the master will solve these issues. He does not start laying from the corner and to obtain a perfect seam, he cuts the material at an angle of 45 degrees. You can use a plastic corner.
Sometimes sellers of kabanchik ceramic tiles put small samples in the packaging so that a whole tile can be placed in a corner and a smaller tile can be placed in a row. To ensure perfect tile joints, use a grout based on epoxy resin. It hardens quickly, you need to immediately remove the excess and rub it in small areas.
Main materials used for simulation
To choose the optimal solution, you should always look at the interior itself. Manufacturers of various imitation materials have taken these features into account and therefore offer many options to choose from. The result obtained with their use will differ visually and in characteristics, so you need to imagine in advance what the end result will be. Now we will try to give such an idea to the reader. We will go like this - first we name the material, describe its main properties and present step-by-step instructions for implementation.
Brickwork will never go out of style
Soft tiles
Flexible tiles, which are compressed rubber granules painted the color of brick, are perfect for both interior and exterior wall decoration. This material is not afraid of deformation, water and other negative factors. It is elastic, which means it will withstand any movement of the base and can be laid on curved surfaces.
Innovative material – flexible tiles
Flexible tiles do not rot, are impervious to microorganisms and are a vapor-permeable material, which allows the walls to not be blocked from the passage of gases, which helps to establish a favorable microclimate in the premises.
This decoration looks very beautiful and presentable. You can understand what material it is made of only from a very close distance, and even then this does not spoil the impression of the finish.
Variety of colors and textures
The great advantage of installing such tiles is its simplicity - any craftsman can handle the job. This does not require a specific tool - almost everything can be found in any home.
Unlike rigid analogues, such tiles can be installed with a bend in the corners of the room. This allows you to create the illusion that the masonry is actually made of real brick - look at the photo above. Also, you will not be able to use other materials to decorate columns and half-columns, and indeed other architectural elements that have a complex curvilinear shape.
Flexible tiles on the corner
It is better not to use this finish in bathrooms and kitchens, since the material will not reliably protect the base from water.
Such tiles are quite expensive, but their properties justify the price. The service life of the products is very long and will be determined only by their appearance. The material cannot be damaged by an accidental blow, and if necessary, it can be partially dismantled and replaced with a new one.
Prices for flexible tiles
Flexible tiles
How to install flexible tiles
First, let's prepare the materials and the necessary tools.
Table 1. Required tools and materials.
| Photo, title | Description |
| This tool will help you apply the adhesive evenly on the wall. It is more convenient to use a comb rather than a spatula. Also take a regular spatula to scoop up glue from a bucket, mix it and work on it during the application process. |
| The highest precision when laying such tiles is not required, but it is always good when the seams between the elements are smooth and level. Therefore, take a long building level, or supplement a short one with an even rule. |
| Dyeing thread | To quickly and evenly draw lines, take a dye thread. Other marking tools include a pencil, tape measure, and carpenter's square. |
| Rubber tiles are very easy to cut. To do this, you can use regular scissors or a sharp stationery knife. Scissors should be chosen more powerful so that they can cope well with thick elastic material. |
| We will need 2 types of brushes. The first is maklavitsa, for applying soil to the surface of the wall. The second is round, 12 mm in diameter, for filling the seams between the tiles. |
| Primer | To improve the adhesion of walls and reduce their water absorption, a primer composition must be used. If it is not applied, the quality of adhesion of materials will be much worse. We use acrylic primer with deep penetration. If the surface of the walls is such that the glue will not stick well to it, then it is worth taking a concrete contact, which will additionally create a strong abrasive film on the surface - it contains quartz filler. |
| Tile adhesive | You will also need glue, and everything you need to dilute it, if you do not buy it ready-made - a bucket, a mixer, and so on. The tiles can be laid either with regular cement-based tile adhesive or with elastic compounds, which will create enhanced adhesion and will not be subject to subsidence and other movements of the structure, like the tile itself. Naturally, the second option is better, but it costs much more. |
Prices for building levels
Construction levels
The work is carried out in the following order (we assume that you have already completed the priming and the walls are completely dry).
Step 1 – marking the walls.
The instructions recommend first dividing the wall into sections and marking them to indicate the areas where you will apply glue. Let's say right away that this is long and not very convenient, since in the process of spreading glue you will constantly stain the lines, and it will be impossible to navigate along them. Therefore, we advise you to do the following.
Wall marking
Using a level, you need to draw a horizontal line on the border of the second row; a tape measure will help you accurately determine its height. This line is drawn with a dye thread. Then you can nail a metal profile PNP 27*28 onto it, which will help you accurately align the first row, or more precisely, the second. Then it is removed and the pass is filled in.
An even bar helps to accurately set the thickness of the horizontal seam
The seams between the rows must be aligned using a spacer, which can be any flat strip of the required thickness. We use it only for horizontal seams, and the run-up between the vertical ones will not make any difference, essentially.
Step 2 – diluting the glue and applying it.
Mix the purchased glue with water according to the instructions on its packaging. If you purchased a ready-made version, you can immediately start working. It is applied to the wall, as shown in the photo above. For this we use a comb with a tooth of 2-4 mm, having previously spread it on the wall in a thin layer with an ordinary spatula. You should cover a surface area of no more than 1 square meter at a time, since the elements are small and you may not have time to glue them, and the surface of the glue will become weathered, and the quality of the adhesion will suffer.
Dilution of glue and its application
Step 3 – cutting the tiles and gluing them.
Then it’s a matter of technique - we glue the tiles one by one, pressing them firmly against the wall. There is no need to remove the squeezed out excess glue; we will need it later. The tiles are laid in order, as is the case with real bricks. Between the rows we make an offset of ½ the width of the tile. The material is cut very simply - we accurately mark it using a square and divide it into parts with scissors. For greater reliability, you don’t need to use a square - let it feel like the edge is uneven.
Tile cutting
If you need to get around some obstacles, you can make any shaped cuts in the material, spending a minimum of time and effort.
Step 4 – washing the seams.
As soon as you go through the entire area coated with glue, take a brush, moisten it in water and start rubbing the seams with it, smoothing out the relief from the comb. Differences in glue will create the most reliable effect of simulating a brick surface.
A huge advantage of this solution is that it does not require subsequent finishing, the material is not as cold as brick, and it is pleasant to contact your body with it. Having finished the work, you wait for the solution to dry, and you can safely bring furniture into the room and use it.
Seam washing
Advice! The color of flexible bricks in packs may vary slightly. Before starting work, open them all and mix them together so that you don’t end up with noticeable stains on the wall.
Hard tiles
All other imitation falls into the hard category. Various materials can be used here, ranging from gypsum to plastic. Each has its pros and cons and is installed using similar technology. Let's take a little closer look at the options.
Gypsum brick tiles
Gypsum tiles
The most common solution is gypsum tiles. Due to the plasticity properties of this material in the liquid state, it is possible to achieve excellent results in imitation, but its use is associated with a number of difficulties that should be taken into account. Namely:
- Gypsum is an organic material, so colonies of microorganisms can multiply on it.
- It strongly absorbs water, which is why it is not used in rooms with high humidity. It's also not as good for the street as its competitors, which we'll talk about next.
- Plaster is white, which is not suitable for every interior - as a result, the surface needs to be painted, and such work can safely be called delicate.
- For corners, you need to buy shaped products, which, as usual, are more expensive than the main material.
Corner element for external corners
At the same time, this material has the following advantages:
- It is vapor permeable, which will allow your room to “breathe”. This finish is beneficial to human health.
- Gypsum is a neutral material that does not cause allergies.
- This finish looks very beautiful and original. For example, it will go perfectly with a Mediterranean interior.
Despite the fact that gypsum stones are cheaper than natural ones, their price does not seem quite affordable to everyone. That’s why the idea of making them yourself comes to mind. Simple manufacturing technology allows you to cast stone from gypsum at home. All that is required for this is the necessary components, special forms and positive air temperature. Find detailed instructions here.
Prices for gypsum tiles
Gypsum tiles
Cement tiles
Cement tiles are more expensive than their gypsum counterpart, but they have several significant advantages over them.
- The material is colored in bulk by adding pigments of different colors to its composition. This allows you to achieve greater realism of the brick surface.
- Concrete tiles are much stronger than gypsum tiles and will definitely last longer.
- The material is not afraid of water, and mold does not grow on it.
- The decorative properties of cement tiles are at a higher level.
- The material is not afraid of temperature changes, so it is often used when finishing facades.
Decorative cement brick
Interesting to know! High-quality products may have fiber reinforcement. Such tiles will serve for decades without being damaged in any way.
Fiber for concrete
Among the disadvantages, one can note only a more complex process of cutting the material, during which you can get untidy chips.
Prices for decorative tiles
Decorative stone tiles
Clinker tiles
A truly beautiful imitation will only be achieved with the use of clinker. Here are high-quality ceramic products that will look even better than simple red brick. This material costs a lot of money, but this is justified by its unique properties.
- The hygroscopicity of clinker is almost zero. It is very durable and invulnerable to acidic and alkaline environments. The material is also not afraid of frost, so it is what you need for exterior decoration.
- It is not used so often for indoors, due to the lack of need for its strength and other amenities, but if you have the money, then why not - you can never go wrong.
- The material is equipped with different styles, which will also allow you to beautifully go around corners in the room.
Clinker tiles to imitate brick
Rigid tiles, by and large, are installed in exactly the same way as flexible ones. The whole difference will be in the thickness of the glue layer , which is recommended to be around 5 mm, and cutting of the material. For the latter, electric tools with diamond wheels are used. You can use a grinder, a circular hand saw, a miter saw, or electric tile cutters with an upper and lower motor. The glue can be applied directly to the tiles, if you later want to use a special grout - this way the work is more accurate. Otherwise the same principles are used.
Interesting to know! Without corner elements, decorating external corners with such tiles is problematic - you have to make complex cuts at 45 degrees, which takes a lot of time. The result may not be very good if you chose a textured material - the differences remain noticeable.
Options for hard brick tiles
Wall decorative panels
You can also assemble a “brick” surface from composite panels, which can achieve a pretty good effect. The main advantage of this solution is the cost and high speed of installation. Some models can be installed on a frame, which allows you to place layers of insulation from cold and noise behind them, as well as to conduct hidden communication lines. Essentially, this is an adult puzzle that almost anyone can assemble.
Surface made of decorative panels
Such panels are made from different materials - the most common are plastic and MDF. There are also fiber cement panels, but they are used mainly for exterior decoration, although no one forbids installing them in the house.
- The first option is good for wet rooms and outdoors. Externally, it does not look very attractive, so this finish can be classified as budget.
- MDF panels also don’t look much like brick, but they look nicer than plastic ones. They are used only in dry rooms, since the material is very afraid of water and quickly becomes unusable upon contact with it.
- High quality fiber cement panels may have a ceramic coating on the surface, which will visually make them almost indistinguishable from real brick, but these materials are very expensive.
Plastic panels to imitate brickwork
In addition, there are other types of panels:
- Hardboard.
- Fiberglass.
- Fiberboard.
- Plaster and more.
Glass fiber concrete panels
There are several installation methods for such panels. Some, as already mentioned, are attached to a frame made of wood or metal, others are simply glued to the base with glue. All information about this can be found in the instructions for the specific material.
Video - Japanese fiber cement panels: features of facade finishing
What style is better to decorate?
The most striking design options in various styles:
- Loft. In this style, a rougher finish would be appropriate, such as brickwork, plaster, hog tiles or a concrete wall without tiles. Such an original and unusual wall covering will fit perfectly into a loft.
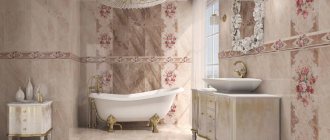
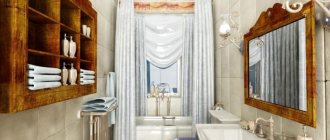
- Classic. Elegant but at the same time functional design in calm and neutral colors with pleasant textures will become a favorite in classic design. Wallpaper, patterned tiles, plaster, marble or expensive tiles are suitable here.
- Minimalism. For minimalism, a one-color or two-tone finish in gray, black, brown or white is assumed. Glass, wood, metal or ceramic surfaces without ornaments or designs will look especially organic.
- Provence. Painting, plaster, wallpaper with patterns of plants and flowers, stone, brick or wood cladding will emphasize the gentle, peaceful atmosphere of a simple Provencal style.
The photo shows a classic-style bathroom with combined walls made of half tiles and half wallpaper.
To decorate a variety of interior styles, beautiful and practical finishing materials are chosen at the same time.
Wall design options
The most commonly used design options.
For painting (painted)
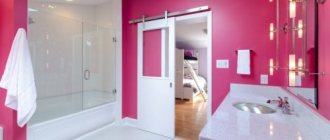
This type of finishing is quite popular. Painted walls can retain their original appearance for a long time and, if necessary, they can be repainted quite easily.
The photo shows a bathroom interior with walls painted pink.
Decorative plaster
Pebbles
A relief surface with pebbles of different sizes is popular. The marine theme is popular, you can enhance it with the help of the interior; sea or river pebbles are a great chance. If only part of the interior is lined with pebble material, then the overall appearance of the room will be original.
Before covering the pebbles with glass, consider the quality of sealing of the seams
A border tile is laid between the wall and the bathroom. Pebble tiles are available for sale in squares (300x300mm), the stones are attached using a reinforced mesh. Pebbles are used to cover the floor in the bathroom, which looks very original; you can create any pattern. Pebbles are an ecological material that has healing properties, because when walking, the foot is massaged and has an effect on the internal organs. The textured surface is convenient because you won’t slip on it when walking.
The pebbles on the floor look natural; for installation, you can choose pebbles of different sizes and lay them more densely. They can be laid out separately; to do this, the surface is leveled, insulation is laid, then the pebbles are laid out on glue or in a solution, after drying, they are grouted and covered with liquid polymers or varnish. To massage your feet, pebbles would be ideally used at the bottom of the shower stall or near the washbasin.
Using stones of different colors and shapes, you can create original panels
Making a shower tray from brick
In hardware stores you can purchase a ready-made shower tray made of acrylic or cast iron. Its advantage is ease of installation and minimal installation time. However, there is a serious drawback - size limitations. In addition, its installation still requires bricklaying work. Therefore, we offer the most common option - to make a shower tray out of brick with your own hands.
This method is much more reliable and practical, especially if the work takes place at the initial stages of repair.
Initially, the installation location of the drain (siphon) is determined. As a rule, it is recommended to install it in easily accessible places, which will simplify its routine inspections and replacement procedure (drains and siphons often break).
We draw a diagram on the floor for accuracy of future installation, and also install and secure the drain at the level of the future floor of the shower tray. We fix the drain pipe with cement mortar. Be sure to maintain the slope of the pipe, at a rate of at least 1.5 cm per 1 meter of pipe.
Our expert’s comment: “Yes, that’s right. But I would also give this advice - when designing a shower stall, it is better to focus on the size of the tiles with which the shower stall will be covered. Because sometimes you can make the corner of the partition smaller and you won’t need to cut a lot of tiles.”
Now, we lay the first row along the marked line on the cement mortar. The bricks are placed on edge, this will be the front part of the future pallet.
After the first row of the brick pallet is ready, thermal insulation material (expanded polystyrene) is laid on the subfloor. For stronger fixation to the base, you can use polyurethane foam.
It is advisable to put something heavy on top of the insulation so that it sticks more tightly to the floor.
In our example, brick was used. It is also recommended to “foam” the polystyrene foam at the corners and joints to insulate it.
Now, it’s time to mix the mortar for the internal rough screed, with the addition of expanded clay. The proportions of such a screed are standard: 3 buckets of sand – 1 bucket of cement – 4 buckets of expanded clay.
The finished mass is poured into the shower tray, while the master must take into account the slope converging to the drain. You need to maintain a level of 10 mm below the drain neck. The setting and initial hardening time is a day.
After 24 hours from the moment of pouring the rough mortar, you can begin the finishing self-leveling screed, while also monitoring the safety of the slope.
The hardening time is also a day, then you can begin control measurements. We pour the leveling screed into the level with the neck of the drain, but leave a slight slope.
You can check the efficiency of the drainage system, as well as the correct design of the pan, by pouring a bucket of water into it. If all recommendations are followed, all available water should go down the drain.
Ideas for use
The first thing that comes to mind when it comes to materials that are beautiful and not afraid of exposure to water is to assemble a wall or a full-fledged shower cabin from it. A wall made of this material will look very original if you are happy with a slightly reduced degree of privacy. Still, this is an almost transparent material, and even matte or corrugated details will be partially translucent, clearly indicating that there is someone in the bathroom.
The second option is more practical and can be an excellent solution in a large room - you can assemble full-fledged shower cabins without a tray from glass bricks. Implementing such an idea is quite difficult, despite its apparent simplicity. However, modern solutions offered in construction markets significantly facilitate this task.
It is not at all necessary to assemble full-fledged walls or structures consisting only of glass blocks. You can use them as a decorative element and replace only part of the wall. Also a very popular option is a decorative insert in a solid partition made of one or more glass bricks.
If your bathroom has a window, then you can replace classic glass with glass blocks, filling the window opening with them. Such a window will have sufficient light transmission, but absolutely nothing will be visible through it from the outside. There will be no need for curtains or other ways to cover transparent glass - grooved and frosted blocks are opaque.
Calculation, planning
Planning and preliminary calculations are perhaps the most important stages of renovation. Accuracy and compliance with all standards are very important here, neglect of which can lead to wasted money and time. When creating a floor plan, it is very important to mark the installation locations of the shower, sink, technical appliances, cabinets, niches, etc.
For the shower stall, it is worth making a separate diagram in which to indicate the type of sewerage system, location of the drain, fixation of the shower stand, doors (if their presence is assumed in the design).
In addition, the layout of water supply, sewerage, and electrical wiring systems is schematically depicted. Be sure to provide for the wiring of water supply pipes and electricity, if necessary, in advance.
You can make such a booth both in a private house (if not a wooden one) or in an apartment.
By the way, we have another great project on our website that might interest you. This is a house bed for a child that you can make with your own hands in a few evenings from ordinary pine bars.
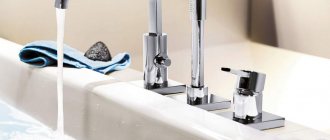
Installation of a shower stand, watering can
Installation of fittings is carried out after all work on the construction of the cabin structure has been completed.
As accessories, you can choose ready-made shower stands; they are a system consisting of a mixer, a watering can and a rain shower head. Such systems are widely available in hardware stores specializing in plumbing equipment.
The final design and set of configurations directly depends on the user’s preferences. The main thing is to pay attention to the quality of workmanship, the material of the parts, and the availability of documentation. It is these factors that influence the efficiency of the system and guarantee its durability.
Is it necessary to open the surface of the decoration under artificial brick in the room with varnish?
After the glue has dried, the surface must be varnished. This will protect you from external destructive factors: moisture, temperature changes. As well as dust settling - the varnished lining can be easily wiped with a damp microfiber to remove settled dust. Unvarnished decor will quickly wear off and darken from absorbed dust.