Attaching the tank to the toilet is a simple process, but it is important to carefully follow the installation instructions. The installation procedure differs depending on the type of waste container. Compact models are the easiest to install; even a beginner in construction work can do it.
Before starting installation, you need to prepare equipment and tools, then prepare the location. If necessary, you must first remove the old tank and clean the surface.
How to install a toilet on tiles with your own hands
It is easiest to install equipment on tiles when all tiling work in the bathroom has been completed. Dismantling an old toilet and installing a new one is not a difficult job, so you can save on the services of specialists and install it yourself. Toilets differ in design and size, but the components for its installation are identical.
Since the installation of a toilet on a tile occurs directly with the base to the floor, the most important task is to determine the boundaries where its leg will be attached. You need to take measurements carefully and carefully distribute the distance to the walls and other plumbing fixtures in the bathroom.
Preparation process
Types of pipe supply from the tank to the plumbing
When choosing a toilet, it is important to consider the type of connection of the tank to the water supply system. There are side and bottom inlets
With the lateral type of supply, the tank is connected from the side; this option is more popular.
In the lower type of supply, the tank is connected from below; this option is considered quiet and allows the pipes to be hidden from view. The sideways type is gradually pushing out of the markets.
It is necessary to purchase a suitable type of supply for the existing sewer structure if there are no plans for a major replacement of water supply pipes.
Tools you will need when replacing a toilet structure
To replace a broken toilet, you will need standard tools. The composition of the kit varies depending on the characteristics of the out-of-service plumbing, the type of toilet, the condition and location of the pipes.
You will need a hammer drill, a screwdriver and an adjustable wrench, a chisel with a hammer, a hacksaw, a rubber spatula, a measuring level, safety glasses and work gloves.
An adjustable wrench is used when connecting a water supply. A hammer drill is used to make holes in a concrete wall or floor for attaching a tank or bowl. Screwdrivers are needed to tighten screws. Silicone sealant is used to process joints.
What items to prepare in advance
To quickly dismantle and install new plumbing fixtures, you need to buy the necessary items in advance, namely a compact toilet. The composition includes rubber sealing rings, fasteners, and a tank drain device. If there is a cast iron riser installed under the toilet, you will need a chisel and hammer. When installing the bowl for accuracy, use a measuring level.
Consumables you will need when replacing plumbing fixtures
If there is a shortage of bolts, screws, washers, or dowels in the mounting kit, you can independently purchase the missing ones.
The process of dismantling an old toilet
Dismantling modern equipment will not cause many difficulties. The process of dismantling outdated plumbing has its own nuances if the sewer system consists of a cast iron pipe.
If the toilet is attached to a wooden stand, it is quite easy to remove. The stand itself is removed and the floor hole is filled with a special screed.
A step-by-step description of the dismantling of modern toilets
First of all, we limit access to water, then drain the water from the tank. We remove the remaining water using a bucket and a rag. At the bottom of the tank, unscrew the bolts and remove it, take out the corrugated pipe or plastic eccentric connecting the sewer and the bowl. It is necessary to wipe the bowl dry with a cloth or sponge. Use a wrench to unscrew the fastenings under the bowl, and it can be freely removed from the floor.
Removing a toilet installed with cement mortar
In Soviet times, the installation of plumbing was done conscientiously; the toilet was installed using cement mortar. Dismantling the plumbing will be similar as for modern toilets until the bowl is removed. Using a chisel, hammer the base of the toilet in a circle and crack the cement, then rock the toilet, use the chisel to carefully split the outlet and remove the bowl. Then remove the remaining plumbing fixtures and cement mortar from the pipe.
Required materials and tools
When buying plumbing equipment, you need to carefully inspect it and find out if all the components are available. The set of spare parts depends on the type of design. To install a toilet on tiles you must have:
- Mounting bracket;
- Bolts;
- Hairpins;
- Plastic dowels;
- Gaskets;
- Washers;
- Top plugs for decoration.
If the manufacturer does not provide factory fastening, then you need to take care of this yourself by purchasing additional ones from the plumbing department.
In addition to the components, you need to have on hand a set of tools, equipment and building materials:
- A hammer drill or drill complete with various drills, including those for working with ceramic tiles.
- Adjustable wrench.
- Building level.
- Hammer.
- Screwdriver.
- Lead pencil.
- Rubber spatula.
- Marker.
To connect:
- Hose supplied to the drain barrel (flexible);
- Ball valve;
- Sealant;
- Pipe for supply to the sewer pipe.
Preparatory work, dismantling the old cistern
After preparing all auxiliary tools and materials, it is necessary to carry out preparatory installation work. In particular, it is necessary to dismantle the previous cistern.
If you need to remove a cast iron model, you will most likely need outside help, because... Doing this yourself with your own hands will be quite difficult. Before disconnecting the water hose, it is advisable to place a bucket so that the remaining water does not spill onto the floor.
Brief instructions:
- Shut off the water supply by turning the valve.
- Rinse off any water present in the container. Make sure there is no liquid at all.
- Disconnect the tank from the water supply and overflow (if any) pipes.
- Unscrew the bolts for attaching the tank to the toilet and other fasteners.
- Remove the old tank. This should be done as carefully as possible so as not to drop the heavy structure, because This may cause damage to the ceramic flooring and toilet bowl.
- Clean surfaces from rust, traces of corrosion, and cement mortar residues.
When the surface is completely cleaned and ready for installation, it is necessary to check all structural elements. In particular, it is recommended to pay special attention to the following points:
- Correct installation of the toilet bowl. This is true even in cases where only the tank needs to be replaced. Before fastening, it is recommended to make sure using a building level that the toilet is placed level. If there is a slight slope, it is advisable to eliminate it. This need for a level position is especially relevant when you plan to install a compact model of plumbing fixtures, because... otherwise the tank will not be able to function properly.
- State of communication systems. It is advisable to check the condition and location of the cold water pipe, which will subsequently be blocked, and also make sure that there are no problems when connecting the toilet to the sewer. To attach a new tank, you will need to calculate the required length of the flexible hose used to connect the tank to the cold water supply. At this stage, you should also find out about the need for a ball valve or other special outlets for water supply (for example, to a washing machine).
- Condition of the tank. It is advisable to make sure not only that there is no obvious damage, but also that the fasteners and all components of the system are suitable for installation work. Particular attention should be paid to the length of the hose for connecting to the water supply and the bolts for fastening, as well as the size of the couplings and rubber gaskets used. It is also recommended to check that the drain fittings are functioning correctly.
IMPORTANT! Before starting installation work, turn off the water supply.
Preparing to install a toilet
Before you start attaching the toilet to the floor on the tiles, you need to empty the room and remove everything unnecessary. The first step is to mark the boundaries where the toilet will be installed, install it and outline the outline of the base. A marker is best for this. Along with the outline, marks for holes for fasteners are indicated.
After making the marks, you need to remove the toilet and apply micro chips to the drilling sites with a center punch. This will allow you to avoid damaging the entire surface of the tile when drilling holes.
You need to cut the tiles in two steps. First, take a drill for working with ceramic tiles. After that, you need to take a drill to work with concrete surfaces. The resulting holes must be treated with sealant to prevent moisture from entering them.
Important! When drilling tiles, care must be taken to ensure that the drill does not overheat. To do this, it needs to be cooled in cold water.
Installing the bowl of a floor-standing device
Depending on the method of attaching the toilet to the floor, the connection of the device to the sewer can be carried out before this moment or directly during this operation. Toilet installation begins with installing the bowl, which can be done in different ways.
Method #1: Installation with dowels
This method can be considered the most common. Most often, this method is chosen for installing a toilet on a tiled floor. To implement it, we will need to do some preparatory work.
First, we prepare the base on which the equipment will be installed. The floor must be absolutely flat, without the slightest drop. Otherwise, the device will not stand up straight and will become loose during use. If you plan to lay ceramic tiles on the floor, you need to do this before starting installation work.
It is possible to tile an already installed toilet, but this is a very labor-intensive procedure that requires precise cutting of each tile. It is much easier to carry out all the necessary activities in advance.
In addition, for the work we will need consumables, which we will need to purchase drills for glass and concrete and silicone sealant.
When marking, hold the pencil strictly vertically to mark the point for the mounting hole as accurately as possible
Let's take a closer look at the external method of mounting the device. We carry out the work in the following sequence:
- We start with fitting. We place the toilet on the base prepared for it and control the angle of inclination, the coincidence of the height of the sewer pipe and the neck, etc. If we find any inconsistencies, we quickly eliminate them.
- We carry out markings. To do this, we first determine the central axis of the toilet. It is optimal if it passes through the center of the room. Using it as a guide, we install the device at a distance of about 15 cm from the sewer socket. Take a marker and carefully trace the outline of the device. We insert the marker strictly vertically into the technological mounting holes and place marks under the holes.
- Preparing holes for fasteners. We move the toilet to the side and use a hammer drill or drill to make the necessary holes. If tiles are laid on the floor, first take a glass drill, after drilling through the cladding, change it to a concrete drill. Carefully clean the hole from dust and pour silicone into it. It will act as a waterproofing agent. Then we insert plastic dowels.
- We install the toilet. We outlined the seat of the device in advance with a marker. We place a special rubber gasket on it or generously apply a layer of silicone, which will act as a gasket. We put the equipment in place and press it to the floor. We insert bushings into the mounting holes and carefully tighten the screws, fixing the plugs. Remove excess silicone with a damp finger or rubber spatula.
We tighten the fasteners very carefully. Excessive force may damage the equipment, which may cause cracks.
We will install the device with internal fastening a little differently. Before installing it, you must make sure that all outlets of the engineering systems are connected to the toilet. Installation is carried out as follows:
- We attach the fastening system to the toilet body.
- We carry out markings. We place the device in the place intended for it and trace the outline with a marker or a simple pencil. We remove the equipment and mark holes for fasteners inside the resulting contour, not forgetting that each connection is secured to the floor with two bolts
- We make the necessary holes. On tiles we work first with a glass drill, then with a concrete drill. Pour sealant into the holes and install dowels.
- We screw the fasteners to the floor with bolts. We take the toilet, place it on the installed mounts, and secure it with bolts through special side holes. There is no need to tighten the fasteners too much yet. It is possible that minor adjustments will need to be made during the process of connecting the device to engineering systems.
Watch the video for more details:
Method #2: glue installation
If, for various reasons, the toilet bowl cannot be installed on dowels, you can install it with glue. The method is only suitable for smooth floors. To carry out the operation you will need a high-quality adhesive composition. This can be liquid sealant, silicone glue or epoxy resin with various hardeners.
You can make such a composition yourself. To do this, take 100 parts of ED-6 epoxy resin, heated to 50C, add 20 parts of solvent or plasticizer, stir well. Then pour in 35 parts of hardener and mix well again.
Add 200 parts of cement to the resulting mass and mix until a plastic, homogeneous mass is obtained.
We carry out installation work in the following sequence:
- We carry out markings. We place the plumbing fixture in the place designated for it and trace the outline with a pencil.
- Preparing the foundation. First of all, we thoroughly clean the floor and base of the toilet from possible contamination. To improve adhesion with the adhesive, you need to roughen the surface, so we clean it with emery cloth. Then degrease the base of the device and the floor with any solvent or acetone.
- Following the manufacturer's instructions exactly, we prepare the adhesive for use.
- Carefully apply glue to the inside of the bottom of the toilet and inside the outline marked on the floor. The layer of composition should not be too large.
- We put the toilet in place and press it firmly against the floor surface.
After we have glued the device, we need to wait until the glue is completely dry. This usually takes about 12 hours. During this time, the equipment should not be touched, much less sat on it.
Otherwise, it may move to the side, and the mount will not be strong enough.
Before installing the toilet with glue, be sure to clean the base of the plumbing fixture and the floor underneath with sandpaper, creating a rough surface
Method #3: installation on taffeta (wooden gasket)
The method was developed for installing plumbing fixtures on wooden floors, but can also be used for other types of flooring. To properly install a toilet on taffeta, you need to perform the following operations:
- We are preparing taffeta. This is the name of a gasket made of durable wood to which a plumbing fixture is attached. We cut it out of a board with a thickness of 2.8 to 3.2 cm. We thoroughly treat the workpiece with drying oil or any other anti-rotting solution. To ensure that the support post is securely attached to the floor, we fix anchors in it. The easiest way is to hammer nails into the part in a checkerboard pattern so that they protrude 2-3 cm from the board.
- We make a recess in the floor to install the device. Its shape and size must match the taffeta. Fill the hole with cement mortar.
- We turn the taffeta over with the anchors facing down and sink it into the cement. If done correctly, the board should be flush with the floor. We wait until the cement dries completely.
- Let's start installing the equipment. We place the toilet on the taffeta and fix it with screws lubricated with graphite or grease so that they can be easily unscrewed later. Be sure to place rubber spacers under the screw heads to avoid damaging the ceramics.
In addition to traditional wooden taffeta, you can use a rubber backing. For these purposes, sheet material with a thickness of 5-15 mm is suitable.
It is quite possible to use an old rubber mat.
For taffeta, it is best to take durable wood such as ash or oak. Be sure to treat the part with drying oil or other composition that protects the wood from rotting
Mounting on plumbing dowels
Dowel fastening is the most common and reliable method. But it also has points that need to be taken into account during installation.
First of all, for this method of fastening you need to drill a hole in the ceramic tile under the intended location of the toilet base. This must be done very carefully, because any mistake can lead to damage.
The dowel mounting is designed for low installation weight. If the toilet is heavy, then it is better to choose another method.
The first step is to mark the intended installation location with a marker, outlining the base and attachment points.
Important! The toilet should not wobble even before screwing it to the tile. If this happens, put a thick backing on the tile under the toilet or clean its base, if the problem is not the unevenness of the floor surface.
Drill the tiles carefully to avoid chips and cracks. To do this, you need to take a drill for working with ceramic tiles and a drill for concrete. After the tiles are drilled, you need to change the drills.
Insert plastic dowels into the resulting holes treated with silicone sealant. Position the toilet in accordance with the holes and insert the dowels. They need to be tightened after installing special rubber bands that will protect the coating from damage when tightened.
Removing the old toilet
Dismantling the toilet
First step. Turn off the water supply and drain all the liquid from the tank.
Shut off the water
Second step. We unscrew the hose through which the tank is connected to the water supply.
Disconnect the hose
Third step. Unscrew the tank fasteners. If they are rusty, we arm ourselves with a screwdriver or open-end wrench. We press the bolt head with the selected tool and unscrew the nut using an adjustable wrench. If that doesn’t work, pre-soak the nut with kerosene. We remove the tank.
Fourth step. We dismantle the toilet mountings.
Fifth step. Disconnect the toilet flush from the sewer.
Corrugation is easy to remove
In older buildings, drains are usually secured using cement coating. To destroy it we use a hammer and chisel. We need to crack the cement and carefully rock the toilet to the sides. The drain should turn and become loose. We tilt the product, allowing the remaining water to drain into the sewer.
Dismantling the toilet
We loosen the seal, if there is one.
If the toilet had an outlet to the floor, you need to clean off the wax ring
Sixth step. We close the sewer hole with a wooden or other suitable plug.
While working, plug the hole with a rag.
Important! Sewage gases do not have the most pleasant smell. However, they are poisonous and flammable. Be sure to take this point into account as you work.
Dismantling the toilet
How to install a toilet on tiles yourself without bolts
It happens that you need to install a toilet without bolts on tiles. Most often this happens when a “warm floor” system is installed. Then it’s worth knowing how to glue the toilet to the tile if drilling is impossible. To do this, install the toilet using glue without drilling.
How to glue a toilet to ceramic tiles
To install in this way, you need to buy specialized glue, which is used in construction. Before installation, measure the base of the toilet and mark it on the tile with a marker. Clean the base of the toilet and degrease it along with the tiles.
Apply the glue carefully to the base of the toilet. Observe the proportions, because if there is not enough glue, the toilet will not hold well. If there is a lot, there is a risk of staining the rest of the tiles.
Carefully move the device to the mounting location and lower it along the marks. It's best if they help you. It is problematic for one person to cope and place a level base.
Important! If the composition protrudes beyond the boundaries of the base, it must be immediately removed with a spatula soaked in soapy water.
Do not use the toilet for 24 hours to allow the glue to cure thoroughly.
Choose and buy a toilet online
We have agreed on DISCOUNTS for our readers in the LEROY MERLIN store.
Buying online is cheaper than buying in a store (online prices are lower)! It is very profitable, convenient and safe: you can buy any product without leaving home or visiting a store. All purchases will be delivered to your home. And if for some reason the product does not fit, you can return it to the store.
In addition, in the online store, on each product page you can see the exact characteristics and real customer reviews.
- To select a floor-standing toilet model at a discount, follow the link>>>;
- To select a wall-hung toilet model at a discount, follow the link>>>;
- To select an installation for a toilet, follow the link>>>.
Installing a toilet on tiles using cement mortar
Installing a toilet on tile using this method is not the best option. It is suitable for cases when the toilet is installed in place of a dismantled one or when installation tools are not available.
To attach a toilet to a tiled floor without drilling using cement mortar, you need the following tools:
- cement mortar or cement-based tile adhesive;
- marker or pencil;
- hammer;
- spatula (narrow and medium);
- chisel.
Before you begin, you need to roughly check the joints of all installation elements by installing the device in the intended location and connecting all the necessary plumbing elements. Then you need to outline the base with a marker or pencil. Using a chisel, it is necessary to apply notches at the marks.
Important! The notches must be applied carefully to prevent the tile from cracking. Be sure to wear safety glasses to prevent shrapnel from getting into your eyes.
The next step is to prepare the cement mortar; the cement mortar is diluted 2:1. The cement mixture contains large admixtures of sand, which can affect hardening. It is best to use a ready-made mixture of tile adhesive, as it is much more reliable and dries faster. Calculate the preparation of the solution for 4 kilograms.
Once the mixture is prepared, it should be carefully applied to the notched area. Before gluing the toilet to the tile using the resulting composition, you need to moisten the surface a little. The base of the device’s legs must also be moistened and installed in the place allocated for it. On the front and back sides, plastic plates must be placed under the base, the thickness of which should be 5 mm and the width 50 mm.
Important! While placing the plates, it is necessary to ensure that the toilet seat is perfectly level.
Remove excess solution using a spatula. After drying, it is necessary to remove the pads and concrete the holes from them with the same solution. Do not use plumbing fixtures for 5 days.
Replacing the tank
toilet cistern installation
Replacing the toilet tank yourself is the last stage of the work associated with replacing the toilet. If we are talking about a barrel that is attached to the toilet shelf, then the pipe must be connected to the neck using a rubber cuff. This will be quite enough to ensure a strong and tight connection. One third of the rubber cuff is put on the pipe, and the remaining two thirds are turned inside out. Then this part must be pulled over the previous one. Here we get a situation where the end of the pipe is released. Then the pipe and neck are combined with each other. The inverted part of the rubber cuff is pulled over the neck. Thus, we can say that the tank is perfectly secured. No additional action is required. The rubber cuff is enough to ensure a tight connection. At the same time, it is worth checking the tightness of the cuff nozzle so that unpleasant events do not happen to the neighbors below.
attaching the toilet cistern to the toilet itself
Sometimes a situation arises when the tank is mounted a short distance from the toilet on the wall. In this case, a rubber cuff alone is not enough. You'll have to put in a little more effort and skill. In this case, a pipe is screwed to the barrel, and its opposite end is lubricated with red lead and wrapped in tow. The neck of the toilet and the pipe itself are connected by means of a cuff. It is fixed to the pipe using a thin wire. Now you can energize the flush tank and adjust the water level in it.
Thus, the work on replacing the toilet can be considered completed. As you can see, all actions do not require any special training. The work can easily be done with your own hands. Of course, if we are talking about a toilet that is installed on the floor. Otherwise, it is difficult to do without the help of a plumbing specialist. By the way, even before starting work on replacing a floor-standing toilet, you should consult with a professional. He will help you understand all the intricacies of the work. For those who are well versed in the work associated with installing plumbing, this manual will definitely help. It is also suitable for those who have never tried to do such work on their own before. Here you can find detailed instructions describing all the main stages of the work, and also attach a video showing clearly how to replace a toilet with your own hands. Many will definitely find this guide useful. In addition to the work associated with installing the barrel and the toilet itself, it provides information on how to correctly dismantle the old unit so that there are no further problems in operation. The video will help even those who decided to save money and not call specialists, although this is the first time they are dealing with this type of work. Everything is shown clearly and will be understandable to absolutely every person.
Installing a toilet with liquid nails, epoxy resin, silicone
It is possible to install the device on the tile using liquid nails, silicone sealant, or epoxy resin. When using these methods, it is necessary to study all the pros and cons of such an installation.
If you use liquid nails, subsequent dismantling will lead to splitting of the base.
Fixing a toilet with silicone is a common method, but this method does not guarantee that the installation will not move over time. The only advantage of installing on silicone is that subsequent dismantling will take place without damage to the device and tiles.
A safe and reliable mounting method is to glue the toilet to the floor using epoxy resin. But this also has its drawbacks; when dismantling, the tile covering will be damaged.
Installation using all three methods is similar to mounting on cement mortar. The first step is to mark the edges of the leg on the tile. Then degrease the joints, namely the edges of the base and the tiled surface. Apply the mixture to the tiles and the base of the device, then press well and wait until the mixture hardens.
Construction and adjustment of the compact
When the toilet tank can no longer be repaired, it is replaced. A step-by-step replacement of the toilet tank can be performed by following the following algorithm:
- shut off the flow of cold water;
- disconnect the old tank from the water pipe;
- using an adjustable wrench or wrench, remove the mounting bolts to dismantle the tank;
- clean the container mounting area from traces of rust, dirt and lime;
- install a new tank in accordance with the above recommendations;
- connect the equipment to the water supply;
- adjust the water level;
- install the lid and drain button;
- carry out a test set and drain the water.
- cistern container with lid;
- system for filling water into a container;
- shut-off device or water drainage system;
- control button or lever;
- toilet.
The tank in the compact is installed on a special shelf, which is located behind the bowl. Typically, adjustment of the fittings of such a toilet is carried out after the cistern bowl is installed, but before its lid is installed. Before starting work, it is recommended to carefully study the manufacturer's instructions. Usually there is detailed information about the procedure for performing the work.
Compact toilets are popular because they are convenient and take up little space. The tank of such a device is installed on a shelf directly behind the bowl
The overflow pipe of the device usually indicates the water level that is considered normal for that particular model. You need to find this designation, which is often made in the form of a strip or bead. Usually, if, when filling the tank, the maximum water level is below this mark, poor-quality flushing of sewage is observed.
Read more: Do-it-yourself hydrodrilling of water wells, review of work technology
To change the situation, you need to move the “glass” on the intake valve to a higher position. To do this, loosen the clamps holding this element located under the float. After the required level has been set, you need to check the result of the work, i.e. fill the tank and drain the water.
On the top of the toilet tank inlet valve overflow pipe there is a mark in the form of a dash or collar for adjusting the water level
When installing tank fittings, it should be remembered that all moving parts of the valves must be separated by a distance, at least small. If the valves come into contact during operation, this can disrupt the normal operation of the system, leading to its imbalance and breakdown. It is also unacceptable for the moving elements of the fittings to come into contact with the walls of the tank.
Image gallery
Photo from
If the filling tube is too long, you can simply trim it. If a gap is found in it, you will have to replace it with a new one.
We cut the new filling tube according to the required size. We use a hacksaw for cutting
In place of the broken filling tube we put a new section and fix it
We open the previously shut off water, fill it into the tank and see if the water splashes during the fill. If this does not happen, close the tank with a lid.
Step 1: Inspect the fill tube of the tank fittings
Step 2: Cut out the new filler tube for installation
Step 3: Installing a New Fill Tube
Step 4: Checking the water supply and the operation of the tank
An important stage in installing the tank is installing the lid with a push-button regulator. Before screwing it in, there should be a distance of no more than seven millimeters and no less than three between the cover and this unit. If these conditions are met, the cover will be fastened securely enough.
Before you start screwing the flush button, the instructions recommend making a couple of turns in the opposite direction, i.e. counterclock-wise.
To save water, modern tanks have a double flush button, which allows you to empty only part of the tank if desired.
This will center the thread position. After this, screwing the button assembly is carried out clockwise. You need to rotate it by hand until it stops; additional tools are usually not needed. Upon completion of installation, you should drain the water again to make sure that the button and all fittings are configured correctly and installed correctly.
Compacts are produced with both bottom and side water supply. With fittings designed for bottom water supply, a problem such as clogging of the filter installed at the water supply to the container may arise. After flushing, i.e. During the process of filling the tank, a characteristic, rather loud and unpleasant whistle is heard.
This situation most often indicates that the filter is clogged and needs to be washed. The debris accumulated inside reduces the clearance for water, which enters the tank with high pressure and accompanied by sound effects. In addition, due to this malfunction, the tank fills much more slowly than usual.
There is a filter located under the inlet valve float, a clogged filter that can cause the tank to malfunction. To wash the filter you need to remove it
To correct this plumbing problem, you need to flush this filter. To do this, turn off the water supply to the tank and press the flush button/lever. After this, remove the hose through which water flows to free access to the device. Now the filter just needs to be removed from the intake valve body, washed and installed back. The system is then reassembled in reverse order.
It looks simple in theory, but in reality there can be some complications. For example, you need to unscrew the plastic nut that secures the inlet valve. If this element does not have edges, the task may seem difficult.
You should not use an adjustable wrench in this situation, as excessive force may damage the fastener. It’s not always possible to just do it with your hands, especially if the plastic has become “burnt” as a result of prolonged use.
To ensure that the sediment that forms when low-quality tap water is supplied to the device does not cause a leak due to loose seals and failure of fittings, the tank and devices must be periodically cleaned
Experts recommend using other means; pliers with a large space between the “lips” may be a suitable option. Pliers can also be useful when removing the filter from the housing, since it usually fits tightly and will require additional effort for removal.
Where the quality of tap water remains consistently low (that is, almost everywhere), not only the filter, but also other elements can become clogged. The membrane bushing is at risk, as well as all the holes through which water enters.
If washing only the filter was not effective enough, it makes sense to rinse the entire device and clean all the channels. In this case, you will have to completely dismantle the inlet valve to provide access to the holes.
Unfortunately, washing the filter, and even the entire valve and ducts, does not always help. Low quality intake valves can completely fail within one and a half to two years after the start of operation. In this case, you will have to completely replace the valve with a new model. In such a situation, it is recommended to choose a higher quality filter.
The shut-off and inlet valves of modern toilets are usually provided with detailed instructions, with the help of which these mechanisms are not difficult to assemble, install and adjust
The additional costs will pay off, since there will be several times fewer problems with setup, flushing and repairs. Another way to prolong the operation of the tank fittings and prevent problems: install an additional mechanical filter on the water pipe in front of the toilet or even at the entrance of the system to the apartment.
If the compact has problems with the shut-off valve, i.e. Since water constantly leaks into the toilet, the easiest way to fix the problem is to completely replace the device with a new one, exactly the same. To do this, you need to turn off the water and simply remove the valve from the tank.
The new one is installed in its place, fixing it in the holders of the receiving part. It is recommended to adjust the length of the valve in advance so that there are no problems with installing the flush button.
If it is necessary to replace the old storage tank with a new one, you need to:
- shut off the flow of water into the container by setting the valve to the “closed” position;
- Next, you need to drain the liquid from the bowl;
- if you want to use the old fittings in a new bowl, carefully remove the filling device;
- then you need to unscrew the fastening bolts connecting the container to the toilet seat and remove it;
- remove the drain device by unscrewing the connections attaching the bulb seat to the bowl;
- Before installing a new tank, you need to clean the surface of the toilet seat from rust and mineral/bacteriological deposits.
As can be seen from the above, there is nothing particularly difficult about installing a toilet tank yourself, attaching and adjusting the fittings. These operations are within the power of any person.
Some difficulties may arise only when servicing installed containers, since many operations have to be carried out through a small technological opening in the absence of visual contact.
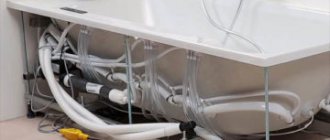
Connection to sewerage and water supply
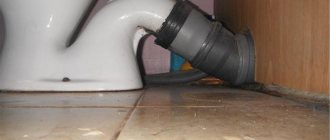
The supplied toilet must be connected to the sewer system for further use. For this, a corrugated plastic pipe is most often used. It allows you to adjust the distance and angle of entry into the sewer pipe. The corrugated pipe has reliable seals that prevent leakage at the outlet and at the junction with the drain hole.
The corrugation must be inserted into the sewer pipe and into the toilet outlet, and lubricated at the junction with plumbing silicone. Then you need to check the tightness by draining water from the drain barrel. If the tank is not yet connected, this can be done using a bucket of water.
Recommendations for the selection and installation of floor-standing toilets
When choosing suitable plumbing fixtures, you should be guided by the following recommendations: • the model is selected depending on the size of the bathroom and how much space is needed to install a toilet of a certain design; • of all the materials for the manufacture of this type of plumbing fixtures, porcelain is considered the highest quality, and earthenware is considered the best in price; • the shape of the bowl is chosen depending on the preferences of the residents; • if there are no special requirements for plumbing, you should pay attention to domestic earthenware models, without additional functions and with a favorable price. When choosing a tank, it is recommended to give preference to a design with a double button (or two separate “Stop” and “Start” keys), which allows you to save water. The top of the plumbing should be at a level of 400-450 mm from the floor - this distance will be optimal for all residents of the apartment or house. It is recommended to pre-lubricate the lower part of the plumbing with silicone to improve the tightness.
Video: installing a floor-standing toilet
Conclusion By adhering to certain rules for installing a toilet, the homeowner can install the plumbing himself without turning to master plumbers. The first advantage of doing the work yourself is saving money, the second is the ability to control all stages of installation, avoiding possible mistakes. In addition, the contractor will gain experience, which in the future may allow him to do without outside help when installing other plumbing fixtures. It is possible that when performing installation work you will have to face a number of problems - dismantling the old toilet, leveling the floor and even replacing sewer pipes. However, all these issues can also be resolved independently.
Useful tips
To properly install a toilet on a tile, there are a number of useful tips:
- Before installing plumbing, it is necessary to complete all repair and finishing work in the bathroom. This is necessary so that during the installation process there are no problems with fitting the tiles.
- Always measure the distance to the sewer pipe and surrounding walls.
- It is best for two people to install the toilet.
- If there is an uneven surface in the bathroom, then to prevent the toilet from wobbling, a backing is placed under it during installation.
- If the toilet has a heated floor, this means that drilling cannot be done. Drilling tiles with a heated floor system will lead to damage. For this purpose, only methods involving gluing the toilet to the tile are suitable.
When is replacement needed?
If various kinds of problems appear with the toilet, this does not mean that it is necessary to change it. There are cases when it is enough to simply repair an element or simply replace it. This can happen for various reasons. So, for example, if there is a leak at the junction of the hose and the toilet, you just need to turn off the water, disconnect the hose and coat it with silicone sealant. This will fix the leak. Or, if the tank does not hold water and it constantly flows, then you need to open the lid and replace the drain system. These simple measures can extend the life of the toilet for a long time without the extra costs of replacing it.
Sometimes it happens that more serious problems arise that cannot be repaired.
In this case, you will have to buy and install a new toilet. The materials from which toilets are made are most often very fragile and cannot withstand shock or temperature changes. If cracks or chips appear on the toilet, this can lead to its destruction. It needs to be replaced as soon as possible.
It happens that an unpleasant odor appears from the toilet. This can be either a smell from the sewer itself, or if dirt has started to get into the cracks. Sanitaryware has a porous structure; microbes enter through chips. The only solution to this problem is replacement. Bathroom renovations can also be a reason to buy new plumbing fixtures. If you plan to carry out major renovations in the apartment, then it is best to buy and install new equipment, and not just replace the floor and walls. You can do this yourself if you carefully study and follow all the instructions.
Before installing a new toilet, you must dismantle the old one
, which most often already has an ugly appearance, is cracked in some places or covered with a thick coating. If the house is old, and the renovation was carried out many years ago, then it is unlikely to be possible to remove the old toilet without breaking it, since its base is firmly concreted into the floor. This method of cementing the floor and attaching the toilet to this place was very popular in Soviet times, when it was customary to do everything with high quality and for a long time.
Common Mistakes
The most common mistake is poor surface leveling. As a result, equipment breakdown and leakage may occur. To do this, you need to have a building level on hand.
Poor sealing can lead to unpleasant odors and unwanted leaks. You need to use only high-quality components with good rubberized gaskets.
There is no need to skip the point of cleaning all pipes from contamination so that the service life of the equipment is longer. If a leak in the drain barrel is detected, it is necessary to check the serviceability of the valves.
Installing a toilet is not a complicated process; you can do it yourself. The main rule is to follow all instructions and recommendations for its installation.
Installation of suspended structures
In most cases, new flushing tanks are equipped with “original” fittings - devices designed to regulate the flow of water into the tank and flushing.
If these mechanisms are not included in the standard package, you should seek help from a sales consultant at a plumbing store so that he can select the appropriate elements. The design is divided into inlet (shut-off valves for a toilet with a bottom or side connection) and outlet. Today there are several modifications of these devices. Let's look at the assembly of a tank using the example of one of the most accessible and widespread fittings, consisting of a supply part attached to the side of the tank and equipped with a horizontal float control element, and a drain device equipped with a rubber plug - a bulb.
The main condition is to tighten all threaded connections made of plastic, without the use of wrenches, by hand with sufficient force. Otherwise, you can easily break the fragile plastic or, even worse, damage the integrity of the earthenware container.
- First you need to secure the saddle for the punching bag. To do this, special bolts included in the package are inserted from the bottom of the container.
- You must first equip the bolts with metal/plastic washers and rubber gaskets. On the inside of the tank, a large rubber gasket in the shape of the base of a pear saddle is placed on the bolts.
- After this, a seat is installed, which is secured with nuts through metal washers made of stainless material (usually brass alloy). It is necessary to tighten the nuts with a force sufficient to ensure a tight fit of the seat to the bottom of the container, but it is necessary to ensure that the structure does not bend, otherwise a distortion of the bulb may occur, preventing normal locking of the drain hole.
- We fasten the plastic overflow tube into the hole located nearby by hand.
- We screw the filling device using the technological hole located on one of the sides of the bowl in its upper part. Don't forget to put a rubber gasket under the washer. We also tighten the connection by hand, with moderate force.
Now let's move on to the question of how to install a flush cistern on a toilet, depending on the type of plumbing - with a shelf, a separate or hidden cistern.
How is the cistern attached to a standard floor-standing toilet? To secure the bowl, you must first install a rubber gasket, usually oval shaped (more about the seals between the tank and the toilet).
A correctly positioned gasket should cover the overflow hole and the bulb seat from the bottom of the container. The storage tank is connected to the toilet shelf using two (sometimes four) bolts.
On both sides of the connection between the tank and the toilet, it is necessary to install metal washers and rubber gaskets to ensure a tight seal and protect the fragile earthenware from chipping and cracking.
Now you can connect the bowl to the water supply system, for which, using a flexible plumbing hose, we connect the output of the shut-off valve to the inlet fitting pipe.
If a diaphragm valve is used, it is also necessary to install a water filter before entering the tank; a classic rod valve is less demanding on the quality of the incoming liquid.
Now you need to find out how to set up the toilet flush cistern - setting up the fittings comes down to the following operations:
- Setting the float position at which the inlet valve will be completely closed. This is achieved empirically by sliding the float along a plastic rod or by manually bending a metal rod.
In the first case, to increase the maximum water level, you need to move the float device closer to the shut-off valve; to decrease it, you need to fix the float a little further on the rod.In the second case, bend the metal lever up or down, respectively.
- Adjusting the level of the overflow tube.
In modern modifications of fittings for a toilet cistern, the overflow tube is usually used in a telescopic design, which makes it easy to adjust. The upper edge of the overflow with a bell should protrude above the surface of the liquid when the tank is completely filled by one centimeter, but at the same time be 3-4 centimeters below the upper edge of the bowl or open technological holes.
That's all. Now you can put the lid back in place and screw the cap onto the stem that controls the drain.
There are toilet designs that provide for remote installation of a storage tank. They use similar fittings, with the only difference being that the flush is controlled by a chain attached to a lever connected to the bulb stem and extending from the other side of the tank from the point of connection to the water supply system. The design is similar to old style toilet cisterns.
Installation is done as follows:
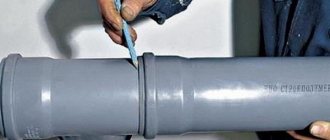
- The drain pipe is connected to the toilet through a rubber gasket and attached to the wall using clamps and dowels (anchors, self-tapping screws - depending on the wall material).
- The fastening elements of the storage tank are marked and installed in the wall.
- The tank is hung and connected to the upper outlet of the connecting pipe, again, through a rubber gasket.
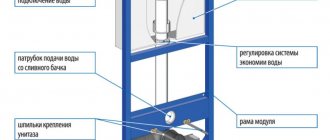
The hidden installation of the tank allows for high aesthetics of the room. To implement it, a plastic container is fixed in a pre-prepared niche in the main wall or on a special metal frame (installation) in the case of installation in a plasterboard wall.
Then it is connected to the toilet using a plastic pipe, after which the room is finished. Such storage tanks for toilet bowls are usually equipped with large-sized buttons, since any technological operations to repair fittings, replace their elements and adjust them are carried out exclusively through the hole occupied by the button block.
There is no need to destroy the installed partition during this installation.
Regardless of which toilet cistern model you choose, the operating principle is very similar in all models. They all have the same purpose - to accumulate water and flush it down the toilet when needed.
The design of the tank consists of two main components - a mechanism for draining and a mechanism for supplying water. Of course, in reality, not everything is as simple as it seems at first glance; in addition to these components, the tank also contains a float, a bulb, an overflow, levers and a float valve. The mechanism by which the liquid is supplied is manufactured differently in different designs.
In the second option, all the fittings, on the contrary, are located below the toilet cistern. In this case, the float moves along the vertical rod. When the float moves, it affects the membrane, which regulates the level of the required flushing fluid. With this method, the work is much quieter than with the first option.
Now you have an idea of what parts the tank consists of and how the whole structure works. Therefore, it will not be difficult for you to install this product yourself.
As we have already said, compact systems are the most common in the modern world, so we will begin the installation with them.
- First of all, it is necessary to install the tank fittings and install a drain valve. This is not difficult to do; just attach it to the bottom with a plastic nut.
- At all stages of installation, be aware of the rubber seals. Most often, they are sold complete with a tank.
- Using two secure bolts, attach the product to the toilet bowl. If the fasteners that were sold in the kit are not strong enough, you should purchase them separately.
- Install an O-ring between the surface of the toilet and the tank.
- When the structure is in the right place properly, secure it with bolts and washers.
Tighten the nuts, but you need to do this very carefully, do not use excessive force, because this may lead to a crack in the tank. Flush mechanism in the toilet cistern - Next, you need to install a mechanism that supplies water to the container and the float mechanism.
- The next step is connecting the tank to the water supply and adjusting the float valve. Please note that the water should reach the overflow level, but not go beyond it.
- The final stage is installing a trigger mechanism and a button so that you can start flushing water into the toilet.
Read more: Waterproofing a pool under tiles: technology for waterproofing seams, execution technology
That's all the recommendations for installing the compact system. If any difficulties arise due to various modifications of the tanks, carefully read the instructions from the manufacturer of this product.
The instructions for installing a built-in toilet cistern differ from those described above. Such tanks are best used for wall-hung toilets, and their installation should be done using appropriate installation systems.
Thanks to such systems, you can achieve maximum reliability of fastening the structure, as well as give your bathroom an aesthetic appearance.
Before installation you need to prepare:
- fittings for draining water, which will be located inside the tank;
- a rubber sealing gasket that serves to prevent leaks between the toilet and the tank;
- flexible hose for connection to water supply;
- lubricant to prevent corrosion of fasteners;
- a set of hardware for fastening - bolts with nuts and rubber cone-shaped gaskets.
After preparing the parts, you can begin installation, following the sequence of actions described below.
- A sealing rubber gasket is placed on the wide rear shelf of the toilet bowl. Most often it is produced on a self-adhesive basis. If you don’t get one, then both sides should be coated with silicone glue.
- The drain container is installed on the gasket so that the mounting holes on the bottom of its inner side coincide with the holes on the rear shelf of the toilet bowl.
- Put rubber cone-shaped gaskets on the bolts and insert them into the mounting holes of the tank. The bolts must be tightened with nuts from the underside of the toilet shelf. The tank must be securely fastened so that it cannot be shaken, turned or tilted.
- Then, using a flexible hose, you need to connect the tank to the water pipe through which cold water is supplied.
- After connecting, you need to fill the tank with water and check whether water is flowing out from under the tank or at the connection point of the flexible hose. If everything is dry, then you can perform a test drain of water. If after this there are no leaks anywhere, and the drain fittings are functioning normally, then the toilet is ready for use.