The only drawback of a cast iron bathtub is its heavy weight , but if all technological rules are followed, installing it is not so difficult.
The installation of the bathtub should be carried out after all preparatory repair work in the bathroom has been completed.
to level the floor well , since the bathtub must stand strictly horizontally on the floor.
If you plan to cover the floor and walls with ceramic tiles, it is best to carry out the final finishing after installation.
The weight of a heavy cast-iron bathtub can cause floor tiles to crack , so it is recommended to place the bathtub directly on the screed, subsequently covering the space under the bathtub with a decorative screen.
It is best to lay wall tiles after installing the bathtub, as this will allow for better waterproofing of the joints. It is possible to install a bathtub on a finished floor covering if you have laid durable porcelain tiles on the floor.
Install the legs
The first step is to attach the legs, which are usually included in the kit. To do this, turn the bathtub upside down without removing the packaging from the sides, and assemble the brackets according to the instructions. Depending on the material of the bathtub, the legs and their fastenings differ.
Acrylic bath
YouTube channel Cersanit Romania
These bathtubs have a special reinforcement insert made of plywood in the lower part, onto which the mounting plates are attached with screws, and the threaded rods of the legs are screwed to them.
You need to mark the mounting points in accordance with the instructions, then drill holes for the screws to the specified depth and tighten them with a screwdriver. To avoid making holes in the bathtub, use only the supplied self-tapping screws that have the calculated length.
Steel bath
YouTube channel “Alexander Cherepitsa”
Steel analogues are equipped with a pair of support-lodgments, which are glued with double-sided tape and pressed down with the weight of the bathtub. Another fastening option is four separate legs, fixed with special hooks on the bottom.
YouTube channel “Ruslan Viktorovich”
In the first case, it is necessary to degrease the surface with white spirit or another solvent and stick the supports. In the second, put the legs on the hooks and tighten them together with studs and nuts.
Cast iron bath
YouTube channel Craftstroy
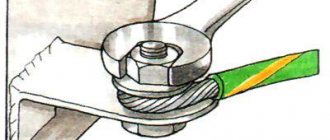
Cast iron bowls also have four separate legs, which are attached to protrusions specially cast on the bottom with holes for bolts.
To install, you need to align the legs with the protrusions, secure them with bolts and nuts and tighten them with a wrench.
Installation features
Installation of a cast iron bath
To install cast iron bathtubs, support legs are used with rigid attachment to the body using metal wedges or coupling bolts. Both legs and mounting hardware are included in the package. No additional frame required.
Helpful Tips:
- The cast iron bathtub is brought into the room in a vertical position. This will make it fit through the door easier and take up less space.
- Before bringing in, the door jamb, threshold and door must be covered with soft material to avoid damage.
- The cast-iron plumbing fixtures are lifted up the stairs, oriented with the drain hole down.
The type of fastening depends on the design. Some manufacturers provide height adjustment using legs. These adjustable supports are bolted to the body. Monolithic steel legs are fixed with wedges.
Assemble drain fittings
The siphon and overflow system have the same design, regardless of the type of bathtub. As a rule, fittings are supplied with it. Otherwise, you need to immediately purchase the missing product in the store.
YouTube channel "Alexander Cherepitsa"
Study the assembly diagram specified in the instructions. Put the pipes in place and tighten the union nuts, having previously installed O-rings on all connections. Next, a rubber gasket is put on the siphon and the entire structure is pressed to the drain hole with a screw through the protective grill.
YouTube channel “Ruslan Viktorovich”
In the same way, the upper pipe is attached to the overflow hole on the bathtub. If the siphon has a drain valve rather than a regular plug on a chain, then a rotary handle is installed on the overflow grid according to the assembly instructions.
Selecting a location
The first step is to choose a place where the font will stand. If you decide to install it instead of the old one, you first need to dismantle you can even make a little money from this .
In other cases, the choice is made depending on its type, shape and size.
There are 3 main types:
- wall;
- free-standing;
- built-in
A groove is a recess, a groove in the wall.
With the first, everything is simple; such models are installed near the wall, usually in the corner of the room, and have a rectangular or angular shape.
here is to accurately carry out all the measurements so that the bathtub fits into the selected space of the bathroom.
But if you miscalculate the size somewhere, and the bathtub has already been purchased and does not fit, it doesn’t matter. You can make a groove in the wall and push the sides of the bathtub into it. For free-standing models, the main condition is the convenience of connecting communications; if in the first case, the pipes can be laid along the wall and will not be visible, then, most likely, they will have to be recessed into the floor.
In freestanding bathtubs, the drain hole is often not on the side, but right in the middle. This is important to consider when choosing an installation location.
Built-in hot tubs require special attention to the choice of installation location, because special recesses or podiums are made in the floor for them. Such issues are resolved at the design stage. In private homes, people often install them near a panoramic window.
Try on and display the bathtub
YouTube channel Cersanit Romania
After installing the drain fittings, the bathtub is ready for installation. But before you finally fix it, you need to level the product and mark the border of the side on the wall for subsequent fastening.
To do this, move the bathtub into its place and, adjusting the height of the legs, check the horizontal position using a level. There is no need to make any slopes towards the drain: they are already provided by the manufacturer.
The height of the bathtub is selected according to location. As a rule, the distance from the top of the side to the finished floor is approximately 60 cm. The main thing is that the siphon is 3–5 cm higher than the sewer socket, otherwise the drain will quickly become clogged.
YouTube channel Cersanit Romania
After preliminary alignment along the sides of the wall, you need to draw a line with a pencil. This mark is useful for mounting wall brackets and stops.
Installation errors
Fixing a cast iron bath
To avoid mistakes when installing a cast iron bathtub, it is worth studying the following recommendations.
Couldn't level the bathtub
The bathroom has an additional slope at the bottom, in addition to the main one, towards the drain. In this case, the risk of slipping and injury increases. You'll have to adjust the height again and try using spacers made of hard material.
Poor water drainage
This happens when sewer drain pipes are laid with a slight slope. For pipes with a diameter of 50 mm, the slope is 3 cm per 1 m of length, for 110 mm - 1.5 cm/linear meter. The water stagnates and it is difficult to rinse the bowl clean, without deposits.
The leg screws are overtightened
The mounting screws are specially equipped with wing nuts. This involves hand tightening. Overzealous use of keys and pliers leads to damage to the enamel. It cracks and cannot be restored.
Elastic pads lined
You cannot place elastic or fragile gaskets under the legs and bottom of a cast-iron bathtub. On rubber, the bathtub will begin to spring back and the joint near the wall will gradually open and water will flow in, and the soft or fragile material will simply be squeezed out under the heavy weight. The solution is to replace the gaskets in accessible places.
Flexible corners and silicone have lost their appearance
This happens over time. The surface turns yellow, and fungus appears in the silicone. You need to be prepared for this; they will have to be replaced approximately once a year. Silicone for these purposes should be chosen as sanitary, with antifungal properties. Tile borders are more durable.
Incorrect shelf position
When the bathtub is shorter than the partition for its installation, a decorative shelf is made. It is correct if it is located at the head, and not at the feet. This way less water gets on it and you can put something useful on it.
Mount the wall mount
Massive cast iron bathtubs stand confidently on legs and do not require additional fixation. But light steel and especially acrylic ones are also attached to the wall for reliability.
Acrylic and steel bathtubs
YouTube channel Cersanit Romania
Such bathtubs are most often fixed with brackets in the form of hooks on which the bowl is hung. Homemade metal profile stops for drywall are also used, which perform the same function.
YouTube channel "Alexander Cherepitsa"
In both cases, the fastenings are installed on dowels, for which holes are drilled. Using the line of the top of the bathtub, mark the holes for the stops so that they are strictly under the edge of the sides and evenly distribute the load.
Cast iron bath
Products made of cast iron weigh from 80 to 200 kg, so they stand reliably and do not require additional fastening.
DIY installation instructions
Assembly of legs and siphon
STEP 1. First of all, you need to place the bathtub on the side edge, having previously covered the floor with cardboard or fabric so as not to damage the coating.
STEP 2. The next step is to assemble and install the legs, how to attach them? Although each model comes with its own legs, the principle is the same everywhere . They consist of a wedge and an adjusting bolt. First you need to attach the wedge to the special eyes on the body; this is done using the bolt, washer and nut from the kit. Then the bolt itself is screwed into the wedge. The same is done with the remaining legs.
more detailed information about
installing legs in our special article .
STEP 3. Next you need to assemble and install the drain-overflow, it is also called a siphon with overflow. This is done quite simply:
- first, the drain is assembled: parts (7), (4) and (10) are connected to each other using a special nut, and it is important not to forget to install rubber gaskets (9), they will help avoid leaks;
- the overflow (14), (17) is assembled using the same principle, and then connected to the overflow nut (4);
- the structure is applied to the corresponding holes on the bathtub, gratings are laid on the outside and secured with bolts (5) and (20)
- Check the tightness of all nuts again.
In the picture, the conventional wall and bottom of the bathroom are indicated in red.
Rubber gaskets have different diameters, so carefully look at which one you need to install where. otherwise the siphon will leak.
How to correctly set the desired height from the floor?
Now the font needs to be turned over, put on its legs and moved towards the wall. This will definitely require the help of a second person. This must be done very carefully so as not to damage the tile. Next, we connect the assembled drain to the sewer. This can be done using the corrugation included in the kit.
How to raise it higher? The height of the bathtub is adjusted by twisting the legs; for this you will need a wrench. Adjust the right near leg so that the near right corner is at the required height, the optimal value is 60 - 65 cm .
Next, place a level on the front side and adjust the left near leg so that the level shows the ideal horizontal line. Carry out the same manipulations with the far legs.
Push the bathtub and check that it is not “playing”. If the legs are not adjustable, you will have to file them down or install steel plates.
A slope for draining water is provided in the design, so there is no need to make an additional one!
Examination
Next, the font must be checked. Fill it with water and then remove the stopper. Look under the drain, if there is water there, you need to tighten all the nuts well again , wipe off the puddle and repeat the procedure again. If history repeats itself, all that remains is to change the siphon.
Grounding
Many people forget about grounding, but in vain! After all, a font made of an alloy of carbon and steel conducts electric current, so it is necessary to equalize the potential. For this, a grounding conductor is used. On some bathtubs, for example models from the Roca brand, there is a special plate to which the conductor is attached using a regular bolt, but if it is not there, like with older products, you can clamp it with a leg nut, having first stripped one end of the wire.
It is better to use copper wire with a cross section of 2.5 mm2 .
On the other hand, it must be connected to the grounding circuit of the apartment. Grounding the bathtub is the safety of your family ; it must be approached with all responsibility. Therefore, be sure to read our article on grounding bathtubs, where all the nuances are described in detail.
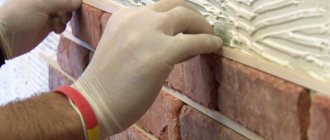
Sealing joints
The next stage of work is sealing the joint between the wall and the cast iron bathtub.
If the gap is small, just put on gloves, take silicone sealant and carefully work it along the entire joint.
Then wet your finger or rubber spatula and remove the residue. If the gap is quite wide, you will have to use sealing tape or a corner.
Screen
It is better to cover the space under the font with a special screen to make it look more aesthetically pleasing. There are many different models:
- sliding;
- mirrored;
- accordions;
- with shelves;
- from tiles.
Which one to install is up to you. Here you should be guided not only by aesthetics but also by ease of use.
Install mortgages
If the bathtub comes with a factory-installed screen, then the design already includes all the necessary fasteners. If not, you will have to install embedded parts into the front side, to which the screen frame is then attached.
YouTube channel “Ruslan Viktorovich”
To do this, you need to cut a piece of a wooden block and glue it to the inside of the side with silicone sealant or polyurethane foam. If the bowl is adjacent not to three walls, but to only two, another block should be secured to one of the free sides.
Some acrylic bathtubs already have ready-made embeds in the form of pieces of timber along the perimeter of the sides. If you see such pieces of wood, it means you can do without additional inserts.
Types of legs for bath bowls
The bath itself (or, as they also say, “bath bowl”, “bath tub”) rests on the floor with its legs.
Bathtub on tile floor
There are many options for legs, differing in mounting structure, size, and design. They are usually sold complete with mounting hardware. If desired, you can choose them to your liking.
Bath bowl legs
Each leg can be individually adjusted to adjust the installation height of the bathtub, its tilt and prevent vibrations from angle to angle.
Practical basic options
The main function of the legs is to hold the very heavy bathtub in a stationary position. The cast-iron bathtub itself is heavy, and almost a ton of water is poured into it and there is a person in it.
Additional legs provide immobility and stability, and guarantee against deformation if the bathtub itself is not cast iron, but acrylic.
Auxiliary and decorative models
Decorative ones serve only for decoration; they can generally be overhead. If the bathtub is covered with a screen, then decorative legs are not needed.
Decorative legs
Make thermal insulation
Acrylic and cast iron bathtubs retain heat well and do not require a layer of thermal insulation. Steel ones, on the contrary, cool quickly and are also very noisy when drawing water. Therefore, before installation, polyurethane foam, spray insulation or automotive sound insulation is applied to the bottom and walls of such bathtubs.
YouTube channel “Ruslan Viktorovich”
To do this, turn the bathtub over, wipe it with a damp cloth and cover it with foam, moving like a snake from bottom to top. The average consumption per bowl is 2–3 cylinders. The foam hardening time is 3–4 hours. After this, you can install the bath.
YouTube channel Valiev Andrey DIY
Sometimes, before applying insulation, the bathtub is pre-pasted with automotive sound insulation. The surface is degreased with a solvent, then the protective film is removed from the adhesive base of the sheets. After heating with a hairdryer, the sound insulation is glued to the bottom and walls of the bathtub, and then rolled with a roller.
Place the bathtub in place and secure it
YouTube channel “Pavel Sidorik”
Now you can finally install the bathtub in the prepared place and fix it using the selected fastener option, as well as seal the joint with the wall.
To do this, silicone sealant is applied to the wall just below the previously marked side line with a snake. Then the bathtub is carefully pushed into place. The sides adjacent to the walls are placed on installed brackets or profile stops. The bowl is pressed for a tight fit so that the sealant is slightly squeezed out.
Sealing of connections and joints
The next step in sanitary work will be sealing the joints between the walls and the bathroom. When moisture gets into the cracks, bacteria, mold or mildew can develop. If the cracks are narrow, no more than one and a half centimeters wide, you can use silicone sealant: just put on gloves and walk the material along all the joints. After this, use a wet finger or a soft, non-sharp spatula to remove excess. Sealant can be transparent, white or colored. If the gaps are large and wide, it is necessary to use sealing tape, ceramic or plastic corner. Before sealing, be sure to clean the surface from construction debris and dust, dry well and degrease the surface of the joints. Many people think that grounding is a waste of time. The bathtub is made from an alloy of steel and carbon. Therefore, it is necessary to equalize the potential using a grounding conductor. Some bowls have special plates for securing the conductor with a small bolt. When installing an old cast-iron bathtub, in which grounding is not provided, it is easy to do it yourself. To do this, use a wire with a copper core with a cross-section of 2.5 sq. mm. One end of it is stripped and clamped with a leg nut, and the other is connected to the grounding circuits of the room.
Connect to the sewer
YouTube channel “Repair in detail”
After installing the bathtub, the siphon is connected to the sewer pipe using a corrugated pipe or a rigid pipe with corner fittings. The latter option is preferable: dirt accumulates much less on smooth pipes.
The rubber seals of the fittings are treated with a special lubricant or ordinary detergent, and then simply connected to each other. If there are doubts about their quality, the joints can be coated with silicone sealant to be sure. But keep in mind that disassembling them in case of replacement will not be easy.
Do not forget about the slope necessary for good drainage! The siphon should be 3–5 cm higher than the sewer entrance. With a smaller drop, the water will drain, but due to blockages the drain will have to be cleaned more often.
9. Checking the quality of assembly and installing grounding
Now the test bath needs to be filled with water and then the plug removed. If water appears under the drain, you need to check and tighten each nut. Run the test again. If water appears again, change the siphon. Many people think that grounding is a waste of time. The bathtub is made from an alloy of steel and carbon. Therefore, it is necessary to equalize the potential using a grounding conductor. Some bowls have special plates for securing the conductor with a small bolt. When installing an old cast-iron bathtub, in which grounding is not provided, it is easy to do it yourself. To do this, use a wire with a copper core with a cross-section of 2.5 sq. mm. One end of it is stripped and clamped with a leg nut, and the other is connected to the grounding circuits of the room.
Make a support pillow
Cast iron bathtubs have sufficient rigidity, while lightweight acrylic and steel ones can bend slightly under heavy weight. And although manufacturers allow installation exclusively on legs, for greater reliability, many craftsmen install a support cushion made of brick or gas blocks under the base of such bowls.
YouTube channel "Pavel Sidorik"
To do this, take a full bath of water. Then the floor is slightly wetted, bricks or gas blocks are laid under the bottom. They are attached to the floor and to each other using cement mortar. There should be about 5–7 mm from the top of the pillow to the bathtub - this space is filled with polyurethane foam. If the layer is larger, then over time it may sag and the support will stop working.
Complete hardening of the polyurethane foam takes about a day. All this time, the bath must be filled with water, otherwise the foam, as it expands, may raise the bowl.
Don't forget about grounding the bathtub in your apartment!
Grounding a cast iron bathtub is an important installation step that is often ignored.
Today, a lot of electrical appliances are installed in the bathroom, which, in conditions of high humidity, are a source of serious danger for residents.
The bath is grounded by connecting a special conductor to it, equalizing electrical potentials.
For grounding, a rigid PVC-insulated wire with a cross-section of at least 6 sq/mm is used. The cable must be long enough (at least 2 meters).
If you purchased a new cast iron bathtub, it is already equipped with a special jumper designed to attach the ground wire.
It is recommended to entrust the work of installing grounding to a professional electrician, since your future safety depends on it.
Mount the screen
After the work is completed, the space under the bathroom is covered with a screen. This can be a ready-made complete decorative panel, a purchased universal screen, PVC panels, as well as tiles on plasterboard mounted on a frame.
YouTube channel Cersanit Romania
The factory screen is attached to the walls and sides with latches, like a bathtub: holes for fasteners are marked according to the diagram in the instructions and fixed with dowels. The screen is then placed on the hooks and held in place.
For homemade versions, a frame is pre-built from wooden beams or metal profiles. The upper part of the frame is attached to wooden embedded sides, the lower part is attached to dowels or silicone sealant to the floor. Next, racks are installed between them in increments of 40–50 cm.
YouTube channel "Alexander Cherepitsa"
When laying tiles, the frame is pre-sheathed with sheets of moisture-resistant plasterboard. A screen made of PVC panels and other linear materials is attached directly to the frame.
If the screen is not removable, it is necessary to install an inspection hatch in the siphon area for maintenance. It is important to position the window so that access to it is not blocked, for example, by a washbasin cabinet.
Types of bath fixtures
Several materials are used in construction to create high-quality and durable bath supports:
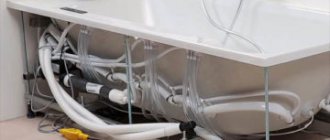
- Polyurethane foam. The simplest option is to fix the bathtub on the floor or against the wall. The essence of this method of fastening is as follows. It is necessary to level the level, determine the optimal height of the bathtub, and then connect it to all communications (water supply and sewerage). Then the structure is installed so that the distance from its wall to the wall of the room is about 1 cm. To make the structure more stable, you should fill it to the top with water. Now you can fill all the free space that is formed between the plumbing and the wall and floor. It will be possible to begin finishing work within 6-8 hours after the preliminary work (although the foam will completely harden only after a day).
Polyurethane foam: the best option for mounting a bathtub on the floor or near a wall
- Metal frame. You can secure a small bathtub using a metal frame. It can be either homemade or one of the accessories for the bathtub. The metal “skeleton” is attached to the plumbing structure using self-tapping screws. Additional strips can be installed along the wall, which will increase the reliability of the structure.
- Brick frame. This type of support is most often used in cases where the bathtub does not have legs. But you can use brick together with them: the structure will have more stable support. Brick laying is carried out both along and across the bathtub. If the masonry is transverse, the bathtub is installed directly on the brick. The corners are attached to the wall using steel dowels. The bathtub should also be installed on these corners. If the masonry is carried out lengthwise, the product is also placed directly on the brick, but polyurethane foam is used as additional support for the wall.
- Insert into a niche. This is the best option for fixing the bathtub when it comes to renovations in a small room, where every centimeter counts. This type of fastening is considered one of the most reliable and at the same time difficult to implement. A groove/slots are made in the wall into which the sides of the bathtub are inserted and reinforced (if necessary) with polyurethane foam.
Advice. When working with polyurethane foam, you should act very carefully, using a reasonable amount. Remember that it tends to expand and fill all available space.
Brick frame: the best option if the bathroom has no legs
Design the side joint along the contour
YouTube channel Cersanit Romania
The final touch in installing the bathtub is sealing the joints using silicone sealant. It is better to choose a white composition to match the color of the bath. Transparent will not look very neat.
Apply a layer of sealant along the contour of the bathtub, and then lubricate the sides and wall with soapy water so that the silicone does not smear when leveling. The excess is removed with a special spatula or a plastic card with a cut corner.
Necessary preparations and tools
A cast iron bathtub is a rather heavy object and the base for its installation must be strong. The best option is a concrete screed covered with thick ceramic tiles.
When installing on bases with insufficient strength, it is recommended to use steel pads made of sheets 5-10 mm thick under the legs.
The walls are finished before installation, if this is a major renovation, or only the wall behind the bathroom is tiled to recess the edge and reduce the gap. You can make a groove into which to insert the edge of the font. The gaps are sealed after installation is complete.
It happens that the bathtub does not fit in size or the contour needs to be aligned. It needs to be cut, but how? Cast iron and enamel can be cut well using a grinder and a cutting wheel. The cut is cleaned with a coarse-grained disk, and then with small fractions along the entire perimeter.
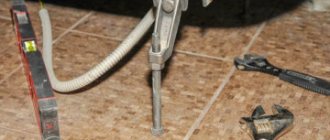
For installation you will need:
- cast iron bowl with legs and a set of fasteners;
- building level;
- hammer and wrenches;
- wooden block for temporary support;
- marker and border tape;
- silicone sealant;
- siphon with gaskets;
- plastic baseboard.
In some cases, red bricks and cement mortar may be needed.