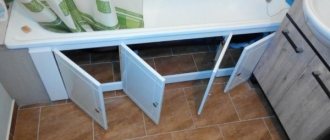
The traditional scheme for installing a bathtub on legs is not always able to guarantee the stability of the structure. The screw fastening begins to loosen under load over time, thereby reducing static. Therefore, the most reliable installation of a cast iron or steel bowl is on strong supports made using brickwork.
If you decide to replace the bathtub, but don’t know where to start and how to implement everything correctly, we will tell you how to install a bathtub on bricks and whether you can do it yourself.
Also, in the article you will find step-by-step instructions for installing supports for various types of plumbing fixtures. To make it easier to understand, the material contains thematic photos and videos.
Advantages of the method
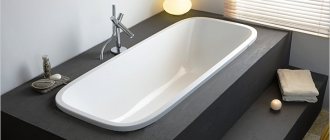
From the photo, installing a bathtub on bricks looks attractive. This method is suitable for fastening containers made of steel, acrylic, cast iron, which can be done independently. It is advisable to choose a red solid brick that can withstand heavy weight, exposure to water and harmful microflora.
Although every bathtub has standard metal legs, craftsmen install plumbing fixtures onto a brick base. This is necessary to evenly distribute the load and ensure greater stability. This installation method has the following advantages:
- Sustainability. During installation of structures, high-quality stability is ensured. This indicator is especially important for steel and acrylic products, which are light in weight. Models made from these materials, if fastened poorly, wobble, wobble, and slide, which is unsafe.
- Protection against wall deformation. A solid base that supports the bottom prevents deformation of the walls, so the enamel can last a long time. The walls of thin-walled structures deteriorate from weight, causing the enamel coating to crack and then peel off. This method eliminates noise during water collection, which is usually observed with metal bathtubs.
- Versatility. Brick legs are installed on all bathtubs, regardless of weight, shape, size. In addition, the method will help raise the container to any height.
Installing a hot tub on bricks yourself will cost more than mounting it on standard legs. Costs consist of the price of bricks and cement-sand mixture. Since the least amount of material is needed to create brick pillars, this method is not much more effective than the classic one.
Brick laying
The first step in making a bathtub with your own hands is laying the bricks. For work, use ordinary sand-lime brick or red ceramic. The laying is done in one row using moisture-resistant concrete grades mixed with water in a ratio of 1:4.
Brick laying
Since there is high humidity in the bathtub, experienced professionals recommend using a solution with antiseptic additives that prevent the formation of fungus or mold. To make the walls of a brick font, you will need a trowel, a construction mixer, mixing containers, a mop and a level. This operation is performed in the following order:
- The bathroom floor is cleared of debris, the old decorative covering is removed down to the concrete base and leveled.
- The siphon is connected to the sewer system, the pipes are replaced, since after completion of the work it will be impossible to get to them.
- Lay out the sides of the font of the desired size and height. The correctness of the masonry is constantly checked using a building level.
Checking the bath level
- The seams between bricks should be 0.8-1.2 mm. Excess mortar that extends beyond the seam is removed before it hardens.
Important! Before laying out the walls of the bathroom, you need to wet the brick with water. This operation prevents water from being drawn out of the cement mortar and loss of structural strength. It is recommended to soak for 24 hours.
Masonry options
Masonry under the bathtub is different. This is determined by the specifics of the room, the characteristics of the bath, production needs, capabilities and imagination of the person. The following types are popular:
- Two supports in the form of small walls. Usually they are made with a concavity at the top in the shape of the vessel.
- A solid pedestal that serves as support for the base.
- Brick walls around the edges of the tank. This type is often used during the installation of a corner acrylic structure.
There are no significant differences in the technology for creating these masonry structures. The differences are only in the amount of material and the amount of labor. Although debris will still appear during bathroom removal, cleaning and preparation are considered essential procedures.
If you plan to install a brick base, but an old bathtub is placed, dismantling is carried out first. The work must be done in special clothing and protective equipment. This job is dirty. Before dismantling, communications are turned off: the water taps are turned off. You also need to take out supplies and accessories.
Furniture is removed from the room, plumbing and sanitaryware are dismantled. The room is cleared of anything that will interfere. Often, when dismantling a bathtub, a major renovation is carried out, so tiles, tiles are removed, paint and other facing materials are removed. Everything is done quickly. These works allow for high-quality repairs.
Tips for further use
Special measures during the further operation of the brick base consist of protecting the masonry and mortar from the spread of fungi and mold in conditions of high humidity. This is facilitated by insufficient ventilation of the room.
Mold spreads not only over the surface, but also sends threads deep into materials, destroying the building. Therefore, the floor and walls under the bathroom are treated with antiseptics.
Do not forget about grounding the bath to protect a person from electric shock when using electrical appliances: washing machine, hair dryer, electric razor.
Preparation
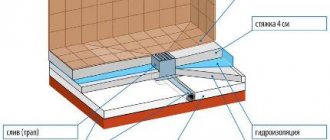
Installing a bathtub on bricks without legs with your own hands begins with preparatory work. You should pay attention to floor leveling and waterproofing. If tiles are to be laid, cement mortar is needed for strength. Installation of an acrylic bathtub on bricks, like a steel container, is carried out using the same technology.
Due to the weak construction adhesive mixture applied using the ridge method, small voids remain under the tiles. This position should not be allowed to prevent the tiles from cracking or breaking under the weight of the bathtub. The walls are tiled with tiles when large structures are installed. The service life of the bathtub will be long if the work is done well.
Installation features
Work begins with dismantling the old bowl. Usually, when replacing plumbing fixtures, they make a major renovation of the room, so they remove the old tiles, a layer of oil paint, disconnect the device from communications and take out the trash to free up the work space.
Measure the length, width and depth of the bath. To correctly determine the location of the supports, step back 25 cm from the middle of the bowl.
The preparatory stage consists of checking the horizontal level of the floor of the cleaned room and applying the necessary screed from the solution to level it. Waterproofing made of ceramic tiles laid on a mortar will help protect the ceiling from leaks as much as possible. To prevent the coating from subsequently cracking under the weight of the sanitary device, the solution must be applied in an even layer.
Why is it required?
Installing a bathtub on bricks is not a new solution; this method has been in demand for decades. This is a reliable method in which the structure is securely fixed, stable, will be installed in the required place, and will be used for a long time.
As can be seen from practice, bricks are a more durable option than the “original” legs that are included in the kit. After 10-12 years, the supports become warped, after which deformation of the product is observed, due to which the water does not completely drain into the sewer after water procedures. If a bath is taken by a fat person, then only with brick supports will you be sure that the product will withstand. Over time, the legs rust, which does not threaten the bricks.
Installing a bathtub, how to install a bathtub on a brick
If you have a steel bathtub, install spacers before installation. Usually one person cannot handle the installation; ask 1-2 people for help. Carefully place the level on the bottom of the tub.
Then grab it from different sides, lift it and lower it onto the bricks. Do not forget about bathtubs, which may already be adapted to a favorable drainage. The level is used only in the classic version. This is when the bottom is parallel to the floor.
Well, if the bathtub has slopes inside, then using a level the correct location is noted from the outside. Do all the work slowly, don't rush anywhere. Do not forget about the tight fit of the bathtub to the wall. Talk each action out loud with your partner.
Next you need to check for strength and durability. Grab onto any edge of the bathtub. Then carefully try to move it to the side. It's like you're trying to turn it over. If it moves a little, errors were made during installation. Understand the problem and carefully inspect the entire structure. Maybe somewhere you need to lay another brick, or it’s better to use more mortar and sealant.
Materials
To install a bathtub on bricks with high quality, it is not necessary to buy a lot of expensive electrical accessories or cheap materials. To do this you will need:
- bricks - at least 15 pcs.;
- sand, dry cement, containers for obtaining the mixture;
- sealant;
- metal profile, grinder, self-tapping screws;
- trowel;
- level;
- protective rubber gaskets.
The sealant should be taken as a tape sealant, which simplifies the work of sealing the seams. Bricks should be red or white, which do not have voids inside. Protective gaskets are only necessary for a steel bathtub, and the number of bricks is increased, since the weight of such a structure is greater. A level is needed to install the container horizontally.
Location in the room
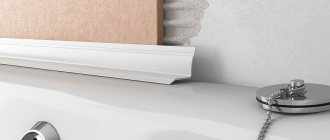
Before installing the bathtub on bricks, you need to make sure that the container fits snugly against the wall. Otherwise, water will pour into the distance between it and the structure, which will cause mold to appear. The ends of the container should touch the walls tightly, so after installation the gaps must be filled with sealant. It is important to determine at what height it is more profitable to place the structure. The indicator will be equal to the height of one brick.
The bathtub must be tilted towards the drain to prevent water from stagnating. It is advisable to create brick racks, and the height of the rear ones should be 19 cm, and the front ones - 17. If the container is made taking into account the slope for drainage, then there will be no need to lay out racks of different heights.
Erection of a support for a cast iron bathtub
Cast iron bathtubs, used everywhere in Soviet times, do not lose popularity today. And the secret of popularity is easily explained by the high heat capacity of the iron-carbon alloy.
The heavy weight of the product itself plus the weight of the person in it, with unreliable support, can cause the plumbing to become distorted during operation. And this will entail a violation of the angle, the likelihood of depressurization of node connections and difficulty in the normal drainage of waste water into the sewer.
For all its advantages, cast iron structures are very heavy; the same bath measuring 160x80 cm with a bowl depth of 50 cm will weigh about 100-120 kg
A cast-iron bathtub installed on bricks can be freely used for water procedures by a person of almost any body type, without fear that the walls will bend and the bowl will warp.
As a supporting structure you can build:
- two separate platforms;
- several pillars on the sides and corners of the bowl;
- continuous brickwork around the perimeter of the product.
Due to the heavy weight of the structure, the installation of a cast-iron bathtub on bricks is carried out only by two people. The work is carried out in several sequential stages.
The specific moments of installing a cast iron bathtub on a brick base are demonstrated by a selection of photos:
Image gallery
Photo from
Moving the mixer to a convenient height
Siphon of a bathtub bowl raised on bricks
Rules for laying bricks under the bathtub bowl
Recessing the side of the bathtub into the groove
Selection of tools and materials
To erect a supporting structure for a cast iron bathtub, you should prepare:
- bricks;
- concrete grade M:400;
- sifted river sand;
- tile adhesive;
- tape sealant.
Bricks can be white silicate, made from pressed sand, or red, burnt, made from clay. The main thing is that they do not have empty spaces inside.
The number of bricks should be taken on the basis that on average it takes up to 10 bricks per support, and to securely fix the bowl you will need to build 2-3 such supports
Additionally, you will need about 20 bricks for laying along the edges of the bed - the recess.
Tools you will need:
- Master OK;
- building level;
- container for mixing the solution;
- grinder and self-tapping screws.
To prevent chipping of the brickwork, protective rubber gaskets can be laid between the bottom of the bathtub and the upper edge of the erected supports.
It is recommended to glue the areas of contact between the steel bathtub and the brick supports with Guerlain on a fabric basis. For cast iron containers, sizing is not necessary. In order to reduce noise from accumulating water, the bottom of steel plumbing fixtures can be completely glued
Preparation of the base and carrying out measuring work
Before installing the bathtub on the bricks, remove the covering from the floor to the base base. If necessary, cracks in the floor are cleaned and sealed with cement mortar. If the base floor is uneven, it is better to screed using any inexpensive method than to adjust the position of the plumbing by laying down scraps of board or something similar.
It is also necessary to consider how the bowl will be located in relation to plumbing equipment, water sockets, drains and household appliances. Measure in advance the distance from the rear end of the container to the opposite wall of the bathroom.
If there is a gap between the side of the container and the wall, you can always fill it with bricks, and fill small voids with sealant
When taking exact dimensions, you should clarify:
- length and width of the product;
- the depth of the bowl (if it changes from one edge to the other, then the depth should be measured on both sides);
- the distance from the intended installation location of the supports to the ends of the plumbing fixtures.
When calculating the dimensions of the structure, it should be taken into account that the height of the upper edge of the bathtub will reach 55 - 70 cm. The specific height is determined according to the conditions for the convenience of taking hygienic procedures in the bathtub for people of any age, build, and physical limitations, if any.
To optimally calculate the distance between the support posts, you should mark the center of the bowl and step back 25 centimeters from it in both directions
The height of the front stage will be 17 cm, and the stage located on the opposite edge will be a couple of centimeters higher.
If the bowl is already designed taking into account the slope for unobstructed drainage, then there is no need to lay out racks of different heights.
Approximate heights of brick racks with the sides of the bath at a height of 60 cm: 17 cm for the front support and 19 cm for the back
There is no need to artificially form the slope of the bowl, because some reduction towards the drain is inherent in the design.
At the end of the measuring work, you should record on paper the distance in centimeters from the overflow hole to the bottom of the bowl.
The standard distance between brick supports for a bathtub is 50 - 60 cm. This distance allows you to arrange niches at the bottom for basins and other accessories. For wide bathtubs, the spacing of the supports should be reduced and their number increased
Carrying out masonry with cement mortar
To prepare the solution, the cement mixture is diluted with sand in a ratio of 4:1. Water is added during mixing until the mixture has a creamy consistency.
Having laid out the first row of bricks of one support until the mortar has acquired the necessary strength, use a level to level the masonry. After this, lay out the second row, followed by horizontal alignment, then the third.
In order not to waste time and effort on leveling the mortar and adjusting the seams to the specified parameters, you can use tile adhesive in brickwork instead of the traditional binding composition
At the upper level of the support, mortar is laid out on the outer sides of the masonry to a height of half a brick. For good adhesion of the cement mortar to the building bricks, it is necessary to allow the erected supports to “settle” for at least the first two days.
Otherwise, under the heavy weight of the iron bowl, the newly erected racks will shift or even collapse.
Before installing the bathtub, mortar is laid on the brick supports. It is also laid along the sides of the bathtub adjacent to the walls
It is also possible to build a solid stand made of bricks. It is constructed between the four legs of the product.
The solid stand is a straight brick platform equipped with grooves that comfortably accommodate the bottom of the bowl. When laying out the “pillow”, you should also take into account the slope towards the drain.
Creating such a support will require more materials and time, but the reward will be confidence in the stability and durability of the installed plumbing fixtures
Installation of siphon equipment
A siphon with an overflow is mounted on a bathtub that has not yet been installed on supports. To do this, the bowl is placed on its side. The drain hole under the siphon is equipped with silicone gaskets and treated with sealing agents.
Since replacing a siphon in an already installed cast-iron bathtub is not an easy task, at the installation stage a product should be selected of high quality, giving preference only to trusted manufacturers
The bowl is placed on a leveled base, guided by the level. The outer edge of the bathtub should be half a centimeter inside. This helps prevent water from overflowing onto the floor of the room.
The outlet pipe of the siphon is connected to the sewer pipe.
The drain and sewer hose can be connected in two ways:
- hard - involves the use of a plastic pipe equipped with elbows at an angle of 45° and 90°;
- flexible - through a plastic movable corrugation.
To ensure a tight fit of the outlet pipe to the sewer pipe, the connecting elements are covered with a layer of sealant.
For any assembled installation method, the outlet siphon hole must be located above the location of the outlet pipe of the sewer pipe
In order to reliably seal the holes and prevent water from leaking during emptying of the bowl, the applied composition must be given enough time to dry and harden.
Before installing the bowl on the brick pedestal, spacers are placed at the points of contact with the supports. Having placed the container on the supports, use a level to check the horizontality of the sides. The sides in the longitudinal direction must be strictly horizontal.
If the container does not have special recesses along the perimeter of the sides for water drainage, then in the transverse direction the control of the horizon should show some deviation. Then the bathtub should be installed so that the outer side is higher than the inner side adjacent to the wall by about 0.5 cm. This deviation will reduce or completely eliminate splashing on the floor.
Attaching the bowl to the walls of the bathroom
The edges of the bowl are placed as close to the wall as possible. To check the stability of the structure, take the edge of the bathtub and make several movements from side to side, as if trying to rock it.
If the structure has moved due to instability, you need to inspect the supports and, if necessary, place pieces of brick under the bowl, securing the new parts with tile adhesive or cement mortar.
Installation of the bowl should be carried out slowly, carefully checking and coordinating every movement with your partner
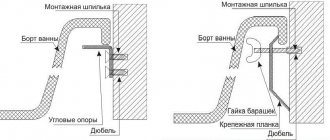
If desired, the sides of the structure are fixed using a metal profile, “placing” it on dowels and screws. But most often craftsmen limit themselves to filling the voids with tile adhesive or mortar.
For greater strength, the side surfaces of the bathtub adjacent to the wall can also be coated with tile adhesive. This adhesive edging will seal the seams and create a strong “tub-wall” connection.
To ensure correct installation, first fill the bowl completely with water and then open the drain. Ideally, water should drain quickly and freely, and no leaks should form in the area of the joints. If the water does not drain so quickly, there is a distortion.
Finishing of plumbing fixtures
The final design of the plumbing depends only on the interior of the room and the preferences of the master.
Ideal for cladding:
- sheets of moisture-resistant plasterboard;
- ceramic tiles or porcelain stoneware;
- wall panels made of plastic or PVC material;
- ready-made decorative screen.
The only requirement for the facing material is that it be resistant to moisture.
The tiles can be laid on the same cement mortar or on a special tile adhesive. To increase the adhesion of the finishing material to the walls, the surface should be pre-treated with diluted PVA and the addition of sand.
When carrying out finishing work, it is important to leave a working hole to ensure free access to the siphon for routine inspection and repairs.
You can use the bathroom as soon as the cement-sand mortar has hardened. The waiting period can last from two to five days.
Installation of supports
We continue to install the bathtub on bricks with our own hands. When measurements have been taken and the placement area has been marked, we begin to prepare the sand-cement mortar. For this you need cement and sand in a ratio of 1:4.
First, the first row is laid for one support and leveled until the mortar is dissolved. This procedure is carried out by level. Then bricks of levels 2 and 3 are installed. At the end of the construction work, 1/2 bricks should be placed on the mortar along the outer parts so that there is a recess in the shape of the bathtub. It takes a day to harden.
Do not rush to place the bathtub on dry masonry; first you need to install a siphon with an overflow. To do this, turn the iron bowl upside down and use any sealant to treat the water holes. Then the siphon with overflow is installed independently, and then the container is installed on a brick pedestal.
Articles on the topic
How to insulate a half-brick house with mineral wool and expanded polystyrene?, instructions, advice from masons
Mosaic with bricks - preparation, masonry features, instructions, advice from masons
Cladding a house made of aerated concrete with bricks - masonry, disadvantages, instructions, advice from masons
Columnar brick foundation - technology, disadvantages, instructions, advice from masons
Cladding a house with bricks - how to calculate how much material is needed, instructions, advice from masons
Strengthening the foundation of a brick house - how to do it, instructions, advice from masons
Waterproofing a brick plinth - horizontal, vertical, instructions, advice from masons
Brick sides - what they are called, characteristics, instructions, advice from masons
Reviews ()
Installation
Before installing the iron bathtub on the bricks with your own hands, you need to place gaskets. It is advisable to do the work independently by two people, or even better – by three people. First, a level is placed at the bottom of the container. The structure is then lowered onto the bricks.
A bathtub is installed level this way only if its design is classic - the bottom is horizontal. If the bottom is made with a slope, then the level must be applied not inside, but outside. The procedure is performed slowly, without haste. It is important to ensure that the edge fits snugly against the walls.
The next step in installing a meter-long steel bath on bricks will be to check the strength and stability. You need to grab the edge of the container and pull it gently to the side, as if rocking. If movement is observed, then the structure is uneven, then you need to inspect the work and place a piece of brick; if necessary, strengthen it with mortar or glue. If desired, the edge can be glued to the wall with a profile or fixed with dowels and screws using a profile.
We measure sizes
First of all, you need to check the surface on which the bath will be located. If there are gaps and cracks, they need to be cleaned and sealed with cement mortar.
It is also recommended to measure with a level and level the floor with a screed if it is uneven.
Undoubtedly, it is better to carry out this procedure right away rather than suffer afterwards, fixing the location of the plumbing with the help of boards or any auxiliary materials.
The next step is to take the dimensions of the bathtub. Need to measure:
- length and width of the font;
- depth of the bathing tank;
- distance from the installation site of the supports to the ends of the bath. If difficulties occur when measuring the distance between the rows of bricks, you need to measure a distance of 25 centimeters in both directions from the middle of the bathtub. Brickwork should be located at the resulting points;
According to the rules, when measuring the dimensions of the bowl, it is necessary to take into account that the height of the bathtub from the floor should reach 55 - 70 centimeters.
Determining the required height is simple - you need to understand how it will be most convenient for home owners to take water treatments directly and choose the result obtained.
It is also necessary to remember that there is no need to form a slope of the font towards the drain hole, since modern bathtubs are already equipped with a slope at the factory.
Upon completion of measurements, it is recommended to record all data on paper.
Fixing and installing the pipe
To install a steel bathtub on bricks, additional support points are needed, since bathtubs are light and unstable. It is advisable to make a wall or brick racks under each of the 2 nearest corners. If the container is adjacent to the wall on only one side, then it is necessary to build walls, and if the steel vat is limited on 3 sides, then brick columns are needed.
The next step in installing an acrylic bathtub on bricks is to attach the drain to the sewer pipe sleeve. You need a plastic pipe and an elbow with angles of 90 and 45 degrees. A flexible plastic corrugation is connected to the sewer outlet. This must be done tightly so that nothing leaks out when the water is drained. For a tight fit, sealant is used. It needs time to dry and harden, otherwise it will not be able to properly seal all the holes.
Installation of a cast iron bathtub on bricks is carried out according to the above rules. After this, the reliability of the connections must be checked. To do this, fill the container with water and open the drain, after which you carefully monitor what is happening. It is important that water is removed quickly and freely, in the area of the joints and under the bathtub so that it does not drip. The check is performed 2-5 times, after which the structure should rest, and then you need to repeat filling and draining the water.
Facing
To give a brick bath an aesthetic appearance, it must be lined with decorative material. The cladding, on which the service life, appearance and convenience of the hot tub depends, must have 3 qualities: moisture resistance, impact resistance, and durability. For finishing you can use:
- Mosaic. Ceramic mosaic is an excellent material for cladding a brick font. It does not absorb water and is small in size, allowing it to cover bathtubs of complex shapes. However, when working with your own hands, it is better to abandon this idea, since finishing will take a lot of time.
Bathtub tiling with mosaic
- Ceramic tiles. Ceramic tiles are also suitable for lining a brick font, but working with them is easier and faster. The disadvantage of this material is that it will not be able to finish bathtubs with curved, complex shapes.
Tiling
- Liquid acrylic. To give an aesthetic appearance, the inner surface of the font is coated with a compound based on liquid acrylic. It gives the surface smoothness, glossy shine and a beautiful, rich color. Liquid acrylic dries in 3-5 days.
Some craftsmen use a combined method of lining a brick washing container, which can be used when working with your own hands. It consists of finishing the outer surface with ceramic tiles or mosaics and then filling the inner surface of the bowl with liquid acrylic.
Recommendations
It is important to follow the process of installing a bathtub on bricks. Errors can lead to negative consequences:
- The top of the product should not be higher than 60 cm from the floor. Many novice craftsmen make mistakes in this, which shortens the service life of the product.
- It is necessary to pay attention to the angle and direction of tilt. This is required to correctly calculate the placement of sewer pipes. Errors can lead to difficulties with draining water. Typically the difference between the heights of the sides is 2 cm.
- When forming a pedestal, it is important to take into account the dimensions, configuration of the product, as well as the material. The most difficulties will be with cast iron and metal structures. They are heavy, which creates a load on the base.
- You should not fix the bathtub immediately after completing the brick support. Drying is done first.
- Sometimes, using construction foam, not only the brick base is processed, but also the outer part of the product. This is necessary for high-quality sound insulation. It is not necessary to coat an acrylic product, since it already has good sound absorption.
- You can adjust the angle of inclination using pieces of bricks and cement mortar. If you have to work with an acrylic container, it is important to ensure that the sharp corners of the brick fragments do not puncture it.
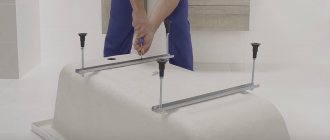
Construction of racks for a steel bathtub
The weight of steel plumbing, in contrast to cast iron bathtubs, is only about 50 kg. But the light weight of the plumbing fixtures is a key reason for its instability. The products often come with legs.
Therefore, you can install a steel bowl in two ways:
- Only on brick supports without legs and additional frames.
- Combined installation , involving the use of both brick supports and the legs of the product.
Supporting support points can also be constructed by constructing a pier.
Installation of a steel bathtub can be done using a combined method: using steel legs and brick supports. It is recommended to additionally fasten the steel bowl to the walls or support box with self-tapping screws through the rear corner
When determining which is better, a wall or support posts, focus on the location of the plumbing equipment. If the steel bathtub is adjacent to only one wall of the room, build a wall. If its bowl is limited by three walls of the bathroom, then brick columns are quite enough.
Preparing the necessary materials
Materials you need to purchase in advance:
- bricks;
- concrete grade M:400;
- metal profile;
- water-repellent impregnations;
- roll guerlain;
- tile adhesive.
Guerlain is a plastic roll material made of foamed polyethylene based on bitumen sealant. The material perfectly insulates steel.
Due to the presence of an adhesive layer on one side, Guerlain brand thermal insulation is convenient to apply to untreated vertical surfaces and to use for insulating joints
Since a significant disadvantage of steel bathtubs is their noise during the filling process, in order to reduce the noise, craftsmen recommend foaming the outside of the bowls with polyurethane foam. To foam a bathtub, on average it takes 1.5-2 cylinders with a volume of 65 liters.
Support legs for increased height
Often there is a desire to raise the bowl above the standard distance from its top to the leveled floor. This happens when carrying out repairs if the part of the floor free from plumbing is already equipped with a water-heated floor system. It is necessary if the builders made a mistake with the location of the drain or the owners want to slightly adjust the small height of the container.
When planning to use the installation scheme on rising posts, the first step is to screw the legs to the bottom of the bowl. To do this, the legs are inserted into a specially drilled hole and fixed using connecting elements.
Having determined the place where the bathtub will be located, we begin to measure the plumbing. To do this, measure the height of the space between the bottom of the bowl and the floor, as well as the width between the legs. Based on the measurements, locations for brick support posts are outlined.
The height of the racks is made such that the distance from the top edge of the bathtub to the floor is the required number of cm - read more in this material. Most often, additional supports of one or two bricks are sufficient.
To ensure free flow of waste water into the sewer, the bowl is placed at a slight inclination towards the drain hole
The distance between the erected brick racks is determined by the same size between the screwed legs. But for steel plumbing, which is distinguished by its lightness and flexibility, it is recommended to supplement the low columns with the above-described full-fledged brick supports in the middle of the tank.
The shape of the supports is made in accordance with the dimensions of the bottom of the bowl.
After all, the configuration of bathtubs on sale can be very diverse:
- oval and beveled;
- triangular under corner model;
- rectangular with slightly rounded corners.
The brickwork of the supports is carried out using the same technology as when constructing racks for cast iron plumbing.
If the shape of the bottom of the bowl allows you to make racks, the upper edge of which has not a semicircular, but a flat surface, you can use moisture-resistant plywood to create a flat base plane.
To do this, a cement “cushion” is formed on top of the racks, the top layer of which is laid out with pre-cut sheets of moisture-resistant plywood.
The bathtub bowl is installed on top of the constructed structure as soon as the cement mortar of the supports acquires the necessary strength.
Foaming a steel bowl
The most convenient way to blow foam on the bathtub is to turn it upside down. Before carrying out work, wipe the surface with a damp cloth or sponge. The foam is distributed around the perimeter of the bowl, gradually covering areas of 0.5 square meters.
Using a special gun when applying foam, you can reduce material consumption by up to one and a half times. With its help, it is convenient to regulate the amount of incoming foam and the degree of its expansion.
The space around the technological holes 1.5-2 centimeters wide is left untreated in order to freely connect the siphon in the future
It will not be difficult to cut off the excess applied foam when it hardens using a construction knife. When treating the bottom of the bathtub, the installation sites on the brick racks should be left unfoamed. This is due to the fact that over time the foam may sag and the bathtub will become less stable.
Sealing spatial gaps
Having installed the bathtub on the supports and connected the siphon and drain/overflow to it, we begin to process the spatial gaps.
To seal the resulting cracks and improve the adhesion of the sides of the bathtub with the cement mortar, the bricks are covered with rolled guerlain. The fabric layer included in the composition of guerlain acts as a kind of compensator between the bathtub body and the cement mortar.
Such a separator is necessary in order to change geometric parameters depending on temperature changes
To eliminate air zones between surfaces and better adhesion of materials, tile adhesive is applied to the interlayer in one layer. The easiest way to seal small cracks is with liquid cement diluted with tile adhesive.
To enhance the reliability of adhesion between the bottom of the bathtub and the dried brickwork, blow foam. The joints between the edges of the bathtub, the decorative screen and the wall are sealed with transparent sealant. After hardening it will be almost invisible.