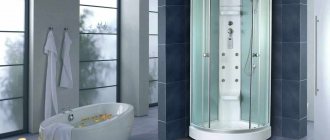
The design of a shower cabin with a tray includes a number of parts and assemblies that provide water supply, protection from splashes and drainage of contaminated liquid. When installing equipment, the design features of the elements are taken into account. For example, some of the cabins have a roof panel with lighting and a ventilation system, while in others light curtains replace glass doors.
What is attractive about the design of a shower without a tray?
Models without a tank have the following advantages:
- the cabins have a compact design, which significantly saves space and makes it possible to install a shower even in very small rooms;
- a tiled shower without a tray in an apartment is easy to use. It has a minimal risk of injury: the absence of high sides is suitable for bathing small children, the elderly and people with disabilities;
- ease of care: cleaning the coating does not require the use of special detergents;
- the ability to independently create an original bathroom interior;
- economical and long service life.
The disadvantages of the structures include the need to raise the floor (or deepen it).
Close or open
All models have closing doors with magnetic locks . After water procedures, it is better to leave the doors ajar . This will prevent the appearance of fungus inside the structure. Excess moisture will evaporate faster and will not leave a cloying odor.
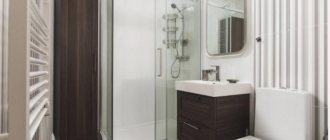
Photo 2. Equipment: 1) pallet; 2) back panel; 3) upper dome; 4) door guides; 5) vertical stand; 6) sliding doors; 7) pallet apron.
Features of a shower without a tray
The key difference between designs of this type is the absence of a reservoir bowl with sides.
One of the main features is the high requirements for the evenness of the cladding surface. At the slightest change in altitude, water will accumulate in the bathing area, which can lead to leakage or the appearance of an unpleasant odor.
Schemes for arranging showers without a tray
How to make a shower without a tile tray? The cabin can be “hidden” into an existing niche in the room. If it is not provided for by the floor plan, it is constructed by installing partitions or partitions.
A convenient and rational location option is to install taps, a watering can and a drainage system in the corner of the bathroom.
The compactness of the design makes it possible to locate the shower along the walls of the room.
The swimming area can be protected from splashing water with doors, walls and ceiling made of glass or plastic.
When installing a cabin enclosure that completely encloses it on all sides, it is necessary to install an additional ventilation system.
How to remove water from a shower floor without a tray?
The element responsible for draining water from the shower floor is the drain.
Depending on the material used, drainage systems can be:
- plastic - most often used when installing showers, due to the simplicity and convenience of the installation process. The material is lightweight, does not corrode and can withstand significant loads. The disadvantage is low resistance to high-temperature wastewater;
- made of stainless steel - suitable for use in premises with high sanitary and hygienic requirements (catering establishments, including schools and preschools, swimming pools);
- cast iron - installed in the premises of industrial enterprises. Such systems are durable, have good throughput and can withstand a wide range of temperatures. Due to the significant weight of the products, installation is associated with high labor costs.
Depending on the location and type of reception, the ladders can be:
- point - water is drained along an inclined plane into a funnel connected to a sewer pipe. The drainage system is installed in the center of the shower, in the wall area or in the corner;
- linear - a long gutter with a rigid grid, located near the wall of the cabin, and connected through a pipe to the sewer drain. This type of drain has a high receiving capacity, so it is most often used in large showers;
- wall-mounted - point or linear type, additionally equipped with a water receiver built into the wall.
Drains with a wet seal are similar to the siphon design - an S-shaped channel is built between the funnel and the drain fitting.
Dry gate drains:
- membrane - the system opens when water pressure is applied to the membrane, after the liquid leaves, the spring returns the valve to its original position;
- float - when the drains pass, the shutter is located at the top, after the end of swimming it lowers to the bottom, blocking the passage.
Difficulties in installing tiled showers without a tray:
- the shower structure must be located above the plane of the existing sewer pipes, which requires re-equipping the entire sewage system or raising the floor level to the height required for installation;
- For the normal functioning of a cabin without a tray, it is important to be careful during operation and regularly clean the walls of the drain hole from dust particles and other deposits. In the absence of proper care, the patency of the canals may deteriorate.
It is not advisable to install a shower in a newly built house, if the building shrinks, the drain walled under the cladding and the waterproofing may become deformed and become unusable.
Cabin materials
Enclosing doors are most often made of thick glass (regular or organic), cast polycarbonate, or plastic. The material is wear-resistant and easy to clean; it can be used to create zoning for the bathroom by fencing off a corner or wall area.
The most practical use would be to use frosted, tinted or textured glass: the residue of soapy water and salt will be barely noticeable.
For small bathrooms or combined bathrooms, a shower cabin made of tiles without a tray and without hard barriers is relevant: to protect against water getting on the floor, you can use elastic sliding curtains made of PVC or silicone. Such products last a long time, have a low price, which allows them to be replaced if necessary.
It is advisable to use mosaic tiles to decorate the floor area of the cabin: this will minimize slipping during water procedures. Also suitable are ceramic products of a regular format with a textured front surface and a base made of polished wood (walnut, oak) coated with moisture-resistant varnish.
Turning on ventilation
Any shower stall, regardless of the set of functions, is a closed space, so humidity levels in such plumbing fixtures increase quite quickly. The lack of effective ventilation significantly increases the risk of mold and mildew formation, so a forced air blowing system is very important.
Set for shower cabin AM 11 remote control, speaker, fan, lamp, power supply
Among other things, the presence of forced removal of moist air masses allows you to avoid fogging of the mirrors. Activating the “Fan” button starts the system, and when pressed again, the ventilation device is turned off. Also, many models have an ozonation option. The function not only prevents the formation of mold, but also gives freshness and also cleanses the air of any unpleasant odors.
Enabling the Turkish Bath mode
The presence of an electric steam generator in the shower stall ensures the operation of such a plumbing device in the “Turkish Bath” mode. During the process of heating and evaporation of water, the interior space of the shower cabin or hydrobox is saturated with steam.
In this mode, the humidity inside the cabin reaches 100%, and the temperature is about 50-65°C.
Shower cabin with Turkish bath
Enabling and disabling such a useful and pleasant function is done from the control panel. After filling the steam generator with water, pressing the “Steam” button activates the steam supply. If there is no water inside the steam generator, the indicator on the button flashes red.
Bathing area dimensions
To determine the optimal dimensions of a future tile shower without a tray in an apartment, be guided by the following selection criteria:
- bathroom size. For comfortable swimming in a small room, a 100x100 cm cabin is suitable. If the room is large, choose the design dimensions at your discretion;
- ceiling height. The peculiarity of the building's floors may require raising the floor level in the room by at least 10 cm, so in a low bathroom it will look unaesthetic;
- if the shape of the room is non-standard or irregular, it is advisable to make a shower room with asymmetrical walls, which will also help visually correct the geometry of the room;
- Features of those living in the house: large, overweight people will find it uncomfortable to bathe in a small shower.
The minimum size of the walls of the shower area is 70x70 cm.
Ceiling device
The structure and water vapor barrier of the ceiling are made in the same way as the protection of wooden walls. Reflective thermal insulation is fixed along the ceiling and placed on the walls. There are slats installed on top of the thermal insulation. KVL sheets are fastened along the slats with self-tapping screws, also in two layers, with the seams bandaged.
When installing the ceiling, it is necessary to provide openings for exhaust ventilation, installation of lighting fixtures and wiring for lighting and power supply of the shower stall. The dimensions of the openings for exhaust hood and lighting depend on the size of the equipment used, which must be purchased in advance before starting work.
I'll say a little about the finishing of the ceiling. Taking into account the possible increased humidity in the shower room, I used white PF-115 enamel, in two layers, to protect the ceiling KVL sheets. The ceiling plinth is ordinary, made of foam plastic, painted to match the color of the tiles at the bottom of the shower walls.
Making a booth from scratch, step-by-step instructions
Preparation of necessary materials and tools
- ruler, tape measure, pencil;
- laser level, marking cord;
- cement-sand mortar, expanded clay, mixing container;
- waterproofing (liquid compounds and rolled materials);
- sheet extruded polystyrene foam (at least 5 cm thick);
- tile adhesive, grout;
- drainage system (ladder), pipes;
- facing material.
Marking and preparing the base
Before installing a shower, consider the option of installing a drain: raising the level of the entire bathroom floor or only in the bathing area (in this case, the cabin will have a small step):
- clean the surface of debris and dirt, if necessary, dismantle the old cladding;
- Using a tape measure, determine the future location of the drain. If the ladder is installed in the center, the floor must be sloped on all sides along the perimeter of the cabin; if the drain is near the wall, the plane should have a greater height on the opposite side;
- make a zero level mark on the wall;
- adjust the laser level so that the beam is located in the center of the sewer pipe opening;
- position the ladder so that the inlet pipe is higher than the beam, taking into account the height and thickness of the upper platform of the glass;
- on the wall (1 cm above the beam) mark the level of the drain hole with a pencil;
- to indicate the slope of the surface, make marks on the walls 2-3 cm above the beam, move them along the entire perimeter;
- Use a marking cord to mark lines along the marks.
Waterproofing the installation area
Before installing the drain and pouring the screed, cover the base of the shower with mastic or bitumen. Apply the compositions in 2-3 layers to the entire floor and wall area (to a height of 20-25 cm).
A second insulation layer must be made on top of the dried rough screed: lay sheets of fiberglass or roofing felt in several layers, placing the edges over the walls. Fold at the corners and secure with glue.
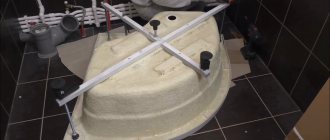
Pipe installation and foundation construction
- install the drain elements, check the quality of the assembly by pouring water. To avoid clogging with debris, cover the grill with tape;
- make formwork from moisture-resistant plasterboard or oriented strand board;
- fix the structure on the ceiling;
- install the drainage system on the base, aligning the position of the outlet pipe with the sewer pipe and maintaining a slope towards it (by 1-2 ⁰);
- Fill the remaining floor areas after installing the ladder with expanded polystyrene;
- prepare the cement-sand mortar for work, pour the screed, its drying time will be at least 2-3 days.
Another option for carrying out the work is possible: install the drainage system in a specially designed formwork, fill the remaining area with a solution of cement, sand and expanded clay, taken in a ratio of 1: 1: 2 (add water in a minimum amount). On the hardened screed, make a layer of waterproofing and lay polystyrene foam.
If it is impossible to adjust the position of the ladder, heat the plastic pipes with a hair dryer, then slowly and smoothly give them the desired direction and hold it there until the material cools.
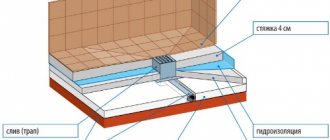
Leveling the surface
The stage of forming the surface of the shower floor consists of laying a finishing concrete screed up to 4 cm thick.
During the pouring process, check the horizontal plane using the marks on the walls and compliance with the required slope: use a trowel to draw lines from each corner of the drain to the corners of the shower area, removing the thickness of the mortar in the required areas. You can use a rule or a rod for this purpose. Correct minor unevenness with a float.
After the screed has dried, dismantle the formwork.
Frame assembly and ceramic tile cladding
In the case of arranging a shower with a frame made of enclosing walls:
- mark the places where the parts are attached to the walls;
- secure the profiles and guides;
- install partitions with seals;
- secure the door frame and install fittings depending on the type of opening mechanism.
If cinder block, brick, plasterboard partitions or walls are used as a protective barrier, decorate the surface with ceramic tiles after tiling the floor: the bottom row of vertically located elements will “cover” the horizontal coating.
Install using a notched trowel and tile adhesive that has high adhesion and resistance to moisture.
Treat seams and joints with moisture-resistant silicone sealant.
Laying finishing tiles
Lay the ceramic cladding starting from the ladder and moving towards the perimeter. The tiles in areas along the walls must be trimmed and the corners joined.
To install the coating yourself, use a waterproof tile solution.
What will you need?
To assemble the shower cabin you will need consumables:
- Silicone and acrylic sealant. Acrylic is a more suitable option for sealing external joints.
- Insulating tape-fum.
- PVA glue.
- A high-quality siphon (the siphon that comes with the product usually does not withstand loads ).
- Adapter for sewerage (diameter – 32/50).
- Hoses (2 pieces, 1.5 m each) to supply hot and cold water.
Tools:
- Adjustable wrench.
- A set of screwdrivers (minimum – slotted and Phillips).
- Level to adjust the installation of the tray.
- Drill or screwdriver. The most convenient way to assemble the cabin is with a cordless screwdriver .
- Drills with a diameter of 3 and 6 mm.
- Screws.
- Gun for squeezing out sealant.
Grouting and cleaning
1-2 days after finishing the cladding work, grout the joints. To ensure sealing of gaps between tiles, use mixtures that have fungicidal and moisture-resistant properties.
After 5-6 hours, depending on the type of composition, clean the surface of the tiles from excess fugue with a damp sponge or soft cloth, remove the tape from the drain grate.
Installation of cabin doors
You can install two types of doors in the shower:
- sliding or folding - opening along the cabin wall using a roller mechanism. The installation of the canvases is carried out on horizontal guides attached to the base and vertical profile;
- hinged (single- or double-leaf) - mounted on hinges that are fixed to the wall or metal frame. The canvas is equipped with a seal to ensure tightness and silent movement.
For small bathrooms, it is advisable to use sliding doors, which significantly saves space.
Installing a heated floor over the entire area of the bathroom or only in the bathing area will help make water procedures as comfortable as possible. When choosing the design of a shower corner without a tray with tiles, focus on the size of the bathroom, the quality and pressure of the water - the choice of materials used and the functionality of the shower will depend on this.
How to use the functionality
blockquote>If the funds allowed you to choose a multifunctional shower cabin, then you should understand in detail the operation of its additional equipment.
So, you have connected the box to electricity. Next, you should check the functionality of all shower cabin modes, such as radio, steam generator, telephone and others. The electronic control panel is a very convenient way to configure equipment options. It is this that allows you to turn on and regulate such amenities as hydromassage, Turkish bath, steam and radio. A convenient control method using keys controls water pressure and temperature, lighting, and fan. In a word, all the electronics of the shower stall.
The control panel is equipped with keys that allow you to adjust the volume. So, by pressing the vol, + - key, you can select the desired volume.
Using the FM keys you can turn on the radio and tune in to the desired wave. How does this device work? You need to press the FM key, after which the display will show the station that was last selected. By pressing the TUN and plus and minus keys you can change the settings. If you want to search for a radio station, you need to press the + or – key and hold until it starts automatically searching. To memorize a radio station, press the M key, select the desired channel and activate the memorization mode by pressing the key again.
If your cabin has an ozonizer function, then that's just great. After all, it is she who can destroy all the bacteria inside. To activate it, you need to press the function key on the control panel and close the cabin after leaving it. The cabin can continue to operate normally after a quarter of an hour.
If you have purchased an expensive and spacious model of a shower cabin, then it should definitely have a steam generator. What does it give? This device turns the shower into a steam room. Look at the control panel and find the key that controls the steam generator. Click on it. When the indicator is activated, the steam generator will fill with water and begin to fill the cabin with steam. Its output will be ensured thanks to the flask that is located on the pallet. By the way, a steam generator can easily also have an aromatherapy function if you put various types of herbs into the flask or pour in aromatic oil.
A fan is an indispensable device that will allow you to feel freshness during hygiene procedures. It is also necessary to distribute steam evenly when activating the Turkish bath function. The fan turns on simply: press the corresponding button. If during operation you want to disable the function, press the button again.
Some shower cabins have a telephone function on the control panel. It is configured to receive incoming calls. The function is very convenient, since few people would risk taking their phone into the bathroom. When a call comes into the cabin, a characteristic sound is heard. In this case, the radio operation becomes quieter. To receive a call, you need to press the “phone” key. You can reset the call by pressing again.
So, we figured out the functionality. But you need to know some general aspects of operation so that the cabin lasts a long time and the electronics do not fail after a week.
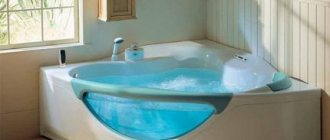
Shower made of tiles without a tray in an apartment
Each tile shower without a tray photo can differ in color, contrasting and visually separating the bathing area from the rest of the area, or be made in one shade to create the effect of space integrity.
For loft-style rooms, it is important to use stone (decorative brick) as a facing material for partitions, floors and walls made of glass, enclosed in dark-colored frames.
For eco-style bathrooms, the walls and flooring can be made of wood or ceramics that imitate this material. The finishing touch will be a home-made or purchased wooden footrest.
A shower corner without a tray with high-tech tiles is equipped with lighting and massage nozzles. The floor (walls) are decorated with black tiles, or doors made of tinted glass are installed, combined with chrome fittings. The outline of the cabin should be of a strict shape, with a minimum number of niches and shelves inside.
You can create a shower room in a minimalist style if you make walls, partitions and doors from transparent plastic or glass - this will visually make the space light and filled with air.
Design selection
The basis for the choice are photos from manufacturers’ catalogs or exhibition samples presented in stores. It is recommended to use finishing elements with rolled corners and edges, allowing the grooves to be rubbed with a special mixture.
Decorative coatings made from ceramics and porcelain stoneware have the greatest durability.
There are products made from impact-resistant glass that are used for finishing swimming pools. Finishing materials made from natural stone have a beautiful appearance.
The rough surface does not become slippery when wet. During operation, it is necessary to clean the material from salt deposits and rust.
Classic options
The classic finishing option involves the use of mosaic tiles, alternating in a checkerboard pattern. There are design solutions with alternating multi-colored elements in a random order.
To decorate the walls in the bathroom, standard tiles measuring 200 x 300 mm are used, which match the color scheme with the material of the tray. Sliding doors are installed on top of the tray to prevent splashing of water during operation of the cabin.
Modern solutions
Modern solutions involve the creation of an ornament consisting of figures of a regular geometric configuration or having an arbitrary shape. The use of elements of different colors allows you to hide surface unevenness.
The installation of decorative lamps emphasizes the original design of the room. The cabin is equipped with partitions and doors made of impact-resistant glass, onto which a decorative pattern is applied.
Rules for using a shower cabin
The operation of the shower cabins begins after the device is completely installed: connected to the water supply and drainage system, the electrical unit is connected, the wiring is grounded, as required by the instructions. After checking the functionality of the shower cabins, the installation seams are treated with silicone sealant to prevent water leakage.
The product is left for 24 hours to allow the silicone sealant to dry, after which it can be used, observing the following rules:
Shower stall structure diagram.
- before starting operation, you need to make sure that there is no leakage of current and voltage;
- Mechanical damage to the shower body during operation should not be allowed;
- press device buttons smoothly without effort;
- the cabin must have good ventilation, the product must dry after use: the shower compartment must remain dry between baths;
- It is prohibited to cut electrical wires, modify or change the control unit;
- To clean surfaces, do not use products containing gaseous substances, acetone and ammonia;
- For children and the elderly, the operation of shower cabins should be under the supervision of adults.
Only trained professionals can install a shower cabin, install water supply systems and electrical components. Self-installation of showers by untrained craftsmen will lead to damage to the device and injury during further operation.
Recommendations from experts
When making shower cabins with your own hands, you must follow several recommendations from professionals:
- Before starting work, it is important to draw a diagram of the future structure, carry out all the necessary calculations, and develop a clear construction plan.
- When installing communications, you need to remember about slopes sufficient for complete drainage of water.
- When building a pallet with your own hands, special attention is paid to waterproofing.
- If the purchased pallet is installed on a brick podium, then polyurethane foam will help give it greater stability. It fills all the voids inside the structure.
When deciding to build a cabin on your own, you need to carefully weigh the pros and cons. If experience and skills are not enough, it is better to buy a finished product and entrust its installation to professionals.