A washbasin built into the countertop looks much more interesting than one standing separately, without any decoration.
And it’s more convenient to use - cosmetic accessories or a razor can be placed nearby, rather than held in your hands.
Many users will be interested in a homemade countertop in a bathroom made of tiles - this will be discussed in detail below.
Advantages and disadvantages
The following arguments speak in favor of a homemade countertop with ceramic cladding:
- affordable price . Branded granite and marble countertops, especially those made to order according to consumer sketches, are much more expensive;
- diversity. There are countless types of tiles on sale with different textures, colors, patterns and surface types. This allows the home designer to create an exclusive product that fits perfectly with the bathroom interior;
- excellent characteristics. Ceramic tiles are moisture-resistant, durable, stable to temperature changes, and are easy to keep clean. Porcelain stoneware has the best characteristics: due to the absence of pores, it is close to natural stone in terms of strength, wear resistance and water resistance.
A natural stone
A stone bathroom countertop can be described in three words – beautiful, expensive, reliable.
Note! Bathroom tiles - which one to choose? Photo review of the best combination ideas!
Stone is a high-strength, resistant to mechanical damage and durable material. For its manufacture, matte/glossy marble or granite is often used.
The advantages include a noble appearance, good impact strength and wear resistance.
Disadvantages include high cost, heavy weight, labor-intensive installation, and subtle maintenance requirements—requires individual selection of cleaning products.
Tools and materials
To make a tabletop you will need the following arsenal:
- drill with impact mechanism;
- jigsaw;
- tile cutter for shaped cutting (you can order tile cutting in the workshop);
- levels: rack and bubble;
- roulette;
- crosshead screwdriver;
- brush;
- spatulas for laying tiles: metal (solid and serrated), rubber.
The following materials are used:
- galvanized profiles for plasterboard structures: guide and rack;
- for supports: profiled pipe or brick;
- moisture-resistant plywood (FSF);
- moisture-resistant plasterboard (GKVL) or cement-bonded particle boards;
- tiled or porcelain tiles;
- tile adhesive.
You will also need a fungicidal grout (with an antifungal additive).
Drywall
A mosaic tabletop made of plasterboard is the optimal solution for lovers of homemade repairs. The mosaic used as cladding is made of ceramic and glass.
Bathroom design in a modern style: review of the best ideas + 120 photosBathroom Design Ideas - 2020
- Bathroom design 2020 - 160 photos of the best new products
These materials are strong and durable. The advantage is that the material and hand-made work allow you to experiment with the shape of the tabletop while spending little money.
The disadvantages are the use of only moisture-resistant green plasterboard and the seam joint of the mosaic, which requires the selection of a special moisture-repellent grout.
Tile sizes
In ceramic cladding, the seams are a weak point, so it is advisable to use tiles that are as large as possible. But in a small room, large modules look bulky and emphasize cramped spaces.
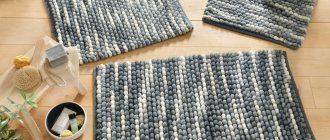
Mosaic tiles
It is recommended to use tiles of the following sizes:
- in a spacious bathroom: from 30x30 cm to 60x60 cm or mosaic (5x5 cm or less);
- in compact: from 10x10 cm to 20x20 cm.
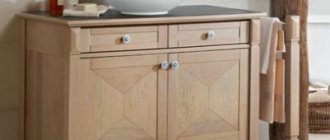
What is the role in design
The countertop is the central link that connects and unites bathroom items into a single whole. Therefore, it is important that the tabletop matches harmoniously with all the furniture located in the room.
You can easily choose a model based on personal preferences and financial status.
There are a variety of shapes (this is well demonstrated by photos of bathroom countertops): rectangular, corner, asymmetrical, semicircular, oval, combined. It can complement the cabinet or be a separately installed element.
You can make an individual order, buy a ready-made budget option, or order an expensive premium designer option.
The width and height are adjusted based on the area of the room and the physical characteristics of family members.
Sinks built into the countertop also have a huge range: symmetrical/asymmetrical, single/double.
Double sinks have become popular in the last decade. They can be built into the countertop or located on it.
In small rooms, designers recommend using a set with a bowl, which helps increase the functionality of the room and save space.
The optimal and convenient option are models where the sink and countertop for the bathroom are a single monolith. Such structures are highly durable, hermetic and diverse.
Frame preparation
The tabletop frame is formed as follows:
- markings are applied: on the wall 80 cm from the floor, draw a strictly horizontal line with a marker, having previously marked the extreme points using a bubble level; a rectangle is drawn on the floor, repeating the outline of the tabletop. A sign of the absence of distortions is the equality of the diagonals of the drawn figure;
- mark the position of the brick supports and remove the floor tiles in these places, having previously cut them along the contour with a grinder. The tool is equipped with a metal disk for dry cutting of stone (segmented);
- walls are erected from bricks to the level of the line drawn on the wall, fixing them with cement-sand mortar. Such supports are good because they allow you to install shelves and doors;
- The brick supports are plastered and a day later they are covered with tiles. It is important to do the finishing at this stage, since after installing the countertop it will be more difficult to implement;
- they make a frame from CD profiles for plasterboard structures. To make the frame stronger, each element is made of two profiles, inserting one into the other (they have a U-shaped section). The result is a prefabricated profile with a box-shaped section. Metal elements are fastened together with blind rivets or metal screws;
- Several cross members from the same profile are fixed in the frame to add rigidity;
- lay the frame on supports and screw one side to the wall using dowels.
In addition to stone supports, they use:
- racks made of profiled pipe with section dimensions 50x30, 40x40, 60x40 mm or purchased chrome;
- welded brackets from the corner, transferring the load from the tabletop to the wall (suspended version).
All metal parts are painted.
Decorative
A variation of floor and wall countertops, mostly serving as a decorative element.
The structure for the floor is equipped with legs, the product for the wall is equipped with brackets. Requires selection of chrome-plated plumbing fixtures.
Sheathing
The base of the tabletop is attached to the frame, manufactured as follows:
- From a sheet of moisture-resistant plywood of the FSF brand with a thickness of 19 mm, cut out two identical blanks and glue them together, laying them on top of each other. If the design of the tabletop involves curved outlines, cutting is done with a jigsaw;
- lay the plywood base on the frame and screw it to it with metal screws;
- glue onto the top and ends of the plywood a material similar in thermal expansion coefficient to ceramic tiles. For plywood, this indicator is very different, so you cannot glue tiles directly onto it.
The following materials are used:
- cement particle board (CSB) with a thickness of 6 – 13 mm;
- moisture-resistant plasterboard sheet (GKLV).
When cutting with a grinder, the DSP generates a lot of dust. It is more correct to make cuts with a construction knife and then break the slab on the corner of the table. If necessary, the ends are ground. The DSP is screwed to the plywood with self-tapping screws, having previously countersunk the holes so that the caps are flush.
The following manipulations are performed with the gypsum board sheet:
- glue it to the plywood with tile adhesive and additionally fix it with self-tapping screws;
- apply two layers of nitro varnish diluted with nitro solvent on top and on the ends;
- fill the joints with silicone sealant “For aquarium” (excess is immediately removed);
- seal the joints with sickle tape;
- apply 2-component automotive putty (the cheapest one will do) with a thickness of 1-2 mm on top and on the ends with a medium-width spatula;
- After waiting for the putty to harden (it takes about an hour), sand it with coarse sandpaper, wrapping it around the block.
Next, an opening for the sink is cut out at the base using a jigsaw. In the case of using gypsum plasterboard, this is done before applying a protective coating of nitro varnish. Modern sinks are equipped with a template - the opening is cut out from it.
In the absence of a template, you will have to make it yourself. To thread the jigsaw blade, drill a small hole on the contour of the opening with a drill.
Due to the high drying speed, automotive putty should be prepared in small portions.
MDF
Despite the fact that the material is based on fibreboard, MDF has sufficient moisture resistance, as it is covered with a durable laminated layer.
It will last a long time if the surface is not damaged. If moisture gets inside, the material will become unusable in the shortest possible time.
Tiling
Tiles for countertops are selected according to the following criteria:
- type . The surface of the countertop is not subject to significant loads, so wall tiles are sufficient (there is an icon with a hand on the package);
- surface . Relief tiles look interesting, but they are difficult to keep clean: dirt is firmly held in uneven areas;
- color . All shades of blue, reminiscent of the sea, are always appropriate in the bathroom: azure, turquoise, sea green. You can add white or make the tabletop red and black.
Tiling is done as follows:
- treat the surface of the base of the tabletop with a latex-based primer - it will increase the adhesive strength of the glue. Work continues after the primer has dried, which takes a day;
- The glue is applied with a spatula with a straight blade. For leveling, notched spatulas are used, which have different tooth heights; this determines the thickness of the adhesive layer. Typically, tile adhesive manufacturers indicate on the packaging which spatula to use to apply the mixture when gluing tiles of different sizes;
- lay the tiles on the layer of glue, using a slatted level to mark the horizontal position. The method of gluing the mosaic depends on the type of flexible base: the synthetic mesh should be on the bottom, the paper mesh on top. After the glue has hardened, the paper is soaked and removed;
- Apply glue again and glue the next module, inserting plastic crosses into the seam between it and the previous one. Cross stitches ensure that all seams are of equal width. When gluing mosaics, select crosses with a width equal to the width of the seams between the chips. The glue that comes out of the seams is wiped off with a rag;
- continue to glue the tiles, leveling the modules relative to each other;
- The tiles adjacent to the sink are cut using a tile cutter for curved cutting. Tiles for gluing the ends can be cut with a regular tile cutter, a diamond glass cutter (if the thickness is small) or a grinder.
The ends can be decorated using a special part - an outer corner. The glue used is waterproof. Better - cement glue diluted instead of water on latex.
It is not advisable to use expensive and difficult-to-work epoxy adhesive, which is characterized by the highest water resistance, in this case, since the countertop is not constantly exposed to direct water.
If the product is going to be covered with glass mosaic, white glue is required.
Fake diamond
It is made from marble, granite or quartz chips, glued with acrylic or polyester resin by molding and subsequent hardening.
The monolith can be of different colors and shapes. In terms of performance characteristics, it is practically indistinguishable from its natural analogue, however, upon visual inspection, the differences are obvious.
Cabinets for a washing machine in the bathroom: types and tips for choosingAt what height to hang a washbasin in the bathroom: standards and calculation of height
How to choose the right heated towel rail connected to hot water supply
Important advantages include the ability to obtain a monolithic surface with a sink, which allows you to do without seams and joints, as well as a budget price.
Wear resistance, resistance to moisture and chemicals. Among the disadvantages, the possible formation of scratches is noted.
Modern technologies can easily correct this flaw: a special paste polishes the surface and returns the product to almost its original appearance.
Grouting joints
The grout is also moisture resistant. Cement-based latex is also preferable; there is no point in buying expensive epoxy. An exception is if silver or gold powder is supposed to be added to the epoxy grout, as is done in expensive interiors.
Filling of joints begins a day after gluing the tiles:
- Remove glue residue from the seams using a special scraper coated with tungsten or diamond. In its absence, a construction knife is used;
- moisten the seams with a spray bottle or a damp sponge;
- Apply the grout to a rubber spatula and rub it into the seams, trying to fill them as much as possible. It is useful to press the mixture with the blade of a spatula and then go over the seam again, filling the resulting void;
- in 15 – 20 minutes. After starting work, return to the first area and wipe off traces of grout from the tiles with a rag or damp sponge. This moment is the most suitable, since the mixture has not yet dried and can be removed, but at the same time it has already hardened somewhat and therefore is not squeezed out of the seam with careless movement.
Contact of grout with water is allowed no earlier than after two days.
You should add an antifungal additive to the grout or buy a ready-made fungicidal composition.
Tree
It surpasses MDF in terms of quality characteristics, as it has greater resistance to moisture. The paint coating protects the surface more reliably.
Light surface damage to the coating can be easily and quickly restored using a brush, paint or varnish and does not affect the service life. It is made mainly from coniferous trees, as well as solid oak and teak, used in shipbuilding.
Wooden table top
Made from natural wood it has a number of advantages. The owners will receive a texture formed by pine, oak or teak. The atmosphere of the bath will be filled with the presence of warmth, comfort and the natural component included in the formation of the interior. The room will receive beauty, richness and sophistication, a connection with nature.
Fragility spoils all these advantages. The service life will not exceed ten years. Time leaves its mark, and the material begins to deteriorate. The cost is also not considered a positive thing - it is not small.
So where to choose?
Consider the individuality of your bathtub; only it can have a major influence on the final decision. Availability of installation work should be ensured in advance. Sometimes installation may not be possible for various reasons.
A countertop sink is the best option, it already includes everything you need. If there is a lot of space, you can use overhead versions shaped like a vessel. Mortise models are suitable for normal conditions.
To ensure longevity, purchase accessories in advance. These include impregnating liquids, soaps, specialized powders and more.
How to install the structure
There are several ways to install a countertop in a bathroom:
- with the help of brackets - solid structures;
- to the finished cabinet;
- with installation of the frame - installation.
Installing floor structures will not take much time, while wall mounting will require the use of additional tools. In this case, they often resort to the help of a specialist.
Modern finishing materials allow you to give free rein to your imagination and create your own masterpiece. Don’t be afraid of experiments, create, try, and then the result of your creativity will serve you faithfully for a long time.