- 1 Tools for work
- 2 Types of chandelier fastenings to concrete ceilings
- 3 On the hook
- 4 Anchor
- 5 Using a mounting plate
- 6 Safety precautions during operation
- 7 Useful tips
- 8 Conclusion
A chandelier lighting fixture is both a decorative element with great weight and a complex design. Fastening the lighting fixture requires special attention, since the safety of the occupants of the premises depends on the strength of the installation. Installation of the lamp can be done in several ways, but in any case it is important to follow safety precautions for mounting the device and check the grounding of the electrical wiring.
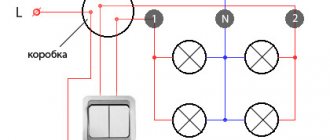
Types of chandelier fastenings to concrete ceilings
The types of fastenings of chandeliers to a concrete ceiling are different. The chandelier is installed using the following fasteners:
- The hook is a reliable and popular type of fastening. It is not difficult to install and has the ability to replace the lighting fixture with another.
- Anchors are used when it is necessary to attach large, heavy chandeliers to a concrete ceiling.
- When attaching a chandelier with a mounting strip, a thin strip is installed, screwed close to the ceiling. This type of installation is a complex process, but it will allow the chandelier to fit tightly and firmly to the ceiling and hide the wiring.
Return to contents
On the hook
Before attaching a lighting fixture to a concrete ceiling with a built-in hook, the first step is to check the strength of its installation. To do this, select a weight the size of the selected chandelier, secure it, and then pull it with force. A poorly installed fastener will begin to wobble or fall out completely; in this case, the hook will need to be replaced.
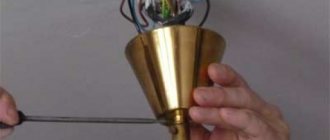
To install the hook, you need to make a hole in the ceiling using a hammer drill and install a collet, followed by mounting the fastening element into it. A pin is placed in the collet and a hook is hung; it is also possible to screw the hook directly into the collet. Before screwing the hook into the thread, you need to lubricate the hole with a thin layer of thick lubricant and screw two copper wires. Next, one hundred grams of gypsum solution is prepared, which in consistency will resemble thick sour cream. After which the hole is filled with a stick, it is important to remember that the gypsum mixture hardens quickly, so the filling of the solution into the thread should be carried out accordingly.
The hook is immediately placed into the solution before it has time to harden and the excess mixture is removed. Wait until the solution cools to room temperature; this will happen after 2 hours or more. After the final setting of the gypsum mixture, they begin to fasten the lighting fixture.
Return to contents
Anchor
Anchor fastening.
Anchors are used to work with durable concrete ceilings that can withstand heavy lighting fixtures. A large chandelier weighing more than five kilograms is hung on an anchor hook, having first drilled a hole of the required diameter. The fastening element has a spacer, which after installation will move apart and fix the lighting fixture.
Such a fastening element has a sloppy appearance and thereby spoils the design of the premises. To hide protruding and protruding connecting elements, installation of chandeliers is carried out using decorative bowls, which will hide the mounting fittings. The anchor fasteners are made of metal, which allows them to withstand heavy lighting elements.
Return to contents
Using a mounting plate
The lighting fixture is mounted using a mounting strip on a plasterboard ceiling, which is not designed for heavy loads. In order not to disturb the weak supporting structure, it is necessary to strengthen the mounting location of the lamp. They think about the future type of fasteners even at the stage of installing the frame. Depending on the size of the fastening elements of the lighting device, the form of installation of the profiles is selected, which can be laid parallel or in the form of a square or rectangle.
Before you begin installing the fasteners, mark the places where the holes will be located in accordance with the locations of the screws in the plank. Dowels are installed in the recesses and the bar is screwed. If there is a previously installed hook in the concrete ceiling, you should not remove it, as it will come in handy if you need to change the lighting fixture. The lamp is fixed to the bar with screws. Light weight chandeliers are fastened with long self-tapping screws. For heavy-duty devices, fasteners are installed on a ceiling made of concrete or wood.
Mounting the lamp has the following sequence:
Place the lamp at the place of future installation, so that the place where the fasteners and wires are closed fits as closely as possible to the ceiling.- If there is a hook in the ceiling, it is advised not to dismantle it, but simply bend it to the ceiling so that it does not interfere with further work.
- Next, mark future fastenings under the mounting strips and install the ceiling clamp for the lighting fixture. It is important to install the mounting strip so that it does not interfere with further electrical wiring. The marks are made with a pencil and holes are drilled along them. Dowels are inserted into the resulting holes and the plank is secured to the ceiling using screws.
It is worth remembering that before installing the lamp, the device is analyzed, i.e. the weight, size and type of fasteners are determined. After the fasteners are installed, proceed to connecting the chandelier to the electrical network.
Return to contents
How to hang a chandelier on the ceiling: step-by-step instructions
Mounting the lamp on a hook
Hooks designed for mounting a chandelier come in two types: with a regular thread and an anchor bolt. Anchoring is used for large-sized devices whose weight exceeds 5 kg.
For threaded fasteners, the procedure will be as follows:
- Drill a hole on the ceiling where the chandelier is mounted and insert a dowel into it;
- Screw the hook into the dowel.
For anchoring in the ceiling, you will also need to drill a hole of the required diameter, insert the anchor into it and tighten it until it stops. Now all that remains is to hang the ceiling chandelier. You hang it like this:
- insert the hook into the loop of the device;
- Press the decorative base as tightly as possible against the ceiling so that it completely covers the wires.
The main advantage of this method is its high reliability. All old chandeliers were fixed to the ceiling using a hook, since it was this hook that could support massive fixtures.
Let's see how the chandelier is attached to the suspended ceiling.
Mounting the device to a mounting plate
You can attach a chandelier to the ceiling without a hook using a mounting strip. The work is carried out in several stages:
- if a hook was previously installed at the installation site of the device, it is cut down or dismantled, and the hole is sealed with putty;
- Next, the base is marked. To do this, the mounting strip must be attached to the ceiling, and marks must be placed through the holes in it;
- You will have to drill into concrete using a hammer drill or drill. If using a drill, you will need a concrete drill bit;
- dowels are hammered into the holes, after which a mounting element is applied, which is fixed with self-tapping screws
Now all that remains is to fix the chandelier to the ceiling. Place the decorative base of the device against the bracket and tighten the screws so that the lamp socket is fixed as tightly as possible.
Thus, installing a chandelier on a concrete ceiling is a simple process, but sometimes it requires special tools needed for the job and outside help. The most important thing is to follow safety precautions and ensure reliable fastening.
Additional materials on how to attach a chandelier to the ceiling.
Safety precautions when working
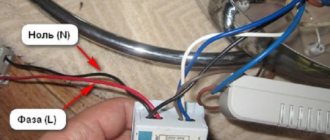
During the installation of the chandelier, it is important to follow safety precautions to avoid electric shock. Therefore, before installing the lamp, the room is de-energized. To do this, open the switchboard and lower the switch. Check the lights are turned off and the voltage in the electrical wires using an indicator screwdriver. If you fix the fasteners incorrectly, this will damage the power supply.
Another safety measure when installing a lamp is a mandatory check of the grounding of the electrical wiring.
Return to contents
Safety precautions
You should read this section before starting work. In order to protect yourself, you should turn off the electricity and check the quality of the wiring before installation. If you are not confident in it, invite professionals.
When installing and attaching the chandelier, use proper tools. The use of special devices (rubber gloves, mat) is also required. Wet hands are strictly unacceptable, this even applies to drilling. The last procedure is accompanied by finding out the location of the wiring. If it is accidentally touched, a short circuit will occur. Do not connect wires made of copper and aluminum, as their combination is fraught with spontaneous combustion. The use of terminal clamps is a safe method of switching.
Such measures will help avoid causing harm to the health of those who directly install the chandelier. Of course, they take time, but this loss is justified by ensuring the safety of the work being carried out.
Useful tips
By listening to the recommendations of experts, you will be able to make a reliable, durable and safe mount for many years. According to the advice of experienced builders, the hook in the ceiling is not removed, but left for possible future replacement of the lighting fixture. To prevent the hook from interfering, it is bent close to the ceiling.
When working with a rotary hammer, it is important to avoid dust getting into it, as this will lead to damage to the device. When connecting the device to the electrical network, you need to determine the phase, zero and grounding. Before choosing a fastening element for a chandelier, you need to analyze the lamp, namely, study its weight and dimensions. You should not try to save on fasteners, because the safe living of people indoors depends on their quality.
Return to contents
Ceiling Hook Installation
The process of installing anchors is quite simple and does not require extensive explanation. A hole of the required depth and diameter is drilled at a selected point on the ceiling. A metal anchor is inserted into it and first screwed in by hand, and then using a wrench, the hook is screwed onto which the lamp can then be hung.
Anchor bolt mounting
To protect the hammer drill from dust, sand and small concrete chips, you can put a disposable cup made of thick paper on the drill. Installation of a clamping suspension, on the one hand, is simpler, since there is no need to drill the ceiling, but on the other hand, it is somewhat more complicated and requires some explanation. Due to the specifics of its design, this fastening can only be used on hollow concrete floors. A spacer rod 10-15 cm long and up to 3-5 mm in diameter is inserted into the inlet hole in the slab and pushed into the internal cavity.
The next step to complete is installing the hanging strip. This is a narrow metal plate, at one end of which there is a series of holes, at the other end there is a small hook on which you can hang a chandelier. The plank is taken in one hand and placed inside the concrete slab. With the other hand, the spacer rod is threaded through one of the holes. The closer it is located to the edge of the plate, the greater the distance from the ceiling to the hanging hook. This way you can adjust the suspension protrusion by 3-5 cm.
Next, the mounting ends of the chandelier are connected to the electrical wiring. The entire assembly process is completed by installing a plastic decorative lining close to the ceiling. Due to the presence of a slot, it fits onto the hanging bar, fixing its position and completely covering the hole in the concrete slab.