Register Login
Publication date: August 2, 2019
How to extract priceless electricity literally from thin air? It’s very simple, all you need is an old screwdriver (maybe a broken one) and all the trash from the workshop.
This will be the simplest model of a wind generator. No special skills or knowledge are required. The hardest part is drilling the holes in the gear. But more on this a little later, but now a little theory to clearly understand how everything works.
Principle of operation
The point is to convert mechanical energy into electrical energy.
The wind flow rotates the blades of the wind generator. The blades rotate the rotor, that is, the screwdriver motor. The rotor generates electricity. That's all, actually.
Calculations
Starting formula: P=0.6⋅S⋅V³
Working formula: P=(0.6⋅S⋅V³⋅0.4⋅0.8-20%)/2
S – area of sweep or circle of blades. Calculated using a separate formula: S=πr² (r – radius, π – Pi number, 3.14)
V – wind speed. It is measured by a special device - an anemometer. .You can also assemble it yourself.
The starting formula shows the power of the wind flow. However, even a factory wind generator cannot convert all this power into electricity. A homemade wind generator made from a screwdriver, assembled with your own hands, is very far from this value.
Where does the energy go?
Blades cut by eye in a garage can only absorb 40% of the power of the wind flow.
This 40% goes to the generator. But it can only process 80% of them. The figure depends on the efficiency of your specific engine.
Another approximately 20% will be lost on the wiring and battery.
And the final figure must be divided by 2. This is the only way to get a pessimistic answer, but close to the voltmeter readings.
In an example it looks like this.
- The blade is 97 cm. From the end of the blade to the center of the propeller is 3 cm. This means that the sweeping area is calculated as – 3.14 ⋅1²=3.14 m².
- The wind speed is, say, 10 m/s.
- Starting power – 0.6⋅3.14⋅10³=1884 W.
- We leave only 40% of this figure, which the screw will capture - 1884⋅0.4=753.6 W.
- And from this we leave only 80%, which the engine will absorb - 753.6⋅0.8=602.88 W.
- From here another minus 20% - 602.88-120.576 = 482.304 W.
- And the final reductions are 482.304/2=241.152.
- Total: 0.6⋅3.14⋅10³⋅0.4⋅0.8-20%=482/2=241.
This gives you a fair number that you can count on.
Of course, you can perfectly calculate the angle of the blades, conduct the wiring as needed, solder the controller and compensate for the losses. But this is an article about how to assemble a wind generator with your own hands from a screwdriver motor without any problems. To feel your power over nature and understand how it basically works.
If you want to make a more powerful wind generator, then it is better to forget about the screwdriver and find a more powerful motor. Well, for now, we work with what we have.
DIY Wind Generator From a Screwdriver Engine
Do-it-yourself wind generator from a washing machine: instructions for assembling a wind turbine
Electricity is an expensive resource, and its environmental safety is uncertain, because... Hydrocarbons are used to generate electricity. This depletes the mineral resources and poisons the environment. It turns out that you can power your home with wind energy. Agree, it will be good to have a backup source of electricity, especially in areas where power outages are common.
Modifying installations are very expensive, alas, with some effort, of course, they can be assembled without the help of others. Let's try to figure out how to assemble a wind generator on our own from a washing machine
.
Next we will talk to you about what materials and tools will be needed to complete the work. In the text of the article you will find diagrams of the device of a wind generator from a washing machine, advice from professionals on assembly and operation, as well as video clips that clearly demonstrate the assembly of the device.
Content
Wind generator as a source of electricity
Wind generators are rarely used as the main sources of electricity, but as additional sources, as others call them, they are perfect.
This is not a bad solution for dachas, private houses located in areas where there are often difficulties with electricity.
Homemade wind generator from a screwdriver, an auto generator or a washing machine
It will cost almost pennies, but it will help you save significant amounts on your energy bills. This is a good option for caring owners who do not want to overpay and are willing to make some efforts to reduce costs.
Standard wind generator
consists of several mechanical devices, the function of which is to convert wind kinetic energy into mechanical, and then into electronic. By and large, modern models are equipped with 3 blades in order to increase efficiency and operate when the wind speed reaches at least 2-3 m/s.
READ Assault Screwdriver
Wind speed is a fundamental indicator on which the power of the installation directly depends. The technical documentation for industrial wind generators always indicates the nominal characteristics of the wind speed when the installation operates with the highest efficiency. In most cases, this indicator is 9-10 m/s.
There are also characteristics of the maximum permissible wind speed - 25 m/s. With such indicators, the efficiency of the wind turbine is already significantly reduced, because the blades of the installation change position. If we are talking about a homemade design, it is difficult to find its technical properties.
It makes sense to focus on the average characteristics and calculate the amount of energy needed for basic needs.
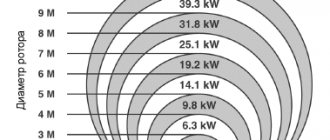
What energy costs can the installation cover?
Installing a wind generator is beneficial if the wind speed reaches 4 m/s. In this case, all needs can be met:
- A device with a power of 0.15-0.3.5 kW will allow you to switch room lighting to eco-energy. It is also possible to connect a computer or TV.
- A wind turbine with a power of 1-5 kW is enough to power basic home appliances, including a refrigerator and washing machine.
- For autonomous operation of all devices and systems, including the heating system, you need a 20 kW wind generator.
Do-it-yourself wind generator using a screwdriver
Do-it-yourself wind generator
from
a screwdriver
.
12V generator from a screwdriver
Here's a video where we'll start assembling the wind generator
from a broken
screwdriver
.
Our generator
will be 12 volts.
When designing and assembling a windmill from a washing machine motor, it is necessary to take into account the variability of wind speed. Electricity can go out at any second, so equipment cannot be connected directly to the generator. Batteries and a charge controller are required, because... electrical appliances require a voltage of 220V.
READ What Batteries Are Needed for a Screwdriver
Types of wind generators and their operating principles
Both industrial and homemade wind generators are different. They are systematized according to several criteria:
- Peculiarities of rotation of the rotor with blades attached to it - vertical or horizontal. The first ones react less to bad causes of the external environment, and the second ones are distinguished by higher efficiency.
- Number of blades. Three-blade installations are considered the most convenient; unfortunately, you will not just like more or less blades.
- Material . For the production of blades, different materials are used - hard or sailing. The first ones are usually more durable, and the second ones are cheaper.
- Blade pitch . You will like it fixed or changeable.
At the wind generator production stage, you have to decide on the design yourself without the help of others. Here you should calculate the required power and take into account the operating conditions of the installation.
Horizontal windmills are convenient because their creation does not require high-precision calculations; the design itself is easier to manufacture and starts with the slightest wind.
Cons: loud noise during operation and bulkiness. A vertical wind generator is suitable for people who are willing to spend time and effort on assembling and servicing a complex but small-sized design.
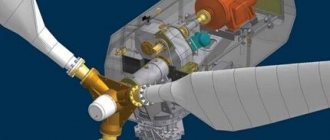
A wind generator operates by rotating blades attached to a rotor. The rotor itself is fixed on the generator shaft, which produces electric current. The energy is transferred to batteries. Here it accumulates and powers household electrical appliances.
The wind turbine is equipped with a controller that converts alternating three-phase current into constant current and controls battery charging. In the installation diagram, it is imperative to take into account that an inverter is connected after the battery.
READ How The Grinder Works
Comparing the pros and cons of installation
Wind generators have been in use for a long time, their designs are constantly being improved, and wind is an all-accessible source of energy. Devices powered by it are completely environmentally friendly and comfortable, because... placed on masts and do not take up usable space. They are easy to maintain and repair.
Windmills make noise during operation. You will like the sound louder or quieter, but it is always there. This disturbs home owners and neighbors.
Let us note other inconveniences. Wind is an unpredictable element, therefore the operation of generators is unstable and it is necessary to accumulate energy so as not to be left without electricity during periods of calm.
Is it profitable to use a windmill from a washing machine?
To create a homemade windmill from a washing machine motor, you need to purchase several parts. Some can probably be found in old household devices, and some will have to be purchased:
- rotor with blades;
- a gearbox that will regulate the speed of rotation of the windmill rotor;
- a casing designed to protect parts of the windmill from water and other negative environmental causes;
- a battery, the function of which is to store energy and power electrical appliances when the blades are not spinning;
- inverter for current transformation;
- the tail section, with the help of which the installation is turned in the wind;
- mast, the structure will be attached to the occupied one.
Such parts cost money separately, and to assemble them into a complete structure will take a lot of time. Isn’t it easier to immediately purchase a ready-made wind turbine? And it’s easier to sell, but it will cost 10 times more than a homemade windmill.
Source
Work plan
Preparation
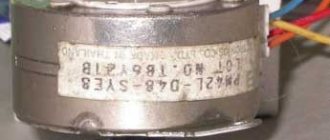
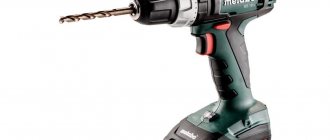
The highlight of the program is the screwdriver. We will need a clamping chuck and a motor from a screwdriver. The remaining parts are not needed yet.
We cut blades out of PVC pipes or something else. Suitable: aluminum sheet, thick plastic or plastic barrels. The main thing is that the blades are strong and light. About a meter long. If you wish, you can tinker with the form. Copy the proportions from the factory wind generator. Then the blades will absorb more air and rotate even without strong wind. But in general, you can do it by eye, as long as it spins.
We cut out a plate to secure them. The plate should come out strong. Material: steel sheet, cutter disc or piece of wood. It greatly affects balance, so do it back to back. There should be a place to securely attach the blades, but nothing more than that.
We drill holes in the plate and gear. Determine the number of holes yourself. At least two holes for each blade on the edge of the plate and three in the center, the same number in the gear.
We make a housing according to the diameter of the bearings for the clutch location. Bottle caps, jars, tubes, whatever. The housing is optional; it is only needed to protect the rotor from dust.
Assembly
We firmly clamp the motor shaft into the clamping chuck and check that the motor axis rotates.
We attach the blades to the plate, and the plate to the gear, preferably with bolts. If you made the mold according to the drawings, then pay more attention to the mounting location. This greatly affects the balance of the propeller and can negate all the effort put into getting the shape right.
Insert the body.
To make the whole structure look more solid, you can tighten it with clamps to a wooden block.
In principle, everything is ready. Before us is a wind generator made from a screwdriver. All that remains is to install and connect it.
Installation
The stronger the wind blows, more energy is generated, and the wind blows at altitude. Therefore, the higher the better. Already at a height of 5 meters, the gusts of wind will be sufficient, but if you have a ten-meter matcha lying around, it would be just fine. Possible options: bare wood, the roof of a house or a PVC pipe driven into the ground.
Connection to electrical appliances
There are already two wires coming from the motor winding: plus and minus. Something as simple as a light bulb can be connected directly to them. The main thing is to maintain polarity.
For more complex equipment, the power must be constant. To smooth out differences, you need a battery and a controller. They are already in the screwdriver, so we simply restore the original chain. From the engine, long wires go to the controller, and the controller is connected to the battery. And already from the battery you can connect it to equipment.