Why is it necessary to install an intercom in a private house?
The key task for which an intercom is connected in a private home is maintaining the security of the home and limiting access to third parties. Equipment with audio and video communication functions will become indispensable if there are children or elderly people in the room, who, more than anyone else, need special protection. With the help of an intercom you can protect them from any dangers and problems due to increased carelessness.
The device will allow you to determine who is at the gate without leaving your home. Additionally, it will provide 2-way communication capabilities to communicate with the guest. And if the system is equipped with a video camera, this will make it even more functional.
But before installing an intercom in a private home, you should determine for what tasks it will be used, as well as how much money you are willing to spend on organizing an access control system (ACS). How the device works
It is not difficult to install an intercom in a private house with your own hands, since most of the models on the market have a similar structure and principle of operation. To open the door, use a key fob or a special key brought to the reading pad. Visitors just need to enter the appropriate code on the intercom or press the call button (if we are talking about a private home).
Information from the calling panel is sent to the controller, and the reader broadcasts what is happening at the gate or door to a special display located inside the room. As a result, the owner can quickly determine who has come into the house and decide whether to open the door or leave it closed.
When standby mode is activated, the monitor remains off and the lock remains locked. When you pick up the handset from the corresponding panel, you can chat with the visitor. The locking mechanism opens only after sending the required command via a key on the subscriber device. Types of intercoms
The connection diagram for an intercom in a private house depends on its type and operating principle. The following devices are common on the market:
- Analog.
- Digital.
We install a video intercom in a private house with our own hands
Today, homeowners are thinking about whether they need to install an intercom in their home.
They are also haunted by thoughts regarding which manufacturing company to choose for their own building and whether, if they try, it is possible to install an intercom on their own, without turning to special companies. Such a thing as access control systems has long and quite firmly entered the life of an ordinary person, and it is this system that intercoms belong to.
This article will discuss how to correctly and efficiently install a video intercom in a private home. From the article you will learn what components you will need, what consumables and tools will be useful during installation.
How to install and connect a video intercom yourself
To install the equipment, you should prepare the following devices:
- Sharp knife.
- Drills and hammer drill.
- Electric screwdriver.
- A spatula and a pike.
- Grinder and discs for working with metal.
- Screwdrivers.
- Pliers.
- Hammer.
- Container for mixing workers with solution.
In addition, you will need consumables, such as switching, sockets, a circuit breaker, screws and dowel-nails, electrical tape, cable ducts, etc.
What components will be required?
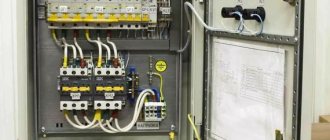
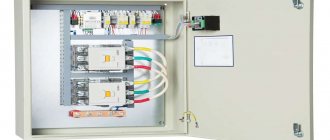
The standard configuration of intercom systems includes all elements of equipment for its correct operation. Audio devices are supplied with an external or integrated power supply, as well as a secure calling panel. The video intercom kit includes a monitor installed indoors.
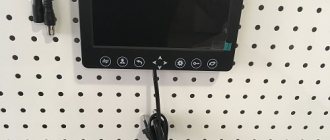
Installing a video intercom monitor
It must be taken into account that the device is powered from a 220 V network, so there must be an outlet within reach. Ideally, the power cable, lock control and data transmission from the calling panel should be routed into one socket box on top of which the device will be installed.
Socket box
The installation height should approximately correspond to the eye level of an adult, 1.4-1.5 m.
DIAGRAM 1 Connecting the calling panel to the contact strip of the video intercom
Intercom installation procedure
Before starting installation work, you should draw up an action plan and consider the placement of the main components of the system.
Cable routing
It is better to lay the switching in corrugated elastic tubes made of plastic or metal. The corrugation is suitable for external installation of cables and installation in walls behind plasterboard.
If the wires are placed in the ground, the immersion depth should not be less than 40-60 cm.
Installation of the calling panel
When installing the calling unit, you should provide maximum visibility to the adjacent territory and the gate. It is possible that for such purposes it will be necessary to turn it towards the enclosing structure.
Installation of the speaking handset
Usually the kit includes fastening elements and related accessories. Therefore, there should not be any special difficulties with installing the subscriber device.
Controller installation
The controller is installed near the calling unit and the key reader. It can be secured in a sealed box or hidden behind the calling panel. The main thing is to protect the equipment from moisture and ultraviolet radiation.
Connection and setup
The combination of intercom blocks is carried out taking into account the installation diagram. To avoid errors, you should adhere to the correct marking of conductors and take into account their functions in the diagram.
Electronic key programming
With the controller, you can program the chips using the master key or programming mode. The latter method is activated via jumpers.
How to install an intercom in a private house with your own hands?
The modern owner of a private house does not face the question: to install or not to install an intercom system?
Access control and management systems (ACS), which include intercoms, have become a part of our lives. Nowadays, owners of country cottages often ask themselves questions: which intercom system to choose? Is it possible to install an intercom with your own hands without resorting to the services of specialists? In this material we will try to talk in detail about installing intercoms in country cottages. Let's consider the issues of choosing components, consumables and tools. We will tell you about technical solutions to ensure reliable operation of the access control system.
Connection diagram
- Connection diagram for an intercom with a regular calling panel:
Screen: wiring diagram for a video intercom in a private house
2) Electrical diagram for assembling a video intercom with a video calling panel:
3) Example of a circuit diagram of a video intercom with a reader:
How to choose an intercom kit for installation?
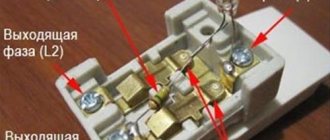
The simplest option is a kit consisting of an audio tube and an audio calling device. It is also possible to install a video intercom. This option consists of an audio tube, a base with a screen and a video peephole, which is mounted directly on the front door. For proper installation of such a system, it is necessary to strictly follow the sequence of connecting the internal cable cores according to their color marking.
The most convenient kit for installation in an apartment will be the most common product, since the audio calling device is installed on the entrance door. Often the decision to acquire an intercom is a collective one at the request of all residents of the entrance and, as a rule, the most convenient in this case will be the conventional model. The video intercom, in turn, is more suitable for use in private houses and cottages.
Intercom kit for: how to choose?
You can opt for the simplest option - a kit that consists of an intercom panel and a handset. Or you can choose a video intercom that has a large number of functions; it can also be installed on your own. It differs from the simple version in a larger number of components: the subscriber's handset, the base on which the video peephole and screen are located, it should be installed near the door blocking the entrance to the entrance. In order for the installation to take place correctly, the internal cable cores must be connected accurately and consistently. The task should be made a little easier by marking each of them with a specific color.
If you live in an apartment building, then the best option for you would be to install a regular intercom for your apartment, since the audio call panel will be located near the entrance door. Moreover, the decision to install an intercom for multi-story buildings is made collectively. You can be more than sure that the preference of the majority will be given to an intercom with a simple configuration. Video intercom is also popular and in demand, but among another category of people, we are talking about cottage residents.
Typical intercom connection diagrams
Below we present several typical intercom connection diagrams. But first, we note that to independently connect an access control system, you must have at least a little knowledge of electrical engineering. Blindly copying standard diagrams can lead to equipment damage.
One of the options for connecting an audio intercom handset with a calling device and an electromechanical lock is as follows:
Note! In this variant, a normally open lock control contact is integrated into the speaking handset.
The output voltage and power of the power supply must correspond to the parameters of the lock.
The following figure shows a video intercom connection diagram in which the lock control contact is built into the calling panel.
To place the lock's power supply, space is required; a 220V cable must be laid to it. To get rid of these problems, instead of a power supply, they often install a BUZ, which was described above. The following figure shows a diagram with a lock control unit.
The BUZ has small dimensions, and many installers place the energy storage device inside the lock.
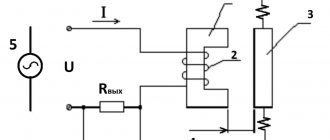
Finally, here is a diagram for connecting an intercom with an electronic key reader and an electromagnetic lock control controller.