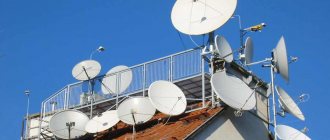
Satellite television provides the potential user with slightly greater opportunities in terms of visual entertainment than standard TV. True, modern technologies are already bringing society closer to completely abandoning any antennas and using exclusively small modular set-top boxes.
But for now, satellite television reception remains in demand. This means that setting up a satellite dish in conditions of independent organization of TV reception remains relevant. Let's look at this point in more detail.
In the article, we examined in detail the issue of choosing a place to install the “dish”, the technology of its installation, and also examined step by step how to configure the antenna for satellite broadcasting.
Preparing equipment for setup
There is probably no need to explain what a satellite dish is. This element of television equipment has already become firmly established in everyday life, and therefore is familiar and understandable to almost everyone.
Meanwhile, it is one thing to imagine a satellite “dish” in general, and quite another thing to consider the device technically and technologically.
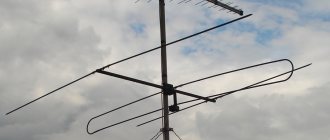
An antenna mirror installed on the wall of a building, fully equipped to receive a television signal. This has long been a familiar household accessory, increasingly being installed independently.
Firstly, satellite dishes of the “dish” type are available in different diameters. Secondly, in order to receive a signal from the satellite, the “dish” included in the installation kit must be precisely adjusted.
Antennas of different diameters allow you to receive signals of different frequencies (from different satellites). And each satellite used is in an individual geostationary orbit.
True, for the household sector it seems typical to use antennas with a diameter of no more than 1 m, and often no more than 50-60 cm (NTV-plus, Tricolor-TV).
Therefore, we will focus on such products in order to show potential owners how to configure a satellite dish with a diameter of 50-60 cm to a satellite.
Correct Antenna Installation
Correctly performed installation of the “plate” greatly favors the setup procedure. Therefore, you should strictly follow all the manufacturer's recommendations when installing the antenna.
The installation of satellite dishes allows for all sorts of variations, but it is necessary to observe all the details of the settings for an individual instance. Then interference from one mirror to another is completely eliminated
Thus, for the Tricolor installation, the characteristic distance and angle values are the numbers 100 and 40. In other words, in front of the antenna mirror at a distance of 100 m, the presence of any objects (objects) that hide part of the sky is excluded.
However, the established “pure” distance parameter is not the only criterion. In addition, the same “clean” angular view should be ensured.
That is why at the marked distance, 40 m in height from the horizon (along the central axis of the antenna), the presence of any foreign objects should also be excluded.
Considering that the satellite “dish” is mounted at a certain angle and at a certain height from the earth’s surface, the ideal installation picture should be approximately as shown in the diagram below.
This is what it looks like, if not ideal, then actually correct installation of the “dish” that will have to be tuned to the satellite in order to get a high-quality signal on the TV screen
When installing equipment, you should ensure protection against possible falls from the roof or other objects of ice, snow, or water.
The surface of the mirror of the mounted satellite dish is directed to the “southern” region of the sky. After completing the installation, connecting the cable and installing the receiver, you can proceed directly to fine tuning to the satellite.
Choosing the optimal weather
First, you should learn the main rule: it is recommended to adjust the “dish” under favorable weather conditions.
Therefore, it is important to ensure that there is no dense clouds, precipitation or strong wind.
Favorable weather for tuning: clear sky or light clouds, complete absence of wind or light breeze. This is one of the main requirements if the potential installer expects to quickly set up the system
After we have decided on the antenna installation location and its approximate direction, the pre-assembled antenna is hung on the bracket. Afterwards, additional multifeeds and converters, cables and other structural elements are installed.
- IMPORTANT: To fine-tune the antenna, it must be moved vertically/horizontally. BUT you should tighten the fastenings just enough so that the antenna itself does not move or change its tilt, but you can still move the antenna in planes, albeit with force. To do this, the left/right screws are not fully tightened.
For example, the free lower left screw on the U-shaped adjustable element of the antenna (see photo) allows you to adjust the antenna vertically , and those on the clamp for fixing the antenna to the wall mount, usually there are two of them, horizontally .
What is multifeed and how does it work?
A multifeed is a design that allows you to receive several satellites SIMULTANEOUSLY on one satellite dish due to the possibility of installing additional heads (converters). This allows you to save money on purchasing an additional satellite dish.
Multifeed law: angle of incidence = angle of reflection
An antenna is often called a mirror. And in the case of multifeed, the laws of optics and reflection apply (remember physics?) Specifically: The angle of incidence is equal to the angle of reflection. That is, if you adjust the antenna to the corresponding satellite so that it is in focus, then the signal from a neighboring satellite located at a different orbital position will be reflected not at the converter that is in focus, but at some other point. This whole thing works according to the same law!
This law is simple to understand: If a neighboring satellite (Amos 4) in geostationary orbit is located to the right of the focus of the central converter (Sirius 4.8) of the satellite antenna, then the reflection of its signal (yellow arrow in the figure) from the dish mirror will be focused to the left of the place where it is in the focus of the antenna central converter. (see pic)
If the satellite is higher, the signal will be focused lower. In general, the effect of a mirror.
Tuning an antenna to a satellite with installed multifeeds
Then you need to put 2 mutifeeds on the antenna nose mount, which already has an installed holder for the main converter (the converters are fixed in all holders). Next, everything needs to be tightened securely, but it is possible to rotate the converters in multifeeds in all directions and planes with some effort. The cable system is connected at the very end.
Setup: Steps in a painstaking process
Setting up equipment is quite a troublesome task and requires a lot of time. It all starts with screwing it to the center. F-connector converter with a piece of cable 2 meters long. The other end of this cable is fixed to the receiver.
The receiver itself connects to the television receiver. Be careful: the power (220 V) must be turned on only after connection. Another important point to remember: when you screw on the F-connector, make sure that the shielding film and the thinnest conductors on the cable braid do not short-circuit with the central core. Otherwise, everything may end in a breakdown of the receiver!
Setting up a satellite dish for the main Sirius 4.8E satellite
Turn on the TV and receiver. Go to MENU - INSTALLATION, then to SEARCH CHANNELS. On the left you will see a list of satellites from which reception will occur. Select the desired one, for example, Sirius 2/Ku 4.8E, if the central converter is configured for it, which was previously firmly fixed.
Next, go to the menu on the right side and remember the following symbols:
- LNBP – turn on the converter.
- LNBP Type – select Universal (the type can be found in the documents for the converter).
- LNBP Freq – 10600/9750 (this data is also indicated in the instructions for the converters).
- 22Khz – select the AUTO item (this is the signal that switches the dial).
- DISEqC – leave NONE (if you connected the signal reception directly, without using DISEqC).
Then look for the corresponding button on the remote control: it will take you to the transponder submenu. This is where you will need to look for a satellite signal. TIP: mark in advance a couple of transponders from satellites with different polarizations and any channels (preferably free) that actually WORK (FTA). These are easy to find on the Internet on specialized sites.
- EXAMPLE: let's look at the option with transponder 11766H. It broadcasts at a frequency of 11,766 Mega Hertz (horizontal polarization). To make it more convenient to adjust the quality of the picture and signal, it is better to display all information in full screen mode. There is an INFO button for this. It will be convenient to navigate the quality using the microscale located below.
Don’t be alarmed if at first the “quality” of the signal is 0. The reason for this failure is quite understandable: at the very beginning we discussed options for directing the antenna and turned it in the right direction using the “scientific poke” method. And now the time has come to tune the antenna in all planes. Get ready immediately for a long and monotonous process that requires accuracy, attentiveness and self-control. Why? A couple of millimeters and the signal will be lost. It won’t even be a matter of its poor quality, but its complete absence!
Tuning the receiver antenna in planes
First you need to find one ideal vertical position. Then slowly and smoothly try to rotate the antenna horizontally. In this case, you need to constantly monitor the signal quality scale. As soon as the number moves from 0, it means you are acting correctly. In this way, you should bring the scale to at least 15. It is possible that all manipulations with horizontal movements will be unsuccessful. Then you will have to return to the vertical position and change it a little. And then start all over again: careful movements left and right until a signal appears, at least a small one. Your task is to achieve the highest quality of reception. Doing this, of course, is not easy, but without this, as they say, there is nowhere.
You can try to slightly rotate the converter in the holder (around the axis). There are even special marks on the case for this. You can also move it a little back and forth along the holder, while achieving maximum readings on the QUALITY scale.
The conclusion is this: to achieve better signal quality, you need to try ALL adjustment options. This is the only way the result will satisfy you completely.
- IMPORTANT: if you have double-checked everything a hundred times, tried to adjust the antenna, changed the receiver settings several times, but still haven’t found a signal, try replacing the converter. There is a possibility that it is simply broken.
Have you achieved the best possible reception quality? Congratulations! It seems like it's time to tighten the screws and enjoy a job well done?! Not everything is so rosy. Remember: the setup was carried out with a transponder broadcasting ONLY in horizontal polarization (mark “H” on the body). It is also necessary to configure the V-transponder, that is, with vertical polarization. Yes, and back into battle!
In each specific case, completely different actions can help. Somewhere, a slight rotation of the converter around its axis clockwise or counterclockwise leads to success. And some have to scan transponders in a manual search. A description of this process can be found in the documents for the purchased receiver. And then visually monitor the reception of certain channels and their correspondence to the desired satellite.
Let's tighten the nuts!
The long-awaited moment has arrived when signals in both polarizations produce the highest possible quality. Now you need to tighten the nuts very tightly and firmly. And here again difficulties can overtake you: by tightening the adjusting nut, you, without meaning to, slightly change the direction of the antenna. As a result, the signal quality again noticeably decreases! Therefore, this must be done extremely carefully, with great caution.
Position of converters on multifeeds
Before you start setting up converters on multifeeds, you need to know their angle of inclination to the horizon and understand how they will be located.
Satellites in the sky in geostationary orbit relative to the territory of Russia are located along an arc that runs closer to the south of the sky. To an observer it will look something like this:
Therefore, the location of the converters on the antenna should be inverted and mirrored. If the antenna is directed to the southern sector, then the neighboring converters will be located conditionally like this:
If the “dish” is tuned to a Western satellite, then the converters on the multifeed should be positioned like this:
And finally, if the satellite antenna is directed towards one of the eastern satellites, then the “heads” in the neighborhood should be positioned as follows:
Let's look at another important point that you should always remember. Since a satellite transmits a signal in most cases in horizontal or vertical polarization, for different satellites vertical polarization will not always be “vertical”, and, accordingly, horizontal polarization will not always be “horizontal”. Vertical and horizontal polarization will remain exclusively for the southern satellites, and for all others the polarization will be somewhat “tilted”, as shown in the figures. Therefore, both the central converter and the converter on the multifeed must be positioned at a certain angle relative to their axis. For this purpose, there are special division marks on the converters.
Calculation of the position of converters on multifeeds relative to the central head
The Rainbow TV: Installer Assistant program, which can be downloaded here, is intended for calculating the installation angles of a satellite dish. It also contains all the information for setting up the multifeed. To calculate the multifeed, you can use the corresponding tab in the program. Converters will need to be placed according to the design diagram presented on the tab as a result of the calculation.
Here is an example of a calculation using the program for our multifeeds with distances relative to the central converter:
where Hor is the distance from the core of the central converter to the center of the head on the multifeed and Ver is the distance from the center of the main converter to the center of the head on the multifeed.
Setting up a multifeed for the Hotbird 13E satellite
So, the antenna itself and one of the converters are successfully configured. After this, you should turn off the receiver and twist the cable of the central converter to the converter from the multifeed. Then turn everything ON again.
A familiar menu will appear in front of you, only now you should select Hotbird 13E and another valid transponder. As in the case described above, it is necessary to systematically achieve excellent signal reception. However, here it is not the antenna itself that will have to be moved, but the converter on the multifeed. By the way, it is capable of moving in any plane: up/down; right left; back forward.
If you see that the signal is excellent, tighten the nuts. But don't forget to check the polarizations. Scan transponders and check any channel broadcasting without payment, purely visually. Everything is okay?
Multifeed for satellite Amos 4w
Turn off all equipment again and twist the cable, as before, to the last converter. Then the setup process is repeated with some changes: the Amos 4w satellite and its operating frequency are selected in the receiver menu.
Having configured the multifeed, connect all three converters with the disk using the supplied short cables, in accordance with the attached figure.
In the receiver settings, you need to set the port parameters in accordance (set the following numbers in the Diseqc 1,1 menu: Sirius 2/Ku 4.8E - 1, Hotbird 13E - 2, Amos 4w - 3) with connecting the cables to the disk. Then, automatically search for channels by satellite. If not all channels are found as a result of the search, then you should switch to the manual search mode and search for them by entering the parameters of the missing transponders.
Is it worth covering the disks from rain or moisture?
Of course, the disk is also an electronic device and runs on electricity, and if water gets in, a short circuit cannot be avoided. You'll be lucky if it's the only one that burns. Just a bag of tape won't help, it will only make the situation worse.
But a plastic bottle with the top cut off is another matter, simple and reliable. You can get creative and find a bottle or box of a suitable shape and seal the cracks with silicone or sealant.
Modern disk drives are already sold with a plastic protective casing included.
The disek must be installed in such a way that water does not reach the connection points through the cable. Therefore, it must be raised above the level of converters.
ANTENNA tuned to 3 satellites INSTALLED SUCCESSFULLY!
Stages of setting up a dish for a satellite
The next step is a detailed instruction description of how to independently configure the installed satellite dish to receive a high-quality picture on the TV screen.
For a potential owner of television equipment, these recommendations will be very useful - guided by them, you can begin setting up.
Step #1 – setting the “azimuth” and “elevation angle”
Along with tuning the antenna, the installer will have to learn concepts such as “elevation angle” and “azimuth angle”. To make the teaching easier, let us remind you: azimuth should be represented by the angle of horizontal deviation of the “plate” to the left or right.
Both angle parameters are usually provided by the equipment manufacturer's instructions. Usually the instructions contain a table indicating large settlements and the values of the angles in relation to the location of these settlements.
An example of setting up an antenna mirror based on the “azimuth angle” parameter. To perform this action, it is most convenient to use a regular tourist compass. However, more often the direction is set “by eye”
To accurately determine the azimuth angle for a particular location, the potential installer will need a compass. Holding the device in the palm of your hand, find a position where the red arrow exactly coincides with the “South” mark.
Next, on the scale you should find the value of the “azimuth angle” for a given area, for example, 204°, and align the found point with the center of the device by placing, for example, a small ruler on the scale. The resulting direction is the orientation for the antenna.
Setting the required “elevation angle” parameter using a simple plumb line: 1 – converter module; 2 – plumb line; 3 – antenna mirror; A, B – parameters “X” of negative and positive “elevation angle”, respectively
The elevation angle can be determined using a simple plumb line and a protractor ruler. The weight, which acts as a plumb line, is attached to the zero mark of the protractor - the conventional horizon line. Next, the desired elevation angle parameter is marked on the protractor scale.
Step #2 – ensuring a high-quality TV signal
Pre-installation of the antenna mirror in “azimuth” and “elevation angle” does not always provide a high-quality picture on the TV receiver screen.
Often, the installer has to perform so-called “fine” tuning, which consists of minor changes in the position of the mirror and subsequent monitoring of the picture on the TV.
First of all, the installer should use the “Antenna Settings” OSD menu item. This section of the system menu is equipped, in addition to options with parameters, with a pair of adjustment scales.
They are located at the very bottom of the “Antenna Settings” menu window and are indicators of “fine” mirror tuning.
Performing “fine” adjustment of the direction of the mirror to the satellite signal is provided by the system menu of the transceiver - a module included in the home satellite TV equipment
As noted above, initially the frontal plane of the mirror is directed to “South”. Traditionally, users who perform the installation themselves do not use a compass due to the banal lack of a tool, but set up the mirror “by eye.”
Therefore, you have to slightly adjust the position of the “plate” by moving it horizontally.
Usually it is necessary to change the position of the mirror with some shift towards the “East”. The displacement, as a rule, does not exceed 10 mm (1 cm), after which it is necessary to wait a little (signal capture criterion) and control the levels of the indicator jacks of the setting window.
Theoretically, both signal level scales should increase. Thus, by moving the antenna mirror with small movements, it is necessary to achieve maximum values of both indicator scales (optimally 80%).
Step #3 – performing “fine” tuning
Sometimes in the process of “fine-tuning” operations, a potential installer may well encounter some nuances.
For example:
- only one indicator is filled to 80%;
- The indicator scales are filled, but there is no picture.
Such nuances are usually caused by the detection of false signals coming from other satellites or the appearance of some foreign objects in the radiation pattern area.
In such cases, you should continue to move the antenna mirror until a real signal appears.
Upon completion of the entire setup procedure, all that remains is to save the received parameters in the memory of the receiver module and start watching television broadcasts via satellite
Provided that a real source is detected, a stable image appears on the screen, which can only be brought to acceptable quality (filling at least 80% of the scales of both indicators) using the above adjustment methods.
Assuming a real signal, the option settings windows are filled with information regarding the source.
More information about setting up a satellite dish tuner is provided in this article.
Having achieved optimal adjustment of the antenna mirror, the installer needs to fix the “dish” in the optimal position. At this point, the setup work can be considered complete.
Some DIYers abandon satellite antennas and make TV signal catchers themselves. Such options are quite workable if the TV tower is installed nearby.
You can find interesting ideas and detailed instructions for their implementation in the article - DIY TV antenna: step-by-step instructions for assembling popular TV antenna models