What and how you can check
The fluorescent lamp has a not very complex design and a rather simple operating principle. This is an energy-saving type of light source that can produce the same degree of brightness as incandescent lamps, but at the same time consume 6-7 times less energy.
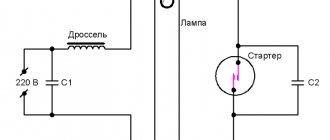
The flask of the device is evacuated and an inert gas with a small drop of mercury (30 mg) is pumped into the vacated space. Electrodes are located near the base. Each gas-discharge device is equipped with a starter, ballasts and a throttle.
Initially, the electric current arising in the starting device of the fluorescent lamp heats the bimetallic contacts, then heats the electrodes, and then opens the circuit. At the same moment, the choke delivers an arc discharge to the electrodes, resulting in ultraviolet radiation. Passing through the phosphor coating, UV rays become visible to the human eye.
Thus, the main cause of failure of a fluorescent lamp can be considered failure of:
- Ballast or electronic ballast;
- capacitor;
- throttle;
- starter.
The problem may also be a low capacitor capacity or burnt out tungsten filaments.
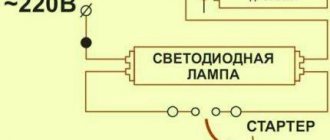
Important: if the design has electronic ballasts, it does not include a starter.
A number of devices are used to detect breakdowns. However, most often it is a simple multimeter or an indicator screwdriver.
Electromagnetic ballasts
Electronic starting and control equipment is a board with various elements soldered onto it. The easiest way to check is to replace this element with a working one and connect the device to the network. If the lamp works, then the problem was in the ballast.
It will not be possible to ring the entire board with a multimeter from both ends. You will need to check each element separately. The work algorithm will be as follows:
- Fuse. In order to ensure its functionality, you will need to check its integrity.
- Capacitors. Damage to these fluorescent lamp elements can be determined visually by swelling of the lower section of the “barrels”. You should also pay attention to the soldering points, which may be damaged and, as a result, contact will be lost.
- Transistor. This electronic ballast part most often burns out due to sudden power surges. You can check the performance of the transistor using a multimeter. To replace it, just remove the same one from another board or purchase it in the radio parts department.
- Diodes. One of the simplest elements of the device, which can also be tested with any multimeter with the appropriate test mode.
You can compare the data obtained by the device with a resistance table taken from the Internet.
Testing an energy-saving lamp with a multimeter
Such a lamp may burn out:
- filament coil;
- ballast circuit.
What exactly happened can be understood only by disassembling the device. Taking the lamp in your hands, you will notice a small recess in its lower part. It is marked with arrows in the photo.
Carefully, trying not to break the lamp body, you need to place the tip of a screwdriver or the blade of a knife into this cavity. After which the body needs to be slightly raised
The main thing is to do everything carefully so as not to break the flask.
Having disassembled the device, you can see that all the wires inside are simply intertwined with each other, without any thermal connection. Inside you can see a round board, darkened due to overload. There are square-shaped bayonets installed at the edges of the board. These are some kind of terminals. Power wires are connected to them. The wires are simply wound around these terminals.
As soon as the wires are untwisted, each of the spirals needs to be tested with a multimeter. This will allow you to determine which one has burned out.
Having determined what exactly is broken in the lamp, we can safely replace the failed spiral with a working one.
How to check the starter
The starter performs two main functions: closing and breaking the circuit. In the first case, the electrodes are heated, in the second, an increased voltage pulse is formed (after the circuit is opened).
Starter failure is the most common cause of fluorescent lamp failure. A defect in the operation of this part is indicated by the blinking of the lamp during operation or its complete failure to turn on.
The easiest way to check for serviceability is to replace it with a similar working device. However, it is not always possible to find a spare part of the same power at hand. You can check the performance of a part even without a measuring device. It is enough to organize a simple electrical circuit from a 40 W incandescent lamp and a starter with power connected to a 220 V outlet.
If the light comes on and blinks for a split second, it means the element is in working order. Otherwise (if it does not light up or lights up without interruption), the starting device is faulty.
Important! When working in this circuit, periodic clicks should be heard, indicating that the contacts are working properly.
It is impossible to check the starter for resistance. This is due to its special structure.
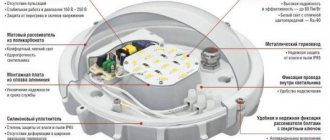
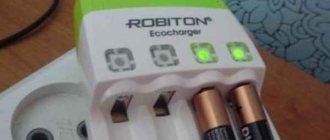
Checking the serviceability of LED spotlights
The “stuffing” of the spotlight has its own characteristics.
Before checking an LED, you should determine what type it is. The following are usually installed inside such spotlights:
- a board with several small SMDs that can be tested by testing, similar to conventional LED lamps;
- a powerful yellow LED with a voltage of ten to thirty volts.
Reference. The high-power LED has too high a voltage for a multimeter; check it using a driver. The characteristics of the driver must match those of the LED.
Is it possible to check with a multimeter at home?
The easiest way to check is to use a similar lamp, install a fluorescent lamp in it and then connect it to the network. But there is not always a device with the same type of cartridge for replacement. In addition, the screw threads of the base and the socket may not match, and as a result, the electrical contacts simply will not close.
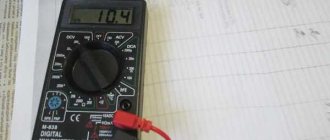
In this case, a very common measuring device, a multimeter, comes in handy at home. Among its modes you can find a “continuity test”, which easily determines the integrity of the electrical circuit.
The check is very simple:
- the appropriate mode is selected;
- the first probe is placed on the central contact, and the second on the side;
- readings are taken from the device.
The second mode often used for diagnostics is “resistance”. During the test, probes are also used and the initial values are compared with those detected by the multimeter. A small error in measurements may occur due to weak contact with the probes.
Troubleshooting and Troubleshooting
All LDS malfunctions boil down to the following:
- the product does not turn on;
- the light flickers and turns off;
- the flickering lasts a long time, the product does not light up;
- buzzing without turning on;
- LDS lights up, but flickers.
These manifestations lead to vision damage, so the lamp should be repaired immediately. To test a fluorescent lamp, you need to have a multimeter to measure resistance. First, replace the lamp with a suitable one. If it turns on, that’s the problem; if it doesn’t light up, use the tool.
A common cause is loose contact between the lamp electrodes and the socket terminals. They need to be cleaned with an alcohol-containing product or an eraser, use fine-grain sandpaper for this, or simply bend the pins slightly. This method works well when troubleshooting problems at home.
LDS is not designed to operate at low ambient temperatures and with large voltage surges in the network (more than 7%).
Troubleshooting Lamps
A faulty fluorescent lamp can be determined by external signs, as well as by the peculiarities of its operation.
| Sign | Cause |
| Darkening of the sides of the flask | Full service life |
| The lamp glows at the ends, but does not fully ignite | Failure of the starter or capacitor |
| Flashing and glowing lamp from one end only | Fault in holder or wiring |
| Changing the glow spectrum | Violation of the integrity of the layer or properties of the phosphor coating |
| The hum of a working lamp | Throttle fault |
| Overheating of ballasts | Violation of plate insulation |
| Reduced luminous flux | Capacitor problems |
| Orange glow at the ends of the lamp | Depressurization of the flask |
| Enabling startup protection | Breakdown at the input of the compensating capacitor |
| Lighting and rapid extinction of the lamp, starting from its ends | Throttle fault |
| Lighting up and shutting down | Problems with the starter |
And yet, any of the possible causes should be further diagnosed and checked using special equipment or constructing a simple electrical circuit.
Classification of fluorescent lamps
Fluorescent lamps exist in limited versions. By and large, there are only two options, linear and compact. There are also ring and U-shaped ones, but they are often classified as linear varieties. They have the same structure, size and shape of a glass tube.
Fluorescent light sources are divided into general lighting devices and specialized devices. For general lighting, devices with a power of fifteen to eighty watts are usually used. In this case, additional characteristics of light and different lighting spectrum may be present.
They can imitate regular lighting in various colors and shades. The criteria for dividing such lamps are power, type of discharge, type of radiation, shape of the bulb and method of light distribution.
Various shapes
Each of the presented options has separate subgroups that more accurately characterize the device. For example, the power may be 15 watts, such a lamp will be low-power. When using an 80-watt device, the lamp is called heavy-duty.
Light emission is divided into the following types:
- Natural light.
- Emission of a colored spectrum of light.
- Special types of radiation for special cases and conditions.
Marking is done using letter designations. It starts with the letter L, this indicates that the device is luminescent. The next letter shows the spectrum of emitted light, for example, D - natural daylight, B - white light and other options, where the letter corresponds to the first letter of the lighting color used.
If the light source produces warm light, then the color designation will be preceded by the letter B, respectively, cold light will be indicated by the letter X.
Labeling for domestic products
Additional designations are also carried out using the following letters:
- C – improved quality of light transmission.
- CC – super high-quality transmission.
- P – indicates that the type is reflex.
- B – quick or instant start device.
At the very end there is a designation of numbers that displays the power of the device in watts.
Main conclusions
Checking a gas discharge device is more difficult than diagnosing a conventional incandescent lamp. First of all, this is due to its more complex structure and the presence of additional elements.
- The cause of lamp failure may be a breakdown of one of its elements: limiter, starter, electronic ballast or capacitor.
- In most cases, you can check their serviceability using a multimeter tester.
- Based on a number of external signs, the cause of a fluorescent lamp failure can be diagnosed.
You can find out why a fluorescent lamp stopped working at home, without the help of a specialist. To do this, it is enough to have a measuring device and a summary table of resistance values at hand.
Previous
Lamps and fixturesChoosing lighting options for paintings
Next
Lamps and lampsTypes and principle of operation of a fluorescent lamp
Checking filaments (spirals-electrodes)
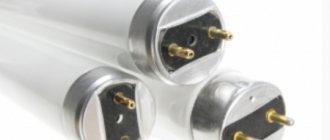
One of the causes of the malfunction is the electrodes that perform the function of filaments. They are placed inside a tube filled with gas, and their ends are soldered to the contact legs of the base that extend out. Checking the integrity of the spirals is carried out using a multimeter or tester connected to the terminals located at one end of the glass flask.
To carry out measurements, the multimeter is set to resistance measurement mode with a minimum limit or continuity mode. Checking the spirals is carried out alternately, at both ends. If the spirals are in good condition, the indicator lamp will light up and the buzzer will produce sound signals. The multimeter display will show a resistance within 5-10 ohms.