Homemade contactless dialing
Below is a diagram of a simple non-contact break detector; it can be assembled within one evening. Considering the small number of parts, you don’t have to bother making a printed circuit board, but use wall mounting.
Detector circuit
List of required radio components:
- variable resistance R1 – 100 kOhm;
- resistor R2 – from 4 to 8 MOhm;
- electrolytic type capacitors: C1 and C3 – 220 µF, C2 – 33 µF;
- ceramic capacitor with a capacity of 0.1 μF;
- D1 – LAG 665 chip (preferably in a DIP package);
- SP is a regular earphone from a telephone headset.
The circuit can be powered from a source with a voltage of 2 to 5 volts.
The dipstick (P) is made on the basis of a regular spoke from a bicycle wheel.
Probe for a homemade break detector
Properly assembled contactless cable testing does not require adjustment.
Video: Do-it-yourself cable testing. How to test wires using a light bulb and battery
If you calculate the cost of all the necessary parts, it is easy to see that the result obtained will be an order of magnitude less than the cost of services for detecting a broken wire, indicated in construction estimates.
{SOURCE}
How to install hidden wiring in an apartment
- Fix the distribution board to the wall, at a height of 2 m from the floor, and install fuses and a meter on it.
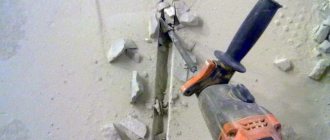
- Along the lines marked on the wall, to accommodate the wires, grooves are made - grooves. To do this, you can use a grinder equipped with a special abrasive disc, a chisel or a chisel.
- Using special loops or plastic clamps, secure the wires in the grooves and cover them with plaster or alabaster.
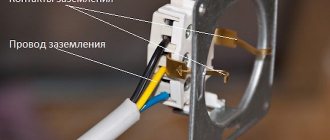
- Make recesses in the wall for sockets and switches. To do this, you can use a hammer drill or drill. Install socket boxes in them on alabaster. Install junction boxes.
How to replace wiring in an apartment
For safety reasons, before starting work on replacing old wiring, the apartment must be completely de-energized.
Replacing the wiring in an apartment is carried out by gradually laying new wires parallel to the outdated ones, while simultaneously connecting switches and all sockets to them, moving from one room to another. It is recommended to start work from the distribution panel. In this case, you must try not to damage the old cable. After the cable has been pulled into all rooms, it is laid in grooves, from which the old wire is completely removed. If this cannot be done, new channels are made above or below the old ones at a distance of 50 mm. The cable ends are connected in junction boxes using terminal blocks
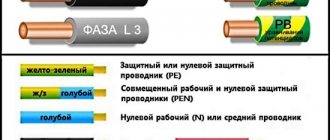
It is important not to confuse the wires going to zero and to phase. They should be different colors. Fastening the wires in the grooves - on alabaster, followed by putty. Connecting switches and sockets is done after the putty is completely dry.
The bare ends of the wires are serviced using a soldering iron before connection. If replacing the wiring in an apartment requires running it through the wall, the input cables must be pulled through a metal sleeve or corrugated pipe inserted into a hole made in the wall.
We check the wiring in the apartment with a multimeter
Let's take as an example a modern apartment in which the wiring is done in accordance with current requirements and standards. This means that when laying the lighting lines and power outlets, they were separated, and separate wires were laid for them in each of the rooms. Each of these circuits is powered from the apartment panel through a separate circuit breaker.
If the light has gone out in one of the rooms, you should first check that the lamp is working properly. Before starting work, it is necessary to turn off the power to the room/apartment depending on the power supply. When using an opaque incandescent lamp in a lamp, the integrity of the filament is difficult to visually determine, so you will need a multimeter and its continuity function. Let's figure out step by step how to do this correctly.
First you need to check the shield for triggered circuit breakers. In the first case, they will be in the on position (then the fault may be hidden in the room switch, lamp or socket). The likelihood of damage to the wiring in such a situation is low. If the device works, you will need to check everything except the room switch, including the switchboard itself.
If the machines don't work
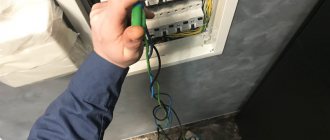
We ring the switch. When the switch is on, there should be a sound signal, when off, there should be silence and “1” on the indicator.
- Make sure there is voltage at the input and output of the machine. If it is, you can proceed to further verification.
- Prepare the device for operation and check its serviceability by short-circuiting the measuring leads.
- Unscrew the lamp from the socket.
- Touch one of the measuring probes to the base (the metal part of the lamp with threads), and the second to the central contact of the lamp (the insulated center of the end part of the base).
- A sound signal and instrument readings that are different from 0 or 1 mean that the lamp is working. If it is faulty, you need to replace it, which will solve the problem.
- We check the cartridge for serviceability. To do this, you need to disassemble the lamp, make sure that the connected wires and contacts are intact. If everything is in order, then the cause of the failure is not in the cartridge. If malfunctions are detected, they must be eliminated. The lamp cannot be screwed in yet.
- We check the serviceability of the room switch. To do this, remove the plastic cover, unscrew the screws and take it out of the mounting box. We inspect the equipment for the appearance of carbon deposits and check the tightness of the fasteners. If everything is in order, you need to install the measuring ends of the tester on the contacts of the switch. The appearance of a sound signal when dialing in the on position will indicate that the equipment is working properly. The wires do not need to be disconnected.
During such a check, as a rule, a malfunction is identified, which becomes the cause of all the troubles. Eliminating it allows you to quickly solve the problem.
If the machine worked
To ensure electrical safety during work, in this case the voltage is turned off using a general apartment circuit breaker. Next, the serviceability of the socket and the wires connected to the lamp is determined according to the algorithm described above. If there are no faults, you need to check the wiring itself using a multimeter and the continuity function. Such malfunctions happen quite rarely, but they still happen, for example, when installing suspended ceilings or decorative interior elements.
The wiring in this case is performed as follows.
- Using a screwdriver, disconnect the connected conductor (if installed correctly, it is located at the bottom) and move it to the side. The “zero” of this group is, as a rule, located at the zero clamp under the machines.
- Unscrew the incandescent lamp from the socket. Using a ready-to-use tester, we check the line by connecting one of the measuring probes to “zero” and the other to the disconnected conductor. If the device beeps, it means the wiring is shorted.
- In this case, in the room under the ceiling above the switch, we find and open the junction box. We disconnect the wires.
- We check all groups of wires for short circuits. To determine the section of the circuit in which there is a short circuit, we again check the circuits on the apartment panel with a multimeter. If the signal sounds, it means that it is the wire laid from the switchboard to the box in the room that needs to be repaired. Otherwise, the search will need to be continued until a result is obtained.
Means of protection
Residual current device (RCD)
To protect yourself from electric shock and household appliances from breakdowns, the following protection methods are used:
- grounding of all home appliances and devices;
- installation of SHDUP (additional potential equalization bus) in the bathroom;
- installation of an RCD that responds to total readings of about 100 mA and quickly turns off the devices;
- installation of a circuit breaker that cuts off electricity only in damaged areas;
- replacing the terminal strips in the panel and connecting them with high-quality terminals;
- laying a new electrical line with high-quality insulation.
Detection of current leakage will protect a person from injury or death and prevent equipment breakdowns. Independent changes should be carried out in compliance with safety precautions, and the line of defense should be organized with the involvement of qualified electricians.
How to choose the right wires and devices for protection
For residential electrical wiring, copper wires are best suited. Unlike aluminum wires, they have greater flexibility and high electrical conductivity.
Most often, PUPN or VVG wires with two or three cores are used. They have different cross-sections. To determine what cross-section of cable is needed, add up the power of all household appliances and divide by 220. If the result does not exceed 16 A, then a wire with a cross-section of 1.5 mm2 is sufficient.
It is usually used to supply current to lighting fixtures, and for sockets it is advisable to choose a cable with a cross-section of 2.5 mm2. Modern automatic machines and electric stoves will require a cable with a cross section of 4 mm2.
To protect household appliances from voltage surges and the consequences of a short circuit, you will need:
- RCD 30 mA class A - in the bathroom.
- Automatic plug 25A type B – to ensure the safe operation of electrical appliances.
- Automatic plug 10A and 16A type B – for lighting network.
What to check
It is known that the wiring in an apartment consists of wires carrying electricity and auxiliary elements, including couplings, fasteners, etc. The reliability and quality of electrical energy production will directly depend on the condition and serviceability of all these elements. In addition to these, sometimes the electrical equipment itself also needs to be checked. Experts recommend checking the wiring by testing the wires from one point in the circuit to another.
How does a multimeter work?
Even a beginner who has never dealt with electrical work can ring the wiring. The main thing is to be careful. To test the wiring, the multimeter must be switched to resistance testing mode. After this, the clamps are connected to the ends of the electrical wires. High-quality cables should have a resistance that will not exceed 1 ohm. If the wiring in the apartment is faulty, it will have resistance, which is sometimes even more than 10 ohms. If one of the wires in the wall is broken, the device will display a unit on the left side of the screen. This means that the measured resistance is greater than 200 ohms. In this case, it can be stated that the contour has a significant gap.
Using a multimeter, in addition to checking the wiring, you can also check the performance of batteries, determine the voltage in the apartment's sockets, as well as the current strength in high-voltage wiring.
Checking the circuit for open circuit
To check the circuit for an open circuit, in addition to a multimeter, you can also use a special tester. Such a device is a metal rod in an insulating material with a light bulb, a battery and a clip connected to the wire. The tester makes it very easy to determine whether there is voltage in the wiring in the apartment. To check for a break, fix one end of the wire with a clamp, and touch the other with a rod. If the light on the device lights up, this means that electric current is passing through the area.
It is important to note that before checking the circuit for an open circuit, you need to turn it off
Wood is an extremely grateful material. Strong enough to last, hard enough to hold even a very thin shape, enough.
Karambit is a very specific melee weapon that became suddenly popular thanks to the game Call of Duty: Black Ops, and also numerous.
How to check the wiring in an apartment: devices, methods and sequence of actions
Electrical wiring is one of the most important aspects in modern homes. When purchasing a home, during renovations, or when malfunctions occur, it is necessary to find out the condition. There are several ways to check the wiring in an apartment yourself.
How to ring a wiring
Testing the socket with a multimeter
The easiest way is to contact specialists. If you master the rules and techniques, you can cope on your own.
Rules for safe wiring
Operations with electricity require compliance with technical safety standards. In addition to maintaining health, the rules allow you to complete the job quickly and accurately. The main points include:
- de-energizing the circuit;
- the ends of the wires must be secured with lugs - “crocodiles”;
- When checking long wires, it is important not to touch them with your fingers;
- Multi-core cables are separated and stripped.
The last rule is important when working with circuits that are designed for high voltage networks. If the load is small, you can simplify the process.
How to check wiring during installation
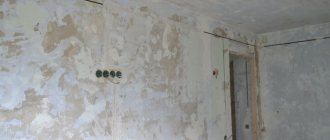
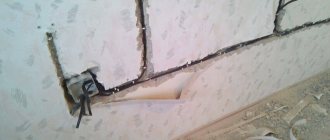
Cable laying in the groove
The wires are laid in special grooves (recesses) or along the walls. This is followed by the stage of plastering and finishing. Checking the wiring in an apartment or other premises is carried out up to this point.
Builders and electricians make mistakes. In the first case, it is necessary to carefully monitor and check the work. In the second, use the prepared diagram and promptly check the wiring in the apartment (before plastering and finishing). Checking the electrical wiring begins with the following activities:
- visual inspection;
- short circuit test;
- checking with a megohmmeter;
- ringing
Electrics are one of the most important elements of any renovation. Poor quality wiring cannot withstand stable or high voltage.
How to test wiring with a multimeter
To test the wires in an apartment, the easiest way to understand the operating diagram is to use a multimeter. If we assume that the electrical system was initially installed according to all the rules, the check will not take much time.
When a light bulb goes out in a room, the first thing you need to do is check if it is working properly. De-energizing the room is the initial stage. Testing the wiring with a multimeter is a quick and safe way to check the electrical system in an apartment. If you follow the rules and safety requirements, you can do this yourself.
What to check
Using a multimeter, they check devices - lamps, switches, sockets - and electrical wiring. Measurements are taken both locally and throughout the room.
How does a multimeter work?
The outer panel contains a display and a switch. The numbers show serviceability and voltage. The following symbols are located on the outside:
- OFF – on/off;
- ACV – voltage (variable);
- DCV – voltage (constant);
- DCA – current (direct);
- Ω – resistance indicator.
There are connectors for probes and for testing transistors.
Before starting work, it is important to correctly position the probes: black - COM, red - up to 200mA in VΩmA, above 200mA in 10ADC.
Checking the circuit for open circuit
Testing is a way to find out whether current is passing through wires. The multimeter is connected and a discharge is released. The device shows resistance. If there is no break, the device will beep and the screen will show zeros.
The resistance level depends on the cable length. There should be no contact between the wires of a multi-core cable product - this is checked by a multimeter.
Conductor integrity check
You can monitor the integrity of the cable using a multimeter. In this case, the amount of current passed does not matter - the voltage either passes or does not. The measurement error is not important.
The stranded wire is first separated, then each is checked with probes. If everything is in order, the device will emit a sound signal, and there will be no short circuit between the individual wires.
If the machines don't work
Sometimes problems occur due to a power surge and automatic shutdown of machines on the meter. If everything on the panel is in the on mode, faults should be looked for in the socket, lighting device and switches.
- Check the voltage on the machine.
- The device is tested for serviceability - the ends of the wires are short-circuited.
- Remove the lamp from the socket.
- One probe touches the base, the other touches the center.
- If a signal appears and a value on the screen other than 0 or 1, the device is working properly.
- They check the cartridge - disassemble the device, check the integrity of the contacts and wires.
- They check the switches - remove the protective cover, unscrew the bolts, and pull them out of the wall; carry out an inspection; The ends of the multimeter are connected to the contacts - if there is a sound and a value, the device is working properly.
Such a check will allow you to identify faults in devices (lamps, sockets, etc.).
If the machines are triggered, it is necessary to test the electrical wiring in the apartment with a multimeter.
If the machine worked
Junction box
First of all, the housing is de-energized by turning off the general apartment circuit breaker. Perform the following actions:
- Use a screwdriver to disconnect the conductor.
- Unscrew the incandescent lamp from the socket.
- Touch the conductor with one probe and the “zero” with the other.
- If a signal appears, the electrical is shorted;
- You need to find the junction box at the top, under the ceiling.
- Separate the wires, check with probes, then check the cables again on the apartment panel.
If the signal sounds when checking from the panel to the box, then the problem is in this area. If not, the check continues.
Checking the outlet
Any multimeter – analog or digital – is suitable for testing the socket. The device will allow you to determine the performance and voltage level. The meter is prepared - turned on, set the knob to alternating voltage. For domestic premises, a level of 750 Volts is suitable.
Finding the break point
After a break in the electrical wiring has been discovered, it is necessary to localize the place where it happened. For dialing in this case, you can use a tone generator, for example, the Cable Tracker MS6812R or TGP 42. Such devices allow you to determine the location of the break with centimeter accuracy, as well as determine the route of hidden wiring; in addition, the devices have other useful functions.
Model MS6812R
Devices of this type include an audio signal generator and a sensor attached to an earphone or speaker. When the sensor approaches the place where the UTP cable pairs or electrical wiring wires are broken, the tone of the sound signal changes. When a tone test is performed, the wiring must be de-energized before connecting the sound generator, otherwise the device will be damaged.
Note that with the help of this device you can test both power and low-current cables, for example, check the integrity of twisted pair cables, radio wiring or communication lines. Unfortunately, such devices will not allow you to determine the correct connection; special equipment is used for this purpose - cable testers.
Methods for installing wiring in an apartment
- The simplest is the open method. No preparatory work is required to complete it. The wires are fixed to the wall or ceiling using special brackets. They can be decorated with installation boxes. In wooden buildings, in order to ensure fire safety, it is recommended to use open wiring in the apartment.
- In most city apartments, a hidden installation method is recommended, in which wiring in the apartment is carried out before finishing work begins. For example, in order to hang a chandelier from the ceiling and then connect it to the electrical network, it would be advisable to use hidden wiring. In brick houses, grooves are made for this purpose. In panel houses, wires are laid in special channels provided in the slabs. The disadvantage of hidden wiring is the high probability of damage during wall and ceiling repairs.
How to check the wiring in an apartment - electrician tips - Electro Genius
You are here: In this article we will look at a very important and interesting topic - how to check the wiring in an apartment or house with your own hands. The need to check the electrical system arises in several cases: when purchasing a new home, during renovations before finishing the walls, in case of problems, and also sometimes after the apartment is flooded.
If you doubt your abilities and have no experience at all in electrical installation work, we recommend calling a specialist who can quickly and, most importantly, correctly inspect the electrical wiring.
However, if you know how to use the tester and at the same time are regular readers of our website for electricians, we recommend that you familiarize yourself with the testing methodology described below.
How to check wiring correctly
Electrical wiring is checked in order to identify faults, make a decision on further operation during repair work in the building, and also to obtain information about the condition of the wiring after emergency situations.
Such situations include flooding of the premises or the activation of protective devices when there are no problems for consumers.
In apartments and private houses, it is necessary to check the wiring immediately after purchasing the premises, if it was previously operated by other persons.
Replacement timing
After the electrical wiring has reached the end of its service life, it needs to be completely replaced without testing or inspection. The timing of inspection, replacement or interval between major repairs is established by VSN 58-88(r) (departmental building codes) and is:
- for hidden indoor networks 40 years;
- the same, but for open 25 years;
- for main wiring between apartments and input and distribution devices 20 years;
- for production and technical premises and lighting of public places 10 years.
Checking the electrical wiring in an apartment or private house, despite its apparent complexity, if you have the necessary knowledge and a minimum set of tools, you can do it yourself, without inviting a qualified electrician.
Types of faults
Faulty electrical wiring can cause fires and electric shock. Basic electrical wiring faults can be of two types:
- wire breakage, and, as a result, lack of electric current in any part of the circuit;
- short circuit of a phase wire with a neutral or ground wire, which leads to the circuit being disconnected by protective devices.
Checking and troubleshooting hidden wiring is greatly facilitated if there is a detailed diagram of the wiring in the room. This diagram is mandatory when drawing up a technical passport of the premises.
If there is no diagram, you need to determine the location of the wiring routes in the walls. Subject to compliance with the requirements of the PUE, wires and cables must run in a straight line connecting distribution boxes with sockets and switches. In this case, the routes must be strictly vertical or horizontal.
Causes of current leakage
Leakage occurs even when the equipment is operating normally, but danger arises when the differential current limit is exceeded. The permissible rate may increase in several cases.
From an electrical appliance in an apartment or house
Breakdown to the housing in systems: A) TN-CS, B) TN-C
Voltage occurs on the body of household appliances (most often a water heater or automatic machine). The reason is damage to the heating element or breaks in the insulation. In a three-wire or two-wire equipment connection diagram, the phenomenon manifests itself in different ways:
- Three-wire connection of the device according to the TN-CS scheme. In case of breakdowns of the grounded housing, the leakage is directed to the PE bus. The electromagnetic or thermal protection of the circuit breaker on the supply line is activated.
- Two-wire connection of the device with grounding type TN-C. The leak will not cause the circuit breaker to trip and the equipment will continue to operate until a differential current is generated. The phenomenon will occur when touching the body, building element or water supply pipes. The leakage conductor from the device to the ground will be a person.
In hidden wiring in a house or apartment
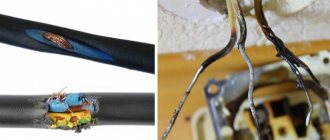
Damage to hidden cable insulation
When wiring is hidden, there is a risk of damage to the insulated cable cores. They occur in the following cases:
- Exceeding the standard service life. An apartment in a building built in the 50s-90s of the 20th century is equipped with aluminum or copper wiring. According to VSN 58-88, copper current-carrying conductors are replaced once every 30 years, aluminum - once every 30 years.
- Incorrect use. Overloading the power supply leads to heating and destruction of the insulation of the power cable.
- Mechanical damage to current conductors. They occur when the installation technology is broken or the walls are drilled incorrectly.
How to check wiring correctly
Electrical wiring is checked in order to identify faults, make a decision on further operation during repair work in the building, and also to obtain information about the condition of the wiring after emergency situations. Such situations include flooding of the premises or the activation of protective devices when there are no problems for consumers. In apartments and private houses, it is necessary to check the wiring immediately after purchasing the premises, if it was previously operated by other persons.
Replacement timing
After the electrical wiring has reached the end of its service life, it needs to be completely replaced without testing or inspection. The timing of inspection, replacement or interval between major repairs is established by VSN 58-88(r) (departmental building codes) and is:
- for hidden indoor networks 40 years;
- the same, but for open 25 years;
- for main wiring between apartments and input and distribution devices 20 years;
- for production and technical premises and lighting of public places 10 years.
Checking the electrical wiring in an apartment or private house, despite its apparent complexity, if you have the necessary knowledge and a minimum set of tools, you can do it yourself, without inviting a qualified electrician.
Types of faults
Faulty electrical wiring can cause fires and electric shock. Basic electrical wiring faults can be of two types:
- wire breakage, and, as a result, lack of electric current in any part of the circuit;
- short circuit of a phase wire with a neutral or ground wire, which leads to the circuit being disconnected by protective devices.
Checking and troubleshooting hidden wiring is greatly facilitated if there is a detailed diagram of the wiring in the room. This diagram is mandatory when drawing up a technical passport of the premises.
If there is no diagram, you need to determine the location of the wiring routes in the walls. Subject to compliance with the requirements of the PUE, wires and cables must run in a straight line connecting distribution boxes with sockets and switches. In this case, the routes must be strictly vertical or horizontal.
Wire inspection
During the process of major renovation of a premises, the electrical wiring is usually replaced entirely.
When making cosmetic repairs, the wiring is examined in order to decide whether it can be used in the future, and for how long its trouble-free operation is possible.
At the slightest sign indicating that the electrical wiring does not meet the requirements of the standards, it is better to replace it before finishing work begins.
The inspection consists of inspecting and checking wires, sockets, switches, and measuring the insulation resistance of electrical wiring.
The decision to replace the wiring in the premises is made if wires and cables with aluminum conductors are identified. Such cables are currently used only for external wiring.
Replacement of wiring is also necessary in cases where the cross-section of the wires does not correspond to the increased total load of electrical appliances.
Sections of circuits must be replaced if the inspection results reveal damage to the cable either mechanically or due to overheating as a result of overload.
Replacement of the wire or cable must be carried out along the entire length of the section between the junction boxes and electrical installation devices. Replacing sections of the circuit is necessary if, during the inspection, wire connections are found outside the junction boxes.
After checking and replacement, the characteristics of the electrical network will change, so it will be necessary to select other protective devices with parameters that correspond to the new network. At the end of their service life, electricity metering devices must be replaced.
Rules for safe calling using a multimeter
Working with electricity does not allow for unprofessionalism, so a certain list of rules has been developed that make it possible to make it as accurate, fast and safe as possible.
When making calls, it is most convenient to use special tips at the ends of the measuring wires, which are more commonly known as “crocodiles”. They will make the contact stable and free your hands when taking measurements. When testing, the circuit being tested must always be de-energized (even low-current batteries must be removed). If there are capacitors in the circuit, they must be discharged by short-circuiting
Otherwise, the device will simply burn out during work. Before checking the integrity of a long length of conductor when taking measurements, it is important not to touch its bare ends with your hands. This is due to the fact that the resulting readings may be incorrect.
When testing a multi-core cable, it is necessary to separate and strip all existing cores from both ends. After this, you need to check the circuit for the presence of short circuits in it: to do this, a “crocodile” is attached to each core in turn, and all the remaining ones are touched with the other measuring end in all possible combinations.
In this case, a sound signal will indicate the presence of a short circuit between the tested conductors
This may not be of practical importance for small cross-section multi-core cables operating in low-current networks, but when working with high voltages it is fundamentally important
To determine the integrity of the cores, the same operation is performed, only at one end of the cable all stripped cores are twisted together
When searching for a break, it is important to consider that the absence of a sound signal at either end will indicate a violation of the integrity of the conductor
How to ring a wiring
Testing the socket with a multimeter
The easiest way is to contact a specialist. If you master the rules and techniques, you can cope on your own.
Operations with electricity require compliance with technical safety standards. In addition to maintaining health, the rules allow you to complete the job quickly and accurately. The main points include:
- de-energizing the circuit;
- the ends of the wires must be secured with lugs - “crocodiles”;
- When checking long wires, it is important not to touch them with your fingers;
- Multi-core cables are separated and stripped.
The last rule is important when working with circuits that are designed for high voltage networks. If the load is small, you can simplify the process.
Cable laying in the groove
The wires are laid in special grooves (recesses) or along the walls. This is followed by the stage of plastering and finishing. Checking the wiring in an apartment or other premises is carried out up to this point.
Builders and electricians make mistakes. In the first case, it is necessary to carefully monitor and check the work. In the second, use the prepared diagram and promptly check the wiring in the apartment (before plastering and finishing). Checking the electrical wiring begins with the following activities:
- visual inspection;
- short circuit test;
- checking with a megohmmeter;
- ringing
To test the wires in an apartment, the easiest way to understand the operating diagram is to use a multimeter. If we assume that the electrical system was initially installed according to all the rules, the check will not take much time.
When a light bulb goes out in a room, the first thing you need to do is check if it is working properly. De-energizing the room is the initial stage. Testing the wiring with a multimeter is a quick and safe way to check the electrical system in an apartment. If you follow the rules and safety requirements, you can do this yourself.
Cable with faulty insulation
The check is carried out in several cases - after the initial electrical installation, after purchasing the premises, in case of malfunctions. There are several ways to check the electrical wiring in an apartment. Each one helps in certain cases.
We invite you to familiarize yourself with: The task of accounting entries in connection with the discovery of defects in production
The insulating layer - its quality and condition - has an impact on the operation of the electrical system. Problems may occur during manufacturing, transportation, or operation. The main ways to check electrical insulation in an apartment:
- periodic, independently or with the help of professional electricians;
- automatic, through special devices throughout the entire technical cycle.
In the first case, a multimeter is used. It is mandatory to assess the external condition of all accessible cables. Insulation is checked through measurement and testing. In stranded wires, the absence of short circuits between them is checked by connecting them alternately.
Broken wire is one of the most common wiring problems. There can be a lot of reasons; the testing methods depend on which cable needs to be examined:
- Cutting (the wire lies on the table) - touch both ends with probes (parameters for “Ohm” or “Ω”, value 1000 Ohm). If there is a malfunction, the device will show EL or a very large number.
- Hidden wiring - the wires are de-energized, separated from the devices, and the ends are connected with a separate wire to create a whole circuit for testing. Next, each is examined with a multimeter.
Knowing how to use a multimeter and how to check the electrical wiring in an apartment, you can find the location of the short circuit. Sometimes devices turn off for no obvious reason. It is necessary to determine the presence or absence of contact.
A short circuit is a connection between the neutral and phase wires without appropriate resistance. Thus, it is enough to check only these two cables. In addition to de-energizing, switches are removed, lamps and appliances are turned off. Check in a junction box or a non-working outlet.
Problems of assessing the condition of wiring
Accurate knowledge of information about the load and condition of the apartment’s electrical wiring is necessary for its reliable organization and elimination of problem areas in all rooms.
Preparing premises for renovation
Buying an apartment often involves its subsequent reconstruction for decent living. The volume of construction work is affected by the quality of electrical wiring.
Its condition must be identified first of all before leveling the walls with plasterboard or other methods, painting them with special dyes or gluing wallpaper on them, applying decorative plaster and other finishing methods.
This is especially true for hidden wiring inside walls and building structures.
The scope of repair work greatly depends on:
- the need to completely redo the electrical wiring in the apartment with the replacement of all components, gating of walls for laying new cable routes;
- the possibility of only partial replacement of individual lines or equipment;
- the prospect of leaving reliable wiring in its original form without any alterations.
A realistic assessment of an apartment’s electrical wiring allows you to accurately plan the scope of repair work and take their cost into account in the family budget.
Clarification of the electrical diagram of the apartment
Unfortunately, not all apartment owners have a complete understanding of where and how cables and wires are laid, how they are configured:
- load sensing circuit breakers;
RCD or difavtomat;
voltage control relay;
arc protection type UZM-51;
Other devices.
Quite often, after eliminating an accident, you have to quickly search for hidden wiring inside building structures to eliminate faults. And all this takes time, and it is difficult to guarantee an accurate result due to the imperfection of search tools.
When checking the condition of the electrical wiring, both the electrical circuit diagram and the installation diagram of the apartment must be clearly marked, indicating on them the locations of the end points and the passage of cable routes in all rooms.
Particular attention is paid to the places where the wires are connected, the ease of use of junction boxes, and the correct signature of the controls in the apartment panel. The computer program Electrician 7.8 is designed to facilitate the search for technical information and the solution of specific issues in electrical wiring for the home handyman.
It contains a lot of reference material and various options for constructing electrical circuits based on their load.
The computer program Electrician 7.8 is designed to facilitate the search for technical information and the solution of specific issues in electrical wiring for the home handyman. It contains a lot of reference material and various options for constructing electrical circuits based on their load.
Registration of work results
Checking the electrical circuit of the apartment should end with saving a working document that can be quickly used if necessary.
To do this, you can simply draw it on paper using accessible methods or create it in a convenient computer program, for example, Visio, and then simply print it out on a printer.
Finding problem areas
This is the main task of wiring assessment. The entire layout of the apartment must be carefully examined, its technical condition checked, defects and weak points identified.
Problem areas are understood as those branches of the electrical installation that no longer comply with safety rules for the loads of connected electrical appliances. They need to be redone.
This also includes those parts where the state of installation raises doubts about the reliability of its operation at maximum load. For example, old wiring with poor quality twisting without welding or soldering of aluminum or copper wires with a reduced cross-section.
Over time, such places are subject to oxidation of metals, leading to an increase in contact resistance at the points of electrical contact and increased heating. This contributes to further damage to both the insulation and all wires.
Aluminum conductors, which were previously widely used in power supply for household consumers, do not cope well with powerful modern loads and operate at the limit of their capabilities. PUE does not allow their installation in residential premises under construction, and in old houses they are completing their service life and already require replacement.
Diagnostics of the electrical wiring of an apartment before purchase - UK Energotechservice LLC
The safety of living in a modern home and the comfort in it depend on many factors. The state of the electrical power supply circuit for household consumers is one of the first places in this matter.
- It can work reliably and unnoticed for decades or constantly cause problems for the owner if installed incorrectly.
- The tips we have selected are intended to help the home handyman to independently assess the electrical wiring of an apartment when purchasing it or in everyday life, as well as to eliminate identified defects.
- For clarity, they are supplemented with pictures, diagrams and a video.
Problems of assessing the condition of wiring
Accurate knowledge of information about the load and condition of the apartment’s electrical wiring is necessary for its reliable organization and elimination of problem areas in all rooms.
Preparing premises for renovation
Buying an apartment often involves its subsequent reconstruction for decent living. The volume of construction work is affected by the quality of electrical wiring.
- Its condition must be identified first of all before leveling the walls with plasterboard or other methods, painting them with special dyes or gluing wallpaper on them, applying decorative plaster and other finishing methods.
- This is especially true for hidden wiring inside walls and building structures.
- The scope of repair work greatly depends on:
- the need to completely redo the electrical wiring in the apartment with the replacement of all components, gating of walls for laying new cable routes;
- the possibility of only partial replacement of individual lines or equipment;
- the prospect of leaving reliable wiring in its original form without any alterations.
A realistic assessment of an apartment’s electrical wiring allows you to accurately plan the scope of repair work and take their cost into account in the family budget.
Clarification of the electrical diagram of the apartment
Unfortunately, not all apartment owners have a complete understanding of where and how cables and wires are laid, how they are configured:
Quite often, after eliminating an accident, you have to quickly search for hidden wiring inside building structures to eliminate faults. And all this takes time, and it is difficult to guarantee an accurate result due to the imperfection of search tools.
- When checking the condition of the electrical wiring, both the electrical circuit diagram and the installation diagram of the apartment must be clearly marked, indicating on them the locations of the end points and the passage of cable routes in all rooms.
- Particular attention is paid to the places where the wires are connected, the ease of use of junction boxes, and the correct signature of the controls in the apartment panel.
The computer program Electrician 7.8 is designed to facilitate the search for technical information and the solution of specific issues in electrical wiring for the home handyman. It contains a lot of reference material and various options for constructing electrical circuits based on their load.
Drawing up a wiring diagram
The best way to start installing wiring in a private house with your own hands is with an electrical circuit diagram. This will greatly facilitate further calculations of consumables and determination of installation locations for power elements.
The wiring diagram must include the following elements:
- Supply from the nearest support to the incoming electrical panel
- Electricity meter
- Input RCD/switch
- Internal electrical panel with consumer groups: Socket group
- Lighting
- Power group (high-current household appliances (boiler, washing machine, machine tools)
- Outbuilding (garage, basement)
A diagram of how to properly conduct and make electrical wiring in a private house with your own hands:
Separate RCDs/automatic circuit breakers are installed for each of these groups.
Also, when drawing up a diagram, you need to have a general plan of the house, on which to mark the direction of laying the cables and the installation locations of sockets and switches.
It would be good if the wiring had two separate circuits. Then it will be possible to turn off one for repairs, and from the second to power the necessary lighting or soldering equipment.
Based on these data, a schematic diagram is constructed, the total length of the cable is calculated, the required cross-section in each case, the placement of power elements, metering devices, and the point of entry of power cables.
Types of faults
Faulty electrical wiring can cause fires and electric shock. Basic electrical wiring faults can be of two types:
- wire breakage, and, as a result, lack of electric current in any part of the circuit;
- short circuit of a phase wire with a neutral or ground wire, which leads to the circuit being disconnected by protective devices.
Checking and troubleshooting hidden wiring is greatly facilitated if there is a detailed diagram of the wiring in the room. This diagram is mandatory when drawing up a technical passport of the premises.
If there is no diagram, you need to determine the location of the wiring routes in the walls. Subject to compliance with the requirements of the PUE, wires and cables must run in a straight line connecting distribution boxes with sockets and switches. In this case, the routes must be strictly vertical or horizontal.
How to independently check the condition of the wiring in a house or apartment before purchasing
The need to check the wiring arises quite often: this can happen when purchasing a new home, during repairs or when some problems arise with the power supply of equipment, and so on.
You can easily check the network yourself, you just need to make sure that all the steps we’ll talk about in this article are safe and performed correctly.
When purchasing a new home, it is necessary to inspect the wiring to avoid problems with it in the future.
You need to find out the total power of the devices, use it to find out the cable cross-section you need and compare it with the one provided in the new home. If it is small, you definitely need to replace the wiring.
Next, you need to check the serviceability of the hidden wiring - the integrity of the insulation, the reliability of the connections, find out the cable cross-section and the power of the sockets.
If everything is normal, then all that remains is to make sure that the distribution panel is assembled correctly and the wiring load is normal.
This is done as follows: all devices in the entire house are connected and all lighting is turned on. If the machine does not work, everything is fine. When a circuit breaker is knocked out, it is necessary to replace the circuit breakers, divide the wiring into several groups, etc.
In an old room, checking the wiring will take more time and effort. It is necessary to find each junction box, with its help to understand what the hidden wiring is made of and what the cross-section of the wire is.
Be sure to check that the insulation on the wiring is not damaged or beginning to deteriorate anywhere. The smallest bend can lead to its destruction.
Check the insulation resistance to determine if there is any breakdown or current leakage. As a last resort, use a multimeter to check the resistance.
The next step is to check all sockets and switches. In sockets, make sure the integrity of the wires, determine the phase and zero. Then check the grounding.
If necessary, replace the socket boxes with plastic ones. Make sure that the switches at the break have a phase wire installed; otherwise, replace the connected conductors, as incorrect connection can pose a danger to life.
Inspect the input panel. There you should only check modern devices - if this is not the case, be sure to replace them. Check for grounding. Find out the cable cross-section and, if necessary, replace it with a larger one.
In addition, if you decide to inspect the network in both a new and old home, be sure to pay attention to the location of sockets and switches, since at this stage you will have the opportunity to change them.
Methods
Testing methods depend on the purpose for which it is performed. To check the integrity of the cable for a break or electrical connection between its wires (short circuit), the continuity test can be done with a tester based on a battery and a light bulb, or you can use a multimeter for this purpose. The latter is preferable.
Despite the fact that the price of a multimeter is higher than a primitive device, we recommend buying it; this device will always be useful in the household.
The simplest device for testing an electrical cable
To check the cable, the multimeter must be turned on in the appropriate mode (diode or buzzer image).
Multimeter set to dialing mode
The testing methodology is as follows:
When checking a wire for a break, the tester is connected to its ends as shown in the figure. If the cable is intact, the light will glow (when testing with a multimeter, a characteristic sound signal will be heard).
Checking for a break
Explanations for the picture:
- A – electrical cable;
- B – cable cores;
- C – power source (battery);
- D – light bulb.
If the cable has already been laid, then on one side it is necessary to connect the wires together and ring the wires at the other end;
Second option for checking the power cable
when checking the presence of an electrical connection between the cable cores, the tester probes are connected to different wires. Unlike the previous example, there is no need to twist the wires on the other side. If there is no short circuit between the wires, the light will not light (when testing with a multimeter, no beep will sound).
How to ring the wiring in an apartment?
The most common way to check the serviceability of an electrical line is to test it using a multimeter (tester). A multimeter is a measuring device that can be used to measure various electrical characteristics:
- Current strength.
- Voltage.
- Resistance.
There are two main types of these testers: digital and analog (arrow). However, the principle of their operation is the same. The price of a regular multimeter is low, and we recommend that every owner have such a device in stock, since it will become a reliable assistant in almost any procedure related to electrical measurements and installation.
By setting your tester to the continuity mode, you can easily check the presence of contact on any part of the wiring, diagnose it for a break, and also check the functionality of the socket or switch.
Testing wires and cables when repairing wiring in an apartment
Testing wires and cables is a necessary procedure after complete or partial replacement of home electrical wiring. In addition, it is necessary to test the wiring in an apartment or car when there is an electrical fault, but its exact location is unknown.
Of course, to check electrical communications, it is easiest and most reliable to use the services of a specialist. But sometimes they wait for days for an electrician from the management company, while private craftsmen have very high prices. Therefore, more and more often, owners prefer to carry out simple work related to electricity themselves.
And in this article we will talk about how to check the wiring in an apartment without resorting to outside help.
Testing electrical wires and cables at the installation stage
Installing new home wiring is always associated with certain difficulties, due to which the integrity of the conductors may be compromised even before the main line is used.
The new line is most often laid inside the grooves, or simply on top of the wall, which is then covered with a layer of plaster and subjected to other finishing work. The initial check of the electrical wiring is carried out before the groove is sealed or the wall is plastered.
If the master is too lazy to do this, then it is possible that, after an unsuccessful attempt to turn on the light or use the socket, he will have to chisel the plaster or open a groove in the thickness of the wall.
A wire break at the initial stage can occur due to the fault of both electricians and finishers. To avoid unpleasant consequences and unnecessary work, it is necessary to lay the electrical line according to a diagram drawn up in advance. Before burying wires in the wall, you need to check the electrical wiring for breaks.
How can you make sure the wiring is working properly?
First of all, you need to make sure that the phase and neutral cables, as well as the ground wire, are not in contact with each other - that is, there is no short circuit.
If the quality of the conductor insulation leaves much to be desired, then under the influence of high voltage it can be damaged, which will most likely lead to a short circuit.
Therefore, when buying an electrical wire, you should not save too much and purchase the cable, focusing on the lowest price. If you doubt the integrity of the insulating layer, check the line with a megohmmeter.
Having laid the line, you should not seal the groove and plaster the wall without first inspecting the surface of the cable along its entire length to ensure there are no mechanical damages.
If the line is not closed, and a visual inspection reveals no damage, it is called for a break.
How to check the wiring during installation is shown in the following video:
How to ring the wiring in an apartment?
The most common way to check the serviceability of an electrical line is to test it using a multimeter (tester). A multimeter is a measuring device that can be used to measure various electrical characteristics:
- Current strength.
- Voltage.
- Resistance.
There are two main types of these testers: digital and analog (arrow). However, the principle of their operation is the same. The price of a regular multimeter is low, and we recommend that every owner have such a device in stock, since it will become a reliable assistant in almost any procedure related to electrical measurements and installation.
By setting your tester to the continuity mode, you can easily check the presence of contact on any part of the wiring, diagnose it for a break, and also check the functionality of the socket or switch.
How to test an electrical cable using a multimeter?
Do-it-yourself testing of wires using a tester is carried out in the following order:
- Set the multimeter switch to dial mode (as a rule, an LED icon is drawn opposite this division).
- The black test lead must be installed in the COM socket (sometimes indicated by a ground sign or an asterisk). The red cable is inserted into the socket marked Ω (or R).
- Turn on the tester (if it is not automatically turned on when you turn the handle).
- Touch one probe to another. The signal that is heard will notify you that the meter is working properly and is ready for operation.
- On the wire being tested, remove the insulation from the ends and strip them until a metallic sheen appears, and then touch them with probes.
Home electrician
A full check and continuity check of the electrical wiring is a mandatory stage of apartment renovation. In addition, it is necessary to call the electrical wiring even when there are doubts about its serviceability.
Of course, the easiest way to check the health of the electrical wiring in your apartment is to contact an electrician. True, the efficiency of municipal services is by no means the best, and private ones charge quite a lot for their services.
That's why we strongly recommend that you learn at least basic wiring skills on your own. It is quite possible that one day you will need them!
When performing any work related to electrical wiring, safety regulations must be strictly observed.
How to check and find leakage current with your own hands
Indicator screwdriver
At home, you can use a simple method - checking for leaks with measuring instruments.
Indicator screwdriver
Using the tool, you can find the phase on conductor objects. Use the tip of the screwdriver to touch various areas. If the light comes on, this indicates a breakdown of the insulating layer.
Working with a multimeter
The device is used in ohmmeter mode to clarify resistance values. You will need to turn on the multimeter, switch it to an ohmmeter, and use probes to look at the indicators between the equipment housings and each of the pins. A leak is indicated by a value greater than 20 mOhm.
Testing with a megohmmeter
Household appliances will need to be unplugged. Since the device can detect damage on non-voltage sensitive equipment, you will need to touch it with probes. By rotating the handle, voltage is generated. A leak is detected if the resistance is more than 20 mOhm.
How to eliminate detected deficiencies
When checking the electrical wiring, you should not immediately rush to correct all identified defects. This work needs to be planned.
When small defects are discovered in individual sections of the circuit, it is not difficult to correct them individually. For example, if there is a shortage of sockets for computer equipment, it is permissible to install one socket block in a loop, suitable for the power of the consumers. (Don't forget about the cross-section of the power wire).
If a complete reconstruction of the electrical wiring is required, then the work should begin with drawing up a project, taking into account the location of each room and your own needs.
It should be noted that electrical wiring in old buildings is carried out using a TN-C grounding system with two-wire lines in a single-phase network. It poses a danger in emergency mode.
In the coming decades, power engineers will transfer it to a TN-CS power supply circuit with three wires, bringing them to the floor switchboard.
The work of modernizing the electrical wiring inside the apartments will be assigned to its owners. Therefore, it is easier to deal with it when performing repair work after purchasing an apartment until you move into it.
It is worth analyzing the technical methods of re-equipment of wiring and calculating the cost of their costs. It is likely that it will be more cost effective to completely replace the equipment from scratch than to try to modify it piece by piece. Such work will be completed faster, and taking into account the fact that the premises are still without furniture or occupants, the issues of daily cleaning and the fight against construction dust will be significantly simplified.
To consolidate the material, we recommend watching the video by the owner of the Royal Electrician “Wiring in the apartment. Replacement of electrical wiring.”
Useful products
- Cable cutting scissors
- Non-contact wiring indicator with flashlight
- Shower temperature indicator nozzle
Checking electrical wiring for electrician errors
Everyone can always have them. Both experienced ones, who have all sorts of permits and a lot of near-electric tales, and beginners starting their professional journey.
Therefore, you should never count on chance. From my own experience, I was convinced that it is better to spend 15 minutes checking the electrical wiring after laying the wires, than to then gnaw at your elbows and new plaster (or Italian wallpaper!) a month later in order to find the missing zero.
To check, you need a testing device (preferably a multimeter). During the test, the group machine must be turned off. We will consider the issue of the quality of connections in the junction box in another article.
How to find wiring under a wall?
Quite often, electrical wires are carefully hidden from prying eyes in walls and other coverings, which is done for electrical safety purposes. How to ring the wiring in an apartment if you don’t know where exactly it runs? You can use several methods to find wires:
- Using the device. There are many devices with which you can find hidden wiring in the wall, under tiles, wallpaper, wood and any other coverings. Buying this device will not put a dent in your pocket and will not be superfluous - the device may come in handy many times. To locate the wires, you only need to use the device according to the instructions. Often it is enough to move the detector along the wall and look at the device’s reaction, which indicates the proximity of the wire.
- Radio. Tune a simple radio receiver to a frequency of 100 kHz and move the antenna along the wall where the cable is supposed to be located. When approaching it, the radio will begin to emit louder and more unpleasant white noise - this is what indicates the proximity of the electrical cable.
- Microphone. Connect it to a tape recorder or other sound-reproducing device, then move the microphone along the walls - the microphone will make a crackling sound where the wiring is located.
When you know exactly where your electrical network is located, you can figure out how to ring the wiring in the apartment. To do this, you will need a special device - a multitester, as well as some calculations.
How often should the wiring be checked and replaced?
As Konstantin Kaluzhin explains, there are no standards stating how often the wiring needs to be changed: in case of problems, you need to invite a specialist who will conduct an examination and then make a decision on replacing the wiring and electrical equipment.
Electricians advise checking electrical panels every six months, ideally.
“But I don’t think anyone does this. Nevertheless, at least once a year it is worth inviting an electrician to check all the contacts and tighten them if they are loose somewhere. Moreover, it is worth periodically checking electrical cabinets both in the apartment and in the apartment hallways,” the expert concludes.
Leave a comment (0)
Wiring Finders
Below are several types of devices that the market currently offers.
"Search".
The first device is called “Search” and it looks like this.
This device uses the electrostatic principle of detecting hidden wiring.
It has 4 sensitivity modes and is capable of detecting a cable at a depth of up to 7 cm. Light and sound indications are used for notification.
It has a number of additional functions and is very easy to use - select mode (the 4th mode is used to search for wiring) and move the device along the wall.
Please note that certain factors may affect its operation (presence of metal objects, high humidity of the wall).
In general, “Search” is a completely acceptable and inexpensive option for detecting wiring, but it does not apply to professional devices.
A large number of analogues of such a device are produced - the same “Woodpecker”, SPO and a number of others.
MAG-2.
The second device, MAG-2, looks like this.
It is combined and uses electrostatic and electromagnetic principles for detection.
It has two operating modes - for detecting a powered network without load, and with load.
Alarm system – light and sound. Refers to amateur options.
LA 1012.
The next representative of the seekers is Chinese, it does not have a name, but there is a designating index - LA 1012.
This is a more “advanced” device, equipped with displays on which all information is displayed.
It uses the electromagnetic search principle and has a number of additional functions.
It already belongs to professional devices and is not cheap.
BOSH GMS 120.
Multifunctional professional combination device.
It is a metal detector that allows you to determine not only the depth of the cable, but also the material of its manufacture.
Equipped with an information display to display all information. It can also use the electrostatic principle for searching. Quite a good and highly accurate device.
Calling the wiring
Dialing tools
Wiring testing is usually done with a special device - a multimeter. which is designed to record all kinds of electrical connection parameters (voltage, current, resistance, etc.). Today, multimeters come in analog and digital forms, but the operating principle of these devices always remains the same.
- Testing wiring using a multimeter
- Checking connections
First of all, you need to set the dial mode on the multimeter - this is often indicated by an LED.
Then you should go to the place where the electrical wiring is ringing, i.e. to the junction box. As a rule, there appears before your eyes a bunch of unmarked wires.
You need to find the phase - turn on the machine, check all the wires using an indicator screwdriver. In this case, the found wire should be marked using insulating tape, as well as tape that is intended for covering windows.
Next you need to find zero. Turn on the device to measure voltage (then when we need to find 220V, we should set it more - 600V for a number of models). Then you need to touch the phase with one probe of the multimeter, and with the other end of the device you should test the electrical wires one by one. As soon as 220V appears on the device, it means that the wire that was needed has been found. It must be marked.
Then you need to check other pairs of electrical wires according to this principle and label them.
Conductor integrity check
In order to check the integrity of the electrical wiring, we need to perform the following steps:
- The conductor should be disconnected from the current source itself. If the conductor is a multi-core cable, you need to do this for all the wires that go into it.
- Then you need to turn on the device either in the dialing mode, or in the resistance measurement mode, but always at the roughest possible limit.
- After this, you need to connect the multimeter probes. In this case, zeros should appear on the device display. At the same time, in the ringing mode, which has sound accompaniment, the multimeter will make a squeak.
- Next you need to connect the open probes of the device to the conductor. You need to know that the whole conductor, at the same time, shows zero resistance.
Testing the electrical wires in the apartment, as well as searching for a violation of the integrity of the cables or a short circuit, can be done efficiently independently - without the involvement of an expensive specialist, and if you have external electrical wiring, then there is no need to call a specialist at all.
The main thing is to approach this issue consistently and strictly adhering to the above recommendations of professional electricians. And of course, be sure to remember that even if it seems to you that you are already a fully experienced electrician, you should not forget about following safety rules!
Checking the wiring with a multimeter
To avoid mistakes, the electrician’s work must be checked in a timely manner using the dialing method. This is done using a multimeter set to AC voltage.
You should start with the junction box. It contains a bunch of unmarked wires. First you need to find the phase wire at the output and mark it with electrical tape. Then they find zero: touch the phase with the probe of the device, and alternately touch the remaining ends of the beam with another probe. A value of about 220 V appears on the indicator - the neutral conductor has been found.
Conductor integrity check
To check the integrity, you need to disconnect the conductor from the power source. The multimeter is set to Ω. Its probes are connected to the ends of the conductor. An entire conductor will show zero resistance. You can call your home electrical network without involving specialists. To do this, you need to look at the position of the machines.
If the machines don't work
If the circuit breakers do not work, you need to ring the circuit breaker. When turned on, the multimeter will produce a beep. After this, the voltage at the input and output terminals of the machine in the house is checked. If there is voltage, the light bulb is unscrewed from the lamp socket. One measuring probe touches its central contact, the other touches the base. If the lamp is working properly, a signal will sound from the device. A burnt-out lamp should be replaced. If the lamp is working, check the socket, then the switch in the room.
The wires and contacts in the switch are inspected. If all parts are in good condition and free of carbon deposits, the probes of the device are installed on the contacts. A sound signal will notify you that the equipment is working properly. Eliminating detected faults solves the problem.
If the machine worked
When the circuit breaker is turned off, they look for the cause of the short circuit between the phase wire and the neutral or protective wire. Use a screwdriver to disconnect it and move it to the side. The lamp is unscrewed from the socket. The probe of the device is connected to the neutral conductor and to the phase. An audible signal will indicate a fault in the circuit. In this situation, you need to open the box near the ceiling and disconnect all the wires in it. Each is checked for short circuits.
Checking the outlet
You need to unplug the outlet, and only then can you remove the cover from it and inspect all the parts. If there is no carbon deposits or visible damage, you need to connect the device probes to the terminals. The tester shows infinity - the socket is intact, there is a fault in the wiring. Then check each conductor separately using the methods described above.
Check at the installation stage
At this stage, you need to pay attention to possible problems with laying the electrical network. It is mounted on bare walls and covered with finishing materials. The check is carried out before the start of plastering work. During this period, electrician errors are easily detected when carrying out electrical installation work on the walls of the house. To perform the operation, take a wiring diagram that will help you understand the tangle of wires.