In cases where it is planned to use paving slabs to create and improve sidewalks in high-traffic areas or to equip areas for parking and passage of cars, laying should be done on a concrete base.
It is this technology that is designed for high loads and can be used not only on private land plots, but also within the city for the arrangement of pedestrian paths and improvement of the area around shops, including for the entrance and parking of cars.
So how to properly lay paving slabs on a concrete base and avoid mistakes? We'll figure out.
Advantages and disadvantages
The advantages of this method over laying paving stones on sand are associated with the higher strength of the structure:
- the concrete base is resistant to high loads and mechanical damage;
- with the same strength, a simple installation system compared to asphalt pavement - there is no need to install an asphalt roller.
But there are some downsides here:
- the technology is more complex than when laying on a bed of sand and crushed stone;
- when removing a damaged slab for repair, neighboring slabs can be damaged;
- If the technology is not followed, the concrete base may begin to paint after the first winter.
Find out on the pages of our website about the technology of laying paving slabs on sand. Let's talk about the advantages and disadvantages of this technique.
Read about the technology for making FEM tiles with your own hands and what materials you will need for this in our special material.
Do you know how to lay clinker tiles correctly? You can learn about the features of working with this type of paving slab here.
Advantages of a concrete base
The concrete base guarantees strength and durability. This base can be used in places where paving slabs are subject to high levels of wear (car parks).
Sustainability. For example, under the influence of precipitation and poor installation, a sandy base can noticeably sag. But tiles laid on a concrete base will not move anywhere and will not sag. This increases the service life. Laying in this way makes it possible to achieve the most even surfaces.
Consumables and tools
To make it easier to carry out work according to the technology, you need to prepare the following tools and materials:
- concrete mixer;
- sand;
- cement grade M500;
- crushed stone;
- 2 building levels 40–50 and 80–100 cm long;
- tamping (automatic or manual);
- pegs and durable cord for marking boundaries;
- Master OK;
- rubber mallet;
- irrigation hose with shower nozzle or watering can;
- rake;
- broom.
Quantity calculation
To ensure that there is enough material for all the work and not a lot of excess is left, you need to make markings on the site and measure the perimeter of future sidewalks and platforms , as well as calculate their area. Based on these parameters, further calculations will be carried out.
- The required number of paving slabs is calculated based on the total surface area of all future structures. To insure against unforeseen situations and unaccounted for moments, you need to add 8–10% to the resulting area. The cost of materials will increase slightly, but you can rest assured that there will be enough paving stones for everything and there will still be a reserve in case of repairs.
- The components of the bulk foundation are calculated based on the thickness of the future layer. To do this, the area of all surfaces of paths and platforms, expressed in square meters, should be multiplied by the thickness of the required base layer, expressed in meters. The resulting figure will show how many cubic meters of building materials need to be purchased.
- The amount of curb stone is the length of all perimeters minus the length of the areas where the surface abuts the foundation of the building and other structures. In this part, the foundation itself will be the border.
- The amount of materials for a concrete pad is calculated depending on its expected strength class. For example, to prepare 1 m3 of class B20 concrete, it will take approximately 290–320 kg of cement, 1080–1150 kg of crushed stone, 630–770 kg of sand, and 160–180 liters of water.
Let's move on to the instructions on how to lay paving slabs on a concrete base and what needs to be done to the concrete before laying.
Technology for laying paving slabs on concrete
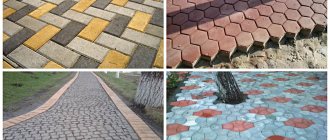
Paving slabs are an ideal material for lining street sidewalks and pedestrian areas, parking lots and playgrounds. It is easy to install, easy to maintain and, unlike asphalt, does not melt in the sun, withstands large temperature changes and does not emit toxic gases.
Laying paving slabs on a concrete base allows you not only to strengthen the coating, but also to give it a more aesthetic and interesting appearance. Let's look at what other advantages this technology has?
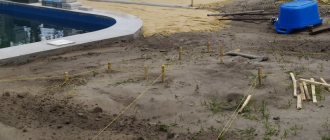
Preparatory work
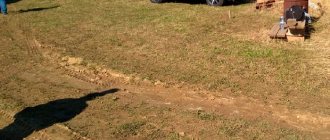
The preparatory stage of work is no less important than laying the paving stones themselves. If the base is made with high quality, in accordance with the technology, the sidewalk or platform will be durable and will serve for a long time. The soil is prepared as follows:
- On the area marked with pegs and a nylon cord, soil is removed to a depth of 25 cm, extending beyond the intended contour to the thickness of the border plus another 2–3 cm. The resulting pit is cleared of plant roots and stones. If the soil is loose, a excavation is made by removing the entire fertile layer, because it is difficult to compact.
- The bottom is leveled with a rake, moistened with a hose or watering can and compacted to prevent further subsidence of the soil. Only then do they proceed to work on the production of the supporting layer.
On our website we will tell you which is the best adhesive to choose for paving slabs on a concrete base. You will learn about the varieties of products and their quality.
In the next article we will tell you how to properly lay paving stones with your own hands. Look for step-by-step instructions describing each stage.
To learn how to lay a paving slab path and avoid making mistakes, read our article:.
Step-by-step instruction
The quality of the load-bearing layer when laying slabs on concrete is very important due to the use of rigid fixation. If done poorly, the structure will quickly crack.
Preparing a concrete pad
To improve the quality of work on preparing a concrete base for paving slabs, you can use a three-dimensional geogrid - a honeycomb-shaped structure made of a synthetic material that is resistant to rotting and chemical influences.
When stretched, such a lattice forms a frame that is stable in the horizontal and vertical directions, reinforcing any bulk material placed in the cells. The service life of such a grating is up to half a century.
- A geogrid is laid at the bottom of the trench and covered with a 15-centimeter layer of crushed stone. The height of the grate is selected so that its edges are below the level of crushed stone and do not interfere with compaction.
- The crushed stone cushion is compacted.
- A reinforcing mesh is laid on top of the crushed stone.
- Along the contour of the marking, made of pegs and cord, the formwork is placed into which the concrete will be poured.
- Concrete is prepared and continuously poured into the formwork so that so-called cold seams, which reduce the strength of the structure, do not form in the body of the concrete pad.
Immediately after filling the formwork, a submersible vibrator is used to compact the material structure and remove air bubbles.The concrete pad is covered with a film to avoid too rapid loss of moisture, and for the next 3-7 days its surface is periodically moistened with water.
- On a large area, expansion joints need to be made every 2–3 m. To do this, boards are installed perpendicular to the formwork and the ground surface, which will then need to be removed and the seams filled with an elastic compound before laying the paving stones. During temperature changes, these seams will help avoid fractures of the concrete pad.
- To remove moisture that has fallen onto the surface of the concrete pad under the paving stones, cut pieces of polypropylene or asbestos cement pipes are installed at some distance from each other, the upper level of which should be flush with the upper level of the concrete pad, and the lower end should be located on a layer of crushed stone. Before laying, the drainage holes are filled with fine crushed stone.
- When the concrete has completely hardened, the formwork is removed.
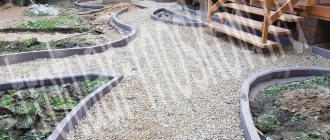
Installation of curbs
In the recess remaining after dismantling the formwork, you need to install curbs. To do this, hard concrete is made, placed in the ditch with a trowel, and curb stones are installed on it one by one.
A rubber mallet is used to drive them into the solution. The gaps between the stones are filled with liquid concrete.
The height of the curbs should be at least 20-30mm below the top of the paving stones so as not to interfere with water flow. After a day, when the solution has hardened, the space between the curb stone and the walls of the trench is filled with sand.
How to put it correctly
The dimensions of the slabs are selected depending on the purpose: for a sidewalk, a thickness of 4–5 cm is sufficient, and if cars will drive onto the surface, then choose paving stones no thinner than 6 cm.
On a concrete base, the slabs are laid on a dry sand-cement mixture or on a cement-sand mortar.
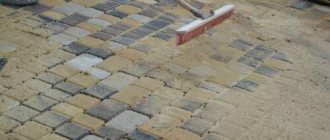
- When using a cement-sand mixture (CSM), only sifted sand is used. The solution is prepared from 1 part cement and 3 parts sand, the consistency should be like thick sour cream. Using a trowel, the mortar is laid out in an even layer of 2–3 cm on the concrete pad. The paving stones are laid on the mortar according to the planned pattern and lightly driven into the mortar using a mallet. The horizontality of the surface should be verified as often as possible using building levels.
- When using dry CFB for laying, the work is carried out in the same way as laying paving stones on a sand cushion - a layer of dry CFB (3–5 cm) is poured onto the concrete, leveled with a rule or a regular board with a smooth edge, and then the slabs are laid out on this cushion. Dry CPS is prepared at the rate of 1 part cement to 6 parts sand, but in its dry form it is not able to firmly hold the paving stones, therefore, upon completion of the work, the site is well spilled with water, which falls down through the gaps between the tiles and the mixture hardens.
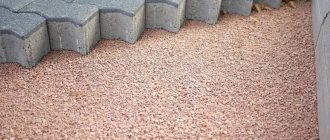
Sealing seams
Between the paving stones, the seams are filled with dry fiberglass and spilled with water. The operation is repeated until the mixture stops shrinking. After 2-3 days, when the surface is completely dry, remove construction debris, sweep away small debris and dust with a broom and, if necessary, wash the surface with strong water pressure from a hose.
Useful video
You will learn even more about the technology of laying paving slabs on a concrete base from this video:
You will learn about the rules for choosing paving slabs, their varieties, characteristics and cost of paving materials on our website.
In this article you will find a description of the main characteristics of porcelain tiles and their advantages during installation.
We invite you to familiarize yourself with samples of drawings when laying paving slabs! Choose the right one here: .
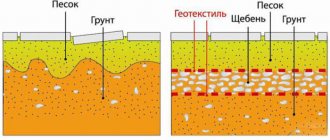
Laying technology on a concrete base
- Soil compaction;
- Preparing a sand cushion, thickness approximately 10-15cm;
- Backfill with a layer of gravel;
- Lay the reinforcing mesh so that its edges protrude approximately 5 cm above the gravel;
- Pouring the concrete base;
- After this, the concrete must stand for 25 days.
After the concrete has dried, you can begin laying paving slabs.
Whether it is necessary to concrete the base for paving slabs, you need to start from the purpose for which you need to use this territory. But we must always remember that poor-quality tile laying cannot be corrected in the future. But you can appreciate all the advantages of a concrete foundation only if all the work is completed by qualified specialists.
Preparation of material https://ekosbud.com.ua
Important nuances: can mistakes be avoided?
The width of the paths and the size of the platforms must be provided so that a certain number of whole tiles are laid between the edges - if you avoid unnecessary trimming, you can save a lot . When laying tiles diagonally, there will be more waste.
The paving stones should be cut using a grinder with a stone disc . To reduce dust, the tiles are cut and then chipped off. Before making a cut, you need to place the slab in its intended place, make a mark and then cut along the mark. This will avoid mistakes and reduce waste.
Surfaces lined with paving slabs should be made with a slight slope for better water drainage. To do this, it is enough that the surface difference is 5 mm per meter.
The paths can be tilted on one side or the middle made a little higher so that the water flows to the edges. If normal drainage from the surface is not ensured, then stagnant water will gradually seep to the concrete base and, when freezing, tear the paving stones away from it.
If the tiles are made by vibration casting, it is better to attach them to concrete with a special glue, which, with a minimum layer thickness, provides excellent attachment to the base.
The solution should be mixed as close as possible to the pouring site, and concrete cannot be mixed at temperatures below 0°C.
Security measures
First of all, you should follow safety measures common to all construction work, supplementing them with the following points:
- when working with cement, you should wear a respirator, and when cutting tiles, you should also wear safety glasses with safety glasses;
- with concrete, in order to avoid corroding the skin of your hands, you need to work with rubber gloves;
- upon completion of work with concrete, all tools used should be washed immediately;
- The paving stones are not allowed to be cut or split when placed on the knee.
When laying paving slabs on a concrete base, you must strictly follow the technology for performing the work. In this case, the concrete will not crack in the first winter, and the tiles will not fall off the base; paths and platforms will last for many years without repair.
Laying paving slabs on a concrete base
Classic paving tiles involve the creation of a sand-crushed stone cushion. But if the future surface is subject to great physical stress, then laying paving slabs on a concrete base will help to cope with them. Such coverage will be effective in areas where car parking or active pastime is required.
Content:
Laying paving stones on concrete has many advantages. It ensures a long service life of the laid areas, their resistance to deformation due to exposure to moisture and temperature changes. In areas landscaped using this method of laying, grass practically does not grow, which makes the process of caring for the coating easier.
It is also important that laying paving stones on a concrete base with your own hands will give you no less pleasure than contemplating the work of a specialist. If you wish and have the necessary knowledge, you can cope with this task yourself. However, it should be remembered that, despite the apparent simplicity, laying paving stones on a concrete base requires strict adherence to important rules, ignoring which can lead to the complete destruction of efforts. If you are not confident in your construction talents, use the skills of professionals.
, which has been successfully operating for more than 25 years, will not only provide you with high-quality materials at competitive prices, but will also send a team of professional installers to you. Order paving slab laying services today!