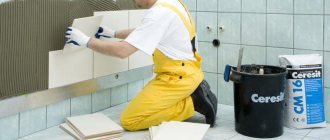
Some people order assembly from professionals. And some people prefer to assemble a shower cabin with their own hands, fortunately there is nothing complicated about it. There are now a lot of instructions and recommendations on the Internet for self-assembly, for example, the article Assembling an 80 by 80 shower cabin with your own hands will help you assemble almost any shower cabin.
And when assembling any shower cabin, the question always arises: what sealant to choose, and how to apply it, in what places.
There are many different sealants, both in color and type (for example, silicone, acrylic, polyurethane). Some people even manage to use sealants for car gaskets and others.
Let's say right away that the shower cabin is assembled only with sanitary silicone sealant, usually white or transparent. All other sealants are not recommended.
Of course, if you do not have the opportunity to purchase silicone sanitary sealant, you can use any other one, and it will also perform its function for some time, namely, prevent water leaks from the shower stall, but why “reinvent the wheel” and invent something , if this has already been done for us a long time ago.
It doesn’t matter what color sealant you use, transparent or white . Very often, during assembly, even two types of sealant are used, one package is transparent, the other is white.
By the way, to assemble a shower cabin, it usually takes two 330 ml packages of sealant.
Most often, when assembling a shower stall with a plastic white back wall, a white sealant is used, and for all other types a transparent sealant is used.
Why is sanitary silicone sealant used ? It contains special additives (fungicides) that will prevent mold and mildew from appearing on the surface of the sealant (after all, we are talking about wet rooms).
Plus, silicone sanitary sealants are elastic (this is important, since the shower tray “breathes”, that is, it does not move much, under the weight of water or a person).
The adhesion of sanitary silicone sealants is at a high level; they “cling” perfectly to PVC (plastic) and metals and ceramics (tiles, for example), earthenware, glass, etc.
They are not afraid of high temperatures and temperature changes, high humidity, and are environmentally friendly.
In general, sanitary sealants were specially developed for bathtubs and showers.
It is worth noting that it is better to use sanitary sealants from foreign or Russian manufacturers, but the price of any good sealant should start from approximately 250-300 rubles per package weighing 280-300 g
Of course, you can also use inexpensive Russian sealants, and sometimes even they are quite good, but you will always notice the difference after some time.
It manifests itself in the fact that inexpensive sealants usually quickly begin to turn black, this is due to the fact that cheaper fillers and components were used in production.
If you are interested in a specific brand, we recommend that you pay attention to the trademarks Ceresit, Tytan, Soudal. Moment sealant has also proven itself quite well .
Choosing a sealant for the shower tray and cabin
Sealant is a paste-like material widely used for sealing various joints. The sealant has found its use in strengthening joints in building materials, gaps around windows or doors, heating and water pipes, and when installing ceramic tiles and plumbing fixtures.
Along with special silicone sealants, you can use transparent aquarium silicone.
Silicone sealants are used to close cracks and glue parts together. Due to its water resistance, this material is well suited for kitchens and bathrooms. Silicone sealants are UV resistant.
Natural antibacterial silicone is used as a sealant for installing washbasins, installing shower cabins, gluing ceramic surfaces, aluminum, glass, and metal.
High-quality silicone sealant is made from a hydrophobic filler pigment (more than 45%), silicone rubber (more than 45%), a related plasticizer, a catalyst, fungicides, and a thixotroping agent. This type of sealant is produced by ANTIA, STERN, Somafix. The best sealant for a shower tray is one that consists only of silicone without the addition of other impurities. This material has the smallest shrinkage (up to 2%). The following impurities may be present in small quantities:
- organic solvents;
- organic extenders;
- mechanical fillers (quartz flour, chalk).
If the composition of the material contains a fungicide, it can also be used for the bathroom tray, since the fungicide prevents the development of fungus and mold in a damp room. When choosing between neutral and acidic silicone, the first option is preferable. It does not have a strong odor and is more versatile.
The booths are sealed not only with widely used special silicone sealants intended directly for use, but also with transparent aquarium silicone.
Popular companies
Today there are quite a few companies producing sealants on the market.
When choosing, you should pay special attention to the manufacturer: it is better to choose companies that have proven themselves in the market.
The most famous include:
- “Tytan” (“Titan”) is a Polish sealant that has proven itself in working with shower stalls. Available in acrylic and silicone. The disadvantages include the package size - 310 ml.
- "Moment" is a well-known company that offers high-quality silicone sealants. Available in packages of different sizes.
- "Ciki Fix" is a Turkish manufacturer, characterized by low cost and excellent quality. Can be used for gluing small decorative elements.
- Ceresit is a subsidiary of a famous German manufacturer of household chemicals. It can be used to seal bathrooms, but cannot be used on aquariums or surfaces that will come into contact with food.
- “Dow Corning” is excellent for sealing any surfaces that are constantly in contact with water: bathtubs, showers, aquariums. Thanks to its thick formula, it easily penetrates into cracks and completely “clogs” them. Has protection against fungi.
Best answers
Grandfather Stupid:
Good fresh cement diluted in liquid glass. In general, the sealant should not come off. Two options: when they smeared it, didn’t degrease it, or the cabin was shaking, it came off.
cement =)
errare humanum est:
There is white - then you can’t get it off. I didn’t clean it when I scored it - it’s still there in chunks (((
Michael:
There should be no sealant there; if there should be, then it should be covered with moldings and overlays. Silicone is applied to the parts of the cabins that are joined together, at the junction with the wall
Gugumot:
What the hell are you... oh, you didn’t buy sealant. When I sealed mine, I first degreased everything, and then went over it with sealant. It's been 4 years now that nothing has happened with the sealant, I haven't missed a drop.
Beauty:
my husband said to use a ceramic border, apply tile adhesive, and grout it... once it dries...
valli:
Special epoxy resin with synthetic additives using special fiberglass
Answers from experts
Rus Ivashkevitch:
1. The “sewage” outlet from the shower stall should be higher than the entrance to the sewer system existing in the house. If lower, make a “podium” according to the size of the cabin. 2. Compare the height of the shower cabin (taking into account point 1) + ventilation outlet from the cabin with the height of the room. The height of the room should be greater. 3. Provide (before installing the cabin) a supply of water (taps for shutting off in an accessible place) and electricity to the corner of it. 4. Before installation, I would prepare the wall behind the cabin in such a way that it would be possible to painlessly remove the cabin (you never know) and not have to do any repairs in the room after that. 5. When choosing the size of the cabin (pallet), try to bend in it. I can’t fit into the 90*90 cabin when bent.
Anfalova Elena:
It’s not worth spending that kind of money on a shower stall. My husband bought a tray and made glass doors, plus a faucet and shelves. It looks no worse than a booth and is 3-4 times cheaper! And a large acrylic tray.
RED:
There is an opinion that a Chinese cabin, so that everything is “smooth” and does not drip from anywhere, can only be assembled and installed by craftsmen who have eaten the dog at this. For example, you can install a Finnish cabin yourself if your hands grow from the right place.
My wife has been kicking me for two months now, but it’s kind of scary to buy from China. And other cabins here cost absolutely indecent money.
Lesya Ivanova:
My husband laid out a brick pedestal to make it higher. It is needed for some reason, either so that the water drains better, or for some other purpose. We installed it, then this problem arose. I had to take it down and redo it.
Sveta:
The main thing is that there are all spare parts in the cabin, otherwise there is often a shortage of equipment, you need to check everything carefully
Bely Oleg:
There are often problems with the equipment - when purchasing, check immediately, the original screws are no good, throw them away and twist your own, you need to silicone all the joints between the glass and panels - otherwise it will leak later, install the screen last, after you have turned on the water and checked for no leaks. . . That's all, probably... If you have any questions, write...
neangelOK:
take waterproof the main thing. Moment-germent
andrezz:
Any sealant for the bathroom, waterproofing.
come to the store and ask which one is suitable for the bathroom - they show you the required quantity, and then which one you like.
Mr Bond:
Yes, that’s the point: they show a lot of numbers, but it’s still difficult to choose. Doubts plague the veracity of what is written on the bottles. Of those that I tried, I personally liked Dow Corning 7091 more. In general, I took it for headlights, because it is specifically for flexible joints, glass and plastic, for example, or glass and metal, it is thicker than other sealants and goes deeper into the cracks. It is suitable for aquariums and showers - in general, for those places where water is constantly present. In general, buy products from trusted manufacturers so that you don’t have such problems in a month...
Irish McClaud:
The sealant must be waterproof and provide insulation. Yes, and I shouldn’t single out anything bad. Therefore, use a trick and take a thing that was developed for aquariums -
Installation of side walls in a shower stall
All work is done on a dry surface. The assembly of the shower cabin should be carried out according to the instructions:
- Install the side walls.
- Pre-fasten all joints with screws.
- Make fastenings for the top and the shower itself.
At each stage of assembly, you need to carefully coat all joints and joints with sealant. At the same time, you need to ensure that all the screws remain on the outside of the cabin.
If you follow this sequence, you can assemble without damaging the sealant itself.
After all the seams that are covered with sealant have been processed, everything is secured with screws and left to dry completely. If there are areas where silicone remains, you need to remove it with a rag.
Then you need to seal the cabin from the outside (front). You can use a sealing cord for this. First you need to insert it into place where the cabin frame meets the glass. Then treat with sealant. This will improve the waterproofing properties of the zones.
Then, once everything is dry, check the level of tightness of the structure. To do this, direct a strong stream of water to any connection. If leaks are detected, resealing must be done. You definitely need to go over the problem areas again.
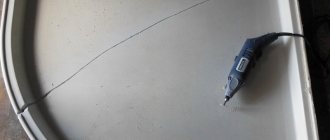
There have been cases when, in order to properly seal a shower stall, it was necessary to carry out repair work and dismantle the old seal. It is easy to remove silicone sealant from the bottom using white spirit.
All you need is a rag, blades and cleaner. Soak a rag in the product and wipe the area with the old sealant, leave for 30 seconds. Take a blade and clean off the old layer from the surface (glass or tile). If a yellowish stain remains in this place, it is necessary to wipe it again with white spirit.
You can remove silicone from the tray mechanically only from surfaces that are not scratched. It is removed with a sharp knife or pumice stone. First, large silicone build-ups are removed. Everything must be done with special care so as not to damage the surface.
Additionally
After the sealant has been removed, you need to disconnect the cabin from the pan. If the silicone has not been completely removed, it can be cut off with a knife. To do this, the tool must be inserted into the opening between the pallet and the wall.
Once the walls have been removed, the residual silicone must be removed using a hard pumice stone. If all the work was done carefully, then you can be sure that the acrylic surfaces will remain safe and sound. After all procedures, it is recommended to completely wipe the shower stall with a dry and clean cloth.
Resurfacing
After the sealant has dried, check the structure for leaks. To do this, it will be enough to direct the flow of water to the joints. In 80% of cases, traces of leaks are detected, so re-treatment will be required, before which the cabin must be dried again.
As you can see, preparing a shower cabin for installation is not difficult, and treating the tray with sealant can be easily done at home without the need to call a professional. It’s easy to do it yourself.
Why is it needed?
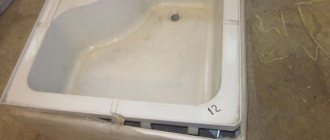
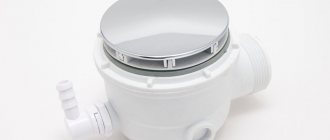
The shower stall is usually a plastic or glass “corner” attached to the wall, with a drain pan.
The wall, in turn, is usually covered with ceramic tiles. And if separately ceramics and glass easily resist moisture, then cracks often form at the joints through which water seeps.
In addition to constant puddles outside, this can lead to a decrease in the life of the cabin and the appearance of mold due to constant humidity.
To prevent this from happening, all cracks must be treated with sealant. This is a building material whose consistency resembles thick sour cream. When applied, it forms an elastic film that does not allow moisture to pass through and additionally holds the parts together. Used for application on glass, metal, ceramics and aluminum.
In case of high humidity (in the kitchen and bathroom), a waterproof sealant is used. It perfectly resists drops and does not change under the influence of ultraviolet radiation. For additional protection against mold and fungi, an antifungal option is produced.
This is interesting: Features, areas of application and popular brands of butyl sealants: lay out point by point
Causes of clogging
The main reasons for a clogged shower head are:
- low quality of supplied water. Due to the quality of water, limescale deposits form on the body of plumbing equipment, which leads to a gradual reduction in the passage holes;
- the absence of filters in the water supply system that can retain particles of sand, rust and other pollutants at the entrance to the system.
Filtration of water before supply to plumbing
To reduce the frequency of shower head cleaning, it is recommended to install equipment made of copper or stainless steel. Plastic products are more susceptible to clogging with small particles, while steel products are more susceptible to corrosion.
Subtleties of sealing a shower stall
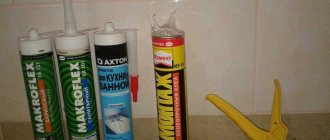
Sealing involves the use of the following materials:
- sealing cord;
- rags;
- silicone sealant.
Use silicone solvent to remove old sealant.
When using polysulfide, silicone, acrylic, butyl sealants, cavities and seams are not only cleaned, but also dried. Experts do not recommend using soapy water or detergents for this purpose, as they can worsen adhesion.
Old sealants and other contaminants are removed from concrete and stone surfaces using a wire brush; if necessary, special cleaning and solvent compounds are used. Metal, plastic and glass are wiped with a solvent or alcohol-containing liquid, the remains of which are wiped dry with a napkin. To protect areas adjacent to the seam to be sealed from contamination, use adhesive tape, which is removed immediately after completion of work.
The surface to be treated should not be too cold or hot. The optimal temperature range is between 5-40°C. It is recommended to warm the tube with sealant to room temperature. The extrusion method is determined by the type of packaging. The sealant emerges from the tip after squeezing the tube. To form a beautiful seam and remove excess material, use a spatula soaked in water. It is necessary to carry out the procedure without delay, since the film on the surface of the sealant appears quite quickly, within 5-30 minutes, depending on the composition. The average curing speed of the material is 2-4 mm per day at a humidity of 50% and a temperature of 20°C.
Waterproofing walls
It is produced using base protection technology: the wall is cleaned of sagging, old paint and other contaminants.
Cracks, potholes and other defects are sealed with an insulating compound, then the surface of the walls is coated with any polymer mastic. Usually one coat is enough, but in “wet” areas you can apply another coat if desired.
How to seal
In order for the DIY sealing process to be carried out correctly, you should use special equipment, which most often comes with sealant. We are talking about a so-called gun, into which a capsule with sealant is inserted, and the force is transmitted from the trigger through a special design to the piston. This allows the sealed mass to be applied in an even layer without breaks along the entire joint length. But before doing this, you need to degrease the surface, completely and very thoroughly clean it of dirt and dust particles to ensure a reliable connection of the silicone to the edges of the degreased surface. It would not be superfluous to apply an antifungal composition to prevent any formation of fungus or mold at all.
The speed of hardening is influenced by the following factors:
- thickness of applied sealant;
- temperature;
- moisture level in the room where work is being carried out.
Considering the last two factors, you should not use the bathroom for some time so as not to increase the humidity and temperature in it before carrying out work. Once the required area has been sealed, experts do not recommend using the shower for a while. As stated, silicone-based caulk is the ideal solution for protecting joints during shower stall installation. It is easier to handle than acrylic sealant, and its properties will be better. And the affordable price indicates that it is better to choose this type of sealant.
If we move directly to the sealing process, then shower cabins should be siliconized either during assembly (each connection) or after installation (all joints that have formed). It is necessary to carefully apply the sealant to areas that are already sealed with cords or rubberized gaskets. It is necessary to process the joints in such a way that the places where the parts are attached to the structure with screws or bolts are on the outside of the sealant strip.
Sealing should be carried out according to the manufacturer’s instructions.
, which clearly and step-by-step describes the entire process. And at each stage, silicone must be applied to all joints and joints.
Processing of seams should be carried out as carefully and very carefully as possible. The substance should not come into contact with the internal parts of the shower box, bathtub or tray. A small amount of sealant will be enough for any corner. If you are not confident that you can carefully apply silicone, then some places, and especially those located next to the seal line, can be covered with masking tape. This will protect them from accidental contact with sealant.
When all work is completely completed, the tape can be easily removed.
If suddenly you accidentally stain some unprotected place, then the fresh composition can be removed with a piece of cloth. Once the sealant dries, it will be nearly impossible to remove without damaging the surface.
When all the joints inside the shower stall are treated with silicone or other sealant, and the structure is fully assembled and secured with all fasteners, it is necessary to conduct a general inspection of the shower stall from the outside. You should inspect it very carefully for the presence of excess sealant on the outside.
If such excess is found, you should carefully wipe it off with a rag or piece of cloth.
Next, you need to give the sealant time to dry.
As a rule, its drying time is indicated on the tube. When it is completely dry, then you need to check the structure for leaks. To do this, simply turn off the drain and collect water in a pan or on the floor to a certain level, and then drain it. While drawing water, you will be able to understand whether the shower stall is leaking in the most important places. If such a leak is discovered, then in order to eliminate it, you will need to replace all the sealant already applied with a new one. It will be pointless to use sealant specifically in places of leakage, since it will not form a single tenacious mass. This solution is temporary. But sooner or later a leak will appear in this place again.
Leak diagnostics
Before fixing a shower stall leak, perform the following steps:
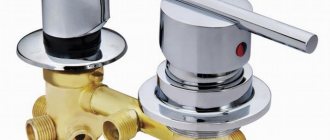
Inspect the mixer. Shower cabins are equipped with built-in appliances. The housing is located behind the rear wall, so the structure is moved away from the wall. If the mode switch is leaking, check the nuts and gaskets. When these elements are in good condition, dismantle the handle and remove the cartridge. If it is damaged, it needs to be replaced.
- They try to open the tap. If a leak appears only after this, inspect the O-ring or gasket.
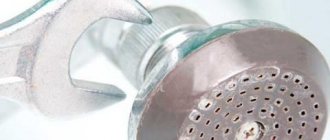
- Checking the shower head. If there are no defects on the nozzle, evaluate the tightness of the nut. They are trying to replace the rubber gasket.
- Check the overhead shower head. Such elements are most often non-separable. When cracks appear on the body, the entire watering can is replaced. First check the adapter, fitting and nut. All fasteners must be well tightened.
- Inspect the shower hose. Most often, leaks appear at the junction with the mixer body or watering can. They try to tighten the union nuts and check the rubber seals. Sometimes cracks appear in fasteners. If the hose leaks, remove the metal braid and inspect the rubber core.
- Check the area where the mixer connects to the water pipe. To do this, you need to move the cabin away from the wall, holding the pallet. If the mixer body is not damaged, check the connections. The nut may be loose or incorrectly tightened. Rubber seals are also checked.
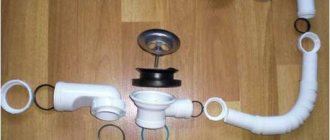
- Inspect the drain system. A minor leak is not detected until water begins to seep out from under the pan. To inspect the siphon, the cabin is moved aside. After this, remove the drain plug and open the tap. If water flows down the drain normally, but a puddle forms on the floor, the problem lies in a violation of the tightness of the connection.
- Check that the siphon is positioned correctly. It may be displaced or loosely attached.
- Inspect the pallet. Acrylic bowls are damaged if improperly installed or transported. Large cracks and chips can be detected with the naked eye.
- Check the injectors. Evaluate the tightness of the hoses to these elements. Check the presence of rubber seals. To inspect the connections, the cabin is moved aside.
- Check the supply hoses. When these elements leak, water is found on the floor or walls. To check the hoses, open the tap and evaluate the pressure power. If it is reduced, the reinforced hose is damaged or displaced.
- Inspect the seals at the joints. Peeling of sealant is easy to detect. To do this, water the joints with water. A malfunction is indicated by the appearance of drops on the reverse side of the seam.
- Check the condition of the steam generator. If water enters the tank, but steam does not come out through the nozzles, the problem lies in the sensors.
Working with sealant
For sealing you need to use some materials:
To properly seal the tray and shower stall, you need to prepare all the necessary surfaces. Clean them from old coating layers, dirty spots, dust, and you also need to degrease the parts.
These procedures must be performed when sealing is carried out. In order to remove old sealant, it is better to use a special solvent designed for working with silicone.
It is best to remove old sealant from concrete and stone surfaces using a wire brush. If necessary, you can use special cleaning and dissolving compounds.
Metal, plastic and glass surfaces are treated with a solvent or alcohol-containing liquid, then wiped with a dry cloth. To protect areas that touch the sealing seam from dirt, you can use adhesive tapes, which can be removed after completing all procedures.
The surface that will soon be processed should be at medium temperature. This range is from 5 to 40 °C. The sealing tube is heated to room temperature.
How to squeeze out the composition is described on the packaging. Silicone or other sealant appears at the end of the tube as soon as the tube is squeezed. In order to form a beautiful seam and remove excess strokes, you can use a wet spatula (moisten in water).
Performing such work requires a quick reaction, otherwise a film on the sealing substance appears in 5 minutes (this factor depends on the components of the material). On average, a small layer of material (from 2 to 4 mm) hardens in a day if the temperature is 20 ° C and the humidity is 50%.
Types of sealants
Processing of joints is carried out with special compounds called sealants.
There are two types of sealants on sale:
- with silicone base;
- with acrylic base.
Acrylic-based sealants are completely unsuitable for rooms with high moisture content. The fact is that acrylic decomposes when exposed to water, and when it dries, it begins to crack and slowly deteriorate. Manufacturers try to introduce substances that are resistant to moisture, but this does little to save the situation.
Silicone sealants are considered the best option for working in conditions of high humidity. They are not afraid of water and seal holes efficiently. It is precisely because of these properties that sealants are preferred by specialists. True, you also need to be able to choose a quality product.
The main task of the sealant is to reliably protect against leaks. Therefore, do not try to somehow make a profit when buying it - you can buy an inexpensive sealant, but not of any quality. It will soon lose all its useful properties and work will have to start from the very beginning.
To determine a quality product, you must carefully study the information on the label. A good sealant should contain forty-five percent hydrophobic substance and exactly the same amount of silicone rubber. The composition must also contain a plasticizer. When choosing, preference should be given to products from manufacturers that have proven themselves for a long time.
Leak due to blockage
Over time, the drain becomes clogged, which allows water to leak from the pan.
Causes of blocked pipes
The following contribute to clogged drains:
- Sediment of fat on the walls of the siphon and pipes connecting it to the sewer system. This substance is found in soaps, shower gels and shampoos. When using warm water, grease accumulates in the drainage system.
- Hair accumulation on the outlet grille. This reduces the clearance of the neck, preventing normal drainage of water.
Cleaning products
To dissolve fat and hair, many alkali-based products have been created, for example “Tiret” or “Mole”.
They are used like this:
- The specified amount of gel or liquid is poured into the socket. Leave the drug for 2-3 hours.
- Flush the sewer system with plenty of hot water.
A metal cable is also used to clean the drain system. The tip is inserted into the outlet grid, constantly rotating the tool. The cable catches hair and fur, and the remaining fat plug is washed out with hot water.
The need to seal shower stalls
The versatility of some models of shower cabins allows not only to use it for its intended purpose. These may include: audio players, massage systems, dryers and other functions.
But one thing remains the same - this is the design of shower cabins. They have a tray for draining water and a body made of glass or plastic. Expensive models can be installed permanently, separately from the bathroom walls. Their body is closed. But often the price of such cabins is expensive. That's why coal cases that are placed against the walls are popular.
The installation of shower boxes itself is not difficult. The main thing is to take the necessary measures to protect the building materials on the floor and walls in the bathroom. There may be gaps between the pallet and the adjacent tile. Flowing down the wall, the water will spill under the pan itself, spreading into puddles.
Such consequences, in addition to inconvenience, cause great harm to the integrity of the installed coatings in the room. And with frequent and large leaks, there is a risk that the liquid will penetrate below to the floor and create problems for neighbors. And the cabin itself may suffer. In the most difficult places to treat, the following can form:
- fungus;
- zail;
- water stagnation.
All this gives rise to the formation of putrefactive processes, which are not only dangerous to the health of the inhabitants of the house, but can also significantly reduce the life of the device.
You can protect yourself from possible problems. And this will be easy to do if you know how to seal. The main thing is to get a high-quality sealant for shower cabins, and coat all the joints of the device with the bathtub with it. This building material has several important properties that are necessary for the safe use of this box.
These include: moisture resistance, elasticity, the possibility of gluing surfaces, as well as an antifungal effect. A whole range of positive aspects can be obtained by choosing the right sealant. But, all that remains is to figure out what factors you need to take into account when purchasing.
"Wet" zones
To begin with, determine those places in the room where moisture gets most often - the so-called wet zones. This includes:
- the floor on which all the water pours in the shower without a tray;
- seams between the floor and the wall;
- bottom of the wall;
- wall areas in the shower area are most susceptible to water ingress;
- risers and pipes collecting condensate flowing onto the floor;
- places where pipes are inserted into the base.
These areas are areas of high concern and must be isolated with special care.
Types of sealants
The sealing process is carried out by using special products called sealants. They are produced as a high-density paste, which is applied to seams at the junctions of various surfaces. This substance consists of polymers with an adhesive base. When they dry, they simply fill the space and glue the surfaces together.
Today, two types of sealant can be used:
- silicone based;
- acrylic.
The latter are almost impossible to use in bathrooms and showers due to the fact that there is high humidity in these places. And acrylic simply begins to decompose under its influence; during the drying process, it simply cracks and slowly collapses. It is for this reason that various types of substances that are resistant to water are added to acrylic pastes. Even so, acrylic is not as durable as silicone.
Silicone is considered the best solution currently on the market for two reasons:
it calmly reacts to the influence of water, and also reliably covers all holes and openings. Therefore, most craftsmen believe that it is better to use silicone sealant in the described case. But you also need to be able to choose it. The main purpose of such a composition is to create a reliable barrier to prevent moisture penetration. Considering that the consequences of its penetration can later result in serious expenses, it is better not to skimp on sealant from the very beginning. The fact is that some low-quality compounds of this type can quickly lose their waterproofing properties, and after some time the work will have to be done again.
To determine whether the sealant is of high quality before its purchase and subsequent use, you need to familiarize yourself with the composition indicated on the label. The best option for a shower cabin would be one that contains at least 45 percent hydrophobic filler, 45 percent silicone-based rubber, a plasticizer, as well as various additives: thixotroping substances, catalysates and fungicides. It is best to choose sealants from well-known manufacturers, whose products have already shown their high quality when creating seams and sealing such areas.
How to seal a shower stall
In order to seal the cabin yourself and with high quality, it is better to use a special device. The device is shaped like a gun and sealant is inserted into it. The gun will make the process of squeezing out the mass much easier. The sealant will lay down smoothly and continuously.
Before you start applying silicone, the surfaces must be treated with a degreasing compound, and dust and possible dirt must be removed. It also wouldn’t hurt to treat it with a mold-protective compound.
Usually the sealant dries within a day, but this can be affected by various factors:
- thickness of the applied composition;
- room temperature;
- humidity in the room.
Based on the last two points, it would be better to refrain from visiting the bathroom for a while, so as not to inadvertently increase the moisture content in it and raise the temperature. After treatment, it is better not to use the booth for a certain period of time. As already mentioned, silicone type of sealant is the best option for such work. And the affordability of its price contributes to choosing it.
When starting work on sealing joints, the treatment must be done directly at the connection, or immediately after installation. Carefully apply the compound to areas with sealing cords and gaskets. The joints are processed so that the places with fastenings remain outside the sealant strip.
During work, you should adhere to the recommendations given in the manufacturer's instructions. At each stage of assembly, all joints and connections are necessarily treated with sealant.
Particular attention should be paid to the processing of seams. Make sure that the composition does not get on the inside of the surfaces.
It is enough to apply a small amount of the substance. If you are not sure that it will be possible to carry out the treatment carefully, then you can apply masking tape to some areas.
Once the work is completed, the tape can be removed. Excess sealant should be removed with a piece of cloth. The main thing is not to wait for it to dry out.
After processing all the joints and final assembly of the cabin, a thorough external inspection should be carried out. Excess sealant must be removed.
After completing the work, you must wait until the sealant has completely dried. After this, you should check how well the work was done. Simply turn off the drain and fill the shower tray with water and flush it. During this procedure it will be easy to determine if there are leaks.
If a leak is detected, the sealant in this area should be completely replaced. There is no point in applying a new layer of substance on top of the existing one. It will not adhere well, and in any case the leak will form again.
If there is no tray in the cabin, then for complete sealing it is necessary to treat the seams between the tiles with a special grout. The grout will allow the seams to repel water, just like tile does.
What to focus on when choosing a sealant
There is a lot of information and information available on how to seal a shower stall. Often, everything happens according to the same scheme, partially modified. The question of which sealant is suitable for sealing a shower stall is more weighty and significant. After all, the durability of the entire structure depends on the right choice.
The first thing you need to focus on is the composition of the substance. The product container contains a list of all the components contained in it
If the pallet material is acrylic, then acrylic sealant will be the best. For metal baths, a silicone product is suitable. And the more of this component in the composition, the faster it will dry and bind the surfaces more tightly.
Sealant color
Transparent sealant is universal
It is selected for the materials being glued. Transparent sealant is more versatile.
Water resistance
It is this factor that determines the possibility of using sealant in the bathroom, where a high level of humidity is constantly maintained.
Bacteriological resistance
Due to constant exposure to moisture, mold can form in the cracks. And a product with such a mark prevents its appearance.
Availability of additives
The fewer foreign elements in the product, the better.
It's rare to get a quality sealant cheaply. The price always matches the quality. An inexpensive material will not be able to effectively perform its basic functions, especially over time.
By choosing a sealant with a suitable composition, color, resistance to mold growth and a minimum amount of additives, you can be sure that this is exactly what you need to seal your shower stall
Peculiarities
After installing the cabin in a small bathroom, there is still space for some furniture, a washing machine, and so on. And sealing the shower stall is the most important element of protecting the room from moisture and its excess and, as a result, dampness in the room. The severity of the problem in this case is due to the fact that the booth is a prefabricated structure. Namely, through the cracks between its parts, moisture and steam enter the outside and increase the humidity.
Moreover, this causes the formation and extremely rapid spread of fungi, mold, and other harmful microorganisms in the bathroom, and then in the apartment. Their spores, which are released into the air, cause allergies, diseases of the respiratory tract, lungs, and so on. In addition, dampness can attract various creatures: cockroaches, rats, insects, woodlice and the like, which are carriers of dangerous infectious diseases. That is why it is strongly recommended to seal and waterproof the shower cabin after installation.
If we talk about the most common places for leaks, then most often these are connecting seams. This is the weakest point in any shower stall. Another reason could be the cabin design itself. A large number of models have thresholds that are small in height, through which water simply spills. Another reason for a water spill may be poor quality of the drain mechanism or the connection of its elements. In this case, water simply accumulates under the shower stall. As a rule, it is enough to either tighten the fasteners or replace the system itself. Another fairly common reason for a leaking shower stall is a crack in the shower tray.
Pasted insulation
In a shower without a tray, it is performed using rolled welded or self-adhesive materials. This could be “Tekhnoelast”, “Stekloizol”, “TechnoNIKOL” and others.
Preparing the base
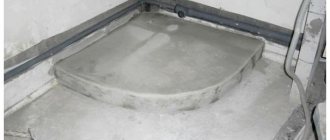
Foundation preparation plays an important role. If there are cracks, depressions or bumps in the floor, the surface is leveled using a cement screed.
After the solution has hardened, a special mastic containing bitumen is applied to it, on which strips of material are laid out.
It is important to roll out the rolls in advance, cut them to the desired length and let them rest for a tighter adhesion to the surface.
Laying the material
The strips are laid with an overlap of 10–15 cm and overlapping the walls by 15–20 cm. To ensure a smooth transition of the material, the abutments are rounded with cement mortar. If a weld-on insulator is used in a shower without a tray, then all joints between strips, connections in corners, near the threshold, and around pipes are thoroughly soldered with a gas burner.
When laying self-adhesive rolls, the edges of the strips are pressed tightly against each other, having previously coated the overlaps with special glue. The next layer is laid across the first and the whole process is repeated again.
Each layer is checked for the quality of gluing and the presence of bubbles, which are carefully cut and, generously spread with glue or mastic, pressed tightly to the base and soldered. Each owner determines the number of layers independently, but it is recommended to put at least two.
To protect and level the multilayer coating, lay a 3-5 cm cement screed, and then lay tiles on top of it.
Types of sealants
Choosing compositions for sealing seams is by no means easy due to the availability of a huge number of different drugs on sale. You need to carefully study the information on the labels, understand the essence of the manufacturer’s recommendations, consult with the seller or manager offering the product, and only then make a purchasing decision.
The sanitary condition of the bathroom, the serviceability of the equipment, and the well-being of the residents depend on the quality of the sealant for the shower cabin and the correctness of its application.
Effective isolation of risk areas is provided by polymer compositions based on:
- silicone;
- acrylic polymers;
- polyurethanes.
All types of products are a viscous paste-like mass, which, when squeezed out of the tube, fills the entire space of the crack, gluing the contacting surfaces.
https://youtube.com/watch?v=Xwn5wPKTn88
Polyurethanes
Composites based on polyurethanes have an aggressive effect on the skin and mucous membranes of the respiratory system; you can only work with them while wearing a protective mask and gloves. Moderate performance characteristics, coupled with the danger of contact, have led to the fact that now polyurethane products cannot withstand competition with more advanced compounds and are gradually losing popularity.
Acrylic polymers
Polyacrylic sealing compounds have a favorable ratio of consumer properties and price, which increases their attractiveness to the buyer. They adhere well to materials due to their high adhesion rates, withstand any temperature, and can be coated with paint, putty or varnish. The desire to purchase acrylic sealants is hampered by their poor resistance to mechanical deformation and the tendency of many modifications of the preparations to be exposed to water.
For example, if you seal the pan with polyacrylate and then allow an overweight person to take a shower, who may well want to give himself a hydromassage, then there is no guarantee that the seams between the lower container and the walls will not crack.
If swimmers with significant weight are not expected, another attack may cause concern. Even composites with added moisture-protective substances cannot withstand prolonged contact with water and slowly decompose, and no one is happy with the prospect of repairing seams in the near future.
Silicone compounds
The leading positions in the ranking of products for sealing shower cabins are consistently occupied by silicones, the consumer characteristics of which make the buyer forget even about relatively high prices.
There are several types of silicone compositions, differing in the structural features of the base substances and the presence of additives.
Composites that contain antifungal additives that increase the viscosity of the mass when drying, plasticizers, and pigments that create a pleasant decorative appearance of the seams can effectively silicone a shower cabin.
Despite the importance of the functions performed by additionally introduced components, the best qualities are those with the maximum concentration of silicone and minimum concentrations of everything else.