If you have decided to carry out a long-planned renovation of a toilet or bathroom, then you, of course, know that the work of professionals will be quite expensive. Therefore, many people opt for DIY repairs. Having a great desire and financial capabilities, you can choose the option with plastic panels. In addition, the installation of PVC panels in the bathroom can be done by a person who has never encountered repair work. Especially if you know how to attach the panels in the bathroom with your own hands step by step and what is needed for this.
Pros and cons of PVC panels
The main advantages of plastic panels are the following characteristics:
- Resistant to moisture. The surface does not swell or become stained when splashed with water.
- Safety and practicality. High-quality material does not emit toxic fumes and does not absorb unpleasant odors. PVC panels do not require special care.
- Easy to install. Finishing the bathtub using this method is completed within a day, after which the room can be used for its intended purpose.
- Possibility of masking communications. When installing panels using a frame method, you can hide sewer or water pipes.
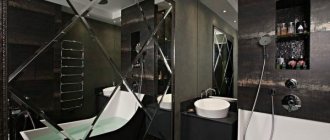
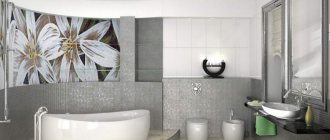
- Variety of colors. The material harmonizes well with modern interiors. It can be used to decorate a small shower room.
The negative qualities of the material under consideration include the following:
- Fragility. When hit or exposed to cutting objects, cracks or breaks appear on the surface. Pressing with a finger may leave shallow indentations.
- Release of toxic substances during combustion. The material cannot be called fireproof.
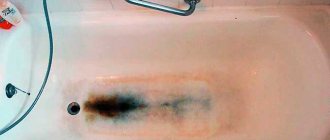
- Condensation accumulation. If there is no ventilation in the room, the joints between the plastic panels will become places for mold to grow.
Advantages of plastic panels.
Application benefits
The popularity of such cladding is explained by many advantages:
- low cost. The panels are much cheaper than tiles, the installation of which, moreover, requires a major renovation of the room;
- simple and quick installation. You can make the cladding yourself without having any special skills;
- cleanliness of the installation, the material does not contain a lot of dust and debris;
- a large assortment;
- the material is resistant to mold and mildew;
- do not require special care, easy to wash and clean;
- durability;
- resistant to moisture;
- are made from safe and environmentally friendly materials.
Flaws:
- not resistant to mechanical damage;
- when ignited, toxic substances are released;
- If installed incorrectly they are dangerous.
There are more advantages than disadvantages. With the right selection and installation, they will decorate the bathroom for a long time.
How to choose the right plastic panels
When choosing plastic panels, take into account the following characteristics:
Plastic panels in the bathroom.
- Strength of the material. Before purchasing, the lamella is squeezed with your fingers near the end. Expensive panels are not always durable. Quality depends on the raw materials used and manufacturing technology. You cannot buy soft panels; if damaged, it will be difficult to replace them.
- Matching pattern. The application of complex multi-colored patterns requires careful control at all stages of production. When installing low-quality panels, the pictures may not match. If ceramic tiles are adjusted to match patterns, then the same cannot be done with plastic. It will not be possible to check the material in the store. You need to warn the seller that an inspection will be carried out at the home.
- No gaps at joints. Sometimes when juxtaposing panels, gaps of uneven width remain. This deficiency becomes more pronounced in bright light.
- Thickness of elements. This parameter must be the same over the entire area. Combine the two panels and see if there are differences at the junctions. If they are present, the panels are defective. This will ruin the appearance of the wall in the future.
- Plasticity of the material. If the panels are made from recycled PVC, they will be damaged during installation.
Care
Selection of products
For correct care, you need to familiarize yourself with several rules:
- First, protect your eyes, hands, and skin from contact with detergent. Wear personal safety equipment – hat, gloves.
- Remove all hanging items, if present.
- If there are large seams, you need to clean them with a rubber spatula.
- To clean PVC panels, use a soft, non-scratch sponge. For rags, you can use those that do not have lint.
- To protect the casing, do not allow the water to overheat above 40 degrees.
- When choosing a detergent, choose liquid or gel detergents. Powders can leave minor cracks, which become clogged with dust and spoil the appearance of the structure;
- After you finish cleaning the plastic with dust, be sure to rinse the solution with clean water. This way, fading does not occur.
- If the coating of PVC panels is glossy, additional treatment with polish will be required.
- Before using a new detergent, it is advisable to check for reaction with the material. Apply a small amount in an inconspicuous area, then wait 15-20 minutes. If visual changes appear, the product is not suitable for use.
Caring for panels
Using polyvinyl chloride sheets as a facing material for the bathroom is a good choice for people who do not have free time to install tiles or other materials. Quick installation, low cost and an abundance of color schemes are the main advantages of plastic, which is why it has become in demand.
Equipment and additional elements
When finishing a bathroom or toilet with plastic panels, the following types of components are used:
- Universal corner. It is a plate bent at a right angle. The part is used for finishing internal and external corners.
- Skirting for floor and ceiling. Part of the profile is placed under the panels, the other side covers uneven cuts and surfaces.
- Outdoor corner. Helps to beautifully decorate the outer corner, hiding unevenness.
- Inner corner. It differs from the external one in the size of the sides. The wide part is placed under the lamellas, the narrow part is used to hide irregularities.
- Connecting corner. Used to connect panels without a lock. It is used when the length of the lamellas is insufficient for finishing the surface.
- Start/finish profile. It is installed when laying the first and last panels. Sometimes a finishing guide is used instead of a universal angle.
- F-shaped corner. Placed at joints and can replace casing.
- Sheathing plank. It is considered the main element of the frame. The part is made of metal or plastic.
- Klyammer. Used to press panels to sheathing. Allows you to remove slats without damaging them.
- Fastening elements. The material is secured with self-tapping screws, staples or liquid nails. The choice of fixation method depends on the installation method of the cladding and the quality of the walls.
What tool and how can you process the material?
There are the following methods for cutting and processing panels with your own hands:
- Construction knife.
Use only new blades with sharp tips. Can be cut along panels. The element is laid on a horizontal surface, the places of cuts are marked. When cutting, use a long, smooth method for cutting panels. bar It is placed on the panel, and a cut is made on one side with the tip of a knife. Turning the lamella over, bend the cut point. The remaining part is cut off in a bent state. Cutting across the panel is more difficult; you need to carefully cut the jumpers with the tip. - Bulgarian. The tool is equipped with a metal disk with a minimum thickness. The cutting process does not take much time, but you need to know how to use a grinder. After the cut has cooled, the burrs can be easily removed. When working, observe safety rules; the tool can cause serious injury.
- Hacksaw for metal. The inconvenient method takes a lot of time. It is used in the absence of other tools. The saw teeth must be of a minimum size. The quality of the cut depends on your skills in using a hacksaw. Uneven places are hidden with the help of additional elements.
Preliminary work for the frameless method
If you have neither the time nor the desire to make the sheathing, you can simply glue the panels directly to the base. In this case, the walls need more careful preparation. The walls must be leveled so that surface differences do not exceed 3 mm:
- First of all, it is necessary to clean the walls of the old finish, right down to the concrete floor.
- After that, all large bumps on the base are knocked down with a handy tool, and the surface is primed for better adhesion to the finishing material.
- It is better to cement the potholes, and seal the cracks at the joints of the slabs with polyurethane foam and plaster them.
- If the wall deviates from the vertical, it can be leveled using the same starting plaster.
- Pay special attention to the corners of the room; they should be perfectly straight, which will greatly simplify the installation process.
- After leveling the surface, it is recommended to prime the wall again. This will not only improve traction, but also remove remaining construction dust and strengthen the base.
After the main preliminary work has been completed, you can proceed directly to fixing the wall panels.
Calculation of the number of panels and additional elements
The bathroom has a small area and a large number of corners. Therefore, measurements take a lot of time. The more transitions, the more unusable material residues there will be. When implementing interesting ideas that require creating a drawing, the amount of waste increases. When calculating the material, you need to take into account a margin of 15%. Measuring the number and length of corners will help you understand how many corners and profiles you will need. Additional elements are inexpensive and can be purchased in large quantities.
When calculating the components of the sheathing, it is taken into account that they are placed in increments of no more than 0.5 m. The guides must be installed at the junction of the walls and the ceiling or floor, near doorways. Reiki are placed here in any position of the final element. It is not possible to determine the exact number of fasteners. They are bought in packs.
Calculation of components.
What kind of panels are these?
Modern technologies play a big role in our lives, and today even renovations in an economy-class bathroom can boast of modern finishing materials.
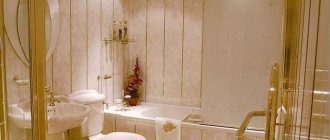
Thus, decorating bathroom walls with plastic panels is one of the most popular options today. As you can see in the photo, the surface covered with them looks quite decent. You can see more examples (photos) in the article “Bathroom finishing options.”
Advantages and disadvantages of PVC panels
Covering the walls with plastic panels is a very economical option, because... their cost is not high compared to all other materials that are used for finishing. And this is perhaps the main advantage that most consumers pay attention to.
We make a chandelier [from wooden slats] with our own hands.. Master class..
11 most common mistakes during bathroom renovations...
After all, if you think about it, the cost of finishing bathroom walls with tiles (including the services of a master tiler) can be several times higher than the cost of installing the panels.
Another important advantage of this finishing material is the ease of installation. Unlike tiles, panels can be attached to the walls by any man with his hands, and this, in turn, will save an even more significant part of the renovation budget.
Well, the disadvantages of finishing a bathroom with plastic panels are perhaps the weak environmental friendliness of the materials, and yet a design that is not distinguished by its nobility. Whatever panels are used, in terms of aesthetics and design they are inferior to tiles. In addition to plastic ones, moisture-resistant MDF wall panels are also available for sale.
The cost of finishing a bathroom with plastic
If there are guide rails on the walls, the panels can also be fastened with self-tapping screws
As we said above, the main advantage of this finishing material is its low price (compared to other options). And, since this topic has been touched upon, it makes sense to indicate the average cost of materials and services of craftsmen (if they are involved).
Usually, the length of the panel allows it to be completely adjusted in height, so let’s assume that one decorative PVC panel will cover 25 centimeters of the bathroom wall.
25 centimeters is the standard width of one panel. Different manufacturers produce products in different sizes, wider or narrower, so before calculating the quantity, it is worth checking the dimensions.
To find out how much it costs to sheathe a room with panels, you need to follow the calculations below.
With the standard width of the material, for 1 meter of wall length you need 4 plastic panels for the bathroom. Their average cost is about 200 rubles per piece, depending on the quality and design, prices can vary from 100 to 500 rubles. In our example, we'll take something in between.
Therefore, 1 linear meter of wall will cost us 800 rubles. In addition, for fastening we will need special guides and plastic corners; usually for all 4 walls of a small bathroom these “little things” cost 1500-2000 rubles.
| You may be interested in these materials: | ||
| DIY plastic slatted ceiling! Instructions with VIDEO! | SHOWER CABINS: saving space in the bathroom! Photo overview of the main sizes. | |
IMPORTANT! When purchasing PVC panels, always take them “with a reserve”, because... in the corners you will most likely have to trim them. Therefore, before going to a hardware store, measure all the walls and ceiling and determine the required quantity. Also remember to subtract the dimensions of the bathroom door.
Based on these average prices, you can calculate your estimated repair costs.
If craftsmen are hired to finish the walls, then for a standard small bathroom it will cost you from 6,000 to 8,000 rubles.
Installation methods
Wall covering with plastic panels is done in several ways. Step-by-step instructions will help you learn the intricacies of the installation process.
Frameless
When using this method, the panels are fixed to the surface with glue. The method is suitable for cladding smooth walls. Therefore, the base is pre-plastered. The corners need to be treated especially carefully. They should not have unevenness or concrete burrs. Plasterboard walls do not require preliminary preparation.
Fastening panels with glue.
Frame
Installing a metal frame allows you to align the slats regardless of the condition of the wall. Bathroom renovation is done like this:
- The locations of the guides are marked on the surface. The distance between them is no more than 0.5 m.
- The hangers are secured with dowels. If the drill hits the reinforcement while forming holes in concrete, the work is stopped. Damage to metal elements negatively affects the load-bearing capacity of a reinforced concrete structure. The hole is shifted, this does not impair the quality of the sheathing.
- Bearing profiles are cut. You need to calculate their number in advance.
- Install load-bearing elements. They are given a vertical position based on the holes in the hangers. For precise installation of the sheathing, the guides can be bent. The load-bearing characteristics of the frame do not deteriorate from this. Profiles and hangers are fastened with self-tapping screws.
- Finishing material is placed. The elements are fixed with self-tapping screws and press washers.
On the walls with glue
Neoprene glue is used to attach the finishing material. The inorganic base of the composition is resistant to moisture. The use of universal types of glue is allowed. Before gluing the lamellas, mark the wall. Glue is most often applied to plastic, but sometimes additional treatment of the walls is required. Having lubricated the part with the composition, it is inserted into the profile, shifted and pressed. The work is completed by sealing the joints and installing additional elements. You can see how to install the panels yourself in the video.
What is the difference between vertical and horizontal laying
The question often comes up: how to cover walls with panels, vertically or horizontally? What is the difference?
In the first option we make a horizontal frame, in the second – a vertical one. But in the bathroom I recommend using only vertical installation. Otherwise, water easily penetrates into the areas between the canvases and the wall. With its regular accumulation, fungi form. To eliminate them, a complete disassembly of the coating, preventive measures and new cladding will be required. And these are serious expenses.
It is important to do everything correctly, here are some articles for you
How to glue wallpaper correctly. The foreman shares his experience. Finishing work. Stages of finishing work. How can you save money when renovating?
Ceiling methods
There are several ways to properly sew a ceiling with plastic.
Installation of panels on a rough ceiling
The rough ceiling does not require special preparation. The finishing elements are laid as follows:
- Treat the surface. Antiseptic compounds are applied to the base and left until dry. It is recommended to install a waterproofing material, such as polyethylene film. The joints are taped.
- Measure the distances between walls located opposite each other. The skirting boards are cut so that when two parts are combined, an angle of 45° is formed. It is not recommended to fasten the part with self-tapping screws. When installed on an uneven surface, the additional element will sag. Liquid nails are used for fixation. At this stage, only 3 skirting boards are installed, the fourth is installed after laying the cladding. Installation of panels.
- Panels are cut. The element fits into the plinth by 2 cm. Having measured the distance between the walls, add 1.5 cm to the resulting value. The remaining 0.5 cm makes installation easier.
- Re-measure the ceiling. If there are minor errors, they are eliminated by changing the size of the gaps between the lamellas. It is recommended to align the panels in hidden places. Open areas must have smooth joints.
- The end of the lamella is inserted into one plinth. The element is slightly bent and the second end is inserted into the opposite profile. The long side is inserted into the third plinth.
- Pressing the lamellas tightly against each other, they are fixed with staples. The more tightly the elements are installed, the stronger the connections will be. When fixing on an uneven ceiling, pieces of plastic are placed under the end of the panel. This will help prevent cracks from appearing.
- After installing the entire elements, measure the width of the uncovered part of the ceiling. Taking into account the obtained value, the material is cut using the previously selected method.
- The lamella is inserted into 2 skirting boards. One edge is connected into a lock, the second is secured separately. The element is fixed with liquid nails or self-tapping screws.
- The fourth plinth is removed from the base part. The remaining part is treated with glue and installed on the wall.
Installation of panels to the ceiling on a metal frame
This method is used when finishing an uneven ceiling yourself. The work is carried out as follows:
- Mark the installation locations of the supporting profiles. The parts are placed in increments of 0.5 m. If there are pronounced irregularities, hangers are used. They are mounted in the same way as on the walls.
- 3 skirting boards are glued using liquid nails. If there are no right angles, the cuts will have to be adjusted. The plinth is attached both to the wall and to the metal frame. After applying the plastic element, it is removed for 2-3 minutes. After reinstallation, the correct position is checked with a level. The corners are sealed with sealant.
- The ends of the lamellas are inserted into the baseboards. The finishing material is laid along the long side of the ceiling. This reduces the number of cuts and waste. The plastic sheathing is attached to the profiles with self-tapping screws. To prevent the screwdriver bit from coming off from damaging the finish, place a metal spatula on the ceiling when screwing.
- The finishing panel is cut, taking into account the dimensions of the uncovered part of the ceiling. The back side of the fourth plinth is removed. The remaining parts are lubricated with glue and pressed to the base. After the glue has dried, they proceed to placing the lighting fixtures.
Fastening plastic panels to the ceiling in the bathtub.
How to install panels when mounted on a ceiling diagonally
This idea is difficult to implement. Installing the frame and adjusting the cladding elements is a labor-intensive process. The work is carried out as follows:
- Determine the area of the base and the longest length of the lamella. To do this you need to measure the diagonal of the ceiling. The volume of waste when using this installation method increases, so the material is purchased with a reserve.
- 3 skirting boards are installed in the standard way. When the glue dries, the height of the additional elements should not change.
- The end of the panel is cut at an angle of 45°. The second end of the lamella is cut off at the same slope. The result will be a starting element with the shortest length. It is installed in the corner.
- Measure the length of most of the installed part. This is how the length of the shorter side of the second element is determined. Markings are applied to the panel and cuts are made. Use the same method to cut and fasten the remaining parts. You can see what the ceiling will look like in the photo.
Installation by frame method
You can mount plastic panels with your own hands using a frame method. The work begins with the installation of horizontal plastic guide rails along the entire perimeter of the wall. To do this, you need to apply markings on the walls to install metal profiles. Using a hammer drill, drill holes in the places on the markings, hammer in dowels there and, placing the guides against the wall, attach them using self-tapping screws.
Metal hangers for lathing
Materials for mounting a metal frame
At the same time, it is not recommended to use wooden panels, since ideal joints cannot be achieved, which will lead to the destruction of the wooden frame due to constant humidity. The frequency of horizontal slats depends on how strong you want to make the cladding, but in general, it is customary to use the following distances:
- when facing the ceiling - 30-40 cm;
- when facing walls - 40-50 cm.
In this case, the distance of the first and last slats from the floor surface should be about 5-7 cm. And the end parts of the profiles should fit exactly into the corners of the room. The slats of the future frame must be attached perpendicular to the panels being installed. In most cases, the panels are placed vertically, which means that the slats should be perpendicular to them and parallel to the floor. The vertical arrangement of the panels not only visually increases the height of the ceilings, but also better removes accumulated moisture, since drops of water will flow down, and with horizontally installed panels, water will linger on them.
Stages of installation using the frame method
Having completed the frame, you can start attaching the panels, but how to do this correctly? The panels must be mounted on the frame using self-tapping screws, which can be easily screwed into them. In this case, you need to start from the corner farthest from the front door. To avoid moisture getting between the panels, it is recommended to seal their joints with sealant.
In order for the panels to fit beautifully in the corners of the room, it is necessary to use a device such as an external and internal profile, which in appearance resembles the English letter L. You can use a plinth at the junction with the floor, then an additional profile will not be required.
Ready metal frame
Having installed the side profile, one panel is inserted into it and secured to the frame rail. The remaining panels are inserted into the gaps of the previous one, very tightly. If you have provided an outlet on the wall of the toilet or bathroom, then you need to cut a suitable hole on the panel to be installed and install it to the wall.
To give the room a more complete look, after installing the panels, attach floor and ceiling skirting boards; in addition to the aesthetic function, they will also perform a practical one, hiding minor defects.
Insulation is placed under the panels
The frame slats should be mounted perpendicular to the location of the plastic panels
Ventilation arrangement
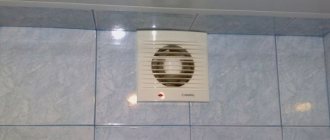
The ventilation system is an important part of any room with high humidity. In the absence of air circulation, plastic panels become covered with mold, which negatively affects the health of apartment residents. To ensure ventilation, a hole is made in the plastic casing that matches the size of the ventilation window. The latter is covered with a decorative lattice. It is fixed with glue or sealant. The ventilation grille should not touch the frame rail.
The mine is equipped with an electric fan that provides a constant flow of air. Devices can be exhaust, supply or multifunctional. The device is powered from a separate grounded outlet. The electrical wire is connected to the bathroom switch. Work is carried out before finishing the walls. It is recommended to install an additional ceiling fan.
Useful tips
Answering the question about how to install plastic panels, experts or those who have already done it themselves advise:
- Before installation, allow the material to “get used to the climate” of the room;
- carry out all work at a temperature of no more than 20°;
- before installing the panels, mark the locations of all parts and openings (pipes, valves, etc.) protruding beyond the wall plane;
- ventilation holes, door openings and built-in furniture should be edged in advance with corners, into which PVC sheets will then be installed.