Why do we need niches in the bathroom?
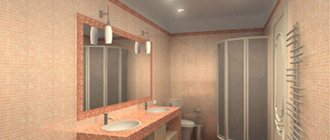
This architectural element is an excellent decoration, and in addition, hygiene products and bath accessories are stored here. Niches are installed both above the washbasin and in the wall above the bathtub. Pots with plants, figurines, beautiful vessels, and candlesticks placed in these places look stylish. A mirror in a niche placed opposite the doors will make the room visually wider and the niche itself deeper.
According to the design, there are niches both horizontal and vertical. It is better to place the first ones on a narrow wall; they will visually lengthen it. On a long wall, openings located vertically look good, especially when equipped with decorative light.
The configuration of the niches depends on the imagination and capabilities of the owner, but must necessarily correspond to the general style. Thus, the marine interior corresponds to round openings reminiscent of ship's portholes with mounted photographs depicting the underwater world. An aquarium installed in a niche will be in complete harmony with this style. High-tech or modern correspond to niches with strict geometric shapes. Arched recesses are suitable for a classic style.
Purpose
The cavity in such a room was used in ancient times to store various figurines. Today, its functionality allows you to make maximum use of the bathroom space. Thanks to the design, you can avoid buying small storage boxes or nightstands. This saves space. The plasterboard frame is easy to use. And spotlights are often installed in it to complement the room with lighting.
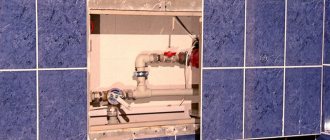
An alcove in a bathroom wall is usually located above the toilet or bathtub. This approach allows you to save space. This is especially important if the room has a small amount of square meters. Typically, a recessed niche in the toilet room is designed to store household chemicals or bathroom accessories. The structure can also be used to hide pipes and other communications. In this case, a decorative recess is made.
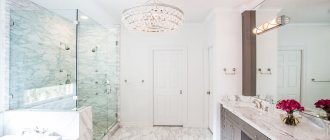
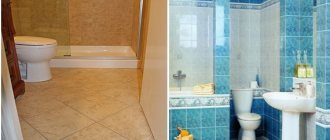
Niche in the bathroom, photo
In modern interiors, niches in bathrooms are quite common; photos of various options for this design confirm this:
Design and decoration
There are many options for how to create a structure above a bathtub, sink or toilet, but many owners want to get an original and stylish niche. The simplest design option is to use lighting. It is possible to use various lighting options, these can be spotlights or LED strip. On sale you can find not only classic white or yellow lighting, but also LEDs that change shades. Craftsmen also recommend using more mirror surfaces for recesses if the toilet room is not large. Mirrors not only add light, but also visually make the space larger. If there are shelves in the recess, it is also recommended to use them for additional lighting. It is enough to install small battery-powered lamps on them.
Bathroom with niche
In some bathrooms, a niche is provided in the original layout. In this case, it is important to use this element most rationally. In a large niche are placed:
- heated towel rail;
- washing machine;
- boiler;
- a cabinet to hang robes;
- shower stall.
The free space is decorated in the same style as the bathroom, with shelves at the top.
Minuses
Although the design has a lot of advantages, there are also several disadvantages that you will have to face during the repair process:
- Making a niche in the bathroom does not take much time, but some may have problems with its installation. Although creating a system does not pose any difficulties for experienced craftsmen, beginners may encounter some difficulties, since it is necessary to make accurate calculations. In addition, you will have to purchase the required tools and materials to make the storage unit. If you don’t have the time and opportunity to make the device yourself, you can simply turn to a specialist for help.
- If we consider traditional options for storing things in the bathroom, they are more reliable and functional, as they hide items from prying eyes and also protect against water ingress. In addition, it is worth noting the size and configuration, because it is not always possible to make a niche deep enough. To solve the problem, you can think about how to close the opening in the bathroom to protect things from moisture and dust.
- Another disadvantage is the dismantling of the building. Regardless of the location of the voids, if it is necessary to eliminate this element, you will have to spend some effort, money and time on it. For this reason, craftsmen strongly recommend that you think through the design of the bathroom down to the details, so as not to dismantle the built structure after a year.
Installing a plasterboard niche in the bathroom
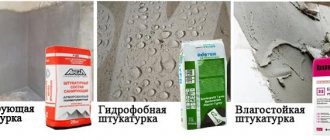
Drywall is simply an ideal material for constructing niches. It’s easy to work with, so if you have the desire and at least a little skill, you can start decorating your bathroom yourself. The main thing is to buy the right drywall - moisture resistant. It is easy to distinguish it from the usual one - it has a blue or green tint. Let's look at a step-by-step example of constructing a horizontal niche located along the entire wall. To complete the work, you must have the following materials and construction tools:
- plasterboard 12.5 mm thick;
- metal guide profile (ud) and rack profile (cd) thickness 0.6 mm;
- drill or hammer drill;
- special knife;
- laser or rack level;
- screwdriver;
- tape measure, square;
- reinforcing tapes;
- assembly glue;
- hammer
- self-tapping screws, dowels.
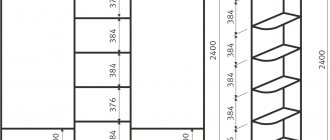
We begin constructing a niche in the bathroom with a sketch, where we indicate all the dimensions and installation of the frame, as a fundamental element responsible for the strength, appearance and durability of the finished structure.
We mount the frame
Before we begin installation, we prepare the surface of the walls: clean the old plaster and level it. Next, the algorithm is as follows:
- We take a level and make markings by constructing a rectangle of the required size, constantly checking the sketch.
- We mark the depth of the niche by drawing lines on the ceiling, adjacent walls and floor.
- Let's start attaching the guide profile. First, we punch holes in the wall for the dowels. The difficulty is that at the same time you need to hold the profile strictly along the marked line, so the presence of an assistant is advisable. We secure each profile with at least 4 dowels, otherwise the structure will not be rigid enough. If the niches are planned to join the ceiling and floor, then we fix the guide profiles there too.
- We form the corners by connecting 2 guide profiles to each other strictly at 90 degrees and complete the front side by closing the 4-gon with another guide profile. At the same time, we check using a level that all profiles are positioned perfectly evenly both on the front surface and on the sides. For a niche you need 2 such structures - for the bottom and the top.
- We install rack profiles with a maximum pitch of 0.6 m with the shelves inward.
- We reinforce the frame by cutting sections from the cd profile with a length equal to the distance between the opposing guides. We fasten them crosswise in pairs with the back wall to each other on one side and the other. These elements perform another function - they are a support to which we will subsequently screw the drywall.
- We form the shelves using the same technology: we make a plane from guide profiles, reinforce it with load-bearing elements, orienting them with shelves up and down at intervals of 0.3 m.
- We lay the wiring and mount a transformer if we plan to use LED lighting. We also provide holes for light bulbs and arrange grounding.
We cover the frame with plasterboard
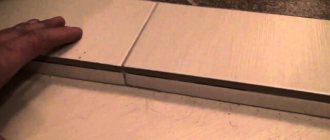
If you managed to successfully make a frame, then consider that 80% of the work has already been done. Sheathing with plasterboard is a very simple operation compared to what has already been done. All that remains is to cut the material according to the sketch and screw the individual elements to the frame. For this we use self-tapping screws 2.5 cm long and 0.35 cm in diameter. A good final result depends on following several rules:
- To get a smooth surface, be careful when adjusting the slabs. Finish their edges with a special plane.
- For high-quality design of corners, use metal perforated overlays specially designed for this purpose, which protect the material from damage. Make the joints in such a way that there are no gaps left.
- If you intend to cover the drywall with tiles or other fairly heavy material, then the installation step of the fasteners should be a maximum of 10 cm.
- Use fasteners with a countersunk head, otherwise there will be difficulties when applying putty - the coating will turn out uneven.
- If the drywall needs to be bent, first use a needle roller to perforate the strip, then moisten it and shape it according to the template.
- When lighting is provided, the final stage will be making holes and bringing out the wires.
Keep in mind: to prevent moisture from destroying the drywall, leave a gap of at least 1 cm between the floor and the sheathing.
Niche finishing
Finishing work comes down to priming, sealing recesses and seams with putty, painting or cladding the structure. To ensure that the niche fits harmoniously into the bathroom interior, use the following tips:
- If the bathroom walls are light, then decorate the niche in light colors. The dark one, in this case, will look like a hole.
- It is better to decorate a small niche in the same colors as the walls, but a little lighter.
Tip: start applying putty from the corners of the niche along the reinforcing tape previously laid around the perimeter.
pros
The main functions of a plasterboard cell in a bathroom include storing things. The structure can be used as a shelf or a full-fledged rack, it all depends on its size and location. But if an ordinary cabinet or shelves look ordinary and outdated, then using a storage hole is relevant and unusual.
This device makes it possible to decorate some space that was not occupied by something, for example, a wall above a toilet or bathtub. This approach allows you to save space and also create a place for household chemicals and bathroom accessories.
The design allows us to solve another problem. Under it you can easily hide all communications that can spoil the appearance of the bathroom. To do this, they usually additionally cover the wall with a plasterboard frame, and after that a recess is created. It is not necessary to use the structure to store what you need; it can be an excellent design solution if designed correctly. If desired, flowers, scented candles, unusual figurines and other additional decorative elements are placed on the shelves.
Corner floating shelves on the wall
Decorative corner shelves, which are intended for the bathroom, can be of several variations: cabinets, racks or shelves. They are similar in appearance to floor structures, but differ in shape - they look like a triangle, and the facade is located at an acute angle towards the two walls of the room. The most common option is a simple corner shelf, which is compactly placed in any corner of the room, perhaps even above the bathtub or toilet.
These shelves are quite durable and designed to hold fairly heavy objects. The material for their manufacture can be plastic, metal, wood, glass or all sorts of combinations
There are convenient options for placement inside the shower stall, but you need to carefully select the material of manufacture: wood, MDF, chrome surfaces will not work - they do not tolerate large amounts of moisture.
Finishing the finished structure
The finishing of plasterboard shelves depends on the overall design of the bathroom, and is done as follows:
- Apply two layers of primer to the finished structure and let it dry thoroughly;
- using putty and serpyanka, seal all joints and connections to the walls so that cracks do not appear later;
- Install perforated corner elements on the outer corners and fix them with a mixture of plaster. Important! For curved structures, buy an arched corner made of plastic; it bends perfectly thanks to the sections applied to one side;
Preparing the shelf for decoration - Apply a layer of putty to the entire surface of the plasterboard structure and let it dry;
- putty the shelves again after 24 hours;
- as soon as the second layer of putty has dried, the structure must be sanded well with an abrasive mesh;
- Apply primer to the finished shelves.
Preparation for the final coating is complete. You can decorate plasterboard shelves in various ways, for example:
- Apply decorative plaster with a water-repellent effect.
- Paint it any shade.
- Place decorative mosaics on the shelves using tile adhesive. This cladding method can be used without prior puttying.
Installation of built-in lamps
By making a plasterboard shelf with your own hands, you can create a unique project. For example, supplement it with lighting. This will give the structure an attractive, stylish look and become an additional source of light in the room. All you need to install the lamp is a drill and a special round bit for cutting a hole. The wiring must be done in advance, even before the sheathing, by hiding the wires in a protective corrugation. Instead of spotlights, you can use LED strip, which, due to its flexibility, is perfect for shelves with curves.