Bathroom renovations are considered one of the most difficult for a number of reasons:
- it contains a large number of engineering communications
- humidity and water contact of building materials
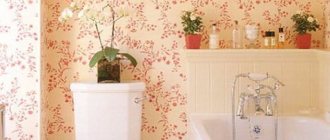
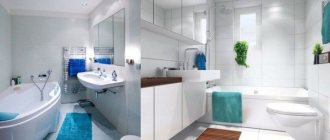
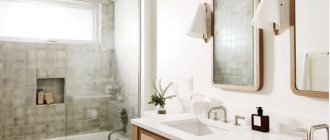
Comparing photos of new and old tiles in the bathroom, residents decide to repair the tiling or radically change the tiles.
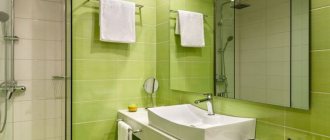
Bathroom redesign
The approach to changing the design of a bathroom can be divided into thorough and superficial. In the first case, for example, you can change the layout in the bathroom, connect or disconnect it with the bathroom, or replace the entire interior. Of course, this option requires considerable investment.
Most often they resort to the following options: decorating tiles, applying designs to them, repairing existing damage, and much more. This approach allows you to modernize an existing design, make it brighter, more positive, etc.
And it requires significantly less financial costs. Below we will consider possible options for this budget approach.
Do-it-yourself volumetric decoration
Volumetric decor will allow you to both update old tiles and radically change the design of the bathroom. A variety of materials can serve as decorative elements:
- stones, rhinestones;
- glass;
- shells;
- buttons of any size and color;
- coffee beans;
- beads of different colors.
You can make this kind of decor with your own hands, for example, prepare a panel from plastic, decorate it with shells or other decorative elements, and then attach the panel to the wall itself using liquid nails, acrylic varnish or hot glue.
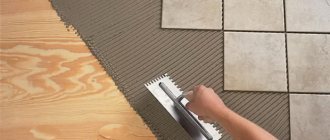
Today, even without knowing the instructions for laying tiles, you can update old tiles, and thereby make your bathroom design more interesting and original. In addition to the walls, you can also treat areas of the tiled floor, because cracks also appear at the seams there and the gaps darken. It is especially worth paying attention to the areas under the washing machine, bathtub and washbasin.
Vinyl tile stickers
You can easily and quickly turn familiar tiles into a stylish design element using vinyl stickers. They are very different in color, shape, theme (marine, children's, eco-motives, etc.). Therefore, finding suitable ones will not be difficult.
IMPORTANT: vinyl sticker is an excellent and budget option to hide a chip or crack on bathroom tiles.
The stickers are made from moisture-resistant self-adhesive vinyl film. Important qualities: it does not darken over time, does not fade or lose its original appearance for more than five years. This film is resistant to temperature changes.
It does not require special care. Moreover, in most cases, they can be peeled off and re-glued, which is also a definite plus.
ATTENTION: the surface to apply the sticker must be dry, clean and level. Place a piece of tape on the surface of the sticker in an inconspicuous place, smooth it with your finger, then remove it. If you see pieces of paint or rust on the tape, the surface is not suitable for gluing.
When preparing to apply the film, first thoroughly clean the tiles with a sponge and warm soapy water to remove all dirt. To remove greasy stains, you can use special cleaning products and alcohol. Then wipe dry with a clean cloth. And wait until the surface is completely dry.
If you need to stick small stickers, for convenience you can mark the locations with a pencil. Instructions for applying small stickers:
- peel off the paper protection;
- Place the adhesive side against the tile and press with your fingers;
- smooth from center to edges using a soft cloth or spatula. Make sure that the sticker does not move during these actions.
Large stickers are more difficult to apply. It is recommended to do this using mounting film.
Instructions for applying large stickers:
- lay the mounting film on a completely flat surface, for example, the floor;
- transfer the sticker to the film. In this case, the adhesive side of the film should be adjacent to the sticker design;
- Using a soft cloth, carefully smooth out any wrinkles;
- remove the paper protection from the sticker without touching the mounting film;
- Apply the sticker to the place of application on the tile, press with a rag or spatula.
Be careful not to spoil the paint on the drawing. HELP: if air bubbles appear under the film, pierce them with a needle and smooth them with a spatula. - remove the mounting film and press the sticker onto the tile.
What problems might you encounter?
There are several shortcomings of old bathtubs that can be eliminated using suitable methods. This includes:
- the enamel has become rough, the problem is eliminated by restoration;
- rust appears on the coating, and removing dirt has become difficult - the problem can be solved by updating the coating;
- water does not drain well from the product, which is due to serious errors during the installation of the structure, so dismantling and repeated correct installation are carried out, but a stain may appear from the water, which can be eliminated by using an acrylic liner;
- peeling paint is removed by creating new enamel or using an insert;
- when using a steel bath, a lot of noise occurs, the water cools quickly and rust constantly forms - this problem applies to all steel products, and it is solved by installing a special acrylic liner, which increases the thermal insulation parameters of the bath, making it quiet and resistant to rust.
Applying patterns
You can update the tiles in the bathroom by painting them with drawings and patterns. Not everyone has the talent of an artist, but this is not necessary. There are several ways to apply a pattern to a wall:
- You can use a projector to display an image, trace it, and color it.
- Scale grid. In this case, it is necessary to divide the applied image into squares. Then, using a large ruler or building level, divide the drawing surface itself in the same way. It is important to maintain proportions! Then, step by step, square by square, copy the image from the picture onto the surface. If it’s difficult, you can enlarge and print fragments, and then transfer them using carbon paper.
- Self-adhesive film is also an excellent option for applying patterns to tiles. With its help you can make a stencil and create small patterns with a clear outline. You can order a stencil, for example, from an outdoor advertising company.
There is an option to prepare it yourself. To do this, use a photo editor to make an outline of the desired image, enlarge it to the desired size in the ProPaster program, divide it into squares, print it, and cut it along the outline with a utility knife.Apply the finished stencil to the wall. And then color with foam rubber, a spray gun or an airbrush. Afterwards, carefully remove the self-adhesive paper.
- Draw by hand if you have confidence in your abilities.
Drawing with paints
To paint a design on a tile, you first need to prepare the surface itself.
- Clean the surface from dirt using a metal sponge and cleaning powder. You can even use sand. These actions will make the tile clean, remove greasy stains, and slightly disturb the smooth surface layer.
- Sand the tile. The paint will not stick to a smooth surface, so we make it rough. Using a block or sandpaper, carefully walk over the tiles. Also sand the seams using a sanding mesh.
- Primer of tiles.
First, rinse the surface with warm water to remove any dust or streaks. Then apply the primer and let it dry. After this, lightly go over the tile again with a sanding mesh or sandpaper. IMPORTANT: Epoxy primer is most suitable. - Now you can apply the drawing. Use coloring compounds on mullet and glass. They are durable and colorfast. Apply them using a roller. You can also use an aerosol can of car enamel. In the latter case, keep it at a distance of at least 30 cm from the surface.
- Drying. This process should take three days.
We put fillings and restore enamel with liquid acrylic
Renewing a bathtub with acrylic is a little more expensive and takes longer. You need to strip off the old enamel from the bathtub and apply a new coating based on acrylic resin. To seal it, speaking in dental terms.
- Arm yourself with a sander with a coarse abrasive, a drill with a wire brush, or regular coarse sandpaper and carefully remove all the old enamel. It will be noisy and long.
- Once all the old enamel has been removed, rinse the tub with a degreaser and dry thoroughly.
- Fill large unevenness and roughness (and there will certainly be some) with metal putty. Where to buy - at any hardware store.
- In the same hardware store, buy a special filling composition for bathtubs based on acrylic resin. For example, “Stacrylic” or “Liquid acrylic”.
- Disconnect the bathtub from all plumbing: remove the faucet if it is interfering with the process, and be sure to disconnect the drain. Place a container under the drain hole - excess prepared mixture will drain there.
- Prepare the composition. Mix liquid acrylic with hardener in the proportion indicated in the instructions and mix well. The mixture should be viscous and fluid.
- Carefully and evenly pour the mixture onto the edges of the bath so that it flows down to the bottom of the bath. There is no need to correct or “help” the composition - it will flow to the bottom itself and leave a coating of the required thickness.
Acrylic coating is applied in one or several layers. Before applying the next layer, let the previous one dry thoroughly - at least 24 hours.
Leave the updated bath alone for several days - the acrylic composition needs 3 to 5 days to completely dry. If you covered the bathtub in several layers, wait at least a week. The service life of such new self-leveling enamel, subject to careful care, is up to 5 years. Then the procedure will need to be repeated.
How much does this procedure cost?
Grinding machine - from 500 to 1200 rubles. Liquid acrylic for a 1.7 m bath - about 2000 rubles (for one layer of coating), detergent - about 200 rubles, putty for metal - 700 rubles.
Total: 3400 rubles (with the most inexpensive sander).
You will have to spend two to three days on the whole process: a day to clean off the old enamel, wash and putty, and a day or two to pour and dry the mixture. You can use the bath after 5 days.
Replacement of damage
If the tile is damaged, it can be replaced. For this, the same tile or another one, but identical in size, is suitable, on which you can then apply a vinyl sticker. Or, alternatively, replace a few tiles.
The procedure for replacement is as follows:
- remove damaged tiles;
- Apply glue to the wall and distribute it evenly;
- place the tile and tap it until it snaps into place;
ATTENTION: leave assembly crosses at the seams, then the seams will be of the same thickness.
- After the glue has dried, remove the mounting crosses and fill the seams with grout.
Agglomerate and self-leveling floor
Agglomerate is often called artificial stone. This material is similar in appearance to ordinary tiles. An important difference is the high wear resistance. The agglomerate is less susceptible to damage and is durable. The elastic structure helps in implementing unusual interior solutions. This type of coating is suitable for decorating round or oval rooms.
The agglomerate can be used to cover floors, walls and other surfaces exposed to moisture.
Self-leveling flooring is considered a suitable option when decorating a bathroom. The material is highly resistant to damage and is reliably protected from scratches and cracks. If dirt, stains or dust appear, the floor surface can be easily cleaned using specialized products. If necessary, a heated floor system can be installed under the main covering.
The surface of the self-leveling floor can be plain or with a pattern
Self-leveling floors with a 3D effect look very impressive
The advantages of self-leveling floors also include solidity. The material is arranged in a full array, which eliminates the possibility of seams or joints.
Self-leveling floor with a spectacular stylization of wet sand
Full painting
One approach to updating tiles is to paint them entirely in an identical or different color. Next, we'll figure out how to do this.
Basic Rules
- Be sure to thoroughly prepare the surface: wash, degrease, dry.
- Sanding tiles is an important and necessary process, otherwise the paint “will have nothing to cling to and nothing to stick to.”
- Don't forget to apply the primer and let it dry thoroughly.
IMPORTANT: Painting must be done in two layers. Give each layer time to dry completely. In hard-to-reach places you can use a brush.
Required Tools
Prepare:
- sandpaper;
- soft cloth, brush and sponge;
- detergent and cleaning agent;
- primer for increased adhesion;
- brushes and rollers;
- paint for wet rooms;
- water-based acrylic varnish.
We also recommend watching - How to paint tiles in the bathroom?
Coating repair
How to update old tiles if they have become deformed in some places? Defects will be noticeable and will spoil the appearance. Local repairs will help you.
For example, the tile is cracked, chips are visible along the edges, or the enamel is cracked. It can be replaced; to do this, do the following:
- remove the grout in the place where the deformed tiles are found;
- moisten the joints generously with water and leave to soak;
- carefully pry the edge of the tile with a spatula (you can use a screwdriver) and remove it;
- If you are going to lay old tiles, then first clean them of glue. And also remove the solution from the wall;
- prepare glue and treat new tiles with it;
- having placed it in the right place, press it, check it with a level, process the seams, tap it with a mallet;
- After waiting for the glue to dry, seal the seams.
Repair and care of an outdated surface includes not only priming and local replacement of damaged tiles. You can stick another tile with a pattern to dilute the existing wall ambience. Also treat the replacement areas with an antifungal agent.
Chip and crack repair technology
- Prepare your own “cement milk” grout by gradually mixing cement with water until it reaches the consistency of milk without adding sand.
- Fill cracks and chips evenly with the mixture.
- Gently rub the solution along the damaged area with a piece of cloth.
- Wait until completely dry.
- Grind the sealed surface.
- Paint with paint to match the color of the tile. Important! To ensure that the solution sets well and the crack heals well, moisten the sealed crack with water for several days.
The tile has peeled off, but is still holding up
In this case, follow these steps:
- Remove loose tiles using a chisel and chisel.
- Use a spatula to remove any remaining tile adhesive from the tiles.
- Remove any remaining solution from the base.
- Clean the base from dirt and dust.
- Cover the surface of the base with a layer of primer and let it dry.
- Apply fresh adhesive to the tiles and secure them back into place. Important! Photos and video instructions, which are provided by professionals on the Internet absolutely free, will help you to more clearly imagine how to make such a renovation in a bathroom with tiles.
Renewing seams
Simply updating the grout lines can help give tiled bathroom walls a fresh look, as over time they fade and become unsightly.
Special markers, pencils or paints will help restore color.
If this is not possible, for example, there are cracks in the seams, then it is necessary to completely change the grout.
Rules for cleaning damaged areas
- The damaged area is removed with a sharp object.
- The seam must be well cleaned. It is recommended to use a vacuum cleaner for this.
- If the damage is minor, make a local replacement.
Complete replacement
Remove old grout using a sharp object, such as a scraper. Be careful not to damage the tiles. Then clean the surface of the joints: first with a brush to open small fragments of grout, and then with a vacuum cleaner to remove dust.
After this, use a sponge and water to rinse the seams and leave until completely dry. And only apply new grout with a spatula to a clean, dry surface.
Preparation
Before the renovation procedure, prepare the walls:
- Grade. Inspect the tiled walls carefully, noting any defects identified. Select solutions. Imagine a new room design.
- Cleaning seams. The intertile surface becomes dirty and darkens over time. Clean - remove accumulated dirt, dark spots, and remove fungus. Remove the top layer of old grout.
- Removing dirt. After cleaning, greasy stains, stains and dirt remain. Wash it off naturally.
- Degreasing. Take thinner or rubbing alcohol. Treat the surface, removing invisible greasy film.
- Grinding. Its need is assessed individually. You clean off the old top layer from the surface of the tile, removing uneven spots and old stains.
- Primer. The last preparatory procedure before painting.
Act consistently, having prepared the necessary compounds and tools in advance.
Removing damaged material
Replacing floor and wall cladding elements does not differ significantly and includes the following steps:
- wear safety glasses and gloves;
- Carefully clean and remove the grout mixture around the damaged element using a metal spatula;
- use a puncher to make several holes in the center of the lamella;
- insert a chisel into the drilled places and, carefully tapping it with a hammer, remove the damaged tiles piece by piece; Make sure that the tool does not slip and damage adjacent elements.
Preparing the surface for installation
- remove all tile fragments from the surface;
- moisten the surface and thoroughly clean it with a spatula to remove old adhesive. If the solution is too hard, knock it out with a chisel and hammer;
- Using a utility knife, carefully remove the remaining grout mixture around the perimeter of the niche;
- remove dust from the base using a damp sponge;
- dilute the required amount of adhesive solution in a special container;
- Apply the composition with a notched trowel to the inner surface of the lamella and place the cladding on the prepared base;
- if the new decorative element protrudes slightly forward, adjust the position by gently tapping it with a rubber mallet;
- insert plastic crosses into the space between the tiles;
- After the solution has completely dried, remove the separating elements;
- one day after completing work on replacing the coating elements, fill the seams with a grout mixture that has water-repellent properties.
Overlapping tiles with another material
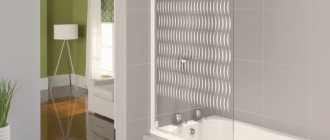
You can update the walls in the bathroom by covering the tiles with plastic panels. They are resistant to moisture and elevated temperatures. Before fixing, it is important to sand the tiles well so that the panels last well and for a long time. A material such as mural is perfect - stylish and effective, durable and practical. Liquid nails and glue are used to secure the ceiling.
ATTENTION: When installing plastic panels in the bathroom, you should not use alcohol, it can damage the plastic.