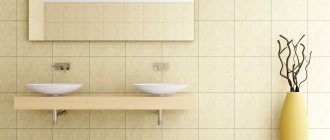
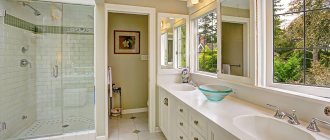
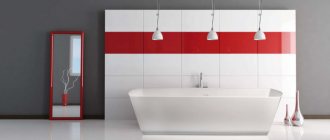
It is known that the most popular way to decorate walls in a bathroom is to lay tiles. But recently another method has become very relevant - coloring. The bathroom design with painted walls in the photo looks quite fashionable and stylish. This finishing method has gained popularity due to the emergence of moisture-resistant paints that are reliable and beautiful.
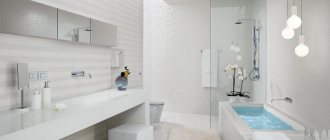
Bathrooms with painted walls are widespread in the West. For a long time, we had a specific, not very favorable attitude towards surfaces painted with paint - apparently, we remembered the corridors, kitchens, bathrooms and toilets of the last century painted with oil paint in dark dull colors. But today fashion is returning again, only in a new, modern look.
Bathrooms with painted walls are common in the West
In a modern interior, painted walls look completely different - stylish and beautiful. To be convinced of this, just look at the photo of the bathroom design with painted walls. The interior looks fashionable and creative.
Bathroom with painted walls
Pros and cons of painted walls
People often associate painted walls in the bathroom with Soviet bathrooms, with uneven coloring and ugly, greasy, dirty paint. Of course, such an image cannot inspire inspiration for painting the walls in your home.
Modern paints have a number of advantages that may influence the choice of this material for finishing a bathroom:
- Ease of application and quick repainting of walls to your liking;
- Possibility of using decorative elements - prints, artistic paintings;
- Large selection of colors and textures.
Bathroom paint, however, also has its disadvantages:
- If the room is poorly ventilated, mold and mildew may appear on the walls, which does not linger on the tiles;
- Paint is inferior to ceramics in terms of moisture resistance, although it is protected from this factor.
We update the color scheme completely
Typically, painting a complete ceramic tile in a bathroom will not be too difficult for someone who is familiar with the basics of building craftsmanship. To do this, it is enough to have only certain skills in painting and working with an electric sander. To begin, you should prepare the following materials necessary for the event:
Proper preparation will ensure excellent results
- metal brush and foam sponge;
- dry cleaning abrasives and degreasing liquids;
- personal protective equipment (apron, gloves and petal respirator);
- grinding attachment for a drill or turbine; if the work is done manually, you can get by with not very coarse sandpaper and a sanding mesh;
- primer and paint for bathroom tiles;
- enamel tray;
- brushes of different sizes made of natural bristles and a foam roller;
- masking tape and ready-made stencils if you plan to paint in two or three different shades.
In the future, all work is divided into two stages - preparing the wall and, in fact, painting.
Surface preparation
When starting to paint the bathroom, you need to carry out several preparatory measures. First, the old finish is removed from the surface. If the walls have been painted, a solvent will be needed to remove the paint layer. Ceramic tiles will have to be knocked down. Wallpaper in the bathroom can be removed using a knife or metal spatula, after wetting the surface with water.
If renovations are being carried out in a new apartment, the surface should be carefully plastered and leveled. Only in this case will the paint lie flat and have a neat appearance. Often, in the rough finish, plastering of walls with many flaws and irregularities is allowed. It is recommended to knock down such a coating and replace it with a new layer of plaster.
When the layer of plaster has hardened, you can move on to the next stage - leveling the surfaces with putty. For these purposes, it is best to use a special moisture-resistant and water-emulsion version of this material. It is also recommended to select substances that contain antiseptic and antifungal impurities.
Before painting, the walls also need to be treated with a waterproof primer.
How to remove old paint
In order for the repair results to be positive and the painted surface to last for a long time, you must follow the advice of experienced painters. The surface is carefully prepared before work. If you want a quick-drying composition to perfectly hide surface defects, you need to figure out how to remove old paint from walls. This work includes several stages:
First you will need to remove the previous layer of paint. To do this, use a flexible disc with sandpaper. Special solvents may be used. It is necessary to remove the dust that remains after removing the old surface. Warm water is used for this. The surface is then primed before applying paint.
?Important! It is imperative to prime the walls and eliminate unevenness with acrylic putty. This will create a smooth surface without defects.
In addition, such walls will not be exposed to various contaminants. The long-term coverage will be impressive.
Eliminate surface unevenness by sanding. Use bleach to remove the fungus. The walls should be treated with a latex-based primer. It is better to cover the surface in three layers.
When performing such work, you can perfectly protect the walls from various microorganisms. After completing each layer, you must wait until it dries.
Selecting the necessary tools
To paint the walls in the bathroom you will need a small set of tools that can be bought at any hardware store. If the renovation is carried out in a large room, rollers with a wide surface can be used for painting. If the area to be painted is small, it is worth buying a medium-sized roller.
Using a long-nap roller you can create a textured surface of the paint layer. Short pile is designed to create perfectly smooth or glossy walls.
You will also need brushes for the work - they can be used to paint corners and hard-to-reach places. You also need to buy special cuvette containers in which paint is diluted, tool trays, foam sponges and solvent.
Decorative painting methods
To diversify the interior and create an original room design, decorative painting methods are used.
Decorative painting methods will help diversify the interior.
Using stencils
There is a large selection of ready-made disposable and reusable stencils for walls on sale. Disposable ones are made of vinyl film with an adhesive backing, and reusable ones are made of acrylic and plastic (they are attached to the wall with masking tape).
Before work, determine the location of the pattern. The stencil is firmly fixed and evenly filled with paint using a roller or brush. Then it is carefully unfastened and moved to a new place. The applied drawing is allowed to dry.
Striped walls
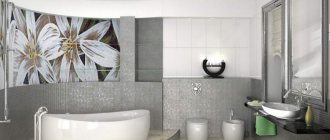
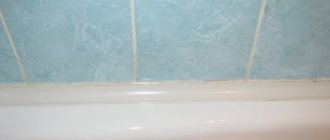
The presence of stripes gives the interior originality and visually expands the bathroom space. Stripes can have different shades, widths and directions. Stripes of the same color, but with different surfaces - matte and glossy - look interesting.
Bathroom walls painted with stripes.
Before painting, the location of the stripes is marked on the walls with a pencil. Painting tape is applied along the lines. It is important that it fits tightly to the wall, otherwise paint will flow under it and the stripes will be unclear. Paint the walls in 1 or 2 layers. The adhesive tape is removed carefully, without making sudden movements, so that the coating does not come off along with it.
Types of bathroom paints
Today there are many paint options on sale for decorating bathroom and bathroom walls.
- Waterproof paints
Waterproof paint is an acrylic composition that provides a dense and airtight coating. The acrylic mixture is available in a wide variety of shades, allowing you to give your bathroom a unique design. It is worth noting that this type of paint is best applied to a perfectly flat wall with a fresh finish. Another advantage of waterproof acrylic paint is its low price compared to other paints and tiles.
- Latex coatings
Waterproof paints also include latex coating. It prevents the appearance of fungus on the walls and creates a protective layer on the surface. Unlike the acrylic mixture, the latex composition allows steam to pass through, so condensation does not form on the walls. If water does not fall directly on the paint layer (for example, when installing a shower stall), smudges will not appear on the surface and they will have to be washed frequently.
- Water emulsion
Water-based compositions are an excellent moisture-resistant material for finishing a bathroom. Most often the mixture can be found in light colors - white or ivory. When renovating a bathroom, it is recommended to cover the walls with water-based emulsion in those places where there is no direct contact of paint with water, soap and other substances.
- Gloss paint
Glossy paint perfectly reflects light, making the room more spacious and tidy. It is also more stable than textured and matte mixtures, due to the creation of an even protective layer on the surface. The downside of glossy paint is its ability to highlight imperfections in walls, so it can only be applied to a perfectly flat surface.
- Matt paint
Matte paint is often used in modern design, it absorbs light and creates the appearance of a fabric covering on the surface. The matte surface looks very modern and presentable. Unfortunately, among all bath products, matte formulations are the least durable.
- Textured paint
To make wall painting look original and expensive, you can use special textured paint, which allows you to create the effect of an uneven surface. With its help you can create real three-dimensional patterns. This decoration does not require additional decorations - it looks elegant and unusual in itself. In addition, textured paint can disguise unevenness and defects in the walls.
How to remove old paint
You can find many recommendations regarding the use of various tools for removing old coatings. It is most effective to choose the following:
- Special chemicals applied to the wall being treated. Each chemical element has a rather specific smell, so when cleaning the bathroom you need to use a mask.
- Curling iron or hair dryer. This method of removing old coating is quite traumatic. In addition, the heated surface becomes a source of toxic fumes.
- Electromechanical method. When choosing this method, use a grinder or drill. Each of these devices is equipped with a nozzle. To ensure the highest quality result, it is necessary to select a special brush of the required level of rigidity. It is with the help of such a product that the old coating will be removed as quickly and efficiently as possible. However, this method is “dusty” and noisy.
Knowing these features of removing old wall coverings and their further processing, you can easily decorate your bathroom with odorless paint.
- Olga. The paint quality is good. Dries quickly, there is almost no smell. The ceiling in the kitchen needed to be painted. I chose this brand intuitively because I heard flattering reviews about it. To paint the walls, I added color. The paint color is really white, even snow white. If you paint a large area at once, the smell is noticeable, but quickly dissipates. I used a roller for the job - painting the ceiling was convenient and quick. The only drawback of the paint is that it is too expensive.
- Alexandra. I was choosing paint for the interior decoration of a country house. I bought the paint on the advice of friends. The store was confused by the high price. But the seller praised the paint from all sides, so I chose it. Now I know for sure - I didn’t make a mistake. The color is somewhat silky, and the ceiling is easy to clean.
- Eugene. We were renovating the kitchen, so I decided to choose white paint color. I thought about taking such a composition so as not to update it for several years. I chose Dulux Dazzling White. I was surprised how thick the paint is. Lays down smoothly and has almost no odor. And it dries very quickly. The only thing that was a little disappointing was that the price was a bit high.
As you can see, reviews about this product are more often positive. This is explained by the high demands placed on modern paints and varnishes.
Painting the bathroom depending on the style
Having decided on the style of your future bathroom, you can make it much easier for yourself to choose colors and textures of paint for finishing. Let's look at how painted walls fit into the most popular bathroom interior styles.
- Classic. Painting the walls is perfect for a classic-style bathroom. This finish can be combined with ceramic tiles. It is better to choose paint in calm shades.
- High tech. In this style, painting walls in cool colors is encouraged: gray, blue. You can add small quantities of brightly colored elements to your interior. In a high-tech interior, glossy paint will look good, emphasizing the smooth surface of the walls. It is also worth adding glass and mirror elements to the design.
- Provence. The popular style of the “French house” is built from light colors and elegant interior elements. To paint the walls, you should choose the following tones: blue, pink, pistachio, light yellow. Matte paint with an interesting texture will look best in a Provence interior. To decorate the surface, it is best to use a floral pattern, which can be done using a stencil.
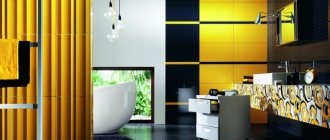
- Retro. For a pop art style interior, you should choose a bright combination of shades. The painting of the room can be complemented with drawings in the form of comic books, celebrity posters and geometric patterns.
Preparing tiles for painting
First of all, the tiles must be thoroughly washed. It is better to use detergents with a slight abrasive effect for this purpose. Particular attention should be paid to the seams between the tiles, since this is where most of the dirt and grease collects.
It is best to use fine-grit sandpaper to clean seams. Wrapped around the end of any flat object, such as a plastic spatula, it will perfectly remove all excess from the tile joints.
After the tile is washed, it needs to be “sanded”, that is, the top layer is removed using the same sandpaper or paint mesh. You need to use a fine or medium abrasive, because otherwise scratches may remain on the tiles that a layer of paint will not hide.
After removing any remaining dust after sanding and degreasing the tiles (any alcohol-containing solution is suitable for this purpose), the surface of the walls should be “primed.”
You can use almost any brand of adhesive primer, the main thing is not to save money and buy a really high-quality product. Otherwise, poorly adhering paint may begin to peel off over time, which will negate the entire result of the repair.
After 24 hours (that’s how long it takes for the primer to dry completely), the primer should be sanded. Paint will lie much smoother on a smooth surface.
Fighting mold and white plaque with painting
To rid yourself of the appearance of mold and plaque on painted walls, you need to choose a paint that contains an antifungal antiseptic. Don't forget about good ventilation and regular cleaning in the bathroom.
If mold does appear, it can be removed using professional cleaning products or using traditional methods. Household chemicals should be selected according to the type of coating in the bathroom - this information can be found on the packaging of the product. Among the traditional methods for removing mold, the most popular are the use of soda, vinegar solution, bleach and hydrogen peroxide.
Preparatory stage
Before painting ceramics, careful preparation is required. The tile must be prepared for processing. This specifically concerns cleaning the surface from various contaminants in the form of dust or dirt. In addition, in order for the applied solution to be applied evenly and without defects, the ceramics should be washed with degreasing agents, cleaned of plaque, and rid of rust, glue or grout residues, as well as other components of the previous coating.
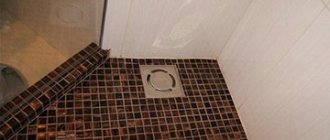
Cleaning seams
First of all, it is also necessary to thoroughly clean the seams between the surface parts, since this is where dirt accumulates. If this is not done, then mold, mildew and other microorganisms may soon appear. A similar requirement applies to joints between interior items, furniture, and plumbing fixtures treated with sealant.
Surface degreasing
Thus, at the final stage, all that remains is to degrease the surface of the tile. If the plans include opening it with paint, then it is best to sand the material, then it will be much easier to work with it. After that, various defects, chips, scratches, and cracks should be eliminated using a special primer. This will additionally ensure reliable adhesion of the paint and tiles.
Rules for painting a bathroom yourself
Let's summarize some tips for those who decide to paint the walls in the bathroom with their own hands:
- In order not to make a mistake with the choice of paint, you can make a template from a sheet of drywall. It also needs to be covered with plaster and primer, then paint of the selected shade. By applying the template to the wall in the bathroom, you can understand how this color will look in the interior.
- Much attention should be paid to leveling the walls in the bathroom, otherwise even the best paint will look untidy.
- To avoid the appearance of mold, you need to select paint with antifungal substances in its composition.
- To prevent painted walls from losing their appearance over time, you should take care of proper ventilation in the room and regularly clean it.
How to choose?
Water-based paints are not used for painting metal surfaces, as they can lead to metal corrosion. They are not resistant to mechanical damage; abrasives and brushes should not be used to care for painted surfaces.
Acrylic and latex paints have proven themselves quite well, while being distinguished by relatively low prices.
Silicate and silicone paints are more expensive than acrylic paints, but they last longer in use and are more resistant to damage.
When choosing paint, you should consider not only the composition, but also the manufacturer. The most popular manufacturers of odorless paints of various price ranges are Ticcurilla, Tex, Dulux, Joby.
Bathroom design: decoration elements
Modern water-repellent paints offer a lot of scope for design solutions that can be used when painting bathroom walls. Most often, acrylic compositions are used for such work - they combine good artistic and technical characteristics. Here are a few examples of how to decorate the walls of a room yourself using paint.
Painting walls with a “watercolor” effect, which is very popular in modern interior design, is quite easy to do with your own hands. To do this, you will need to take several shades of acrylic wall paint, an ordinary household sponge and a small container of water. To create a weightless “watercolor” drawing, you need to dip the sponge into the paint, then into water, wring it out completely and apply it to the wall with light touches, as if driving the paint into the surface of the wall.
Another easy and fashionable option for painting walls is a zigzag or chevron print. To create it, the surface is first coated with white paint, and then stripes of a contrasting shade are applied. To make the lines even, masking tape is used as a stencil. Designers recommend using zigzag in light shades in the bathroom interior.
In photographs of a bathroom with a modern design you can often see original prints depicting inscriptions, silhouettes, and ornaments. How to do such a painting without special artistic skills? The answer is simple - for this you need to use ordinary stencils. They are made of durable paper and fixed to the surface using masking tape, and then filled with paint using a special stencil brush or an ordinary household sponge.
In conclusion, we invite readers to look at photographs of bathroom projects using various wall painting techniques. They can easily be repeated with your own hands at minimal cost.
Adviсe
Some useful tips to create a more competent and interesting design in the bathroom using painting.
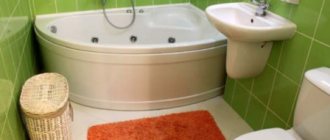
It is not a solid painted surface that looks very original, but when tiles and paint alternate. In this case, there are more opportunities for interesting and unusual designs. The bathroom will look stylish and beautiful.
Paint the bathroom only if you are completely sure that the room has excellent ventilation. Only in this case will the design last a long time without losing its appearance. Open the room door from time to time to allow dry air to enter the bathroom from outside. This way the paint on the surface of the walls and ceiling will last longer. It is especially recommended to open the door for a while immediately after taking a bath or shower.
Before painting the walls, they must be carefully leveled and primed. Only in this case will you get a smooth, beautiful surface. Paint is not capable of masking any defects - any chip or hole will be clearly visible on the surface of the walls and ceiling.
Before painting, pay attention to the corners of the bathroom. It is necessary that they are perfectly smooth, without defects or flaws. Any defect will be evident under a thin coating that does not hide anything. If necessary, align the corners and make them perfect.
When purchasing paint, pay attention to whether it is suitable for painting bathrooms and kitchens. If this information is not on the can, then most likely this paint will not work. Suitable paints contain a mold inhibitor, which allows the coating to resist dampness on walls and ceilings.
It is advisable to choose washable paint - this should also be indicated on the can. If you choose a washable option, the room will be very easy to maintain.
Of course, you shouldn’t paint the entire bathroom. In places where there is a lot of splashes - at the sink, right next to the shower stall - it is still better to use tiles, plastic or glass panels.