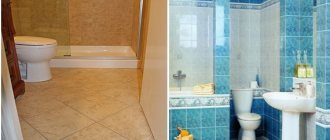
Bath film is one of the most popular materials. Using this finishing material, you can not only make beautiful patterns, decorate accessories, but also carry out complete repairs. Self-adhesive film for the bathroom is an almost ideal finish that does not require great skills, knowledge or craftsmanship during installation. Therefore, if you have never renovated a bathroom, but want to change something in the interior, you should start with this material: self-adhesive for the bathroom will fit as needed and will not cause big problems.
Self-adhesive film for bathrooms, how to choose
Self-adhesive wallpaper for the bathroom is a finishing material, on the back of which an adhesive base is applied and protected with special paper. The film is sold in the form of rolls ranging from 45 to 95 cm wide and up to 15 meters long.
Any pattern can be applied to the film
Self-adhesive wallpaper comes in four types:
- Cork: Their structure resembles natural cork finishes. The surface of the material is additionally coated with a wax-based composition. PVC film. Consists of artificial materials. Diverse in color, pattern and texture. Features an increased service life.
- Satin: Such wallpaper for decorating a bathroom is also called fabric.
- Self-adhesive film: Convenient because they have their own adhesive coating. The most convenient and suitable option for finishing bathrooms. Color variations can be very diverse, from monochromatic to complex patterns and ornaments. It is also possible to imitate natural materials such as wood or natural stone.
Types of wallpaper for the bathroom
The surface of the film can be:
- matte;
- glossy;
- rough;
- metallized.
The metallized surface allows you to create certain visual effects: mirror, fluorescent, stained glass (transparent or shaded) and patterns with a 3D effect. Before choosing a film, you need to pay attention to the manufacturer. Companies that have been manufacturing for many years tend to provide higher quality products.
Useful tips
Uniform application of glue avoids air getting under the canvas. However, even if small bubbles remain, such a defect can be easily corrected. These areas must be carefully cut with a blade, releasing air, and then smoothed out. Before gluing, it is recommended to treat the walls with a primer or a mixture of glue and water.
Indoor wrapping work
Along the upper edge of the film under the ceiling, you can fix a decorative “border” in the form of special paper strips or a wallpaper edging. You just need to choose the appropriate color edging in advance.
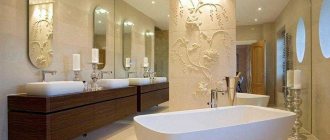
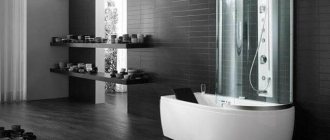
Decorative film in interior design
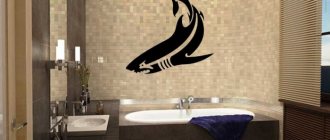
It’s not difficult to cover the walls in the bathroom with film, but will the effect of such a solution please you, especially considering the fact that film has no equal as a decorative element?
Decorating bathroom walls with film
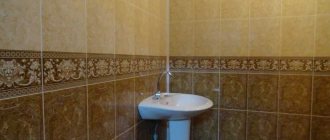
Self-adhesive film allows you to effectively decorate pipes in the bathroom. This solution will look very impressive if you choose the right material. In a rustic interior, pipes are usually wrapped with a beautiful structural rope, but they can also be hidden under a film that imitates wood. For an interior in Japanese or Chinese style, pipes are made into something like columns, covered with red film and decorated with black hieroglyphs. Combinations of films of various shades and textures and changes in their geometry allow you to effectively zone the space. Often the film is combined with other finishing materials, for example, with tiles or liquid wallpaper is used for the bathroom. To highlight areas more susceptible to moisture.
Preparing the surface for work
The main surface on which the self-adhesive material will be glued must be perfectly flat, carefully and accurately prepared. For this:
- First, it is well leveled and sanded to the smoothest possible surface. This is necessary in order to avoid subsequent manifestations of the result of poor quality work on the finished coating fabric.
- Wooden surfaces must be sanded and varnished.
- Metal surfaces must be subjected to a thorough and high-quality primer.
- Plasterboard - you just need to putty and clean it very well.
- Then, after this stage, it is necessary to cover the surface with a special primer, which will additionally hide minor roughness. The best primer mixtures are those with an acrylic base. They will ensure the best result of the gluing process. It is advisable to apply the primer in two layers.
- The final stage will be degreasing the prepared base. This is necessary so that the film adheres well to the base. Degreasing is carried out using water and neutral detergents.
Advantages and disadvantages of the material
Like any other finishing material, self-adhesive film has its pros and cons that need to be taken into account before deciding in favor of a simple budget repair.
Advantages
- The material is available in a wide range of colors and textures.
- The cost of film is an order of magnitude lower than other finishing materials.
Using film to cover bathroom walls is a fairly budget option
- Good quality characteristics that make this wallpaper for the bathroom quite a practical option.
- Pasting work takes a minimum of time and effort, does not require special equipment and can be easily done independently.
- The pasted surface does not require additional care.
- Possibility of finishing various types of surfaces.
Flaws
- Despite the simplicity of pasting, preparing the surface is a rather labor-intensive process and is not always possible for a person without special experience.
Special skills are required to work with film
- The film is highly waterproof, but this is not only a plus, but also a minus of the material. Since the wall under such a coating does not breathe, which means that diaper rash and mold may form.
- The service life, as a rule, does not exceed 10 years. But this can also be a plus for those who like to change their interior frequently. Simple installation and low price allow you to carry out cosmetic repairs more often than usual.
What is required for the work
Before covering the bathtub with self-adhesive film, it would be useful to carry out preliminary preparation of the surface and stock up on the necessary tools. As mentioned above, application of such a coating is possible only on a dry, clean and smooth surface. First of all, eliminate defects in the rough coating of the walls. To complete this task, you will have to putty and prime them. Acrylic-based substances are suitable for these purposes. When gluing metal communications, they should be cleaned of rust and degreased. It is enough to wipe glass or wooden coverings with ordinary alcohol to remove dust and grease film from them.
To successfully paste any surface you will need a simple set of tools.
For better adhesion of self-adhesive vinyl and metal or glass elements, it is better to wet the latter immediately before pasting.
A fairly important nuance will be the preparation of the necessary tools for the work. Usually you can limit yourself to the following list:
- pencil and tape measure;
- metal ruler;
- scissors and a sharp knife;
- special spatula - squeegee;
- industrial dryer.
Of course, purchasing the latter tool will cost much more than the cost of the film itself. Therefore, you can either rent it or use a regular household appliance turned on at maximum power.
Preparatory work.
Decorative film can be applied to almost any surface. It doesn’t matter what it is - cork, glass, plywood, tile, wood or metal. You can stick it on putty or unprepared drywall, but the material will not last long on such a surface.
Leveling the wall surface before pasting with decorative film
The success of the repair depends, first of all, on the correct preparation of the walls. The old coating is completely removed from them, leveled, puttied in two layers, cleaned with fine abrasive sandpaper and primed.
When the surface is completely dry, mark a horizontal line on the wall along which the first canvas will be glued. Usually they try to place this mark in the most inconspicuous place, since the first and last stripes will fit differently than the others. If liquid wallpaper or decorative plaster for the bathroom is used in combination with a finishing film, the preparation of the walls in these areas does not need to be done so carefully. The mixtures themselves do a good job of hiding minor surface defects. It is enough to prime the walls.
Method of gluing decor onto a damp surface
In this way, coating is applied to glass and smooth metal substrates. Sometimes it is appropriate to use it when gluing furniture facades made of laminated wood boards. The cutting process here is the same as in the first case. However, the installation of the material is slightly different. You should generously moisten the surface to be glued with soapy water. Afterwards, completely remove the backing protective layer from the part and apply it to the plane. Level the element using a spatula or a piece of plastic wrapped in felt. Try to do this carefully so as not to damage or wrinkle the decor. You need to level the film from its center, gradually driving excess liquid to the edges.
Material calculation
In order to calculate the required amount of film, you need to know the width and footage of the roll in advance. Room measurements are taken without taking into account windows, if any, doors and the space behind the bathroom. First, find out how many strips of material will be needed to cover all the walls. To do this, the perimeter of the room is divided by the width of the roll. Then they calculate how many strips can be obtained from one roll. To do this, its footage is divided by the height of the walls with an increase of 5-10 cm for trimming.
Before purchasing the film, carefully calculate the required footage. When using wallpaper for the bathroom with patterns or a geometric design, in addition to the stock, the height is added to the adjustment - 35-45 cm. The total number of strips that will be required to cover the entire room is divided by the number of strips in one roll and the required amount is obtained number of rolls for repair. If the bathroom has ledges or niches, add one more roll to the total. Methods of covering surfaces with decorative film. The temperature in the room being repaired must be at least 10 degrees. If the film was previously stored at lower temperatures, it is advisable to keep it warm for at least two days. After completing the preparatory work, they begin cutting the film and gluing it.
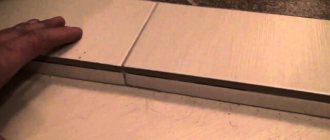
Features of material cutting
As a rule, the film is cut from the reverse side, on which square markings are applied for convenience. But in some cases, when, for example, the selected film is designed to imitate tiles, the markings are carried out taking into account the front design. Additional instructions for working with a certain type of material are always indicated on its reverse side.
It is more convenient to cut the material according to special markings
The panel is cut to length using a special construction knife. It is not recommended to cut the film by weight or with scissors.
Technology of gluing walls with self-adhesive film
Self-adhesive film must be glued to the wall using a certain technology. By following it, it will be easy to improve the interior of your apartment:
- The surface is degreased or washed with detergent.
- Dry.
- If puttying or sanding was carried out, the dust is wiped off, then primed.
- Apply the required dimensions to the film and cut out.
On a film with a pattern, markings are applied to the front side.
- Start separating the protection up to 5–7 cm, apply to the surface, and secure. At the same time, gradually remove the protection and smooth the film with a dry cloth.
If airy defects form, pierce them with a needle, release the air, and smooth them with a rag. Correct inconsistencies immediately by peeling off the material.
- Glue subsequent panels butt to the first part of the wallpaper. There is no need to glue the overlap, since the film is dense, the seams will be noticeable.
Caring for the surface is simple; just wash it using warm water and detergent. If heavily soiled, wipe with alcohol.
Do not use a powder composition for cleaning, as this will lead to scratches on the front layer.
Surface pasting
Glue the film from top to bottom. The protective layer is removed a few centimeters from the upper edge of the first strip. The film is applied to the wall and leveled. Gradually remove the paper protection by 5-6 cm, pressing the adhesive surface to the wall. When the entire strip is pasted, it is smoothed with a rubber spatula from top to bottom and from the center to the edges, trying to get rid of all folds and air bubbles at once.
Important! Any wallpaper for bathroom walls is glued end to end, but the film is always glued overlapping.
It is better if the edges of the covering panel are facing the light source in the room. Otherwise, the seams will cast a shadow and become more noticeable. It is recommended to avoid joints of strips in corners.
If you are gluing decorative film for the first time, you will need an assistant. Important! The decorative film sets completely after a few hours. Soon after gluing, the material can be torn off with a sharp movement and re-glued.
If some air bubbles do form, they need to be carefully pierced with a thin needle and smoothed out. It is almost impossible to remove folds and irregularities from an already glued surface; the strip is torn off and glued again. If the film is pasted on a convex surface, it is preheated with a hair dryer so that it becomes more elastic.
Dry surface installation process
You should start by marking and cutting the elements you need. To prepare single-color pieces, it is advisable to use the wrong side of the film with a mesh applied to it. So, you can easily transfer any figure or silhouette to the cells. It is better to cut rectangular parts using a ruler and a knife. If the configuration of the element requires curved cutting, first cut a rectangle of the desired size with a knife, and then carefully cut out the shape with scissors.
If you choose a film with a pattern or imitation of a modular image, it is better to cut such parts from the front surface.
Having prepared the necessary pieces, you can begin gluing. It must be said that usually on the reverse side of the product, manufacturers indicate detailed instructions for using the material. You need to peel off a corner of the protective layer. Next, carefully apply it to the surface. Smooth it out towards the edges using smooth movements.
Applying film using the dry method is not as easy as it seems
Gradually remove the back part, simultaneously smoothing the surface with a squeegee. This is a fairly complicated process, so don't rush it. It is important to completely prevent the film from creasing or air getting under it.
If you make a mistake and a fold forms on the surface, remove the film with a sharp movement and re-glue it. The resulting bubbles can be pierced with a sharp object, and then carefully smooth out this area and warm it with a hairdryer.
Pay special attention to the junctions of two parts and covering the corners with film. It is not advisable to glue one element onto another at the point of their articulation. It is appropriate to paste over the rectangular junction of two walls in one piece. In this case, the excess material is cut at an angle of 45 degrees and bent. If you are making a rounded corner, then just warm the part well with a hairdryer before gluing it.
Caring for decorative film
Self-adhesive film does not require special care and is easy to clean even with mild cleaning agents. You should refrain from using compositions with abrasive particles and those containing solvents, they can damage the design.
Decorative film does not require special care
Alternative solutions
In addition to film, for inexpensive renovations in the bathroom, paints, plastic panels or waterproof wallpaper for the bathroom are used. The paints chosen are water-based acrylic or silicone. Wallpaper must be moisture resistant, which means only washable, vinyl or liquid wallpaper is suitable. But they are all inferior to film in certain respects.
Washable ones do not have such a wide choice of colors and textures. Vinyl, due to its high cost, may not fit the renovation budget. And liquid wallpaper can be difficult to apply without some experience. Self-adhesive wallpaper for the bathroom is an excellent option when repairs need to be done quickly, inexpensively and with your own hands.
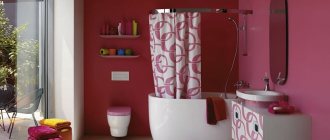
Advantages of film when finishing wet rooms
Self-adhesive film for bathroom finishing
Bathroom film is far from the only cladding option. Panels, cork, wallpaper, tiles - all products are in demand and are suitable for finishing both bathrooms and other areas of the apartment. But despite high quality standards, the materials have one drawback - price! The cost of tiles is incomparable with the price of wallpaper, and they, in turn, are valued much higher than bathroom film. In addition, the speed of pasting surfaces is much faster, and the possibilities of the film are simply enormous! You need to turn an old cabinet into a decent piece of furniture or make a nice pattern on the doors - bath film will come in very handy.
- Affordable price.
- Large and varied range of colors.
- Fast process of facing work without the involvement of third parties.
- Easy to care for.
- Nice appearance.
Vinyl film for the bathroom meets all these points.
Advice! If you choose wallpaper for decoration, pay attention to the pictograms embossed on the back of the material or on the shell of the roll. One wave is moisture resistant, two waves are washable, three waves are super washable. Brush and one wave – easy cleaning with a brush and available detergents. Brush and three waves - excellent resistance to mechanical damage (such wallpaper can be cleaned using abrasives, the fractions of which are not large in size).
Film preparation
The reverse side will help make the process of cutting the film easier. It is a paper backing, lined into squares. Pieces of the required size are cut from them.
First you need to measure out the required amount of film. Then mark the required lines on the reverse side with a pencil or other stationery object. Moreover, if this is a long piece of strip, it is necessary to take into account a two-centimeter margin on each side.
Film with drawings, ornaments or imitation tiles is cut out from the outside along the edging lines of the figures.