Often the architectural decisions made during the construction of a house do not suit its new owners, let alone apartments built according to the same template. The problem can be solved by “zoning” the rooms, that is, installing partitions to delimit functional areas.
And while these problems almost never arise in living rooms, the bathroom and toilet place special demands on the material and technology for installing partitions, which is explained by high humidity and specific operational requirements.
Let's try to figure out what to make a partition in the bathroom from , which will reliably serve for many years and become a real decoration of the interior.
[contents]
Types of bathroom partitions
Even a hundred years ago, when there was no hot water supply in houses, bathtubs and fonts were fenced off from the rest of the living space to create a private, secluded atmosphere for the person washing.
Then, most often, a carved wooden screen acted as a partition. Nowadays, the bathroom partition is usually made of more practical materials:
Bathroom curtains made of moisture-resistant materials.
The traditional type of bath partition is a curtain mounted on a rod with rings. The advantages of this option are that such a partition can be easily opened or closed at will, in addition, it is quite affordable.
The curtain provides good protection from unwanted views while swimming, but cannot completely protect against water leakage.
Glass partition in the bathroom.
This is a more modern design of the curtain, which is made of glass or fiberglass. Such a partition is installed on the bathtub to protect the floor and walls of the bathroom from splashes, and also to hide the person washing from the eyes of those who are in the same room with him.
Glass bath partitions came into use after the proliferation of shower cabins.
Important! A glass partition in the bathroom is simply an ideal find for a designer, as it can “dissolve” in any interior, fulfilling its function of protecting against splashes and creating a private space. It is much more practical and durable than oilcloth curtains, which have to be changed frequently.
Wall finishing methods
The bathroom is a room distinguishable from the rest with its own specific microclimate. Therefore, choosing the first cladding option you like will not work. In order for the coating to serve you for a long time, you must be guided by certain criteria when choosing:
- Hygiene. The bathroom is, first of all, the place where many people keep themselves clean. This means that the room itself must be clean and safe for humans.
- Moisture resistance. The constant influence of moisture on the coating is an integral part of this room, and therefore, if you want the renovation to be durable, moisture resistance is one of the criteria that you definitely need to pay attention to.
- Durability. Agree, renovating your bathroom every year, or even six months, is not a very bright prospect. Therefore, the material must be durable.
- Easy to care for. The constant influence of moisture and other factors suggests that the walls will not be very clean. And you can be sure that not a single housewife will want to spend half a day washing the walls.
- Strength. The material must be resistant to mechanical and chemical damage.
- Decorative. Of course, a dull, tastelessly decorated bathroom will never bring pleasure to its owner. But it is this room that often helps relieve stress and take a break from the hustle and bustle.
Now that we have decided what to guide our choice, let’s talk about what the most popular options are offered to us by the modern market of facing materials.
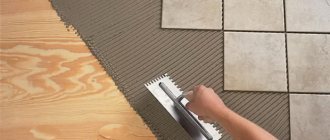
Tile
A classic and widespread option for decorating bathroom walls. The variety of textures and colors available is simply impressive. It also has all the characteristics in accordance with the criteria described above.
Important! The greatest advantage of this finishing material is its versatility. The tiles are suitable for walls, floors and ceilings. Among the disadvantages are the high cost and complexity of installation.
Dye
Painting the walls in the bathroom is an excellent finishing option when the walls are perfectly leveled with putty. The market offers a huge variety of bathroom paints, the durability of which is difficult to dispute:
- silicone paints;
- latex water-dispersion.
When choosing what to make cheap bathroom walls from, you obviously can’t go wrong by choosing paint.
Important! The greatest advantage of paint is its repairability - if a small scratch occurs, you can return the wall to its former freshness in 5 minutes.
Wallpaper
Don't be surprised by this option. These days, there are many different wallpaper options that can easily withstand the humid climate of the bathroom. Among them:
- Washable.
- Vinyl.
- Self-adhesive.
- Glass wallpaper.
Among the options that exist, everyone will find something to their liking both in terms of design, material, and budget.
Important! The downside is that you need to carefully prepare the walls for wallpaper, just like for paint.
Plastic
For those who do not want to level the walls, there is this option. Installing plastic panels on the sheathing allows you to create a stylish interior without a lot of time. This is also a budget option that has many advantages:
- Easy to install.
- A large assortment.
- Moisture resistance.
- Heat resistance.
- Strength.
- The ability to create a frame and hide a pipe system inside.
- Antiseptic.
Important! This finish does not have any noteworthy disadvantages.
Drywall
Universal material. It is used both during construction and for finishing. For the bathroom, specially treated water-repellent plasterboard sheets are often used. The nuance of this option is that it only allows for rough finishing. Namely:
- Alignment of walls.
- Installation of multi-level structures with complex shapes.
- Design of complex architectural elements.
Important! When installing drywall, you need to decorate it with tiles, paint or wallpaper. But in this case it will be much easier than on bare walls.
Classification
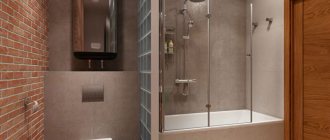
A bathtub with a glass partition is a very practical and aesthetic solution that allows you to delimit the space in the bathroom into a washing area with toilet and washbasin areas.
The lightweight, translucent and impact-resistant design will reliably protect the walls and floors from splashes that will inevitably occur during showering and washing.
Glass partitions differ according to the following characteristics:
By type of material.
Bathroom partitions can be made from glass, tempered glass or fiberglass. The most reliable option is curtains made of tempered, impact-resistant glass, however, such models are much more expensive. Fiberglass is cheaper and lighter, but can scratch and become dull over time.
Therefore, it is better to fork out money once and use glass curtains for the rest of your life. The material also differs depending on the glass.
According to the presence of a frame.
Some models are inserted inside the frame, so a frame is required to install them. Most often, thin-walled partitions are installed using a frameless method.
According to the degree of transparency.
A glass partition in a bathroom can be transparent, translucent or opaque. Transparent glass curtains allow light to pass through well, but do not protect from prying eyes. Opaque ones, on the contrary, create a private zone, but do not allow light to pass through.
Therefore, the optimal solution is translucent or slightly darkened options.
In terms of mobility.
Some partitions can be easily removed and dismantled without the use of special tools; they are considered mobile. And some models are stationary and cannot be removed so easily.
By opening method.
All glass bath curtains are divided according to the type of opening; they can be sliding or hinged, as well as doorless. Sliding curtains are the most compact, so they are suitable for small bathrooms. However, sliding models often break due to water getting on the guides or rollers.
Hinged doors are more secure, but they require quite a lot of space to open.
It’s interesting that glass partitions for the bathroom are now being produced with completely different designs. Options with sandblasting, patterns and decor are popular, which slightly reduces the translucency of the structure, but at the same time makes it less transparent.
Choosing the material of manufacture
Correct selection of material is the most important and critical stage in designing a partition. The modern market offers many ways to implement such a project, each of which has its own advantages and disadvantages.
Ultimately, it must be selected taking into account the individual characteristics of the construction. The most widely used materials are:
- Drywall.
- Plastic.
- Curtains and screens.
- Foam blocks.
- Polycarbonate.
It is characterized by low cost, ease of cutting and installation, flexibility of shapes and sizes. The surface of plasterboard is smooth and does not require the application of intermediate coatings for the installation of facing materials.
However, it must be taken into account that a reliable plasterboard partition will have a thickness of at least 50 mm.
It is impossible to make sliding or swing structures from such material, and high humidity (90% or more) will contribute to rapid wear of the sheets, loss of shape and performance.
Nevertheless, drywall remains the main and most common material , and to eliminate its shortcomings, many design solutions have been developed, which will be discussed in detail later.
A plastic partition is usually understood as an industrial product, adjusted to any unified size, although their installation is often carried out manually, assembling individual sheets or strips.
Plastic is light and flexible, not afraid of water, and is even more convenient to cut and install than drywall . With its help, you can make composite, sliding, folding structures of any complexity, including fully prefabricated partitions.
However, the price for such versatility is a specific appearance, which is not suitable for all interiors, as well as fragility , which can manifest itself in loss of color, deformation, and cracking. This is especially true for cheap, low-quality products.
It is better to make partitions from this material in public places where aesthetics give way to practicality.
They are thin and flexible polymer materials that can be freely suspended from guides or fixed in frame structures. There are transparent, translucent and opaque.
Curtains and screens are perhaps the cheapest way to install a partition , characterized by simplicity and compactness, ease of operation and maintenance. However, most of these materials wear out quickly and are unlikely to complement the style of the bathroom.
The thickness and specific gravity of a foam block partition are comparable to the characteristics of drywall, but allow you to obtain a more durable and moisture-resistant structure. Another beneficial advantage of foam blocks is excellent heat and sound insulation .
At the same time, the material is easily cut and processed even with wood tools, which will allow you to create relief and shaped profiles, and its price is extremely affordable.
However, if you decide to build a partition from a foam block, be patient - this is a long and labor-intensive process, after which it will take more time to gain structural strength and apply a layer of plaster.
It’s unlikely that the usual cellular polycarbonate will look good in any interior, but monolithic polycarbonate, on the contrary, gives the design of rooms a special charm and perfectly complements both classical and futuristic styles.
The material can be colored or colorless, transparent or matte. It is easy to cut and bend, convenient for static installation and for creating movable structures, and is highly resistant to a wide variety of aggressive influences , reliable and durable.
The only significant drawback of monolithic polycarbonate is its high price .
Requirements for enclosing structures
The partition in the apartment must meet the following requirements:
- do not exceed the permissible load on the floor;
- have stability - such that you can lean on the partition;
- not to violate the safety of the premises during operation and in the event of emergency situations;
- be built from materials appropriate to the conditions of the bathroom.
Why do you need a partition in the bathroom?
In a combined bathroom, a partition is most often installed between the bathtub and the toilet, but it can also be used in a separate bathroom as bath curtains, in the design of a shower stall, or to enclose the area near the sink.
Its functions:
- divide the room into zones;
- prevent splashing of water;
- limit visibility;
- serve as decor, emphasizing the style of the room, as can be seen in the photo;
- hide communication lines;
- mask finishing defects.
The partition can be used as a shower wall, if the shower does not have a tray and the water drains into a drain built into the floor, hang hooks and shelves on it for storing things.
Why is there a partition in the bathroom?
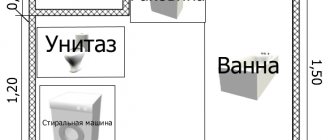
This bathroom partition divides the bathroom into a wash area and a toilet area.
A bathroom usually combines several functional areas, including a bathtub, washbasin, toilet, and sometimes a shower. For effective and comfortable use, functional areas need to be separated from each other, and a partition will help in this matter.
In order to separate the toilet from the bathtub, it is not at all necessary to build a solid wall. A small structure that will visually separate one functional area from another will be enough.
In addition to visual zoning, a properly designed partition allows you to protect furniture and household appliances from water and humid air. For example, many people place a washing machine and, in addition, a drying cabinet in the bathroom. Direct splashes and warm, humid air harm household appliances and make their operation not only short-lived, but also unsafe.
And finally, the partition in the bathroom can be arranged in such a way that it serves as a shelf or stand. In this case, it all depends on the imagination with which you approach the design of the structure.
Materials
Those who have become familiar with all the advantages of a partition built in the bathroom should choose the right material. Zoning of space is carried out both temporarily and “permanently”.
The bathroom partition can be made of anything; it is important to take into account the specifics of the given room.
Depending on the purpose of the partition planned for the bathroom, its construction may require:
- brick, concrete, gypsum blocks;
- glass;
- plastic;
- moisture resistant drywall.
Each of the listed materials has its own advantages and disadvantages, which are best studied in advance.
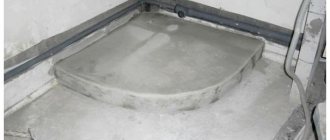
"Heavy artillery"
It is worth using for those who want to make a partition from durable material for a bath that will last for a long time.
As a rule, only the base is concrete, and the wall itself is made of brick. If material possibilities allow, the brick can be replaced with natural stone, or it can be faced with an artificial analogue.
You can easily attach a sink or heavy shelves to such a surface without worrying about their safety.
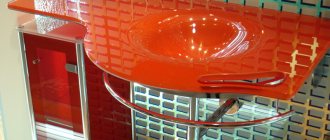
Glass
Glass is the most popular material for constructing such structures with your own hands. At the same time, there is no need to worry about the safety of residents, since the material undergoes special processing. The use of glass is relevant in rooms that are not rich in square meters.
It allows you to achieve the desired visual zoning effect without any bulky structures.
The highlight of this bathroom partition is the texture of the material. You can apply a design to the glass in a workshop, or with your own hands by gluing a special film.
Today, not only classic options are presented on the market. You can also find transforming, hanging and sliding partitions for the bathroom. Such a variety of choices allows you to enliven even a tiny bathroom.
Plastic
Those who do not have great financial resources should make a partition out of plastic. This is a fairly common practice in the hotel business, because... for a small fee you can get a relatively normal result.
However, it should be understood that plastic panels are very susceptible to damage, which cannot be said about other materials.
Even with proper care, a plastic partition in the bathroom will soon lose its original appearance.
Drywall
Without exaggeration, this material can be called universal, since its areas of application are diverse and there are quite a lot of advantages:
- absolutely flat surface;
- reasonable cost;
- easily passes air;
- light weight;
- easy to use.
However, we should not forget about some disadvantages:
- inability to install a sliding partition in the bathroom;
- The maximum humidity level in the room used is 90%.
Taking into account the specifics and climate of the bathroom, you should use sheets marked “GKLV” and “GKLVO” - “moisture resistant” and “moisture resistant, fire resistant”, respectively. The latter is necessary when equipping the future bathroom partition with lighting.
Selection of building materials
Clay or sand-lime brick
Glossy and porous bricks for walls
Until recently, this was the main building material for the construction of walls of plumbing units, and when a wall was designed between the kitchen and bathroom when installing gas instantaneous water heaters, such a solution was the only possible one to meet the requirements of the gas supply organization. Brickwork has excellent load-bearing capacity and fairly effective sound insulation. Red brick is quite waterproof. But brickwork is heavy; a square meter of wall, laid out in half a brick, will weigh about 250 kg, which may exceed the permissible load on the floor slabs. Reducing the weight of masonry when using hollow ceramic bricks results in a decrease in sound insulation properties, and filling the voids with porous material unnecessarily increases the cost of the structure. It is very difficult to attach various equipment to porous bricks; there is always the possibility of falling into the void;
Porous blocks
An alternative to brickwork are porous building materials made of cellular concrete and gas silicate blocks. The specific gravity of such masonry is 12 times less than brick and allows the construction of plumbing cabin walls with sufficient load-bearing capacity and low weight. The increased hygroscopicity of the material requires plastering of the masonry, both sides, which makes the structure somewhat more expensive. The high porosity of the material requires the use of special fasteners because the anchor holding strength for attaching attachments is much lower than in brickwork.
How to cover the walls in the bathroom?
Gypsum blocks
Gypsum blocks and sheets
Gypsum tongue-and-groove blocks have found their wide application due to their middle position between strong and heavy brickwork and light but less durable porous materials. The ability to withstand fairly large loads, rapid construction of walls, which is facilitated by the special shape of the edge. The absence of the need to carry out plastering work has made this material one of the leaders in the construction of walls in bathrooms and toilets. The wall between the bathroom and the corridor can be easily reinforced with standard reinforcement with a diameter of up to 10 mm to ensure the strength of doorways. The only drawback of a tongue-and-groove gypsum board is insufficient sound insulation, which can easily be eliminated by using additional noise reduction means.
Plasterboard sheet
Plasterboard systems are widely used due to ease of installation, low cost of materials and the ability to carry out work by unskilled personnel. A properly made wall made of moisture-resistant plasterboard will not be inferior in quality to walls made of other materials, and the placement of heavy equipment is possible by strengthening the fastening points with special fastening systems.
A manufactured plasterboard partition with a thickness of two sheets (25mm) on each side of the frame with filling of the voids with a layer of soundproofing material made of mineral wool is no different in appearance from a tongue-and-groove or brick wall, even when tapped, and the possibility of placing utilities inside increases the attractiveness of the structure. Moreover, the total thickness of the wall without finishing is 100 mm.
Advice: With a slight increase in the overall thickness, internal niches can be made on the basis of gypsum plasterboard. Such a double wall in the bathroom will allow you to install retractable sliding doors if there is not enough space to open them.
Self-installation
Before you start making any type of partition for the bathroom, you need to prepare the materials.
When installing a gypsum plasterboard partition in the bathroom, you can take care of additional lighting and built-in shelves in advance. If the goal is solely zoning, communications should be hidden inside the structure, and the remaining voids should be filled with soundproofing material.
As the latter, you can use mineral wool slabs, which do not deform due to their structure.
When calculating the required amount of plasterboard, do not forget to multiply the resulting value by 2, because The lining of the partition made of cardboard sheets for the bath is carried out on both sides.
The rack profiles are installed vertically at a distance of half a meter from each other, and the guides are installed across, at the level of the floor and ceiling.
The stability of the structure is directly related to the fasteners. The profile is attached to the surfaces with dowel-nails, and the components of the frame are fastened together with metal screws. Self-tapping screws with a flat head are indispensable when covering partitions made of plasterboard sheets in the bathroom.
When framing the external partition of the specified bathroom material, a primer, putty, and reinforcing tape will be useful. Both interior plaster, paint or ceramic tiles are acceptable as a decorative coating.
The tools needed to build a gypsum plasterboard partition for a bathtub are:
- drill-driver, drill bits;
- metal scissors, knife;
- building level;
- spatula, brush.
Having prepared all the accessories, proceed directly to installing the gypsum plasterboard partition for the bathtub with your own hands.
Sequencing
- Work begins with marking the floor and choosing the location for installing the rack profiles (0.5 m increments). Using a level, the walls and ceiling are marked;
- Cut and fix guide profiles on the ceiling and floor (the size depends on the length of the structure). The minimum gap between fasteners is 1 m, between the wall and the edge of the metal - 0.5 m.
- The length of the rack profile is 20 mm less than the height of the ceiling, which allows you to easily attach the guides. Additional reinforcement of the structure is necessary if its height is more than 2.5 m.
- The next step is covering one of the sides. GKL layers are attached as closely as possible, which will allow you to visually get rid of seams. For fastening, you need self-tapping screws with a hidden head, which is slightly hidden in the coating.
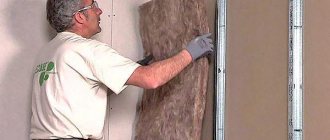
- Having sheathed one side, the VGKL partition for the bathtub is filled with mineral wool, dividing it into parts. This should be done with gloves and glasses.
- Having filled the partition, it is sheathed on the other side, thereby achieving perfectly smooth surfaces.
- The final stage is decorative finishing. The joints are first covered with reinforcing tape, then the seams and fastener heads are puttied, and a primer is applied.
- It should be noted that installing a partition from plasterboard sheets in the bathroom is a less labor-intensive undertaking than using glass or brick. The main thing is to be patient and have certain skills.
Walls
133 votes
+
Vote for!
—
Vote against!
Apartments built according to standard designs can rarely amaze the imagination with non-standard solutions in the design of the premises, as a result of which you often have to make considerable efforts to create a cozy corner in your home where you can relax not only physically, but also mentally. One of the popular solutions, relevant not only from a functional but also a decorative point of view, is a partition in the bathroom. The need for its construction is due to the fact that the bathroom has several functional zones, each of which is characterized by its own purpose. Within the three main functional zones, which include the area near the sink and toilet, as well as the shower area, plumbing equipment is located, and therefore there is a need to separate them functionally. Also, the true purpose of the bathroom necessitates the need to allocate an area for storing things, of which there may be several. They are used to store towels, household chemicals and cosmetics. However, if your bathroom does not have impressive dimensions, full zoning in this case will be inappropriate. To find out how to get out of this situation and how to organize zoning of a spacious bathroom using a partition, read this article.
Content
- Partition in the bathroom: relevance of the problem
- The functional role of partitions in the bathroom
- Advantages of bathrooms with a partition
- Selecting material for partitions taking into account the specifics of the room
- Concrete, brick and stone partitions for the bathroom
- Glass partitions: original ideas for creating additional walls in the bathroom
- Bathroom partitions made of plasterboard: advantages and disadvantages
- Construction of a plasterboard partition: preparation of materials and tools
- Installation work: sequence of actions
Partition in the bathroom: relevance of the problem
In the process of renovating a bathroom or an apartment as a whole, we often have to develop a design for the room, based on the results of which we often come to the conclusion that we did not take into account some of the parameters of the room. For example, the width and height of the doorway, which you need to know in order to bring a bathtub into the bathroom, the height of plasterboard ceilings for installing ceiling lights, the location of furniture for the correct layout of the room and other parameters of the living space, without knowing which it is impossible to successfully complete what you started redevelopment project. If you are the happy owner of a spacious bathroom, you can not only place all the things and necessary equipment, but also experiment with its zoning, placement of plumbing fixtures and decorative design. The most common installation is the installation of partitions that delimit the area in which the toilet is located from the rest of the bathroom space, due to the fact that this area is the least attractive. Therefore, designers recommend installing a shower stall, toilet or bidet as far as possible from the entrance, and for even greater camouflage, delimiting this area with a decorative partition.
If the area of the toilet or bidet can be delimited by a decorative partition, then the area in which the shower is located should be separated by a reliable solid partition that will protect the walls of the room from splashes and water leaks, and therefore increased demands are placed on its quality.
Partition in the bathroom photo
The functional role of partitions in the bathroom
The functional purpose of partitions in the bathroom can only be determined by the owner himself, based on his needs and preferences. Despite this, in most interiors the role of partitions is very ambiguous, since they can be useful not only from a practical, but also from an aesthetic point of view. Let's talk about this in more detail.
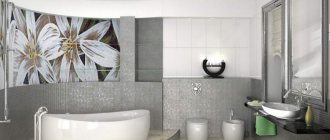
The decorative function is associated with a person’s constant desire for beauty, the desire to turn his home into a cozy corner, and installing a decorative partition in the bathroom will help solve this problem. For example, if you decide to decorate a bathroom in a Japanese style, a decorative bamboo screen will be an excellent addition to its interior, which will not only emphasize the naturalism of the finish, but will also become a beneficial addition to it. Another beneficial solution for an oriental-style bathtub would be to install a glass partition decorated with floral or ethnic patterns;
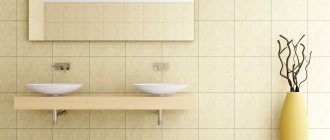
Zoning the room is another important function of the partition, with the help of which you can select several zones in the bathroom, each of which has its own functionality. For example, by installing a partition, you can separate the bath, toilet or shower. You can also install decorative columns on the sides of the mirror or washbasin and thereby separate them from the common room, or create a small niche in which a washing machine will later be installed;
Masking of communications is a function that involves installing a partition in the case of strongly protruding pipes or other technical structures that are not possible to hide under false walls or a screen. In this case, the problem will be solved by installing a decorative partition or columns on which you can hang a lamp or functionally significant shelves.
Advantages of bathrooms with a partition
- A partition in the bathroom separates the “wet” area of the bathroom from the area intended for changing clothes and storing things, that is, it is a kind of screen that protects the bathroom space from splashes from the shower;
- By installing another wall in a bathroom with a small area, you can solve the problem of lack of space for arranging and storing hygiene products, since on the additional wall you can hang several shelves, as well as hooks and hangers for clothes and towels;
Selecting material for partitions taking into account the specifics of the room
Before you buy a bath partition or build it yourself, you need to choose the most optimal material from which it will be made, during which you must take into account the specifics of the room. When choosing a material for making a partition, it is first of all recommended to evaluate not only the economic, but also the technical feasibility of using a particular material. If your goal is to divide the room into several zones, there is no point in using concrete or brick, but in the case of installing a wall-hung washbasin on a newly built wall, these materials will be the best choice, unlike less durable plasterboard and glass.
To everyone who asked the question: “How to make a partition in the bathroom?” — we recommend choosing a material taking into account the specifics of the room. Microclimatic conditions in the bathroom, namely high humidity, necessitate the use of materials that are resistant to its effects and are also easy to finish. The modern market can offer an abundance of materials that meet the above requirements and can be used to make partitions in the bathroom. These include:
- Brick;
- Reinforced concrete;
- Specialized building blocks of various origins, including aerated concrete, foam concrete and gypsum blocks;
- Drywall, resistant to moisture;
- Glass blocks, as well as tempered glass, characterized by increased strength.
Some of the above materials are used for the construction of more permanent partitions that are relevant from a practical point of view. These include brick, building blocks and reinforced concrete. Other materials, which include glass and plasterboard, are used in the case of installing partitions that serve only a decorative and zoning function, due to their lower strength.
It is important to know that most of the above materials, except glass and glass blocks, are characterized by a porous structure that facilitates the penetration of moisture. This necessitates the use of waterproofing materials that prevent moisture penetration. These include plastering, coating and penetrating materials for waterproofing, among which the most universal is considered to be coating waterproofing made on the basis of bitumen and polymers. It is not only easy to apply and dries quickly, but also lends itself easily to subsequent decorative finishing using mosaics, plastic panels, as well as mirror or tiles.
Concrete, brick and stone partitions for the bathroom
If you are planning to build a permanent partition in the bathroom, the best material for it will be concrete or ceramic brick. If we take cases from practice, it is difficult to cite such examples when a wall was erected in the bathroom by pouring concrete, with the exception of those cases when it was necessary to form concrete ledges for a shower stall or for installing a more common glass partition. Thus, we can conclude that this material is used mainly in cases where it is necessary to build a foundation for the installation of something. Brick is a more practical material used for installing permanent bathroom partitions, due to the ease of working with it. You can bring it into the apartment in any quantity you need, build both a partition and a more substantial partition, which can be laid out with various types of masonry, thanks to which you can adjust the thickness of the partition being built depending on the area of the room and your preferences. But, despite the fact that brick is a material that is easy and convenient to work with, experienced craftsmen continued to search for more practical and modern materials for arranging partitions in the bathroom, which was crowned with success.
Glass partitions: original ideas for creating additional walls in the bathroom
Despite the fact that permanent structures are more reliable and durable, the greatest interest for designers are partitions that perform a more decorative function in the bathroom interior. Unusual designs can not only attract attention, but also make the room extraordinary, and also visually expand the space of a small bathroom. At the same time, no one has canceled the practical functions - they are also characteristic of partitions in the bathroom, if an experienced craftsman managed to combine practical and decorative functionality in them. To do this, experts recommend using several non-standard techniques.
Glass blocks . By choosing them as the main material for making partitions, you can add unusual notes to the traditional, unremarkable bathroom interior. This is due to the fact that modern modifications of the material look much more profitable than their older counterparts.
The manufacturer offers glass blocks made in a wide range of colors, and as a highlight of the material uses original details placed inside the glass blocks - shells, numerous sparkles or flowers. Light transmittance and transparency are also variable parameters. The undoubted advantage of glass blocks is their ease of installation - using them as the main material, you can lay out walls of various configurations.
Tempered glass is a material produced in sheets of both medium and large sizes, and therefore, a non-professional often experiences difficulties in the process of installing a partition made of sheet glass. As for the practical use of glass partitions for the bathroom, it is characterized by significant narrowness compared to more permanent partitions. Such fences can only be used as shower partitions or as the main element used for zoning space. However, this does not interfere with the growing popularity of glass partitions, since the main highlight of such a wall is weightlessness and transparency, which will be especially important in a small bathroom.
Bathroom partitions made of plasterboard: advantages and disadvantages
Despite the advantages of the materials described above, plasterboard structures are still the most popular. Drywall is a material whose structure is represented by a gypsum layer, which is covered on both sides with sheets of thick cardboard.
The advantages of drywall include:
- A perfectly smooth surface, free of any irregularities and not requiring subsequent additional leveling;
- High level of air permeability;
- Light weight and no difficulties during installation;
- Reasonable price.
Drywall also has its own disadvantages:
- Due to the design features of the material, it is not recommended to make plasterboard partitions in rooms where the humidity level exceeds 90%;
- Installation of a plasterboard partition only as a stationary structure and the impossibility of installing a sliding version.
Construction of a plasterboard partition: preparation of materials and tools
From the point of view of design features, a plasterboard partition in a bathroom is a metal frame covered on both sides with sheets of plasterboard. The free space between the sheets can be used to mask unsightly communications, and the unused space in this area is filled with soundproofing material. If you want to organize more complex designs, you can rely on built-in shelves or additional lighting.
Required materials and tools
- In bathroom conditions, it is recommended to use drywall that is resistant to high humidity. Such materials include plasterboard marked “GKLV” and “GKLVO”, while the presence of the letter “O” in the material marking means fire resistance. The use of such material will be relevant if you plan to integrate electrical wiring inside the structure. The area of a standard sheet of drywall is usually 3 square meters. meters, and since sheathing with sheets is carried out on both sides of the structure, when calculating the area of the material, it must be doubled.
- The installation of a plasterboard partition also involves the use of rack and guide metal profiles. If the installation of the former is carried out in a vertical position in increments of 50-60 cm, then the latter are fixed at the level of the floor and ceiling in the transverse direction.
- Soundproofing material is another necessary component in the process of installing a partition. To fill the space between sheets of drywall, it is recommended to use mineral wool boards, which have a dense structure and therefore remain resistant to deformation.
- Fastening elements are important components of the structure that will ensure the strength of the finished structure. To attach the profiles to the walls and ceiling, dowel nails are used, and the frame elements are connected with metal screws. Sheathing the frame with plasterboard is done using self-tapping screws equipped with a flat head.
- The final finishing of the structure is done using primer, putty and reinforcing tape. Paint, ceramic tiles or interior plaster are suitable for applying the front coating.
What tools should you stock up on?
Prepare in advance the following set of tools that you will need during the work process:
- Drill-driver and set of drills;
- Metal scissors and a sharp knife;
- Building level;
- Spatula or paint brush.
Installation work: sequence of actions
At the site where the partition is installed, mark the floor and, if necessary, in the place where you plan to install the doorway. Mark the installation of rack profiles in increments of 50 cm, then, using a level, mark the ceiling and walls;
Taking into account the length of the partition, cut the guide profiles and, using dowel nails, secure them to the ceiling, after which, do the same on the floor. If the floor is wooden, use self-tapping screws to fasten the profiles; if it is concrete, use dowel nails. Remember that the distance between the fasteners is at least a meter, and between the edge of the profile and the wall - at least 0.5 m;
Next, we move on to cutting the rack profiles, not forgetting that they should be the same length, namely 15-20 mm less than the height of the room, which will ensure ease of fastening the guides. After cutting, they are strengthened in the vertical direction. The profiles located on the border with the wall are secured with dowel nails, and the remaining racks with self-tapping screws with a press washer;
Important! If the height of the finished structure exceeds 2.6 m, it is necessary to strengthen it with the help of additional guides between the rack profiles;
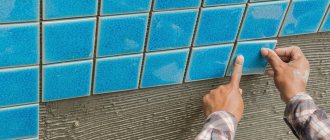
After installing the metal frame, they begin to cover it. Having cut the sheets of drywall using an ordinary sharpened knife, they are secured on one side, positioned exactly end-to-end, which will make the seams almost invisible. The sheets are fastened to metal profiles using self-tapping screws equipped with a countersunk head. In this case, the head of the fastener is somewhat recessed into the material, which will make it almost invisible;
Heat and sound insulating material - layers of mineral wool - are placed inside the structure. It is recommended to carry out this activity with glasses and gloves. To most effectively fill the free cells of the structure, mineral wool slabs can be cut or torn, depending on your preferences;
Having carried out this activity, the second side of the structure is covered, as a result of which you will receive a perfectly smooth surface, devoid of any irregularities and ready for further front finishing;
Before proceeding to the final stage of installation - front finishing, it is necessary to carry out a number of standard measures. These include filling the seams and screw heads, before which the joints are glued with reinforcing tape, as well as applying a primer. After this, you can safely proceed to the front finishing of the partition, which depends only on your individual preferences.
Functions of a partition in the bathroom
Despite the fact that the purpose of the redevelopment is set by the owner of the room, the partition itself, erected in the bathroom, performs a number of specific functions:
Partition as a decorative element in the bathroom.
The appearance is varied, depending on the overall style and materials used. Varies from a barely noticeable element to the visual center of the room.
A partition as a way of zoning a bath.
Delimitation of space, isolation of the soul. This is especially true if two people need a bathtub with an installed partition at the same time. It is possible to make a niche for a built-in cabinet or washing machine.
Looks good both in spacious apartments and in a tiny bathroom.
Partition as a distraction for the bath.
An excellent opportunity to hide communications and various wires while maintaining free access to them. You can use the resulting surface with your own hands by using small shelves and hangers.
Thanks to these features, installing a bathroom partition is becoming an increasingly popular remodeling option. The design allows you to make the shower area separate from the rest of the room, preventing water drops from getting on furniture and equipment.
The order of construction of walls
When you have already decided what to make the walls of the bathroom from, it’s time to start the installation itself. Follow these tips to get the job done right:
- When designing a renovation, determine the load-bearing capacity of the interfloor floor. It is also necessary to check the presence or absence of waterproofing and other systems.
- If you are reconstructing an old building, determine the finishing materials.
- Next, select building materials and determine the required qualifications of builders. Otherwise, the quality of work may be very questionable.
- Now dismantle the old walls, while being careful and cautious, because you must not reduce the structural strength of adjacent walls.
- The next step is to create a small depression and better load-bearing capacity of the base. To do this, pour a reinforced base onto the concrete base.
- Depending on the chosen material, carry out the installation, not forgetting that the wall is a common element for two rooms and must be laid out with bandaged seams.
- When building a wall, be sure to double-check the verticality of the structure, as well as the diagonals between opposite corners.
- Next, waterproof the floor. The connection to the walls must be at least 15 cm in height. This will create a very reliable barrier from water.
By following these simple rules, you can easily make the walls in your bathroom strong and reliable. Now that the main structure has been laid, let's talk in more detail about the interior of the room. Building a wall is half the battle; you also need to make the room attractive. Let's talk about how to decorate the walls in the bathroom. What is the best material to use for surface cladding, and how to prepare it for it.
Partition between plumbing fixtures
Now let's look at what you can use to make a partition between the toilet and the bathroom. Since the structure will not only have to be in conditions of high humidity, but will have to come into contact with water, it should be made from moisture-resistant materials.
At the same time, it should not be too heavy so as not to create unnecessary stress on the floor. Considering these requirements, you can give preference to the following materials:
- aerated concrete;
- hollow brick.
Next we will consider both of these options.
From aerated concrete
To build a partition, you can use D400 aerated concrete. On such a wall you can hang shelves or other lightweight interior items.
Instructions for building a wall are as follows:
- First of all, you need to mark the location of the partition. To do this, first apply the markings to the ceiling, then use plumb lines to transfer it to the floor;
- After this, you need to prepare the floor - if necessary, you need to dismantle the floor finishing coating. In addition, the surface must be cleaned of debris;
- The aerated concrete partition is now being waterproofed. To do this, any waterproofing material is laid on the floor;
- then a vibration damping strip is laid, which prevents the occurrence of cracks. Mineral wool or high-density polystyrene foam can be used as a vibration damping strip.
It must be said that roofing material can perform the function of waterproofing and compensation tape;
- then the first row of blocks is laid. To do this, special glue with a thickness of no more than 5 mm is applied to the surface of the vibration-damping strip;
- A perforated metal strip is laid on top of the first row, which is placed on the wall and attached to it with dowel nails. To avoid cracks in the corners, damper tape or foam is placed between the partition and the wall;
- According to this principle, the partition is erected to the required height. A damper tape is also laid between the ceiling and the wall.
Now that the partition is built, you need to finish it yourself.
The optimal solution is to plaster the wall with a moisture-resistant compound. Since the seams between the blocks are minimal and the wall is smooth, plastering can be done without guides.
As an alternative to plastering, you can consider covering the partition with panels. This option is even simpler and faster.
Note!
Before finishing, the surface of the partition must be primed with an antiseptic primer, which improves adhesion and prevents the occurrence of mold.
You can stick tiles on top of the plaster or finish it with other materials. If the wall is to be painted, it must first be puttied and thoroughly sanded.
Made of brick
If you need a strong partition on which you can place communications, a washbasin, etc., it is best to build it from brick. The process of its installation is in many ways similar to the construction of aerated concrete partitions:
- before making a brick partition, you need to make markings and lay waterproofing and damping tape;
- then the first row of bricks is laid on the cement mortar. Since bricks are much smaller in size than blocks, pull laces along the partition, which will serve as beacons for you, so that the wall is level;
- Every three rows, pins should be driven into the main wall, the edge of which is placed in the gap between the bricks.
Here, in fact, are all the nuances of constructing a brick partition. Otherwise, the technology does not differ from the construction of aerated concrete structures.
Drywall
If during the renovation process the partition between the bathroom and the rest of the apartment was removed for redevelopment, you will probably think about what to make a new partition from. If it is not adjacent to a shower or bathtub with a shower, you can use moisture-resistant drywall for this purpose.
This design can be erected quite quickly without any serious effort.
The process of installing a plasterboard partition includes several main steps:
The frame installation process is as follows:
- you need to start work by making markings on the ceiling, according to which the partition will be located;
- Using plumb lines, the markings must be transferred to the floor. This must be done very carefully and carefully so that the wall turns out smooth;
- Now, according to the markings, you need to secure the guides to the floor and ceiling. To do this, use dowel nails;
- on the walls adjacent to the partition, profiles should be fixed after inserting them into the lower and upper guides;
- then intermediate racks are installed in increments of about 40 cm. To increase the strength of the structure, insert wooden beams into the racks through one;
- After installing the racks, they should be reinforced with jumpers. The latter should be located at different levels, i.e. in a checkerboard pattern.
Note!
Before using a wooden beam in a frame, it must be treated with antiseptic impregnation.
The next step is to install the drywall. The work is carried out in the following sequence:
- First of all, cut out the sheets of drywall. To do this, apply markings on them and cut the surface of the cardboard along it with a mounting knife. After this, the sheet is broken and the cardboard is cut from the reverse side;
- Now the sheets need to be secured to the frame. To do this, use self-tapping screws. The latter should be located in increments of about 25 cm. When screwing in the screws, recess their heads so that they do not protrude above the surface of the drywall. To make the partition in the bathroom durable, during the installation of sheets, leave a gap between the floor of about 1-1.5 cm;
- Mineral wool or expanded clay can be placed in the space between the sheets of drywall to provide sound insulation. Also, do not forget to lay out the wiring and cut holes in the sheets of drywall for mounting switches;
- After this, you need to cut off the chamfers at the junction of the sheets with smooth edges. The chamfer width should be about 5 mm;
- then the surface of the drywall needs to be primed. To perform this procedure, pour liquid into the roller tray, then dip the roller itself into it and, after squeezing it out, treat the wall.
Make sure that the soil “lays down” in a thin layer without drips. When the surface is dry, apply primer again;
- after the surface has dried, stick a special self-adhesive reinforcing tape onto the joints of the sheets;
- To complete the work, cover the screw heads and the joints of the sheets with starting putty.
Note!
To putty drywall, use only moisture-resistant polymer putty.
Now all that remains is to do the puttying. It must be said that in the case of finishing the surface with ceramic tiles, puttying may not be performed.
So, this procedure is carried out as follows:
- Apply primer to the surface using a wide spatula. Work as carefully as possible so that you end up with a smooth surface;
- After the putty has hardened, sand it with a special grater with a mesh. After this, you can stick wallpaper on the wall on the side of the apartment;
- if the surface is to be painted, the wall should be cleaned of dust, then primed again and a thin layer of finishing putty applied;
- At the end of the work, the putty must be carefully sanded with fine sandpaper. Work in bright light so that all surface imperfections are clearly visible.
That, perhaps, is all the information regarding bath partitions that I wanted to share with you. Now you can decide for yourself which partition to make in the bathroom and from what.
The procedure for constructing walls
Any transformation begins with planning and preparation of the material, especially if a complex structure is to be made (for example, a brick partition with a plasterboard insert and a glass window inside). Before we build such a partition, let's try to build a plan:
- Build a brick frame. This step involves laying the bricks in a rectangular area, keeping an open space in the center.
- Install the plasterboard panel by screwing the profiles onto dowels directly into the brick.
You should not rely on construction glue or silicone; such a structure will certainly collapse and the glass will break.
- Next you need to perform facing and finishing work. Why before installing glass? Because it will simply be inserted inside. After carrying out the work with the glass installed, it will have to be washed if it does not break by then.
- When the entire structure is ready, think over the design and decoration.
Remember that the wall has strong points (the brick frame) and weak points - the glass core. Therefore, the degree of strength and heat transfer/sound insulation will be heterogeneous.
This design is an average option that combines pros and cons. If the master pursues a specific goal (strengthening the room, isolating it from sound), he needs to choose one thing. The standard is a plasterboard partition, which has great customization potential and allows you to design it “to suit yourself.”