Hello! From time to time, plumbing fixtures in apartments and houses have to be replaced - they can break down or become aesthetically and functionally outdated. If it makes sense to call a specialist to install complex systems, then you can install a toilet with an oblique outlet on your own, and we’ll talk about how to do it correctly in this article.
Conditions for installation
First, it should be noted that connecting the toilet to the sewer is possible in several ways, using:
- fan pipes,
- plastic bends,
- cuffs
Fan pipes ultimately give a holistic look to plumbing. But such pipes cannot be cut or changed in shape. And this imposes certain restrictions on their use.
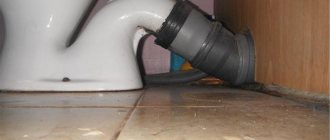
As for the corrugated cuffs, they are very convenient to bend and stretch. Eccentric devices can be rotated about their axis. This is very convenient if there is a misalignment of the parts being connected.
Therefore, a corrugated cuff is excellent for connecting a toilet in hard-to-reach places or if the sewer system has excellent inlet pipes.
Tools and materials
During the work of dismantling the old toilet and installing a new one, you will need:
- tape measure, set of wrenches/adjustable wrench and metal saw;
- hammer drill + drills for concrete, set of screwdrivers + dowel-nails;
- knife, hammer, plumber's heel (strand of resin) + red lead;
- cement, fum tape, white silicone sealant;
- fan pipe or corrugated cuff or eccentric cuff.
Installation with corrugation
Installation is done like this:
- First, the corrugation is inserted into the sewer pipe. The connections must be lubricated with silicone sealant.
- The second end of the corrugation should be connected to a toilet with an oblique outlet. At this stage, preliminary testing should be done. To do this, you should take water into a container or into a tank and try to drain it. During the process, it is necessary to monitor the tightness of the formed channel, in particular, special attention should be paid to the connection points.
- After this, you should determine the place where the toilet will be installed, after which you can make marks for drilling holes. The product will have to be set aside to make holes and insert dowels.
- Now the toilet can be returned to its place for fastening. If the corrugation was previously disconnected, you should reconnect the pipe and check the functionality of the system. If there are no leaks, the product can be fixed.
- Next you need to check the stability of the structure. There should be no wobble. Otherwise, you will have to remove it and make a screed.
- The final process is sealing the joints of the toilet with the tiles (if, of course, they are present on the floor).
DIY toilet installation
You can install the toilet in the bathroom yourself. First, the old toilet is dismantled. The process goes as follows:
- Draining water from the tank.
- Turning off the water supply.
- Disconnecting the toilet from the floor. If it is attached with screws, they must first be unscrewed; if it is cement, then it should be carefully broken.
- Detaching the bell: the corrugation is simply removed; if the bell is cast iron or plastic, then it is disassembled or cut down.
After dismantling the old toilet, the following preparatory work is carried out:
- Cleaning the floor from dirt, cement residues, glue, silicone.
- Surface preparation. It is necessary to level the floor if its evenness was damaged during dismantling. Next, you need to prepare holes for fastenings for the new toilet. You can also use old holes if they are in good condition, do not crumble and hold the dowels well.
Toilet installation diagram.
After all the work has been done, they proceed directly to the installation of a new toilet in the bathroom. It can be attached using screws, cement or epoxy resin. The most convenient and common way is to use screws and bolts. Rubber gaskets must be placed under the heads. It is necessary to tighten the screws gradually, on one side and the other alternately, as the toilet may crack. It is necessary to install the plumbing fixtures level.
The use of epoxy resin is possible if the floor is perfectly flat. The surface must be cleaned of debris, degreased, then roughened with a corundum stone and degreased again. Next, prepare the solution in accordance with the instructions; the mixture is applied to the surface in a layer of 4-5 mm. The toilet is pressed tightly and forcefully against the surface and kept in this state for at least 12 hours.
Article on the topic: Knitting in patchwork style: patterns, patchwork knitting video, technique and master class, jackets and cardigans, socks and jacket, stylish pullover, sweaters and mittens, photos
Next you should proceed in the following sequence, which is the same for all types of toilets:
- Attaching a corrugation of the required size. To do this, the bell is lubricated with sealant and connected to the corrugation.
- Installing the toilet in place and screwing the screws (if this fastening method is chosen).
- Filling the joint between the floor and the toilet leg with silicone. This must be done to prevent water from getting under the base of the plumbing fixture.
- Installation of the tank. When screwing the fasteners, you must ensure that the tank is evenly positioned. After installation, it is necessary to check the tightness and proper operation of the drain tank.
- Installation of flushing mechanisms.
- Connecting the toilet to the water supply using a flexible hose. The ideal liner option is a reinforced hose with union nuts.
- Checking the tightness of the connection. You need to turn on the water and make sure there are no leaks.
- Final check of the entire system, its high-quality working condition.
It is also recommended to check the system after 1 hour. This completes the installation of the toilet in the bathroom. And if the plumbing fixture works properly, then the whole process was carried out correctly and efficiently.
Oblique release
You can install a toilet with an oblique outlet yourself, fulfilling the following conditions:
- The release grooves should be lubricated with a mixture of red lead and drying oil.
- The resin strand is wound on top so that the end remains visible, because getting it inside can cause further clogging of the channel.
- After winding, the strand should also be lubricated with red lead.
- After this, the toilet is installed as described above, and the outlet branch is inserted into the sewer pipe.
Connecting a toilet to a cast iron pipeline
In older buildings, drainage systems made of cast iron are often found. In general, connecting a toilet to any type of pipe is almost the same, however, it is worth noting that to connect to a cast iron pipe, additional materials will be required - a rubber cuff.
Technology for connecting plumbing to cast iron sewer:
- The first step is to prepare the cast iron socket. It is cleaned of slag and rust, and all cement mortar used earlier during installation is removed.
- The second step is to install the rubber cuff. The tightness of its installation is achieved by using sealant; it is applied to the walls of the socket before installing the cuff.
- The last step is to connect the toilet using a corrugation or pipe, the inlet is connected to the installed cuff, then everything is sealed.
It is worth remembering that cast iron is susceptible to corrosion, so you should take care of the high quality of the connection between the pipe and the plumbing elements. For sealing, it is preferable to use silicone compounds.
Oblique release is not a death sentence
You should not think that the design of a toilet with an oblique outlet significantly complicates the installation process. The procedure can be done with your own hands; this does not require special knowledge or skills.
It is enough to have some experience working with plumbing or other appliances, and also be able to use a hammer drill or impact drill. And the rest can be gleaned from photos and videos.
If you have doubts about your capabilities, then, of course, it is better to contact a specialist. But in any case, the result should be excellent.
Choosing a method for connecting the toilet to the sewer
To quickly install a new toilet instead of an old one, it is recommended to select a suitable connecting cuff in advance. To do this, take comparative measurements of the existing and new toilet - if the parameters are the same, you can choose a cuff of the same type that is already installed.
Rigid drain pipes with a hermetically sealed fastening system at one end are used if the toilet outlet and the entrance to the sewer pipe are strictly on the same axis. The dimensions of such a pipe are regulated by trimming. A pipe with cuffs at both ends cannot be cut.
Eccentric cuff, suitable for use if the axes of the toilet bowl outlet and the entrance to the sewer are slightly misaligned. By turning such a cuff, you can achieve the correct connection of the elements.
Corrugated pipe – universal fastening. It has a certain drawback - if installed incorrectly, waste can accumulate in the sagging folds of the corrugation, which threatens to clog the system. But the corrugation allows you to connect the toilet to the sewer system, regardless of the location of the entrance to the sewer pipe.
Preparatory work
Of course, you remember that if you have ceramic tiles on the floor, then the floor must be level. If you neglect this detail, the toilet may split or crack. But if you don’t have tiles, then be sure to make an even screed. After completing the work, leave the floor to dry for at least three days. This is due to the fact that the toilet will be mounted using toilet dowels, and in order to securely fasten them, you will need a reliable base. So it’s better to take your time than to redo it later.
Since you are replacing the toilet yourself, you can now proceed to preparing communications:
Choice
Installation
Children's toilet
Most often, people do not consider choosing this device a difficult matter. The list of requirements for it is limited to convenience, lightness and, sometimes, color. Most buyers don't go further than this. But in addition to external characteristics, each model has its own technical indicators. Leading companies in the plumbing market regularly update their product range, releasing more and more interesting new products. Focusing only on the appearance and convenience of the toilet, you may soon encounter problems that will not be easy to solve. Before you make a replacement, you need to think about some characteristics.
When choosing a device, you need to take into account the size of the bathroom or toilet. For large spacious rooms, it is recommended to purchase designs with a bidet and a tank. If the size of the bathroom is very small, then you can organically fit a toilet without a tank into the space. Such models have a special built-in flushing system. They are very convenient and will save space in the room. The material used to make the unit is very important. By purchasing cheap products, the consumer runs the risk of receiving low-quality ceramics, which will very soon ruin all the pleasure of the purchase. Of all the offers for the home, it is better to choose models made of porcelain and earthenware in the middle price segment. The internal shape of the bowl is of great importance. Some of the models have a special surface that protects against splashing. The design of the flushing device is also important. It is selected taking into account the features of the communication system in the house. There are three types of such structures: vertical, oblique and horizontal. To make the right choice, you need to look at the features of the flush device in your system. Today there are many models of cisterns. It is necessary to take into account the noise level of the tank, its capacity and other indicators. You should also pay attention to the location of the tank relative to the toilet itself.
Without a tank
It is known that the simplest models are easiest to install. Usually they also do not cause any particular problems during operation. By choosing a design that is too complex, the consumer may later regret his choice. In the simplest models, most problems are associated with the drain tank, which is not difficult to repair.
Preparing the toilet
Installing a toilet yourself is not such a difficult task. The entire process can be completed without the involvement of plumbers. Considering that they charge from 1,500 rubles for the work for installing the simplest toilet, in addition to saving money, you will gain invaluable experience.
Preparing the room consists of:
- Cleaning old plumbing;
- Leveling the seat;
- Determining parameters for a new toilet;
In general, installing a toilet with your own hands, although it is an easy job, does not tolerate “white hands”. We recommend purchasing rubber gloves and wearing them when working with sewer pipes. This is the dirtiest place.
Turn off the water supply to the toilet tank and disconnect the water line.
Removal of the old toilet depends on the mounting. In some cases, they may be set on cement, in which case it must be chipped off. If the fixation was on a bolted connection, then unscrew the bolts, slightly loosen the toilet and carefully lift it tilting back. This must be done to drain the remaining water in the siphon. Now you can remove the toilet pipe from the sewer pipe.
In old houses, the connection between the toilet and the sewer was sealed with cement mortar. If this is your case, then you will have to work with a hammer and break the drain pipe. Its fragments may be inside the sewer pipe. They must be removed! The hole in the sewer pipe is covered with a plastic bag.
Depending on how the old toilet was fixed, the seat is prepared.
Sometimes, toilets were coated with cement mortar and tiles were laid to form a new surface. In this case, you will have to fill the recess to level it to one level. The easiest way to do this is with a quick-setting self-leveling screed. It is found in small packaging, 2-5 kg. A two-kilogram bag will be enough for the job.
All debris is removed from the excavation, swept, then primed. Dry screed is diluted according to the instructions on the package. The finished mixture is poured so that its level coincides with the level of the main surface.
After a day, the screed gains the declared strength, and it must be primed.
If the toilet was installed on top of a complete covering, but in this case a dirt rim may clearly appear. No matter how well and thoroughly the cleaning is done, microscopic particles of dust are always deposited in such places. They eat into the surface of the tile and can be very difficult to remove.
A solvent with a very weak surface tension film will help cope with this task. This is a necessary condition for the penetration of liquid into the smallest pores of the glaze. They will not harm the tile itself. We recommend trying:
- WD 40;
- Acetone;
- Xylene.
One of these solvents will help cope with the task.
To determine the parameters of a new toilet, you need to measure:
- the height of the inlet to the sewer pipe;
- liner length;
- dimensions of free space behind the toilet.
Write down the results obtained on a piece of paper so as not to make a mistake when choosing. TIP: Take a photo with your mobile phone camera of the general view of the prepared toilet. This may come in handy in the store .
Installation of a hanging bowl and a hidden tank
It should be noted that the work on how to change a toilet of a conventional design to a wall-hung product with a hidden drain container yourself differs from the previous option in greater complexity. In this case, it will be necessary not only to replace the plumbing equipment, but also to repair the floor covering, build a false wall with its further finishing with tiles or other modern materials.
You have to attach the hanging bowl to a durable installation. After finishing the walls, the fixed metal frame will not be visible. When carrying out renovations in a combined bathroom, when decorating the interior, it is advisable to install a wall-mounted washbasin and a bidet of a similar design.
A detailed description of how to change a regular toilet to a wall-mounted one is as follows:
- Mark the location of the plumbing fixture. A sewer pipe with a diameter of 110 millimeters and an inlet is connected to it.
- Try on the purchased installation, which is a rigid frame for installation. You need to decide on the height. The standard placement is 450 millimeters from the floor to the seat and 100 millimeters from the floor covering to the bottom edge of the seat.
- Using a marker, mark the places of fixation to the floor and wall of the bathroom so that they exactly coincide with the mounting holes.
- They are prepared using a hammer drill and the frame is installed. Using a level, check the correctness of the installation work.
- Water is connected to the drain tank.
- The installation kit includes a diagram for cutting plasterboard sheets to cover the installation site. GCR is attached to the metal profile and to the installation. It is better if they are moisture resistant.
- Finishing is carried out taking into account the personal preferences of residents.
- When replacing a toilet bowl, it is connected to a corrugated sewer pipe and a drainage system, not forgetting the need for sealing.
- The bowl is screwed directly to the installation frame through drywall and tile using pins.
- The device is connected to the sewer system and the drain tank.
Despite the fact that the process of replacing an old toilet with a wall-mounted product takes a lot of time, the result of such a repair looks stylish and expensive. The work of installing an electronic plumbing fixture with the addition of automatic hygiene functions has much in common with fastening and connecting a conventional product, but there are still some nuances.
The fact is that to connect a smart wall-hung toilet, you need to provide it with power. For this purpose, a separate line is usually laid, since smart equipment is sensitive to voltage drops in the network.
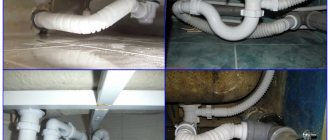
Application of corrugated pipe
A corrugated toilet pipe is an element of the system that allows you to connect the toilet outlet to the sewer pipe. Corrugation can be used to connect to any type of pipe. This pipe has a fairly wide cross-section with corrugated walls, which allows you to vary its length. There is a cuff on the edge of the pipe, which facilitates its installation. The corrugation is very convenient when installing a toilet with an offset. Corrugated pipe is also often used as a temporary element on a loose toilet.
Pipes should be replaced from time to time
Of course, a connection using a plastic pipe is more reliable and durable, but there are cases when a corrugated connection cannot be avoided:
- If the floor level has changed, or it is impossible to install the toilet opposite the sewer outlet.
- If the types of openings for the toilet flush and the socket of the sewer pipe do not match.
Before purchasing a corrugated pipe, you should consider the size of the holes to which the corrugated connector will be connected.
For several objects connected to the sewer pipe, there are corrugations with bends - tees. With the help of such devices, several devices are connected to the water supply system, or the toilet and bathtub drain are mounted into one outlet.
It is important to consider the quality of the material used, its characteristics and durability. To install a toilet using a corrugated pipe, you will need additional elements - couplings and pipes.
Corrugated pipe is a fairly vulnerable and thin material. When using a toilet connected to a sewer this way, you should adhere to the following rules:
- The water flushed into the toilet should not contain caustic chemicals, as they can damage the walls of the corrugation.
- If the corrugation is long, it is necessary to provide supports during installation to prevent it from sagging.
- Protect the pipe from mechanical damage; its thin walls break easily.
When installed correctly, corrugated pipe does a good job of draining waste and hiding unpleasant odors. If this does not happen, the water in the pipe stagnates, which means the installation was carried out incorrectly, and you need to choose a different method of connecting the plumbing.