Along with metal and cast iron products, polymer plumbing has also become widespread. Acrylic products are very practical, but mechanical damage can cause significant damage to the coating. Repair of acrylic bathtubs is necessary if chips, deep cracks or even through holes appear on the plumbing fixtures.
Restoration of plumbing equipment can be carried out in the following ways:
- DIY acrylic bathtub repair;
- restoration of the product by specialists.
The second method, of course, is preferable, but if you want to save money, you can eliminate defects in acrylic bathtubs yourself.
Surface preparation
First of all, before carrying out any restoration work with an acrylic bathtub, you need to prepare the surface:
- Rinse the hot tub thoroughly with warm water;
- Apply detergent to the surface (you can also use a regular soap solution);
- leave to soak for 20-30 minutes.
- wipe the font with a soft sponge - special attention should be paid to the damaged area, it needs to be cleaned more thoroughly;
- rinse generously with water;
- degrease the damaged area. How to do this, read the special article.
Using liquid acrylic
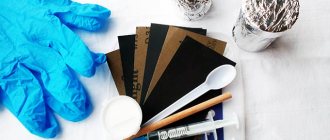
This substance is used to repair chips and large scratches. It is best to purchase a ready-made restoration kit:
- reducing agent;
- device for uniform application of the product;
- polish for surface treatment to add shine;
- several rags;
- napkins.
Before starting repair work, the area of the chip is expanded. This is done so that the product is evenly placed on the area. This can be done using a mounting knife. This must be done with careful movements. The area is wiped with a soft cloth, degreased and sanded with sandpaper. Next, liquid acrylic is applied. Important! The liquid must completely cover the surface. The application technique is similar to wall putty. After the product has hardened, it is necessary to apply polish to add shine. The color of the restored area may vary. This can only be noticed when additional lighting is turned on, aimed at the fragment.
How to repair a crack with your own hands?
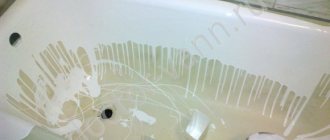
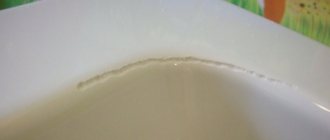
What to do if the coating of an acrylic bathtub cracks during use, how to repair the crack? It is important to understand that it needs to be eliminated as quickly as possible to avoid further spread. Indeed, under the influence of constant load and temperature difference, it can grow significantly.
Such repairs can be easily done with your own hands using a special repair kit , according to the instructions presented below.
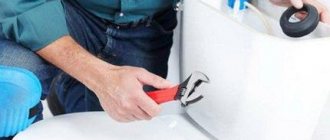
As a rule,
a repair kit contains all the components necessary for restoration; in addition to it, you only need a drill or screwdriver and masking tape .
STEP 1. First you need to drill out the crack along the edges, this will help it not to grow in the future. 5mm diameter works great ) and at high speed make small holes at the very ends of the crack.
It is very important not to drill deeply, you only need to dive
2-3 mm into the surface of the acrylic, this is usually enough.
STEP 2. Next, you can begin to expand the crack. This is necessary to ensure that the repair composition completely fills the damage. Run the same drill along the entire length of the crack, creating a 1-2 mm .
STEP 3. Now you need to cover the area around with molar tape so as not to damage the entire coating, and begin to give it a slight roughness. 1000 - 1200 sandpaper and start “shuffling” the coating in a circular motion. Remove all shavings and thoroughly wipe the surface of the defect with a soap solution.
STEP 4. Mix liquid acrylic and hardener in the proportions recommended by the manufacturer.
Apply the mixture to the damage, smoothing it out with a plastic or rubber spatula. It will take about 24 hours to dry.
Acrylic bathtubs have completely different shades of white and therefore, when renovating, getting exactly the same tone can be very problematic. Manufacturers of repair kits produce acrylic for warm and cold tones of white, so it is important to know which one you need.
STEP 5. Now it's time to polish. Cover the surface around it with molar tape. Take a set of sandpaper and, starting with the coarsest grit (the smaller the number on the back, the larger it is), “sand” the surface, gradually moving to a smaller one. After the acrylic bump has completely disappeared and the surface has become homogeneous to the touch, wipe it thoroughly with a soap solution.
Next, you need to take the polish from the kit and apply it to a fleece napkin. Rub the paste in a circular motion to bring the coating to a mirror shine.
What to do if the shower stall bursts?
Shower bowls are created using exactly the same technologies as acrylic bathtubs. Therefore, all the information provided about the restoration of acrylic bathtubs also applies to shower cabins.
How to prevent breakdowns of polymer plumbing?
When using acrylic products, it is necessary to observe certain conditions, ignoring which you may subsequently encounter the need for repairs:
- The melting point of acrylic is 150°C, because of this it is highly not recommended to pour boiling water into a bathtub made of this material in order to avoid deformation.
- It is not recommended to place basins in bathtubs made of acrylic in order to avoid the formation of chips and cracks.
- To prevent the formation of cracks and other mechanical damage in the bathtub, you should avoid dropping heavy objects into it.
Unfortunately, many users ignore plumbing “signals” about an approaching accident:
- The creaking of an acrylic bathtub indicates that the plumbing was initially installed incorrectly or that the bottom and walls of the device are quite thin. But there are ways to eliminate this nuisance.
- If the acrylic bathtub sags, you can place bricks or blocks under its base. This method is suitable for those who have a bathtub covered with a plastic screen. This solution will reduce the load on the inner surface of the bath and prevent the appearance of cracks.
- Look at the acrylic bathtub in the light; if it is translucent, it is bad. But if you nevertheless purchased such a product, do not be upset, it can be enhanced with the help of latex paint, which is applied to the surface using the pouring method. This will strengthen the surface of the bath and prevent the appearance of various defects.
Many people wonder how long can refurbished plumbing last? If the restoration is done with high quality, then such products can last from 2 to 5 years. Considering the fairly low price for this work, this is quite profitable.
An acrylic bathtub can be restored with almost any type of damage, so there is no need to quickly get rid of old equipment. Almost any person whose hands grow from the right place can restore the former integrity and original appearance of an acrylic bathtub with their own hands. The most important thing is to read the instructions, have the necessary materials and tools on hand, and naturally do not be afraid of physical work.
Repairing holes using a repair kit at home
How to repair a through hole, because they require much more serious repairs? For such cases, bathtub manufacturers produce special repair kits. Their configuration differs from those discussed above only in that they contain sheets of fiberglass and special glue for them. Let's take a closer look at how to use them.
STEP 1. First, you need to prepare the surface for repair: carefully remove all chips around the damage and splinters from the edges of the hole.
The hole will need
access from both sides , so if you can’t get to the defect from the other side, you will have to dismantle the font.
STEP 2. Cut the fiberglass into sheets of the required size. A minimum of 3 sheets is required. It is better if the first sheet extends 3 cm beyond the boundaries of the breakdown, and each subsequent sheet extends 2 cm more than the previous one. For example: if the hole is 2x2 cm , then the first sheet should be 8x8 cm , the second 10x10 and the third 12x12 .
This will ensure better adhesion to the surface of the bathtub.
STEP 3. Now you need to coat the fiberglass sheet well with glue and attach it to the back side of the hole. The same must be repeated for the remaining layers.
Each subsequent layer must be glued after the previous one has completely dried -
2-3 hours .
STEP 4. All that remains is to mix liquid acrylic with hardener according to the manufacturer’s instructions and apply it over the layers of fiberglass from the “finishing” side. It is important to smooth it well with a rubber spatula, covering not only the fiberglass, but also the edges of the hole.
STEP 5. You can start sanding and polishing. How to do this is described in detail in step 5 of the previous chapter.
How can you seal small holes?
If the hole diameter is up to 8 mm, you can safely fill it with acrylic without gluing it with fiberglass. Such damage often occurs when installing the frame on a bathtub, when the guides are screwed in and drilled through the bottom. To eliminate such holes, you can use liquid acrylic from the repair kit by injecting it into the hole using a regular medical syringe. After the polymer has dried, it is necessary to sand and polish the surface (step 5 of the chapter “Eliminating cracks”).
Features of repairing acrylic bathtubs
The most common types of damage to acrylic products are:
- mechanical, appearing when carelessly hitting the surface or burning it. The bathtub may crack as a result of heavy load on it;
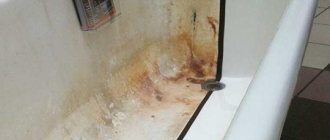
- chemicals that arise due to the use of aggressive cleaning agents that leave streaks and stains.
If the defects are not serious, then the bathtub is simply repaired and not replaced with a new one. Before renovating the bathtub, you need to choose the right shade and coating material, otherwise the work will have to be done twice due to color mismatch.
What to do if the coating has peeled off?
Often, when buying a cheap product, after some time the acrylic delaminates and swells. What can contribute to this:
- Installation errors. The bathtub shakes, the walls are deformed, which leads to peeling of the coating.
- Poor quality material.
In order not to encounter such problems, read our special articles: How to choose a high-quality acrylic bathtub? And how to install it correctly?
What to do if the acrylic is still swollen, how to glue it?
It is necessary to glue it back using a special adhesive for polymer products. If the “bubble” is not cracked, you need to pierce it with a syringe with a thick needle and inject glue into it.
If there is a crack, slightly bend the peeled layer and use a syringe to evenly distribute the composition so that the entire delamination is glued.
Further actions are the same as for restoration of cracks.
There is a more radical and high-quality, but less accurate approach. You need to cut off all the swollen acrylic and instead fill this place with the liquid composition from the repair kit. Performing the same procedures as when eliminating a breakdown ( STEP 5 and STEP 6 of the previous chapter). In this case, the integrity of the coating will definitely be restored, but such a patch will immediately catch the eye. Which method to use is up to you.
Restoration kits - what's the difference?
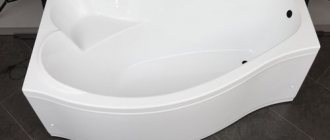
Acrylic structures are made using different methods. Finished products differ in the thickness of the acrylic layer. The most expensive are bathtubs that are made using vacuum molding technology. The thickness of the acrylic layer of such structures exceeds 4 mm. Manufacturers take a sheet of material, heat it up strongly on special equipment, and then mold it according to a specific pattern in a vacuum atmosphere.
Vacuum formed acrylic bathtub
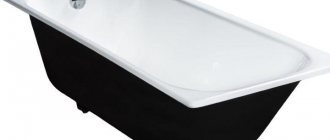
Cheaper are products on which acrylic is applied by casting or spraying onto a fiberglass base. The acrylic layer of such structures never exceeds 2 mm. Determining what kind of bathtub is in front of you is quite simple. Take a look at the cut edge of the product, you will see the thickness of the acrylic layer.
You need to inspect the bathtub not for the sake of empty interest, but in order to understand what kind of repair kit you need to purchase to restore it. Kits for low-cost construction typically consist of epoxy resin mixed with a small amount of special additives. But the restoration of bathtubs with a thick coating should be carried out with a repair kit made from a special type of hardener and liquid acrylic.