Necessary materials
You can create flowerpots or vases from cement and fabric yourself; for this you need to prepare the following materials:
- cement M400 gray or white;
- sand, it must be clean and sifted;
- pure water;
- if you need to give the product color, then use pigment;
- a trough or basin for preparing the solution;
- drill with a nozzle for mixing the composition;
- cellophane film or solid oil;
- as a form you can take an old container, bucket, basin or other improvised objects;
- burlap rags, tulle, terry or waffle towel, you can use thick fabric with a ribbed texture.
Master class on making a concrete pot
First, coat the containers with vegetable oil; it is very convenient to use a spray for these purposes. This step is necessary so that after the concrete has dried, the product can be easily removed.
Mix the concrete according to the instructions on the cement bag. For this master class, sifted sand, cement and water were used. You need to mix until smooth; you can mix with a trowel, stick or drill with a whisk attachment.
Pour the solution into a pot greased inside with oil, place a jar here, greased on the outside, and press it down with a piece of brick. Make sure that the weight of the brick does not press down the jar too much, otherwise the future flower pot will be left without a bottom.
We leave the concrete to harden, in general it sets quite quickly, but to be on the safe side you can leave it overnight. Then we remove the jar with a press, and then turn the main pot over and remove the finished concrete flowerpot from it.
The inside and outside of the pots should be sanded with sandpaper.
All that remains is to plant the plants, and you can admire the result with delight.
How to make a pot from concrete and fabric or rags (video)
Cement bag pot (video)
Quick pot (video)
So, by playing with the shapes and sizes of containers, you can make a lot of interesting products that will look great both indoors and outdoors. By the way, you can add dyes to concrete, then the color of the product will be equal to store-bought counterparts. In such outwardly rough flowerpots, neat living plants will look wonderful, a kind of play on contrasts - the roughness of concrete and the delicacy of flowers! Happy homemade crafts, come visit us again!
WE RECOMMEND WATCHING THE VIDEO “New Year's Decor Ideas 2021”:
Preparation of the solution
Sand is prepared in advance, all debris and stones are removed, it must be sifted through a fine construction sieve. The fabric is placed in a container for the solution to remember the amount of space occupied. Take out the rag, add cement and sand in a ratio of 1 to 1, mix and add water so that the consistency is not too thick. Stir all components with a drill, the mass should be homogeneous. The amount of solution should be enough for one product; if several items are being made, it is better to mix the composition one by one.
Vase making technology
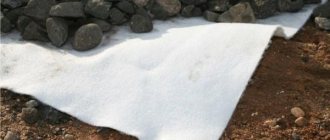
The form needs to be wrapped in cellophane or stretch film, it can be covered with grease in the form of grease, this is necessary so that the product, after drying, can be easily removed. Then mix the solution thoroughly and place a rag in it, carefully straighten the edges, the fabric should be completely saturated. Leave a section of about 10 minutes in the mixture for complete impregnation.
Take out the fabric, let the solution drain, and then hang it evenly on the form turned upside down, the edges need to be straightened, you can create unusual waves or other curls. The product is left to dry for three days, then removed from the mold and decorated. The outer side can be painted in any shade using a special material for concrete. You can make a multi-colored product or leave it in its original form.
We take out unnecessary things
This is also a fairly easy way to make a vase with your own hands using cement mortar. Here we need, in addition to the solution itself:
- old towel;
- bucket or basin;
- polyethylene.
Prepare the diluted cement to the state of liquid sour cream and set it aside for now. We turn the bucket on which the flowerpot will dry and which will also serve as its shape upside down and wrap it with polyethylene to make it easier to separate it from the hardened cement.
Related article: Knitted skirts: patterns for beginners, how to knit clothes for women with a detailed description
We lower the towel completely into the solution, it should be thoroughly saturated with it. And then we spread the towel onto the bucket, as shown in the photo.
There should be no folds on the surface so that the bottom is smooth and stable.
Arrange the falling folds as you like. And we leave this design for several days. Typically, cement hardens in 2-4 days.
When the cement has completely hardened, separate the bucket and polyethylene. You can start painting. You can mix paint with glue, then the surface will be glossy. Or you can leave it in its original form, with its roughness and slight roughness of the material.
You can also prime the flowerpot before painting, then the paint will adhere better.
If suddenly, when the flowerpot is dry, it seems to you that some of its edges don’t look very nice, this can be corrected with a hacksaw. Simply saw off or cut off the unsightly edge, and sand the cut area with a coarse sandpaper.
Using the same technologies, you can make flowerpots of different sizes and shapes. For example, as in this photo - cement flowerpots for succulents.
Or these stylish and bright vases:
The advantages of such flowerpots are obvious:
- This is a huge saving of money and effort. You don’t need to spend a lot of money buying a vase or materials for making it, you don’t need to slog through the work for a long time, even children can handle such a flowerpot.
- Vases made from materials such as concrete or cement are very durable and strong. These materials can easily withstand temperature changes and are not afraid of frost or scorching sun.
- Cement or concrete are very convenient materials; they can take any shape, which is a big advantage. You can make small flower pots or large floor vases.
Related article: DIY garden crafts from scrap materials with photos and videos
Technology for making a vase with a smooth surface
To get smooth walls, you need to prepare silicate glue, cardboard and additional film. The sand must be sifted, and the cement must have fresh expiration dates; you can add Rotband plaster composition. Silicate glue is used instead of ordinary water. Prepare a solution from the listed components, mix thoroughly with a drill to ensure homogeneity and immerse the fabric in it, straighten the edges, leave for up to 10 minutes to soak.
Cardboard is placed on a flat surface, film is spread on it, and the prepared form must also be wrapped in cellophane. Take out the rag, let the excess mixture drain off, and lay it on the film so that no wrinkles form.
A wrapped form is placed in the middle of the fabric, supporting the cardboard and container, and it is turned over. The fabric, along with the adhered film, will be placed on top of the form, and the cardboard will be removed. You can create shallow waves so that the vase can be easily separated from the film. Drying will take longer, since the product is under film; after a week, it can be freed from cellophane.
After removal, small folds or other defects may form on the surface; they must be eliminated; for this, the walls are coated with silicate glue using a brush. If the vase needs to be painted or given a shiny look, then a water-soluble dye is added to the glue.
Creating a print
For manufacturing you will need the same material that was used in the glossy product. To create a print, you need to take printed fabric with various patterns, wallpaper or newspaper.
The cardboard is laid on a flat surface, a film is spread on top, then the location of the print is marked, taking into account that the form will be in the center. The location of the pattern is generously lubricated with silicate adhesive, fabric, newspaper or wallpaper is placed on this area, the outer side is placed on the film, and the inner side is connected to the fabric.
The inner side is also generously lubricated with adhesive; this work can be done while the main fabric is soaked in cement. Leave space for up to 10 minutes for complete impregnation, while ensuring that small folds do not form.
A rag soaked in the mixture is spread on the foam, a bucket or other prepared form is placed in the central part, then it is turned over so that the fabric remains on top of the container. Beautiful edges are formed and left until completely dry, then the product is removed. To create a product with a bright and colorful color, white sand and the same cement are used, and the necessary pigment is added. It is worth considering that such materials may be more expensive than conventional standard types.
You can trim the edges with a simple hacksaw, but the cuts will stand out from the main color, so they are sanded with an emery mesh for plaster.
Plaster vase
To make such a plaster vase, take:
- 2 liter plastic bottle;
- gypsum;
- gypsum putty;
- bandages.
When getting started, first cover the table surface (or other work surface on which you will make the vase) with cellophane or cling film. This should be done to make it easier to remove the plaster after finishing work.
We dilute the gypsum with water to the consistency of thick sour cream, wait until it sets a little. Then we lay out a circle - this will be the bottom of the vase. Place a bottle on top of this circle and begin applying plaster.
Note! You will have to work quite quickly, since gypsum tends to harden quickly.
Now we wrap the part of the bottle sealed with plaster with bandages and leave for 30 minutes so that the plaster dries. You need to cover it with plaster and bandages just above the middle so that later you can easily pull out the bottle.
Next, we dilute the plaster putty and apply it over the bandages. Then again a layer of bandages, and again a layer of putty. The lower part of the vase is ready. For the top one, you can take an additional form, for example, a plastic jar.
Article on the topic: Men's and women's scarf with Aran knitting needles
We form the upper part of the vase in the same way - a layer of bandage, putty, another layer of bandage and a layer of putty. To make the vase strong and stable, you can apply several more layers of putty on top, and after complete drying, sand it with sandpaper.
We send the gypsum blank to dry for a day in a warm place. To paint a plaster vase, you can use acrylic or varnish paints.
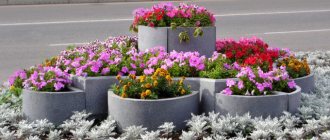
Vase sizes, designs and types of shapes
A vase for a garden can have a variety of sizes and types; large floor or hanging items can be created; they can be used to decorate a veranda or an area near the entrance to a room. The beautiful appearance depends on the textile used, the form for drying and the quality of the solution.
You can create an original appearance of the vase so that it is not inferior to exclusive designer products. Items are made in small, large and medium shapes, depending on the type of plants that will be planted. Large pots must be immediately placed in a permanent place, otherwise, after filling with soil, it will be difficult to mix them. Hanging products look original and are used for plants with a small root system.
The surface texture may also differ, depending on the fabric used, in some cases smooth walls are created. For production, you can take thick fabric or openwork types in the form of knitted napkins or other products. The shape of the flowerpot can be round, square, oval, rectangular. The larger the product, the more it needs reinforcement; for this you need to use reinforcing rings, this allows the service life of the vase. Small items do not require additional securing.
In hanging objects, special holes are made on the sides to secure the rope. A burlap rope is used as a hanging element; it is left in its original form; a beautiful wicker product can be knitted from dense threads using a hook. By creating vases of various shapes and sizes, you can give an original look to the site and emphasize the decor of the landscape. Small containers allow you to create separate zones with a certain class of plants, for example, a flower garden of cacti, or arrange low-growing and tall flowers in order, starting from the smaller pot to the larger one.
It is possible to make several products of the same type to create a certain style; you can make vases in the form of palms or using stands, legs or other unusual elements.
Another option
This master class is a little more complicated, but nevertheless it is very interesting to make such a vase, and it will look simply gorgeous in the interior!
For work we will need:
- gypsum;
- plasticine;
- twine;
- form for filling (you can use a baking form of a suitable shape and size);
- shells (you can use any small parts).
Related article: Elastic set of loops for circular crochet and knitting
Cover the filling mold with baking paper. We roll the plasticine into a sausage and roll it out to the size of the mold and, accordingly, the future walls of the vase. We dilute the gypsum to a thick sour cream.
We make imprints of shells on plasticine, then place it in a mold. Fill it with plaster to a depth of 3-4 cm. In total, you will need 5 walls for the vase (you can make it triangular or rectangular).
Until the plaster has completely hardened, after about 10-15 minutes it must be carefully removed from the mold. Leave the finished future walls of the vase until completely dry.
When the tiles are dry, you need to drill holes on the sides. We connect the tiles and tie them tightly with twine.
We place the assembled structure vertically and fill the bottom with plaster. After 15-20 minutes, remove the walls, level the bottom to the shape of the vase, and leave until completely dry. We drill holes in it to connect to the walls.
Now you need to paint all the parts. You can use acrylic paints of any color. Or you can use improvised means. For example, the color of a vase like in the photo can be obtained by mixing shoe polish with vegetable oil.
Then we coat all the parts with varnish and tie them together with twine.
Of course, you don’t need to pour water into such a vase, but you can put a small glass or plastic container in it so that you can put fresh bouquets in the vase.
Thus, making vases from plaster is quite easy; even a child can do it. Of course, under adult supervision. The main thing is to show imagination and the desire to get an original vase.
Main advantages of cement products
Making a vase from cement and fabric with your own hands allows you to realize the most unusual fantasies, which will highlight the design of the site and give it originality and exclusivity.
The material is quite resistant to changes in temperature, humidity and other atmospheric phenomena. Plants planted in such a pot will have a beautiful, well-groomed appearance, this will ensure a complete absence of weeds. Thus, you can create entire flower beds or flower beds from a certain class of plants. By following the correct technologies for making cement flowerpots, you can achieve strength and a long service life. Original items decorate garden plots, areas at the entrance to the premises, verandas, gazebos, and flower beds. After manufacturing, drainage is placed on the bottom of the vase, soil is filled in, and plants are planted. Larger products are immediately installed in a permanent place, as they are difficult to move. Small vases complement the design style of the garden plot.
Solution for making outdoor garden vases
Peculiarities
We will talk about products that imitate stone - they are the ones that look the most stylish and can last a long time. Carving out a stone flowerpot is very time-consuming and difficult, and the costs will be high. It is much easier to cast a vase using cement or gypsum mortar. Successfully decorated, it will look no worse than stone.
The form into which the solution will be poured can be purchased ready-made - they are sold. Or use available materials for this purpose: boxes, plastic buckets, large tin cans. More about this below. By the way, we will talk about technology that does not require the use of a form at all.
- For a long service life, you should select high-quality cement for the solution, which provides sufficient water resistance (after all, an outdoor vase will have to successfully withstand more than one winter and summer).
- Gypsum products are treated with a moisture-proofing compound.
Read below about how to make a solution from cement and concrete, plaster for such vases, sculptures for the garden.
Don't know what type of vase to choose for your garden? Then watch the following video carefully: