Consumables and tools
To build a foam concrete bathhouse, you will need to prepare the blocks themselves in the required quantity.
It is better to take material with a reserve, since during the work there may be rejection. Other materials will also be required:
- cement, river sand and water - for laying on a cement-sand mortar;
- dry glue in bags - for laying on an adhesive composition;
- reinforcement bars;
- wire for reinforcement;
- sewer pipes;
- fasteners: nails and screws;
- metal corners;
- windows and doors;
- Decoration Materials;
- materials for thermal insulation and waterproofing;
- antiseptic;
- wiring and lighting fixtures.
The tools you need to prepare are:
- drill with mixer attachment;
- buckets for mortar and glue dilution;
- Master OK,
- wide spatula with teeth;
- rubber mallet;
- hammer;
- perforator;
- roulette;
- building level.
Stone laying: direct execution of work
Before building the wall, moisten the stones with water and sort them so that they match in size and shade, and set aside the largest ones so that they fit right through and perform the main binding function.
Apply a layer of lime mortar to the frozen foundation, which should be at least 2 cm, and place several large binding stones on it, and others between them, trying to lay them as densely as possible. Now, using the same principle, you can make another layer, but try to always place the connecting components in different places to make the masonry stronger.
But before proceeding with subsequent layers, it is necessary to make a wooden template at the ends of the proposed structure. This way you will get a completely even masonry. To do this, use smooth boards. The stand itself has the shape of a rectangle with jumpers along the diagonal. The width of the rack is equal to the width of the wall, and the height is equal to its height. A cord is pulled between the side ribs of the rack. It should be attached so that it can be moved freely, moving to each subsequent layer.
To be more confident that each stone will fit securely in exactly its place, you can first lay the stones without mortar, trying to move in small sections in order to remember the position of the components of the future wall. It should not be forgotten that the seam between the stones in the lower layer should always be covered by a whole stone of the subsequent layer. And only then can you make finishing masonry with mortar. The amount of solution should not be too large, as it breaks down faster, making the entire structure less reliable.
Sometimes it happens that some stone does not fit tightly enough into the masonry. In this case, use wooden wedges, driving them into the resulting hole, which is subsequently filled with mortar, but only after the main masonry has dried.
The need to tilt the front or rear wall of the structure also depends on the pressure expected on the wall body. In natural relief areas, stability is ensured by the mass of the soil and the wall itself. In this case, the structure is rigidly buried and is considered elastic. In addition to stone, including cobblestone, brick and concrete walls, elastic structures also include structures that used dry masonry, gabion and rye walls. For such structures, the height of which does not exceed 1.5 m, the slope of the front edge of the wall can be minimal (10-15 degrees).
The rear angle can be determined using the formula:
tg e = (b - t)/h (1),
- e is the angle of inclination of the calculation plane to the vertical;
- b is the width of the foundation base;
- h is the distance from the soil surface to the base of the foundation;
- t is the wall thickness.
The angle of inclination of the calculated plane to the vertical e is determined not more than (45° -j /2), where
j is the angle of internal friction.
Thus, the angle of inclination of the wall can also be approximately determined by the formula:
Moreover, the found indicator will differ for different types of soil: for sandy soil - from 26 to 40, for clayey soil - from 18 to 30.
The finished retaining wall in your garden or dacha must be cleaned of excess lime. Use a wooden scraper first, then a brush and sponge. Clean the finished structure with water, and not with chemical solutions, which can change the color of the stone or even deform it.
Retaining wall
The reason for building a retaining wall is usually an area with differences in height. But even if you have a flat landscape, the wall will make it not boring. You can build it yourself.
Brick, wood, natural stone, concrete, as well as various combinations thereof, are suitable for building a wall. Let's give the structure a beautiful bend. Let's decorate our creation with ceramics, pebbles, shell rock, and plant it on top and along the plant. The highlight of the garden is ready!
Construction of a fence
When the material has already been purchased, you can begin the process of constructing the structure.
In order for the construction of the fence to end with the expected result, you should act in the correct sequence, paying due attention to every detail. The sequence of actions is as follows:
- Construction of the foundation.
- Then the pillars are installed, which will be the load-bearing part of the frame.
- The next step is laying down the cinder blocks.
- The last and final stage is finishing the foam blocks.
The process of constructing a cinder block fence is similar to the procedure for constructing a brick fence. However, due to the fact that foam blocks have less weight than brick, there are still some differences.
Foundation
The weight of cinder block fences is small, so making a foundation for the fence is quite simple. The process is carried out in the following order:
- First you need to make a dig so that a hole is formed in the ground where the foundation for the pillars will be installed. The depth of the excavation should be approximately 20-25 cm. The width should be equal to the width of the cinder block.
- The resulting depression is generously filled with sand. Sand should cover the entire bottom.
- Water is then poured on top to give the sand a hard texture.
- If the decision is made to make a pile foundation, then grillages are installed.
- The next step is laying the profile pipe; it is screwed into the grillage by 2-2.5 cm.
- Horizontal reinforcement of the foundation is carried out using wire rod. The diameter should be 8-10 mm.
- The foundation should not be more than 10 cm above ground level.
- To strengthen the foundation, at the last stage the surface must be treated with a material that has waterproofing properties. Most often this is bitumen.
Laying the plinth and installing the pillars
After the foundation construction process is completed, you need to proceed to the next step.
This process can also be done with your own hands, the main thing is to act one by one. The sequence of work is as follows:
- First you need to lay a seismic belt made of reinforced material.
- The pillars are installed using formwork technology, which is a permanent structure.
- The outer part must accommodate elements of foam blocks.
- In order to add durability and strength to the fence, reinforcement is also inserted in a vertical position. The beams are then filled with a concrete mixture.
Laying fence posts made of foam blocks
Laying cinder blocks
The process of laying foam blocks is elementary. It is enough to simply glue the blocks step by step, maintaining the composition planned in the fence design. It is better to lay the first layer of cinder blocks on a layer 2-3 cm thick of the mixture, while the subsequent ones are easily fixed on a thin layer of adhesive solution. The video shows the process of laying cinder blocks into a fence.
Finishing
When the masonry process has come to an end, you should proceed to the final stage - finishing. In this mission you should also act in turn:
- First, the surface of the foam blocks must be primed.
- When the primer has dried, you need to cover the fence with fiberglass mesh.
- The next step is plastering.
- Then the prepared coating is finished with the finishing material selected at the planning stage.
Option for finishing a fence made of foam blocks
Fence installation steps
The fence must be strong and reliable, so it is important not only to choose the right material, but also to carefully consider each stage of construction.
Installation of a fence made of aerated concrete blocks consists of three stages:
- Foundation installation;
- Construction of a fence;
- Exterior finishing.
Let's take a closer look at each of them and identify the key points at each stage of work.
Foundation
The construction of the foundation for an aerated concrete fence proceeds according to the following algorithm:
- Mark the area of the future fence and places for posts (2-3 meters from each other);
- Along the marking, dig a ditch half a meter wide and 50 to 80 cm deep (50 cm in dense soil, 80 cm in a wetland or unstable loose foundation);
- At the places where the pillars are installed, widen and deepen the ditch by 50 cm;
- Place a cushion of gravel and sand in the resulting holes - the layer thickness is about 20 cm;
- Install vertical pipes and check their levelness. Insert plugs into the pipes to prevent water from entering there.
- The space remaining after installing the pillars should be filled with stone or coarse gravel and filled with concrete mortar;
- Prepare and install permanent formwork around the perimeter of the future foundation; you can use sheets of plywood, pour crushed stone into the resulting space and fill it with concrete mortar;
- Leave the structure to dry for 7 – 10 days; to protect it from moisture, you can cover it with polyethylene;
- After the foundation has dried, it is necessary to carry out waterproofing; for this, the surface is covered with a special mastic and roofing felt is laid.
Laying aerated concrete blocks
Depending on weather conditions, concrete structures gain full strength after 3 weeks, so it is important to begin further work no earlier than this period. Failure to comply with this rule may lead to the fact that the foundation will not support the weight of the fence and will bend or crack.
For installation work you will need a special adhesive solution for cellular concrete, cement-sand mortar, reinforcement and a spatula.
Block laying process:
- Clean the surface of the foundation from dust and dirt;
- Apply 20 mm thick cement mortar to the base;
- Lay out the first row of blocks. It is necessary to constantly check the horizontality of the blocks;
- Columns are laid out around the previously installed pipes, aerated concrete blocks for the fence posts are installed with a dressing of one and a half blocks, the first and subsequent rows of aerated concrete blocks are placed there;
- Lay reinforcement - a rod with a diameter of 6 mm is used as reinforcement; it is stretched between the fence columns and firmly fixed there;
- Lay the second and subsequent rows until the desired height is reached, glue is applied for fastening, the layer thickness should not exceed 3 mm;
- Strengthen fence posts made of aerated concrete blocks by pouring concrete mortar into the space between the pipe and aerated concrete blocks;
- Cover the upper part of the fence with tiles or profiles to protect it from moisture.
The first and third rows of blocks are reinforced.
To build a fence without installing posts, it is worth using solid blocks and reinforcing every few rows.
Finishing work
Finishing is one of the most important stages of installing a fence; it not only gives a finished look, but also protects the fence from premature destruction.
For the external finishing of the aerated concrete surface of the finished fence, the following materials will be needed: deep penetration primer for cellular concrete, reinforcing mesh or fiberglass mesh, plaster for aerated concrete.
- Clean the base from dust and oil stains (if any);
- Cover the entire surface with a primer solution;
- Install reinforcing mesh;
- Apply the plaster in two layers, after the first has dried, the surface is primed again, the thickness of the second layer should not exceed 10 mm;
- After the plaster has dried, the base must be carefully primed; it is better to use solutions with a waterproof effect for additional protection from moisture;
- A special impregnation is applied to the resulting surface, which protects it from external influences. If desired, the fence can be painted.
When using decorative aerated concrete blocks, a primer and varnish or hydrophobic impregnation are used for finishing.
Features of the material
If the owner of the plot decided to build a fence from foam concrete, he understands the features and nuances of the material. Foam blocks have found application not only in the construction of fences, they are also used for the construction of houses and additional structures on the territory of the land plot. To create blocks, manufacturers perform the following steps:
- They take synthetic materials, the reaction of which produces foam.
- The dense foam obtained from mixing the above materials is combined with Portland cement. And also with raw materials such as lime.
- After combining the elements, the resulting mixture is poured into special cassettes, in which the blocks take their final shape.
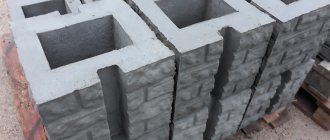
This is what cassettes for casting foam blocks look like
Design and arrangement of cassettes for pouring foam blocks
Due to the fact that the blocks are created from a base that is organic, the material is recognized as environmentally friendly and harmless to human health.
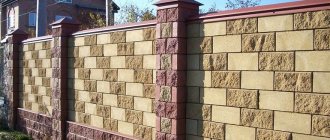
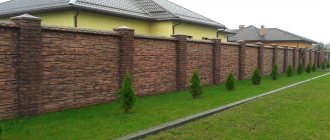
Aerated concrete fence
On the construction market, each owner of a private plot will select materials with which to build a fence enclosing the site. An aerated concrete fence is a popular choice among those owners of private houses who prefer reliability, safety and aesthetics when it comes to landscaping their territory.
Design and appearance of a fence made of aerated concrete blocks
Types of material
Aerated blocks are divided into varieties according to different parameters. Thanks to a wide range of blocks, each property owner will choose the material option that suits them. It is worth noting that gas blocks are divided according to the following parameters:
- Groups of aerated concrete material.
- External characteristics of blocks.
- According to the composition of the mixture from which the material is made.
- By type.
- And also on options for constructing a fence from aerated concrete.
Each of the above characteristics is important when choosing material for the construction of a fence enclosing the territory of a private plot.
The process of laying an aerated concrete fence
Material groups
Aerated concrete blocks are presented on the market in two variations:
- Hollow. Most often used for building fences. The choice falls on this type of blocks due to their low weight, and also, due to their ease, installation is possible without the help of specialists. Also, hollow blocks are chosen to arrange the territory efficiently and aesthetically. For example, the cavities accommodate cables from street lighting devices, as well as various types of communications,
- Full-bodied. This material is also popular in construction. As a rule, it is used for building walls of houses and erecting structures on the territory of a land plot. In the construction of fences, this material is somewhat inconvenient, because construction will require hiring builders and renting construction equipment.
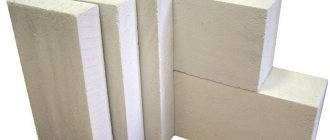
Size of solid aerated concrete block
External characteristics of aerated concrete blocks
Many owners are mostly concerned with the appearance of the material. This is not surprising, because it is this fact that directly determines how the fence will look at the stage of completion of the work. According to this characteristic, aerated concrete blocks are divided into two types:
- Those who want to make a standard fence, without frills and design ideas, choose smooth material. These are ordinary blocks that fit closely to each other and have a strict, uniform appearance. In addition, after the construction of smooth blocks, additional finishing of the material will be required to add aesthetics and beauty.
- Connoisseurs of territory design incorporating design ideas for fences and unusual structures into the open spaces often pay attention to decorative aerated concrete blocks. This material looks unusual and modern on both sides, both external and external. Using such blocks you can build a fence that does not require additional finishing or processing. Naturally, such material differs in pricing policy from smooth aerated concrete blocks.
Return to contents
According to the composition of the mixture from which the material is made
The mixture from which the blocks are made also differs in composition. The most commonly found aerated concrete blocks on the construction market are:
- crushed stone,
- slag,
- expanded clay,
- gravel,
- crumbs of concrete or brick.
In addition to the above materials found in the composition, the following is also added to the mixture:
- dyes of different colors,
- plasticizers.
In any case, before going to a hardware store, you need to decide which composition of aerated concrete blocks is most relevant for purchase.
Also, aerated concrete blocks are divided into types of design, they are:
- One-sided, in this case the attractive aesthetic appearance will only be on the outside of the fence.
- Double-sided, in this version, the fence has an attractive appearance, both from the inside and from the outside.
Example of a double-sided aerated concrete block
According to construction options
Also, fences made of aerated concrete blocks are divided into types according to which the construction of the structure is carried out:
- fences can be open when there are gaps and open areas in the fence structure,
- Also, depending on the type of structure, there may be closed fences. The name itself speaks for itself; these are blank high fences, without various decorative compositions.
Advantages of aerated concrete fences
A material such as aerated concrete blocks for the purpose of building a fence has many advantages, due to which owners of private plots rely on this material. The advantages are as follows:
- The material is resistant to external influences. Aerated concrete blocks are not susceptible to rotting and other destructive factors.
- Easy installation is also a significant advantage. If you rely on hollow material, then the owners will be able to carry out the process of erecting a fence with their own hands, without the help of specialized specialists.
- Aerated concrete blocks can easily withstand temperature changes. They also have high resistance to high temperatures. Because of this, such a fence has fire safety properties.
- It is worth noting that aerated concrete blocks have high strength.
- The lightness of the material is also a significant factor.
Aerated concrete block with dimensions
Existing types of aerated concrete blocks
Disadvantages of aerated concrete fences
The list of positive qualities of aerated concrete is quite significant, so you can immediately go to a hardware store and purchase the material.
However, in order to rationally weigh the decision, it is still worth familiarizing yourself with the disadvantages. These are:
- Fragility of the material.
- Increased moisture absorption.
- Low thermal conductivity.
If you purchase high-quality materials from a reliable manufacturer, the disadvantages may be minimal.
Fence installation
When the owners of the private sector have finally decided and bet on a fence made of aerated concrete blocks, they should begin alternate installation steps:
- First you need to build a foundation for the fence. To do this, you need to dig to a depth of 50-60 cm. As for the type of foundation, for a fairly light material - aerated concrete, a pile foundation is quite sufficient; for reliability, it can be secured with a grillage.
- After the foundation is ready, metal pipes should be installed, placed in a vertical position. Their diameter should be approximately 4 mm. The distance between pipes should be no more than 2 m.
- The next step is laying aerated concrete blocks. The process is carried out using bitumen mastic, then roofing material is laid on top of the mastic. Then the pre-purchased blocks are laid one by one on top of the composition. The first layer is laid on a mortar, which is 2 cm thick, while the remaining rows are attached to a mortar, the thickness of which varies from 2 to 3 mm.
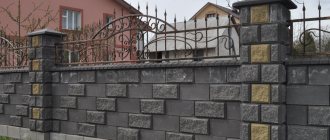
Scheme of the design and installation of a fence made of aerated concrete blocks
An example of laying tiles on a fence made of aerated concrete blocks
Plastering a fence made of aerated blocks
An example of finishing a fence made of aerated concrete blocks
By carrying out all the steps one by one and choosing the right material, you can be sure that the fence structure will last for many 50 years, and if the raw materials are of high quality, then even longer.
What buildings can be added to?
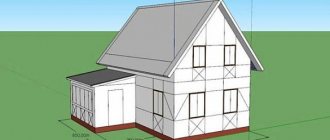
Making extensions from foam blocks is suitable for all types of houses, including wooden ones. What is especially important here is the age of the house, the condition of the walls and the structure of the main foundation (type), with the help of which the added meters of additional rooms will be connected to the main building.
Experienced builders do not recommend starting an extension if the building is a new building. It is best to wait six months for the new building to shrink, and only then build an extension. According to the technical characteristics, the house to which the structure will be attached must be in satisfactory condition and subject to operation.
Foam blocks are a good building material. With their help, you can lay an extension, as it has a number of positive qualities (density, strength, durability), has a cellular structure and is represented by several types of blocks (structural and thermal insulation), which can be used in two installation circuits.
Foam concrete blocks are lightweight, so work with them is carried out in a very short time (and this is very ergonomic). In addition, they are inexpensive building materials, and the façade built with them can be decorated with any finishing.
Preparation for construction should include:
- mandatory project development,
- obtaining a technical passport for the constructed meters,
- carrying out architectural calculations,
- meeting the requirements for the supporting base.
Advantages of a foam block fence
Using cinder block to build a fence is popular today due to the many advantages of this material. These are:
- The weight of the foam block is small, so the elements of the material can be lifted and installed in their places by the owner, without the help of third parties;
- Foam blocks for fencing have a durable structure due to their low density and thermal conductivity;
- A cinder block fence will protect the area from excessive noise;
Scheme of laying a fence made of cinder blocks
- Many are attracted by the pleasant pricing policy for the material. In addition, those who rely on using cinder blocks to build a fence will save significantly on glue;
- Cinder block has high fire-resistant properties;
- The material can withstand sudden temperature changes with dignity, and also easily adapts to different climatic conditions;
- Another significant advantage is that installation of cinder block material is elementary. The installation can be carried out even by someone who has never encountered such types of work;
- Foam blocks combine well with other types of material, so with their help you can safely turn the ideas of combined fences into reality.
These are not all the advantages of the material. In fact, there are many of them, and each owner of a land plot will be able to determine for himself which characteristics to focus on.
How to do it yourself?
Let's consider the manufacture of several types of slatted fences. All of them are easy to install and do not require preliminary preparation.
From corrugated sheet
A fencing made of corrugated sheets (another name for a European picket fence) will improve any area. Even a novice, inexperienced in construction work, can build a stylish fence with his own efforts. This fence is done very quickly and looks neat.
Installation is carried out in accordance with several recommendations.
If the components are disassembled, it is strongly recommended to assemble the sections according to the instructions.
The slats are attached at a distance of approximately 7 cm from each other.
The necessary materials for work must be prepared in advance. Clamps, screws or rivets can be purchased at any hardware store.
A corrugated fence includes a standard installation procedure
Particular attention should be paid to the installation of supports - they must be properly strengthened and located at the same level.
Sections and crossbars are attached to the supports, taking into account the design features. They are assembled from slats.
Fence slats can be assembled in any form: horizontal or vertical.
Made of wood
A fence made of wooden slats is called a picket fence. This design is easy to install. For slatted fencing, it is advisable to select lumber from trees such as pine, cedar or spruce. The design will last a long time, which is a significant plus. The wood must be free of knots and of the same color.
Installation is carried out in several stages.
- The first step is to align the line where the fence will be installed.
- In the corners where the end of the fence will be, you need to install pillars and stretch a rope between them.
- Between the supports along the line where the markings were made, it is necessary to install steel piles. On average, the installation depth of each support should be 1 m, and the width should not exceed 2.5 m.
- When the posts are installed, the horizontal crossbars should be attached next. You can simply nail them to a pole.
- Fence sections are selected depending on the size of the spans. They need to be fixed between the support pillars.
- Modular slatted fences include special grooves in their design - sections are inserted into them very simply, like in a construction set.
Made of metal
Metal fencing looks very impressive. It is installed in a variety of positions. This fence is incredibly beautiful, it lasts a long time and can cope with any load. It only needs to be wiped from dust periodically for aesthetic beauty.
The procedure for installing a metal fence.
- The steel strips are covered with several layers of protection (with this manipulation the material looks even more beautiful).
- The first thing you need to do is mark up. To do this, wooden pegs and ropes are used in the work.
- The pegs must be driven into the ground in the place where the supports are located, and then a rope must be pulled between them (similar to installing wooden slats).
- Rectangular or square pipes are welded to the posts. If the fence is high, you will need 3 logs.
- The metal picket fence can be fixed with galvanized self-tapping screws: each rail is attached on both sides to horizontal joists. For 3 joists you will need 5 screws, if there are fewer of them, for example, 2, then 4 screws will be enough for one plank.
You can create an enviable fence with your own hands. The most common types of fences are made of wooden picket fences and solid ones. Owners of suburban areas are attracted to these types because of the ease of installation and the possibility of making a fence in any style. A picket fence does not completely cover the area - do not forget about this. If you are not used to the looks of others, it is better to choose a solid one.
How to build one of the fence options from slats, see the video.
Tools and consumables for work
To install a pediment made of cellular concrete, the following consumables and tools will be needed:
- Structural autoclaved gas blocks of rectangular and U-shape of the selected size, with a density rating of D500 and above.
- Plumb line, level (regular or laser), construction cords, wooden beams (for marking).
- Screwdriver, drill, anchors, screws and other fasteners, nails, construction hammer, rubber mallet, aerated concrete float or grinder, hacksaw.
- Sand-cement mortar (dry components ready-made or separately - cement grades M400-M500, river sand, crushed stone or gravel, plasticizers) for the 1st layer.
- Glue or foam for the 2nd and subsequent layers.
- Trowel, spatulas, construction mixer, containers for solutions.
If a person does not build a building with his own hands, then the construction company with which he draws up an agreement will provide the consumables itself, according to the estimate. Any company also has construction working tools.
Cost of work
In the Russian Federation, when calculating an extension made of foam blocks, attention is paid to the area of the project, the quantity of all materials used (consumables - mortars, glue, cement, sand in kg, etc.; reinforcement), the use of architectural and construction services (human resources). In 2021
1m3 of foam concrete blocks is 2500 rubles.
The cost of work in cities of the Russian Federation, taking into account all the nuances, can be:
| City (region) | Price in rubles (per 1m2) |
| Moscow | 2 000 |
| Krasnodar | 1 500 |
| Novosibirsk | 1 800 |
| Khabarovsk | 1 000 |
| Nizhny Novgorod | 1 700 |
It is more profitable to order construction services from a company because its specialists are independently able to develop a project, register it, purchase materials, draw up an estimate and provide a guarantee for the work performed.
In addition, qualified builders will lay foam blocks strictly according to technology, without violations or errors. Contacting specialists saves the customer’s time.
Fence installation
Cinder blocks for fencing
When laying a fence from foam blocks, we, first of all, try to provide it with strength characteristics and, of course, an aesthetic appearance.
- For fences, it is more rational to use inexpensive blocks of the D500 brand - with medium density.
- And remember, the denser the foam concrete, the more durable this entire structure is.
- However, structural foam concrete brand D700 already has a higher price and considerable weight, requiring the construction of a special base - a strip foundation.
How to build a cinder block fence
We can build a beautiful and durable fence ourselves, knowing the basic technology of simple masonry, plus the maximum of our efforts.
We will need:
- mold - for making several cinder blocks at the same time or several small molds, which we make from three-millimeter metal: just weld a box with handles, but without a bottom;
- several blanks or simple glass bottles to form voids, reducing the weight of the structure and its cost;
- a solution of cement, sand, slag - the instructions guarantee the strength of the mixture 1: 3: 5 (note that expanded clay is also suitable instead of slag);
Now we are ready to build a cinder block fence with our own hands.
Laying cinder block: price for work
Fence made of gas blocks
Any happy owner of his own private house sooner or later faces the question of erecting a fence. I want it to be not only reliable and solid, but beautiful. Today, a fence made of foam blocks and gas blocks is one of the most suitable options; it satisfies all quality and aesthetic requirements.
Why aerated concrete
There are many variations in the construction of a good fence, the main range of materials that are presented to the buyer are corrugated sheets, bricks, metal structures, cellular concrete blocks of various types and types, and less often wood.
Ceramic brick
The first thing that attracts with its solidity and solidity is, of course, brick. At all times, high-quality structures have been erected from it, but there is a small “but” - this is an almost sky-high price not only for the material itself, but also for labor, and the weight of such a fence will be rather considerable. Again, you will have to spend money on a more solid foundation.
Thanks to modern technologies and various machines, it is possible to build a fence out of wood, not just a good one, but a truly masterpiece. However, the owner of such a fence needs to know that wood, even treated with various special solutions, will require repairs within a couple of years.
Metal structures
A metal fence is reliable and impenetrable armor, but it is quite lumpy and not neat. If you choose the forged version, you will need to come to terms with prying eyes.
Corrugated sheet
Cheap and cheerful - this is a statement about a fence made of corrugated sheets. The level of security of such a fence is high, but the aesthetics leave much to be desired.
Lightweight concrete products
For the construction of fences, the buyer can choose from 2 types of cellular blocks: foam concrete and aerated concrete; we can talk for a long time about their advantages and remarkable characteristics. The best option for fencing is gas silicate products; they will make a fence more durable than foam products. Aerated concrete is more susceptible to the destructive effects of moisture than its cellular relative, however, with high-quality waterproofing, this problem is completely solvable.
As for durability, having purchased high-quality aerated concrete, you can fully count on its service for more than a decade. The costs of such blocks will be reduced significantly not only due to their low cost, but also to their impressive size, with the help of which a beautiful and reliable fence will literally grow before your eyes.
Construction stages
- Any construction begins with the choice of material; for a fence, a more acceptable option would be blocks that have dimensions of 50 * 60 * 17.5 cm.
- The foundation for such an aerated concrete structure is quite suitable for a pile, fastened with a grillage; for vertical reinforcement, you can use an ordinary pipe with a diameter of 4 mm, which is mounted into the grillage every 2 meters. For horizontal reinforcement, ordinary wire rod d = 8 mm is suitable, which is laid through each row.
- Having laid the foundation, it must be thoroughly waterproofed, after which the main masonry can begin. The first row of blocks, for more thorough fixation, are laid on ordinary mortar, all subsequent ones on glue-cement. It is imperative to follow the rules for ligating blocks.
- Having built it to the required height, a seismic belt is laid on top of the fence; its construction is no different from installing a conventional armored belt on aerated concrete masonry.
- The columns for the gates were embedded in the base.
After this work, you can begin waterproofing the walls of the fence; it is carried out by priming in several layers with a special liquid solution suitable for these purposes. After the waterproofing has completely dried, a chain-link mesh is glued onto the walls for subsequent finishing, and plaster is laid on it. After which, the surface is treated with a hydrophobic primer.
Having chosen gas silicate products for construction, do not forget to provide high-quality waterproofing, otherwise this entire reliable structure will not delight you with its beauty and reliability for long.
Making the foundation
We will build a house on a strip brick foundation. The design is extremely simple: the bottom is made of concrete, the top is brickwork. To achieve the proper strength of the foundation, experts recommend immediately laying the bricks on cement mortar, and not filling the cracks in the masonry with it later, as some self-taught craftsmen advise.
Foundation structureCompared to its concrete counterpart, brick construction is characterized by higher thermal insulation properties. If properly installed, it will last 50 years or more without requiring repairs. Directly repairing a brick strip foundation comes down to the banal replacement of damaged areas, which is also very convenient.
Digging a trench
Dug pit We carry out markings taking into account the dimensions and configuration of the future structure. After this, we remove the top layer of soil throughout the site.
We dig a trench of the required depth. If the soil is heaving - below the freezing point. In other cases, a hole about half a meter deep is enough.
We select the width of the holes taking into account the soil moisture in the area: the higher it is, the wider the trench we make. In areas with particularly high humidity and groundwater close to the surface, drainage will be done. In view of this, the width of the trench should extend approximately 100 cm beyond the outer boundaries of the building.
We fill the bottom of the hole with a 15-centimeter layer of sand, spill it with water and compact it.
Foundation laying process
Making formwork
Unplaned boards and other similar materials are suitable for formwork. The height of 10 cm will be enough. Make the width of the formwork half a brick larger than the width of the base.
We lay waterproofing material in the formwork. Ruberoid works well. It will prevent moisture from the soil from rising through the concrete to the bricks.
Pour concrete to the height of the formwork and let it dry a little for 3 days.
Building the foundation
Laying bricks
Let's start laying bricks. We work using any standard dressing. In total we will lay out 4 rows. For an average house made of foam blocks, the power of such a foundation will be sufficient.
Between the 1st and 2nd rows of bricks we place a reinforcing mesh. We also lay the reinforcement on top of the last row of the base.
Foundation
We do waterproofing
We insulate the foundation walls using adhesive or coating material. Bitumen-based waterproofing is best.
Waterproofing
We insulate the foundation
If desired, you can insulate the outer walls of the foundation with foam plastic, and then fill the trench with crushed stone or sand.
Prices for thermal insulation materials
Thermal insulation materials
We arrange drainage
In areas with particularly wet soil, drainage must be installed.
To do this we do the following.
House foundation drainage
First step. We cover the bottom of the trench between the walls of the foundation and the pit with geotextiles.
Second step. Pour a layer of crushed stone on top of the geotextile.
Third step. We lay perforated pipes on the crushed stone at a slight angle.
Fourth step. We cover the pipes with geotextiles and fill them with crushed stone.
Fifth step. We fill the structure with sand layer by layer. Carefully compact each layer.
The pipes are diverted into pre-equipped drainage channels or wells.
Foundation drainage
Step-by-step DIY construction instructions
When all the materials are ready and the stone has been purchased in the required quantity, you can begin work. To do this, it is recommended to follow the instructions:
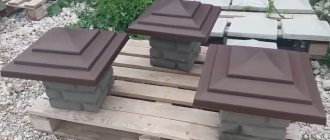
- Construction of the foundation. The best foundation option for a cinder block bathhouse is pile or strip.
Since cinder block is too hygroscopic, the foundation should raise the walls of the sauna at least 50 cm from the ground.
Be sure to use waterproofing material before building walls.
To arrange a strip foundation, markings are carried out, soil is excavated, a drainage cushion is poured and compacted. Then formwork is made and concrete is poured.
- Walling. After the foundation has hardened and dried, the walls are erected. Determine the highest angle and start laying from there. Initially, pull the cord and make markings. The solution is placed on the foundation itself and passed over it with a notched trowel or a special carriage. Place a block on top, leveling it slightly with a mallet.
- Construction of the roof. First, they make ceiling beams from timber, then attach the rafters. It is better to assemble the system on the ground, then lift it up. At the final stage, the sheathing is done and the roofing material is laid.
At the last stage, external and internal finishing is performed. After this, the bathhouse can be equipped from the inside.
A fence made of aerated concrete, as well as fences made of foam blocks with your own hands.
Aerated concrete is a completely universal building material that is suitable for almost any construction. You can use autoclaved cellular concrete to build external and internal walls of a residential building, garage, or bathhouse. It is also often used in the construction of fencing around the house. For example, a fence made of aerated concrete is another option for the rational use of building blocks. Unlike brick, foam concrete, corrugated sheet, metal or wooden fencing, a fence made of gas silicate blocks has a number of advantages. These include: 1) light weight of aerated concrete, 2) durability of operation, 3) low price of aerated concrete, 4) fire resistance of the material, 5) ease of masonry work.
Since aerated concrete is light in weight, the foundation for a fence made from it will not be expensive. It is enough to make a recess of 0.5-0.6 m to build a two-meter fence from Aerok aerated concrete blocks with a density of D300. For example, for brick fences, the foundation needs to be deepened into the ground by 1-1.2 m.
A fence made from foam blocks will also be less profitable and will require significant expenses for the foundation and a large amount of cement-sand mortar. Since foam concrete is a very heavy material, to build a fence you will have to overpay for its delivery.
Wooden fences have a high price and require treatment with special chemical solutions, and after 10-12 years they will definitely require repairs. It is worth noting that wood is far from a cheap material, so today not all builders will be able to afford a high-quality wooden fence.
A wrought iron fence can have a unique design that will emphasize the status of the owner. However, wrought-iron fences will not visually close the space of your yard from prying eyes.
Aerated concrete fencing is characterized by high strength, minimal consumption of adhesive mixture and a guaranteed service life of over 50 years . The only vulnerable point of aerated concrete is exposure to moisture, from which it should be protected with high-quality waterproofing. To solve this problem, special plasters, putties and paints are sold.
To build a fence from aerated concrete, you need to buy porous blocks with dimensions of 250x200x600, 300x200x600 or 375x200x600 mm. It is advisable to take the density D300/D400. Among the manufacturers, we advise you to pay attention to Aerok gas blocks, whose characteristics guarantee frost resistance at the level of F100 freeze-thaw cycles.
Considering that the total weight of one cubic meter of aerated concrete fence wall will be 510 kg , then in this situation a pile-type foundation (additionally secured with a grillage) is quite suitable. To strengthen the structure vertically, use pipes with a diameter of 4 mm. They should be installed in the grillage every 2 m. Horizontal reinforcement is carried out by installation through each row of gas blocks of standard wire rod with a diameter of 8 mm.
Having made the foundation, proceed to create a waterproofing layer: 1) open the surface with bitumen mastic, 2) lay 2 layers of roofing felt on top, 3) protruding edges of roofing felt - do not cut them off, but bring them down and press them with vertical waterproofing. Gate posts are embedded in the base.
Now you can start laying aerated concrete. The first row is laid on a cement-sand mortar 2 cm thick. All other rows are laid on an adhesive mixture 2-3 mm thick.
Having completed the fence to the planned height, begin laying the seismic belt (the technology is similar to creating a conventional armored belt). Tiles are laid on top of the seismic belt.
At the end of the construction of the fence, its surface must be covered with aerated concrete primer, fiberglass mesh is installed and facade plaster is applied.
Step-by-step instructions for DIY construction
The construction of the fence consists of several stages. If you follow the instructions, the fence will be strong and will last for more than 50 years.
Creating a foundation
Aerated blocks are a material that does not tolerate soil movement and moisture. The foundation for this structure is necessary, first of all, to protect the material from bending, which causes cracks to appear.
The fence is long, there are differences in height, you need to protect the material from them and raise it above the ground level. Then the accumulation of water after precipitation will not be able to damage it. The foundation for aerated concrete blocks consists of two parts: piles and a concrete foundation.
How to build:
- Mark the area and mark the locations of the pillars.
- Dig post holes using a garden auger.
- Bury wood piles and check reliability. Concrete pillars should be filled with concrete (M200-250).
- Check the uniformity of the height of the piles and waterproof them.
- Remove the formwork and install waterproofing.
A reinforced concrete slab is a structure that is located in a trench 20-40 cm deep and rises above the ground level. In essence, this is a strip foundation, only smaller in size. It is suitable for blind fences made of aerated blocks and those in the construction of which heavy materials are involved (brick, stone, etc.).
Work order:
- Dig a trench. The depth depends on the type of soil, usually 20 cm is sufficient.
- Compact the bottom with purified clay and level it. Next, lay a layer of sand, overlapping geotextiles on the edge of the trench and the final layer of crushed stone.
- Place a reinforced mesh on top of the crushed stone.
- Install the formwork to the height of the foundation. It should rise 20-30 cm above the ground level.
- Pour the concrete, wait for it to dry completely, and periodically moisten it with water (period of 1 month).
- If the fence is small, it is not necessary to install posts.
The hollow pillars are covered at the top to prevent water and debris from getting inside. This must be done immediately after installation.
Masonry
Stages of work:
- Prepare the blocks, check the dimensions, clean them from dust and unevenness.
- Check the geometry of the foundation. Place the mooring beacons, pull the cord, measure the matching height for each section of the fence.
- The first row is placed on a cement-sand mortar; it will help align the blocks in height if discrepancies are found.
Adjust the elements with a mallet, place them along the mooring line, and check the horizontal and vertical lines with a building level. If necessary, cut down the row with a plane. The blocks are connected vertically with an adhesive solution. Wait 2-4 hours for the solution to gain hardness. The first row is the basis of the masonry; its geometry must be ideal so that all subsequent rows stand level. - The second and subsequent rows are laid on glue. The geometry of the masonry is checked each time; there should be no discrepancies. An ordering is performed, a shift of ½, ⅓ or ¼ of each element in the new row relative to the previous row. It looks like brickwork.
- Every 4th row is reinforced. A reinforced rod is laid inside the block and filled with mortar.
- The last row is reinforced with a belt; for this, U-shaped blocks are used. The belt is filled with solution.
Finishing
Externally, a fence made of aerated blocks looks dreary, but some owners create the finishing only on the front side, leaving bare material inside. Because of this, the area visually deteriorates, plus the material becomes susceptible to external influences. Therefore, work must be carried out on both sides of the fence.
Stages of work:
- After the fence has completely dried, the surface is treated with a primer.
- Level the surface with plaster.
- Reinforce with reinforced mesh.
- The final layer of decorative plaster, resistant to moisture.
Finishing materials can be anything to the taste of the owners. The main thing: mandatory waterproofing of the surface and a ventilation gap of 1 cm if brick is used.
Construction of a fence from aerated concrete blocks or how to save on bricks
Aerated concrete fences are popular among owners of private and personal plots.
They have all the advantages of continuous fencing, in particular dust and wind protection, complete concealment of the yard from prying eyes, durability, and strength. In addition, unlike brick, the material is inexpensive, and the speed of working with it, thanks to the large size of the blocks, is much higher. You can build such a fence with your own hands, but to do this you need to have the necessary set of tools, as well as the skills to create an even, durable structure. What is this article about?
Materials/tools
- The materials and tools required for foundation construction depend on the choice of foundation type and are presented in a separate article.
- aerated concrete blocks,
- masonry mortar,
- metal pipes for poles, cross-section 10 cm,
- trowel,
- electric saw, electric planer for processing blocks,
- waterproofing materials,
- level.
When choosing a base for an aerated concrete fence, factors such as:
- Significant weight of the overall structure,
- possible washing away of it by external or groundwater,
- soil and terrain features.
Any of the following types of foundations are suitable for construction:
- Pile-screw,
- Ribbon-columnar,
- Tape.
You can familiarize yourself in detail with the features of arranging the optimal foundation for a fence made of aerated concrete blocks in the corresponding article.
Installation of pillars
Installation of pillars is a very important stage of work. They will ensure high-quality ligation of spans necessary to protect the entire structure from collapsing, compensate for soil displacement, and also for the possibility of partial repair of the fence in the future.
They can choose:
- Screw piles with a monolithic grillage,
- square pipes 80×80×3,
- the most popular option is round pipes with a diameter of 10 cm, with a wall thickness of 3 cm.
The lower part of the column is treated with bitumen mastic. Then they are immersed to a depth of 0.8-1.5 m, depending on the type of soil. The gap between the pillars is 2-3 meters. The exact width of the spans is calculated based on the material parameters of the height of the fence.
The installation itself is carried out in pre-drilled tunnels, at the bottom of which 10-20 cm of gravel-sand cushion is poured. The pillars are placed strictly vertically.
The well around them should be lightly covered with crushed stone and filled with pre-prepared cement-sand mortar. Before carrying out the next stage of work, it is important to allow the solution to harden for 5–7 days.
The pipes must be closed with protective caps on top to prevent precipitation and debris from getting inside.
Laying aerated concrete blocks
Before starting masonry, care should be taken to waterproof the foundation, since aerated concrete tends to absorb moisture.
First of all, the racks are covered with pillars, in 1 row, in blocks. The seam is being bandaged.
The first row of each span should be laid on a cement-sand mortar with a joint thickness of 2 cm. In this case, you should first install the starting blocks on the sides of the pillars, this will make it easier to maintain the geometry of the masonry.
Each “brick” is carefully tapped using a rubber mallet. The additional blocks are cut to the required size. Upon completion of the first row, a marking cord is stretched between the pillars to control the level of subsequent masonry.
The second and subsequent rows have a seam thickness of 2–3 mm and are best laid with special glue. All of them follow inter-row dressing weaving.
In places where gates or other heavy structures are attached, prepare in advance mortgages welded to a metal post.
After the height of the fence has almost reached the required limit, a reinforced reinforced concrete belt is installed, with a slight bevel towards the street, on which tiles or any other material suitable for protection from atmospheric moisture should be placed.
Regardless of the choice of material, before installation, the surface of the fence should be cleaned and treated with a suitable waterproofing agent.
Next, the fence is covered with any finishing material that prevents the penetration of moisture:
- Any hanging products, for example, lining, siding (rarely used).
- Puttying.
- Plastering for painting. It is better to plaster on a pre-screwed painting mesh, this will help to effectively protect the structure from moisture penetration.
- A suitable species of bark beetle.
- Plastering under clinker tiles, decorative stone.
The capital construction of an aerated concrete fence can take up to 2 weeks. However, if all the work was done efficiently, it will serve its owners for many years.