Is it possible to fix a mirror in the bathroom without damaging the tiles?
In fact, this process is quite feasible. You can, for example, glue a mirror. It is important to do this discreetly. You need to understand that it is not the wall that serves as the place of fixation, but the surface of the finishing material.
In addition to the fact that a mirror in the bathroom has a practical function, this element is an indispensable part of the interior.
The strength and reliability of the fixation will depend on how firmly the tile (or other material) adheres to the wall. Another question is how to mount the mirror in the bathroom and what is needed for this. First things first.
By decorating a room with a mirror, you visually enlarge the space or create a feeling of volume.
Bathroom mirrors, selection and mounting
It is impossible to imagine the life of a modern person without a mirror - or rather, without many mirrors: in the bathroom, bedroom, dressing room, hallway, office hallway, etc. Hanging mirrors are perceived naturally and as a matter of course until the need arises to hang the mirror yourself. This is where you have to think, because the walls are different everywhere, and the weight of the mirrors can vary significantly. The biggest difficulties probably arise when you have to hang a mirror in the bathroom or on a plasterboard wall. Let's figure out how this can and should be done.
What tools and materials may be needed
The list of necessary tools and materials that will be useful during the work process will depend on the chosen fastening method. Let's consider methods that do not involve drilling or other types of surface damage. In this case, the following will be useful:
- glue (it is better to choose a universal one, polyurethane, silicone or hybrid for a wide range of actions);
- sponge or rag for wiping glue residues from the surface;
- degreaser;
- suckers.
If you glue the mirror using liquid nails, silicone, sealant (it doesn’t matter), you will need to prepare a stand that will hold the mirror while it dries for complete fixation.
Much depends on the material of the walls, the size of the mirror and other points that should be sorted out first.
Note! Despite the threat of damaging the tiles, many are still inclined to fasten them with self-tapping screws, screws, and bolts. This will allow you to move the mirror if necessary.
Glue selection
When choosing an adhesive composition, you need to remember the following requirements:
- the composition should not contain toxic substances that can harm the human body;
- good glue is not afraid of moisture and temperature changes;
- after drying, the original color of the mass is retained;
- the dried layer must be elastic;
- the composition fits well on a mirror surface;
- the finished mixture dries quickly.
Titan glue has good qualities. It consists of rubber and synthetic resins. The mirror can be installed on any surface: plaster, concrete, wood, plasterboard, brick. The color of the composition is beige. Complete drying takes 3 days. Not afraid of temperature changes or water.
The next glue is Loclite. It is a two-component composition: acrylic ester and activator. Before use, the mass is thoroughly mixed and then distributed over the surface of the glass from the back side. The finished mass fits well on the base, does not change color, dries quickly, and does not flow.
To attach the mirror to the wall, Abro glue, consisting of epoxy resin and hardener, is suitable. The transparent product dries within an hour.
“Moment Installation” is a moisture-resistant composition that can be combined with any surface: concrete, brick, plaster, plastic walls.
Ottoseal is an epoxy-based silicone compound. It has adhesion and resistance to temperature changes, and is not afraid of water. Used in rooms with high humidity: baths, swimming pools, bathrooms. Reliably fixes products on ceramic surfaces without damaging the amalgam.
Soudal 47A is a solvent containing adhesive. Used when working on concrete, brick, ceramic, porcelain stoneware and plastered surfaces.
Basic fastening methods
There are dozens of methods to securely mount a mirror on a wall. There are those that have been in use for decades, while others are more recent and appeared as a result of filling the market with new products. Let's look at the most popular methods.
If you need to hang a mirror in the bathroom, then first of all you should decide on its location.
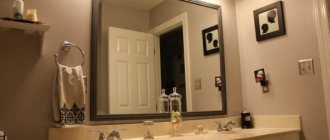
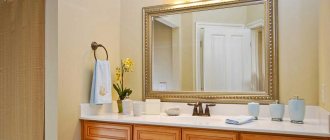
Holders and frames
The design of most mirrors requires holes or hinges for mounting. You can find them on the back wall. Holders are the elements that hold the mirror suspended.
Special fasteners for glass and mirrors allow you to mount them on the wall without drilling (the mirrors themselves) or other damage.
They can be presented:
- in the form of hooks;
- clamping type (with hardware holes and placement outside the mirror perimeter);
- under the screws, inside the perimeter of the mirror (hidden type).
The point type of holders has proven itself best in practice. True, you still have to prepare holes for the screws.
Holders are the most convenient way to attach large mirrors to tiles.
Using glue
One of the most common methods is glue. It is important to choose the right composition. After all, it should be able to fix smooth surfaces and not cause harm to them. In addition, you will need to follow some recommendations:
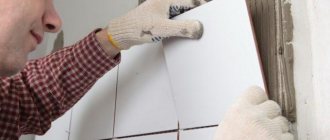
- the tiles must be fat-free;
- the grout must be treated several times with a primer (layer-drying-layer-drying);
- the adhesive composition should not destroy the amalgam.
Despite the smooth surface of the glaze of the tiled wall covering, a medium-sized mirror can be fixed to it using the gluing method.
As for the composition, there are also some nuances here. The most common option is neutral silicone sealant. It perfectly fixes smooth surfaces in the desired position, is not afraid of moisture, and, unlike acidic, helps prevent the formation of salts that are harmful to the amalgam.
Experts recommend gluing mirror elements to any base with neutral silicone sealant.
Plate holder
Such holders are presented in the form of a metal plate with mounting holes. The back side of the plate is fixed to the mirror using glue. Anchor hooks are screwed into the wall, onto which a mirror with a plate is hung.
The industry produces special holders for household mirrors in the form of a metal plate with mounting holes.
Chronology of actions:
- degrease the surface of the plate and the back of the mirror;
- using a spatula, apply the sealant in a dense layer over the entire surface of the plate;
- press (the main thing is evenly) and leave for a day for complete fixation;
- When gluing, sealant residues may be squeezed out; they must be removed immediately.
The plate itself is glued to the back of the glass with amalgam, then the entire structure is hung on two anchor hooks.
Note! This method is quite effective, and the sealant is designed for long-term fixation.
Double-sided tape
Double-sided tape also finds its use. One side is glued to the back wall of the mirror, the other is glued to the tile. This method is considered the easiest to implement and the fastest.
A universal material for attaching small mirrors to tiles is double-sided tape.
IMPORTANT! This method is not designed for attaching heavy mirrors. The tape may fail, and not immediately, but at the most inopportune moment.
Pendant on a cord
Depending on the interior design of the room and the design of the mirror itself, it may be equipped with a special rope for hanging. The holder is a self-tapping screw or hook screwed into the wall. The latter can even be on a suction cup, glue or anchor. The cord/rope can be designed as a decorative element on its own, but there are models that are already equipped with such a suspension.
For some types of interior, the mirror can be hung on a hook or self-tapping screw using a cord.
What it looks like in practice:
- we prepare the frame, drill holes in it, and pass the rope through them;
- you can buy a ready-made mirror with a cord;
- glue the rope to the mirror.
This method is effective, but it is used in some cases to add some feature or zest to the interior as a whole.
Factory made mirror with cord.
The desired option is selected depending on the interior design of the bathroom and how much the user is willing to spend on finishing the bathroom.
Homemade frame for attaching rope.
Suction cup mounting
Demand creates supply. With the advent of this method, small mirrors designed for fastening using suction cups began to appear in specialized stores (including construction stores). The method quickly gained fans, because all you need to do is choose the right place, press the mirror to release the air from the suction cups, and release. That's it, the installation ends here. The main bonus is the ability to remove/move the mirror as needed, again, without any effort.
Bathroom interior stores sell small mirrors with suction cups.
Note! Before fixing, the surface of the tile is degreased, and the suction cups themselves are moistened with water.
Swivel mount
This type of fastening is suitable for mirrors with a small area and weight. It is quite possible to use several degrees of mobility of the hinge elements. As a result, the mirror can be moved or moved to a different position without changing the location of the main fixation. Mostly, fastening occurs through hardware and drilling holes in the wall for dowels.
There are mirrors with one or more degrees of mobility of the hinge elements.
The nuances of installing mirror elements in bathrooms
To ensure a high service life of the mirror and user safety during installation, some nuances should be taken into account:
- type of enclosing/dividing structure - concrete wall, plaster or plasterboard on a profile frame;
- weight, dimensions of the mirror element;
- reflection angle - the mirror can be placed in the same plane with the wall, its upper edge can be tilted outward, and hinged fasteners can be used to provide several degrees of mobility.
Concrete walls and plaster under a layer of tile adhesive have high strength and, accordingly, load-bearing capacity. Plastic dowels for self-tapping screws and anchor hooks are held securely in them. Standard installation technology is used here - drilling, driving in dowels, screwing in hardware.
On drywall covered with tiles, which has normal load-bearing capacity but is extremely thin, a special plastic or metal anchor will help you hang a mirror element, as in the bottom photo.
Heavy reflective sheets are best fixed with holders, through holes drilled through with self-tapping screws, or glued to a neutral sealant. For lightweight, small-sized mirrors, you can use the other mounting methods indicated in this manual.
Advice! If you need bathroom renovation specialists, there is a very convenient service for selecting specialists from PROFI.RU. Just fill out the order details, the experts will respond and you can choose who to collaborate with. Each specialist in the system has a rating, reviews and examples of work, which will help with the choice. Looks like a mini tender. Placing an application is FREE and does not oblige you to anything. Works in almost all cities of Russia.
If you are a master, follow this link, register in the system and be able to accept orders.
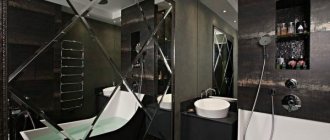
Options in the interior
The choice of mirrors begins with an awareness of the purposes of its further use. If we talk about bathroom mirrors, we immediately think of small-sized hanging models. In the hallways, if desired, you can place bulky models on stands. Speaking about options for fitting into the overall picture of the interior, you need to take into account the principles of placing mirrors.
Various details and design elements allow you to create an exclusive interior for even the simplest bathroom.
Check them out:
- when choosing a place for a mirror, you need to position it in such a way that the top edge is at a level exceeding the height of the tallest person in the family;
- if we place a mirror above the sink (and this is the most popular option), the bottom of the reflective surface should rise 15-20 cm from its side (it is necessary that water does not fall on the smooth surface and does not leave stains);
- the width of the mirror must be determined depending on the plumbing, so that it is smaller than the sink, etc.;
- The weight is determined by the thickness of the glass; you need to choose in the range from 2 to 10 mm.
Mirror products provide an ideal comfortable environment in the bathroom and make the toilet space more thoughtful, practical and functional.
It is possible to increase the viewing angle even on a small mirror. This can be done by tilting. Its angle may be insignificant, and changing the fixation method (rope, hook, etc.) will help ensure this effect.
A reflective element can be used in the interior to visually increase the work space.
Necessary materials
When performing installation work you will need:
- mirror;
- dowels (for installing medium and small format canvases - with a diameter of 6 mm, for a large mirror - with a diameter of at least 8 mm);
- wooden strip or metal profile for support;
- fastening material. Depending on the installation method: screws, self-tapping screws, anchor bolts, liquid nails, staples, tile adhesive, double-sided tape, moisture-resistant drywall;
- rubber gaskets;
- degreaser.
50 bathroom mirror designs
The final stage is decoration
You can make your own mirror decor:
- make an original frame using various materials - mosaic tiles, wood, drywall. Paint the surface and cover with moisture-resistant varnish;
- glue beads, shells, bugles to the mirror in any order or in the form of a pattern;
- Apply a design using a stencil or by hand using stained glass or acrylic paints.
Installing a mirror is a responsible job, complicated by the fragility of the material. Be precise, careful, and never rush. Then your efforts will not be in vain, and the bathroom will acquire a complete, harmonious look.
Mounting a mirror on a special tape
Attaching the mirror to the tile using a special waterproof tape is the easiest installation method. The process is quite simple and can be done even by women.
Gluing the mirror is performed in the following sequence:
- Place the mirror directly in front of the installation site in a vertical position with the front side facing away from you.
- The mounting tape is glued to the reverse side in parallel strips with a minimum distance equal to half its width.
- Place the mirror against the wall and press it.
To avoid distortions, it is better to use a level when installing the mirror. Otherwise, you will need to replace the adhesive tape with a new one and perform all the steps again.
Installation rules
The installation itself is quite easy to perform by following simple installation recommendations:
- we correctly determine the location;
- measure the line, leveling it;
- drill holes using a drill;
- the number of holes must correspond to the weight and size of the mirror.
The mirror surface is fragile, so any careless action can lead to chips, or worse, cracks. Working with it will require accuracy and leisure.
Using double-sided tape
This type of self-fixing is suitable for small and light mirror surfaces.
- mark the dimensions on the wall;
- degrease the surfaces to be glued;
- cut the tape into strips;
- stick them in a checkerboard pattern on the back side of the mirror plane;
- Remove the protective film from the tape and stick it to the wall.
Hang it carefully and straight away, as it is difficult to remove from the tape.
Double-sided tape is used for additional reliability when fixing with glue, sealant, or liquid nails.
What to consider when working
Before installing a mirror, you need to decide on its location in the bathroom. It is important that the decorative element is correctly fixed - not close to the floor and not too high. The installation area must be illuminated. There are several methods of fixation: the use of fasteners, double-sided tape and high-quality glue. It is necessary to remember the main nuances of the work:
- When installing mirrors with heavy weight and impressive dimensions, it is recommended to use supports, the main purpose of which is to support the element. If you ignore this point, the mirror will come off or slide down, which will lead to damage to the product and unnecessary financial costs.
- The adhesive composition must be applied to the inner surface of the mirror, avoiding the corners, so that when the product comes into contact with the wall, the substance does not end up outside the edges.
- Before you start fixing the mirror, you need to treat the tile - remove dirt, wipe off dust and degrease the surface. In the absence of proper pre-treatment, the glue or tape will not adhere well to the coating, causing the decorative element to fall to the floor.
Advice!
An oversized mirror is best secured using self-tapping screws. Otherwise, under the pressure of its own mass, it can detach from the wall at any moment.
Mirror in the interior. Sunny Marazzi tiles
For liquid nails
Professionals love this construction fastening material. It holds the surfaces to be glued firmly, does not leave marks, does not lose its qualities during operation, and does not spoil the amalgam coating of the mirror. When choosing, read the instructions, pay attention to the composition and temperature range.
MACROFLEX MF930 has proven itself well; it can withstand mirror coating thicknesses of up to 6 mm. Suitable for tiles and concrete.
Degrease the surfaces to be glued, apply liquid nails in dotted or parallel stripes to the back side of the mirror coating, glue it and immediately tear it off, and after 3-4 minutes, glue it again. Setting time is 15–40 minutes, complete drying is at least 12–24 hours. Gluing should be done in a ventilated area as there is a strong odor from the solvents that are present in the composition.
At what altitude
The answer suggests itself - to make it convenient for everyone. But the average wall mounting heights are shown for ease of decision-making.
- From the sink to the mirror surface to keep the glass clean from splashes - at a distance of 200–400 mm.
- The lower boundary of the mirror plane is a reference point at the chest level of the lowest family member, but not lower than 1.2 m from the floor.
- The upper limit is that the height of the tallest person is 2 cm higher, but no higher than 2 m from the floor. They also advise hanging it no higher than the height of the doorway.
- If there are children, place it at a slight angle for a better view.
How to glue a mirror to tiles?
How to apply glue correctly
A feature of gluing a mirror into the space between the tiles is the need to apply the glue in strips at a distance from each other equal to the spacing of the joining seams.
This method allows you to attach the canvas without damage to the decorative surface immediately after the repair.
In this case, be sure to ensure that the thickness of the tile and the mirror match in order to obtain an even plane of the wall.
If thick tiles were used, then you will need to build up the layer to the required level using a metal profile sheet fastened with self-tapping screws.
The disadvantage of this type of fastening is the inability to remove the mirror without damage and then select the required canvas size. Therefore, it is permissible to glue the new one on top of the old one.
Apply a layer of glue in the form of a snake, stripes or pointwise to the prepared surface of the mirror in order to evenly distribute the composition and ensure maximum gluing area.
After this, wait a few minutes and install the mirror sheet in place with instant position control.
Then press the mirror tightly against the wall, but without excessive force, and hold it for a while. After this, it is advisable to seal the end parts, if the installation was carried out above the tile level, and stick on a decorative frame.