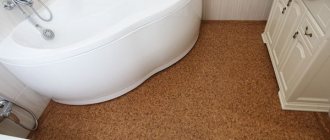
If you want to decorate the bathroom floor in an unusual way, then you need to choose an unusual material, and at the same time, it should have good characteristics. In the bathroom, high humidity and constant contact with water are inevitable, so not every finishing material can cope with such a load. One of the unusual options is pebble bathroom floors, which we will talk about in this article.
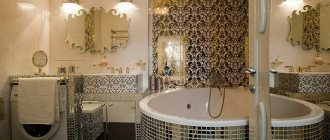
Stone mosaic in the bathroom
Pebbles are stones that, under the influence of water, have acquired a streamlined shape.
This material has long been used for flooring indoors and outdoors, and modern designers often use it for decoration. After all, natural materials are always valued more than plastic substitutes or other stone imitations.
In addition, it produces a massage effect; it is pleasant to walk on it barefoot, especially if you have heated floors. You will feel like you are on a sea beach.
Benefits of pebble floors
Small round and streamlined stones that can be found on the coasts of rivers and seas are called pebbles. This cut allows them to be used for interior decoration without pre-treatment.
A pebble floor in a bathroom has a number of advantages:
- Easy to install. This simple process can be completed independently.
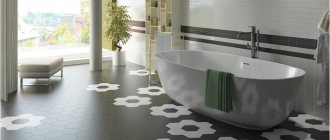
- A plane consisting of pebbles always looks beautiful. The use of small stones allows you to create an attractive picture - a panel or pattern.
- Walking barefoot on the pebbled floor has a healing effect as it massages the vital points located on the foot.
- Pebble flooring is moisture resistant, so it is often installed in rooms where there is usually high humidity.
- Wide selection of shades. For cladding the floor surface, pebbles of beige, white, black, grey, burgundy, brown, green and blue are used.
- To create original compositions, pebbles can be combined with materials such as tiles, mosaics, and natural wood when decorating the floor.
- Affordable price. Residents of coastal settlements have the opportunity to collect pebbles themselves. Those who live far from the sea coast can purchase this material at a specialized retail outlet.
You can add a special touch to your bathroom without any help - make a pebble floor with your own hands.
Installation method
Depending on the type of material chosen, the installation methods will not be too much, but still different. There are several options for how to lay pebbles on the floor:
- Using simple tile adhesive or a mixture for porcelain tiles - in the case of ready-made stacks, onto which stones are glued.
- If loose pebbles are used, a durable cement-based mortar is needed. It will hold individual stones in place better than standard tile adhesive.
- Another method of attaching the covering allows you to create a portable carpet from stones. You will need a waterproof base in the form of a rubber mat and moisture-resistant transparent glue. The stones are glued to the mat and you get an excellent covering that can be placed anywhere.
There is no point in considering the last type of coating in detail - everything is extremely simple and you need to take into account only one nuance: when carrying it, you must be careful, since individual stones can come off and will have to be reattached.
Laying a floor from individual stones
Natural pebbles are used to cover the flooring - they can be purchased either in bulk at a retail outlet or collected independently on the beaches. This option requires a significant investment of time and hard work. In addition to the installation process, you will have to sort the pebbles according to shape, size and shades.
Sequence of creating a floor covering:
- Purchase all the necessary materials - pebbles, glue, grout, varnish, sponge, brush, two spatulas (rubber and notched).
- Prepare the concrete base in the same way as for laying ceramic tiles. The subfloor in a bathroom or shower is leveled, primed and waterproofed from supporting structures. Therefore, the screed is poured over a layer of waterproofing material that extends to the surface of the walls of the room by no less than 15 centimeters. Before laying on the adhesive composition, you need to carefully apply a primer to the base.
- Selected stones are washed using cleaning products and a wire brush.
- Pebbles are laid out on the floor surface in the right place and an ornament or pattern is selected. Then it is better to move the layout to the side and gradually move the pebbles, placing them on the glue.
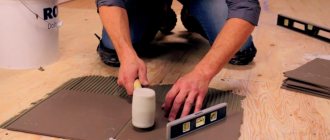
- Using a notched trowel, apply a layer of adhesive mixture 1-1.5 centimeters thick to a small area. It is advisable to use adhesive designed for natural stone or low-absorbent tiles. It should be diluted with water according to the instructions. Each pebble needs to be placed on the glue and drowned by about a third of its thickness. By the way, the denser and more evenly the pebbles lie, the more durable the floor covering will be.
- Then wait until the glue hardens. It usually takes several days for the pebbles to be securely fixed to the surface. After this, begin applying high-quality grout using a rubber spatula. Until it is completely dry, wipe the surface with a damp sponge. This aligns the seams and removes excess jointing mixture.
- After about 48 hours, the cladding is completely cleaned of grout residues.
- A water repellent, varnish or special impregnation is applied with a brush to a clean pebble surface to create a wet effect. It will be possible to move on the floor after the surface has completely dried (on average after 6-12 hours).
Cladding with independent selection of elements
A little more complicated is the method of buying individual stones in bulk and artistic selection of the laying pattern yourself. Here you can show your creativity to the fullest.
Pebble floor made from individual stones
In addition, the method is notable for the fact that this way the pebbles in the bathroom interior look especially natural. In this case, it is better to choose pebbles of different sizes and shapes. These steps will help lay out the stones more densely.
Preliminary stage
As for the base coat, it should be prepared in the same way as in the first case. You need to level the floor and lay an insulating layer on it. On the finished base they begin to lay out pebbles. Having selected the required number of elements, it will be useful to clean them from dust and dirt. To do this, wash the stones first in a soapy solution with a stiff brush, and then under running water. Remember that this must be done in advance; only dry and clean pebbles are suitable for installation.
Laying work
Apply a layer of adhesive with a thickness of one to one and a half centimeters to a small space using a notched spatula. Then begin laying the prepared stones, sinking each one into the solution to a third of its height.
If you decide to lay the pebbles vertically, then, accordingly, the layer of glue should be about 3–5 cm, and the elements should be immersed approximately halfway.
Try to install, leaving as few gaps between the pebbles as possible. Remember that an even and dense distribution of stones will be the key to the durability of the coating. After a few days, you can apply grout to the joints. In the future, actions are carried out in the same way as in the case of tiled modules.
Try to stack the stones as densely as possible
In addition, you can coat such a surface with varnish or liquid polymers. It all depends on the initial idea of the bathroom design.
Laying pebbled tile floors
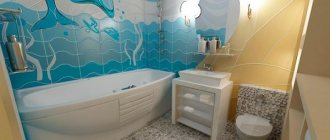
There is the easiest way to create a floor surface from sea pebbles in the bathroom. To do this, you will need a special pebble tile for the floor. It is a fiberglass mesh (usually 30x30 centimeters in size) with stones glued to its surface. As a rule, there are about 60 of them.
Thanks to the presence of a transparent base and the wavy arrangement of the pebbles, the joints between the tiles become almost invisible. After laying on the floor, a mosaic canvas is obtained that has no visible seams (read: “Mosaic floor tiles - types and methods of installation”).
Flooring installation steps:
- Before starting work, prepare the following materials: tiles, floor pebbles, tile adhesive, primer, grout, impregnation, varnish, water repellent. You will also need: a roller or wide brush, a sponge, a knife, two spatulas (rubber and serrated).
- Before starting to create a tiled floor, prepare the surface for its installation. Its horizontalness is checked with a level. Minimal defects can later be eliminated using tile adhesive. Significant cracks and deep potholes must be repaired either with a cement screed or by applying a self-leveling mortar.
- A primer is applied to the prepared base using a brush or roller, thereby enhancing the adhesion between the glue and the surface. A primer must be purchased with a moisture-proof effect, penetrates deeply and does not contain solvents. The bathroom floor should be waterproofed; it is best to use special mastics, applying them with brushes or a roller. You can also lay roll waterproofing, for which the material is fixed to the floor, extending its edges 5 centimeters onto the walls.
- Before fixing the tiles, they are laid out on the floor surface in a “dry” way, as a result of which during the installation process it will be possible to avoid possible errors when joining elements and to preliminarily evaluate the installation result. If necessary, cut the tiles with a knife.
- At the next stage, they begin laying the products. An adhesive composition is used for fixation; it is preferable that it be a product for natural stone or low-absorbent tiles. To prepare the glue you will need water and powder; mix them until you get a thick, creamy mixture. Installation should begin with the wall farthest relative to the entrance to the room. The glue is applied in no more than a 1-1.5 centimeter layer. The mesh is placed on the glue, leveled and pressed tightly with the palms of your hands, or a piece of plywood, or a metal trowel. The second tile is combined with the already fixed element.
- After installation is completed, voids are noticeable on the floor surface at the junction of the elements. Existing defects are eliminated by laying individual pebbles. They are separated from the surface of the mesh and glued.
- At the end of laying the tiles under the pebbles, the joints are grouted and impregnations and varnish are applied. The glue dries completely in about two days. Then grout is applied to the joints using a joint compound for tiles. It is placed in the cracks between the pebbles using a rubber spatula. If necessary, add color to the mixture.
- After about half an hour, when the grout has already set, but has not completely hardened, its excess is removed from the stones using a damp sponge. After a day, the pebbles are wiped again and thereby the plaque is washed off from them.
- Then a water repellent is applied to the stones - a special impregnation that protects them from moisture. To make the pebble surface decorative, it can also be coated with one or two coats of varnish. As a result, the stones will become shiny, thanks to which the pebble floor in the bathroom will acquire a natural look and beauty. An enhancer sealant can also give a wet effect to the coating.
Marble ↑
This shining stone, translated from Greek, has such a name for a reason. Marble flooring is a coating with a unique natural pattern, indescribable in its depth of shades. There's plenty to choose from! After all, marble comes in a variety of colors: gray, white, yellow, pink, brown, beige, green and even cherry.
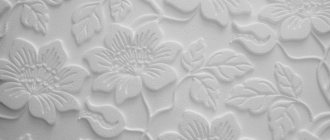
Palette of colors and textures of natural marble
The main countries supplying this beautiful material are: India, Italy, China, Greece, Brazil, Turkey, Portugal, Spain, Egypt, Norway.
Marble is a metamorphic rock. Each piece of marble is unique—variation in vein formation and color is often considered its most striking feature. Marble is distinguished by its luxury and solemnity. Mosaic floors made from this stone look very impressive.
Advantages and disadvantages ↑
While admiring the external characteristics of marble, one should not forget about its rather capricious character. In fact, marble is not the best choice for a bathroom. This is a very porous material, absorbent. Marble absorbs everything: evaporation from the air, moisture, all liquids and mixtures. Any spilled liquid will leave a stain on the marble that will be either very difficult or impossible to remove. Moreover, it doesn’t matter whether it’s the notorious glass of wine or just shampoo, shaving lotion, and so on. Therefore, high-use areas (for example, next to the washbasin or wall cladding next to the bathtub/shower) are recommended to be decorated with companion ceramic tiles rather than pure marble.
Due to constant contact with moisture, iron particles in marble can rust and all the noble beauty of the expensive stone will fade forever.
Marble requires careful pre-use treatment and careful care. It must be washed and wiped as often as possible, never using aggressive, acidic or alkaline cleaning agents.
Thus, a bathroom decorated with marble will have to literally “breathe”, fearing every puddle after a shower and any stain. Well, and finally, marble is a rather expensive and rare material. And it is sold everywhere. Therefore, it is very easy to end up with low-quality raw materials. If you decide to use marble in finishing your bathroom, then you should not skimp on it and only contact trusted suppliers.
White marble with gray veins perfectly complements the interior of an elegant bathroom in a classic style
Marble flooring is not only very impressive, but also very slippery
Decorating the floor with a pebble rug
When there is no desire to fix sea stones to a concrete base, you can make a floor covering, for example, from standard tiles, and on top of it place a rubber mat with pebbles glued to its surface, as in the photo. It will be a piece of the beach on the floor of your own bathroom.
You can make such a rug from pebbles yourself, for which you will need:
- flat pebbles of the appropriate color and size;
- special adhesive composition for rubber;
- inexpensive rubber mat of the desired configuration.
A pebble mat is made as follows:
- Purchase materials.
- They prepare the floor and sort the pebbles by color, shape and size, then wash and dry them. Since the basis for installation is a rubber mat, choose what shape it will be. You can make the configuration yourself using a knife or scissors.
Insufficient number of tiles. What to do in this case?
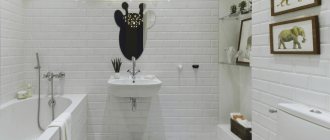
As you understood at the very beginning, this is a budget option for decorating the facade. We decided to limit our budget. Unfortunately, we didn't buy enough pebbles. We didn’t go to the store anymore, because it was too late, and I wanted to do it in one day. Without thinking twice, I decided to decorate the part where there was not enough material with a heart for my husband. I removed a few pebbles from the mesh and got to work. I just wanted to once again remind my partner how much I love him.
Hermione or Ron? Fans decide which of the two Potter characters is better
The “egg” beach in Vietnam is famous for its secrets and unusual stones: photo
Roskino already knows which films to present in Cannes. True, online
This glue is also universal in that it can be used as an independent finish. It looks like paint.
Types of finishing stone
Natural stone, which is used in bathroom decoration, is represented by the following types:
- sandstone;
- marble;
- granite;
- quartzite;
- malachite;
- onyx;
- jasper.
It is worth saying that the use of these types of stone in finishing will not be cheap, especially when it comes to the last three options. They are semi-precious. Some types of natural stone have the disadvantage of having pores. Because of them, contamination can be caused that will be almost impossible to remove. Another disadvantage of natural stone is its significant weight. Not all walls are adapted to such loads; this fact must be taken into account when choosing a finishing method. Due to these disadvantages, many choose artificial stone. Its main types are:
- granite;
- acrylic stone;
- quartz agglomerate.
All these types of artificial stone consist of more than 90% natural filler, which is represented by powder or fine mineral chips. They are held together by special compositions of various resins. The advantage is lower weight, as well as the absence of pores in the material. This simplifies the process of caring for the stone.