When starting work, you need to understand why you need to dismantle the lamp. If this happens as part of general cleaning, then, as a rule, it is enough to carefully remove all decorative parts, lampshades, and wipe the base with a damp cloth.
In the case when a complete replacement of the chandelier is required, it is necessary to carry out a whole range of measures, including de-energizing and insulating the wires, and in some cases additional work with the ceiling.
Safety first
Electric current is a risk factor that can cause harm to both health and property. The process of dismantling a lighting device can be made as safe as possible only if the rules and safety precautions are followed.
- All work is carried out with the power turned off (the machine on the panel is turned off or the plugs are unscrewed).
- Before manipulating the wires, be sure to check the absence of voltage using special tools or equipment (indicator screwdriver or multimeter).
- Do not touch exposed, uninsulated contacts.
- All wiring cables are marked.
In the case of simultaneous preparation of contacts for the subsequent installation of a new chandelier, it is worth making the necessary grouping and securing the wires in the terminals.
Dismantling the elements that make up the chandelier
When you have collected all the necessary tools, visually examine the chandelier. Once again, make sure that there is no voltage, and then begin to remove all hanging elements from the device, which include glass decorations, lampshades, etc.
Be sure to unscrew the light bulbs from the sockets and remove the cover under which the wires are hidden.
The remaining parts used to connect the device to the electrical network are located under a decorative cap secured to the base of the ceiling with a screw.
Step-by-step instruction
The entire process of dismantling a chandelier with your own hands can be represented in the form of a simple algorithm of actions:
- Power outage.
- Preparing tools.
- Removing decorative elements, shades, and light bulbs from the chandelier frame.
- Dismantling the decorative base.
- Disconnecting wires.
- Fastening works.
- Removing the frame from the ceiling.
- Insulation of exposed contacts.
Despite the apparent simplicity of the actions, each stage is characterized by its own nuances.
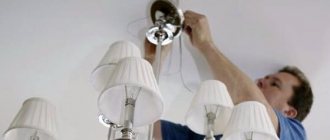
We remove lampshades, decorative elements and components
After completely turning off the light from the input panel, you can begin to “disarm” the lamp. The design of most lighting fixtures is similar. It includes the following components:
- decorative cap (cup);
- wires;
- frame made of metal or plastic;
- lampshades;
- light bulb sockets;
- hanging decorative parts (depending on the model).
First, all hanging elements and shades are removed.
The second stage is incandescent lamps or their LED analogues. Next, the ring or washer securing the cap is unscrewed and the latter carefully goes down, providing access to the connection diagram.
Important! In small rooms, they often use not massive hanging chandeliers, but plate lamps that are closely adjacent to the ceiling panels and take up little space. During their dismantling, it is necessary to carefully unscrew the bolts holding the single lamp using a screwdriver. Then you need to remove the lamp and the cover under which all connections are located.
De-energize and disconnect the wires
The room is de-energized at the very beginning of work. To do this, you can use a switch, but it would be more expedient and safer to turn off the circuit breaker.
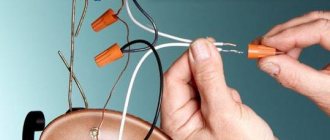
Disconnecting the wires is quite simple. When twisting and manual insulation, it is enough to carefully cut off the layer of insulating tape with a knife and disconnect the chandelier contacts from the wiring cables.
When using terminal blocks, you need to press the lever or release the spring (depending on the clamp model) and release the contacts.
Removing the chandelier from its mount
There are several ways to remove a chandelier from the ceiling. It all depends on the method of its initial installation.
Hook
An anchor hook is the most common method of installing ceiling lights. In this case, removing the chandelier is very simple. It is enough to lower the closing cap, stick your hand into the hole, feel for the hook and carefully remove the chandelier frame from it. Then disconnect all wires.
Instructions
In order to remove any lamp from the ceiling, you must do the following:
- Disconnect from electricity at the input panel. It is not enough that the lights in the room are turned off. Situations are different, so it is better to protect yourself from further problems and from electric shock.
The next step is a tool with which you can remove the lighting fixture from the ceiling.
An auxiliary tool will be:
- indicator screwdriver
- insulating tape
- ladder
- pads
Electricity check.
- Having turned off the light even in the panel, we check again through the switch.
- If the light does not turn on, everything is in order, you can start working.
So, lighting devices, as you know, can be completely different.
- First you need to get rid of various fragile elements that adorn the lighting fixture. That is, light bulbs, decorations, a lampshade.
- unscrew the cap that hides all the wires. One way or another, it can still be called decorative. We are talking about something that is tightly attached to the ceiling and holds the entire chandelier. This cap is often secured with a screw, which can be immediately detected. When you unscrew the screw, the cap will “loose” and go down.
Removing the decorative cap
The lamp can be held by a hook or mounted on a bar. If you have to work with a lamp that is attached to a hook, then the wiring can be immediately disconnected, moved to the side and removed from the hook. Removing the chandelier from the bar is a little more difficult. To begin with in this situation, it is necessary to loosen the bolts holding the bar. After a complete shutdown, you should carefully insulate the conductors on the ceiling in order to protect yourself from electric shock.
Slat mount
Hook to ceiling
Features of working with different lamps
The range of lighting devices produced today is very diverse. Often, installation and dismantling problems are associated not so much with the processes themselves, but with the unusual designs of pendant lamps.
The type of ceiling covering is also of great importance. The algorithm for working with a suspended ceiling may differ from manipulations with a standard or suspended type of structure.
Removing a chandelier from a suspended ceiling
Stretch ceilings are most often found in modern houses and apartments. They are attractive due to their ease of installation, cost and variety of designs. When installing lamps, a special fastening system is often used, which includes a wooden mortgage or a suspended platform. As for the type of fastener, it all depends on the type of lighting device.
In order to change the chandelier in such conditions, it is necessary to turn off the power to the room and prepare a stepladder and tools. The further algorithm of actions will look like this:
- cleaning the body (removing all decorative parts, shades, glasses and lamps);
- dismantling the protective cap;
- releasing wires from terminals and insulation;
- checking the absence of electricity in the network (using an indicator screwdriver);
- dismantling the lighting fixture from a hook or strip with careful removal through a slotted hole in the ceiling.
The remaining ceiling wiring must be insulated to prevent short circuits after the power is turned on.
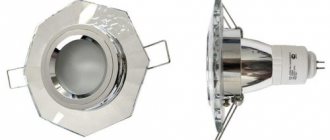
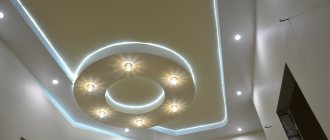
How to properly remove spotlights from a suspended ceiling
Spotlights do an excellent job of providing additional lighting, replacing outdated wall sconces.
Replacing such a lamp in an apartment yourself is quite simple. You just need to strictly follow the sequence of all actions, namely:
- De-energize the room.
- Using a flat blade screwdriver, remove the housing cover and remove the light bulb.
- Carefully pull out the body of the spotlight, if a gap forms, insert your fingers and press the latches, thereby releasing the lamp and dismantling it completely.
- Using a lever or hidden spring, open the terminal block and pull out the contacts.
Important! If there are no plans to carry out any work on installing a new light source in the near future, then the wires must be insulated.
Removing a spotlight from a suspended ceiling
The instructions for dismantling built-in lighting fixtures from a suspended ceiling differ from the suspended version. Its design is much more rigid, which allows the luminaires to be installed using a spacer system. Such fasteners provide more reliable fixation of the device.
How to remove a light bulb from a suspended ceiling
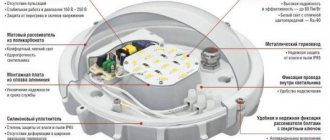
Point spots are attached to the main ceiling base, and only the decorative part of the illuminator is fixed in a special hole in the tension fabric or suspended structure. The cartridge can be attached to a frame or electrical wire.
To remove a spotlight from a suspended ceiling, it is recommended to follow these rules:
- It is necessary to use stable stands (chair, table, etc.) or a ladder. Do not rest your hands on the surface of the stretch ceiling.
- Ceiling lighting fixtures use removable stoppers to secure the lamp, without which they will fall out. Therefore, the lamp must be disassembled carefully so that the fastener does not get lost.
- You need to unscrew the light bulb from the spotlight without any effort so as not to damage the plasterboard or polyvinyl chloride surface of the ceiling. Manufacturers include instructions for installing and operating the lighting equipment with each model of ceiling lighting fixture. It is recommended that you familiarize yourself with it before starting work.
- Halogen lights quickly fail when exposed to oily stains. Therefore, replacing light bulbs in spotlights of this type should only be done while wearing gloves. It’s better to replace them with similar LED elements.
Replacing MR16 GU5 3 lamps
In MR16 GU5.3 devices, the lamp is secured using a locking bracket or ring.
The lamp must be dismantled in this order:
- Power outage. It is recommended to do this on the electrical panel that supplies electricity to the entire apartment or building. The phase wire is not always broken by a wall switch placed in the room.
- Remove the lamp, if the device has one.
- Removing the fastening element holding the light bulb. It is necessary to squeeze the antennae with your fingers and carefully remove the ring (bracket).
- The base is held with one hand, and the lamp is pulled out with the other. But do not pull the wire on which the lamp hangs, it can easily come off.
- Remove the light bulb on the suspended ceiling, install a new one, and secure the device.
When reassembling the illuminator, the mounting ring may not return to its proper place. The reasons for this nuance may be the following:
- when replacing several lamps at the same time, the retaining rings were mixed up;
- the body of the new light bulb is made to different standards or it was not fully inserted.
If the lamp model has a threaded retaining ring, replacing the lampshade or light bulb is carried out in the same way, only the ring is unscrewed and not removed.
Replacing lamps type GX53 tablet
GX53 models are available in a round shape, which is why they are also called tablets. Replacing the lamp in this lamp is easier than in the GU5 3 model. It is fixed to the socket with two pins of different diameters. The smaller diameter pin is located closer to the lamp, and the larger one is 2 times closer to the edge. To remove a spotlight from a suspended ceiling, you do not need to disassemble the lighting equipment.
- You need to grasp the bulb with one hand, and hold the frame of the lighting equipment with the other.
- The light bulb rotates 20° counterclockwise and comes out of the socket freely.
- Then you need to insert the work lamp and turn it all the way in the opposite direction.
- Check functionality.
Replacing light bulbs with E14 E27 sockets
For spotlights, E14 (E27) bulbs are rarely used; pin ones are more common. In such devices, you just need to unscrew the burnt-out light bulb and screw in the whole one.
Lamps that use lighting lamps with a threaded base are available in different designs. In some devices, the light bulbs are fixed using corkscrew brackets (rings). And other illuminators have to be removed from the suspended ceiling.
In plasterboard ceilings, spotlights are held by special arms with springs, which are placed on opposite sides and directed in different directions. The lamp must be pulled with a slight force, and the arms will close in the opposite direction. After this, the device can be easily removed from the ceiling structure and the lamp socket can be replaced.
How to change an old chandelier yourself
Despite the fact that an electrician is present on the staff of every HOA and management company, many apartment owners prefer to replace chandeliers and fixtures themselves. This procedure is much simpler to install and does not require particularly deep knowledge of electrical engineering.
The main thing to remember is that all work is carried out only in a completely de-energized room. The best option is to turn off the electricity in the entire apartment.
To facilitate the process, it is necessary to get rid of unnecessary elements that increase the weight of the device. These can be lampshades, decorative pendants, chains. It is also worth unscrewing all lamps from their sockets.
By unscrewing the cap you can easily access the wiring. Beginners should once again make sure that there is no voltage in the contacts using an indicator screwdriver. After this you can disconnect the wires.
Depending on the mounting option, the device is removed from the hook or unscrewed from the surface of the bar.
After this, you need to make sure that the cables are marked and you can begin installing the new lamp. The sequence of actions will be reversed. First, fastening is carried out to a hook or bar, after which the wiring is connected. You need to make sure that the connection is correct: phase to phase, zero to zero. If grouping of wires is required, it must be carried out before installation work begins.
The last stage is fixing the decorative cap and equipping the lighting fixture with all the necessary parts.
Photo instructions on how to remove a chandelier
1+
Read here! Nylon ties - types of clamps, their characteristics and features of use during installation work
Tips to make the process easier
If the ceiling lamp is heavy, it is better to remove it with two people. Do not cut the stretch ceiling fabric to get to the fasteners and wiring. It is unlikely that it will be possible to restore it after this, and replacing it with a new one will cause additional financial and time expenses.
By following the sequence of steps and taking your time, you can remove the lighting fixture yourself without the help of a professional electrician. The main thing is to remember basic safety rules.
Possible problems during dismantling and ways to eliminate them
Most of the problems that arise during dismantling are associated with work to remove point light sources.
Thus, too much clamping of the staples can damage the integrity of the housing or thermal ring. Fingers are often slightly injured by the latches when trying to remove the device from the mounting socket. Beginners trying to sharply pull out the structure can damage the stretch ceiling fabric.
First of all, don't rush. If the point device does not come out of the socket, then perhaps one of its spacers is not pressed down enough. When releasing wires from the terminal blocks, you should press the spring harder, for which you can use a thin needle or toothpick. When cutting off the insulation, you must try not to damage the contacts, but the main thing is to make sure in advance that they are de-energized.
Main conclusions
Don’t think that an electrician has many ways to safely and quickly remove a chandelier. The general principle is the same. The only differences are the nuances associated with the features of the mounting and ceiling structures.
- To remove a chandelier you need a minimal set of tools.
- Before starting work, you need to find out the type of chandelier or lamp, the design of the ceiling and the method of fastening.
- It is much easier to remove a chandelier if it is cleared of shades, lamps and decor in advance.
- All wiring after dismantling the lighting fixture must be insulated to avoid short circuits.
- You need to work with spotlights carefully, primarily because of the possibility of damage to their body and ceiling surface.
The algorithm for dismantling is quite simple. Even a beginner can implement it. The main thing is to remember about safety precautions and not to neglect unnecessary checking of exposed contacts.