Lamp installation options: connection diagram
When installing lamps, you should take into account the characteristics of the coating, especially if the installation is on a suspended ceiling. For flammable materials, the following parameters should be taken into account:
- it is important to use special heat-resistant wires;
- the connection must be reliable and isolated;
- lamps are selected based on the device data sheet, otherwise there will be overheating, which will affect the coating.
The connection diagram depends on the type of lamps. For example, for spotlights - uniform and chaotic distribution. The choice of scheme depends on the type of lighting and functions (main or additional), the area of the room in which the lamp will be installed, and the interior.
Connection methods by model type
Connecting a wall lamp, or rather, its method, depends on the type of device. There are different types of sconces in stores - with a cord, a plug, a rope (chain, sonnet), without a cord - on keys. To properly connect the device to the power supply, it is important to familiarize yourself with the specifics of operation.
When installing, you should consider the following points:
- in case of high air humidity, make sure that the lighting device is moisture-proof;
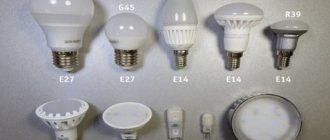
- take into account what type of light bulbs are used - you cannot buy those that exceed the power indicated in the passport;
- if the lamp is powered by 12-24 volts, additionally purchase a voltage transformer and include it in the circuit.
Rope model
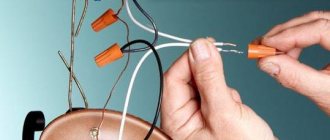
Hanging a rope lamp on the wall is not difficult; even a novice master can do it. Electrical wires are brought to the height required by the user (usually 1-2 meters from the floor) in a hidden way so as not to spoil the appearance of the room. There should be three of them - zero (N), phase (L) and ground (PE). Then, in accordance with the attached diagram, you need to attach the contacts to the terminal blocks with the corresponding markings. Phase is connected to phase, zero to zero and ground to ground.
Keyboard model
Installing a sconce with a key switch has a number of features. Instead of a rope, such devices have contacts that connect independently. All wires and connections for such a sconce are completely hidden in the wall. This will require ditching, so it’s worth thinking about mounting the lamp in advance.
You must be careful when working. Otherwise, there is a high risk of a short circuit, and since the wiring is internal, it will be difficult to eliminate the consequences. It is necessary to install the sconces strictly according to the diagram, connecting the wires according to color and markings. The network input phase will go to the switch, from it again to the sconce, to ensure the possibility of disconnecting the electrical circuit. Zero and grounding must be connected directly during installation work.
Cord with plug
Hanging a sconce with a plug on a cord on the wall is very simple. Such lamps have a wire, like all electrical appliances, they are plugged into sockets using a plug. It is recommended to buy them if it is not possible to groove the wall, lay new wiring and mount a separate switch. To turn on the light, you just need to insert the plug into the socket or use the switch (it is added for more comfortable disconnection of the circuit). You can hang such devices on the wall without basic knowledge of electrical connection diagrams.
Installing wall devices
Wall lamps are used as additional and main light sources.
In bedrooms they are installed in the bedside area at a low height. Wall-mounted devices are attached to the surface using two, sometimes three, dowel-nails. There are 2 mounting options available:
- In the first version, the fastening system is located in the lamp body under the diffuser. The diffuser cover is removed, the device is applied to the wall, after which markings are made. Using a hammer drill, holes are drilled for fastening, into which the lamp is then attached. The final part will be connecting and installing the light bulb in the lampshade.
- In the second case, a special frame is installed at the place with the wires, which is included in the lamp package. It is easy to remove as it is secured with two screws. After installing the frame, the wires are connected, the lamps are fixed to it, the screws are tightened and the light bulb is screwed in.
How to install a lamp on the wall
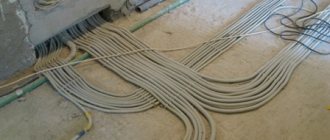
The actual process of installing the lamp on the wall must begin by turning off the voltage to the main power cable. There are two fundamental solutions for laying wires for sconces - open or hidden wiring. The first option is the simplest and least expensive in terms of the amount of work. The cable is attached to the wall surface using special clamps or clips. The method is simple, but due to the open cable it does not have the proper aesthetic appearance. This drawback can be partially corrected by covering the wiring with a special profile made of polymer material.
The second option for running the wire to the installation site of the wall lamp will require the use of a hammer drill or circular saw for concrete. With their help, channels are formed in the partitions where the cable is placed. After which they are sealed with mortar, and the surface is plastered.
The next stage of work is directly related to mounting the wall lamp itself on the wall. We strongly recommend that you first read the instructions that come with the product.
A typical wall light design typically consists of a mounting plate, wall trim, bracket, and shade or shade. In some models, the bracket may be missing, which is not important when carrying out installation work.
The first step is to secure the mounting plate to the wall using dowels. For this purpose, it has holes for fastening. At the second stage, the main cable is brought out and connected with factory wires using a terminal or crimp sleeve. Twisting is prohibited by safety regulations. At the last stage of installation, the plank is covered with a wall plate, and the lampshade is installed according to the factory assembly diagram.
Wiring connection
Wall-mounted fixtures are connected in the same way as other lighting fixtures. The neutral wire always goes directly to the lamp, and the phase wire is connected through a switch. To connect several lamps from each lighting point, you need to lay a neutral wire to the distribution panel. The phase wire is laid from the switch.
Before installing the device and turning it on, you should check the electrical wiring and the lamp itself. The wires of the wiring harness must be trimmed and connected to the contacts in the distribution box with the line packet toggle switch turned off. Then connect the contacts on your device. The packager needs to be turned on for a short time, checked with an electrical device which of the wires is zero and which is phase, and these contacts must be marked.
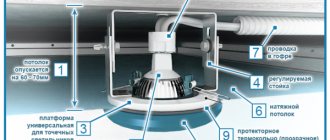
Features of installation and connection of built-in lamps
The connection diagram for recessed luminaires differs from other lighting devices in the presence of an additional power supply. The installation of such a device is the main difference from other devices. Before installing lamps, electrical wiring is laid according to the number of lamps, taking into account their power. The reflector and light source remain on the surface of the recessed lamps, the rest of the body is hidden.
Installation of ceiling lights
After the ceiling support frame has been installed, you should mark the points where the lamp will be installed. Based on this diagram, laying bundles are laid along metal profiles. For LED lamps and strips, you need to additionally find a place to mount and connect the power supply.
Ceiling devices are often installed on a spring suspension. The size is indicated in the device passport. After assembling the ceiling, holes of the required diameter are cut out and the wires are pulled out and connected to the lamp. It is then mounted into the ceiling.
When is it necessary to install a bracket in the ceiling?
The method of attaching a lighting fixture to a bracket is more labor-intensive, but accessible to the average user.
Using the bracket, you can distribute the load evenly over several attachment points. The bracket is included with the device and is fixed to the ceiling using two screws. The lamp is brought to the ceiling and fixed with bolts. Fastening with a bracket is used for light fixtures; heavy chandeliers are hung on special hooks. This part is also needed when installing on a suspended ceiling. Installation on the bracket is carried out as follows. It is necessary to mark the installation location, pressing the bracket to the ceiling surface. Holes need to be drilled and plugs inserted into them. Then a bracket is placed next to them, which must be screwed using self-tapping screws. A chandelier is hung from the bracket, and power wires of the same color are connected. The final step is to use a decorative cap to cover the place where the chandelier hangs.
Fastenings for hanging massive chandeliers
The main type of fastening of heavy products is with a hook. In this case, the ceiling must be durable, preferably with concrete floors. For a heavy chandelier, an I-beam platform with fastening at several points can also be used.
The chandelier hook is installed during the construction phase. Before hanging a chandelier on it, you should check its strength and reliability. To do this, hang a load with the weight of the chandelier from the hook for some time. If the hook has not moved or fallen out, hang the lighting fixture. To do this, a hole is made with a puncher into which a metal anchor or dowel with a ring is inserted. If the ceiling is made of wood, you can screw in a self-tapping hook
For plasterboard or stretch ceilings, the work becomes more complicated.
Chandeliers weighing more than 6 kg cannot be attached to such a canvas.
Also, when replacing lamps, you can accidentally damage sheets of drywall or accidentally touch a low-hanging lamp. For installation on a plasterboard ceiling, it is important to think about lighting in advance.
When attaching to a suspended ceiling, you need to take care in advance about how the chandelier will be fixed. A stretched fabric cannot be the basis for fastening, therefore, at the stage of installing the ceiling, you need to make a hole for mounting the lamp on a special base (wooden block).
Connecting wires are brought out through a hole cut in the canvas. In this installation option, the chandelier is first hung on a hook, and then the wires are connected. The final step will be to cover the attachment point with a decorative cap.
Connecting a chandelier alone is quite difficult. To connect the lamp, you need one person who will hold the chandelier itself, and the second should be involved in setting up the wires.
Installing a lamp on an I-beam platform requires dowels and screws of larger diameter and length.
Installing lighting fixtures on walls and ceilings does not cause problems even for inexperienced people. By following the installation instructions, you can install the device yourself without the help of professionals.
Preparatory stage
When thinking about how to connect a wall lamp, the user does not always remember the preparatory stage. You will need a number of consumables, as well as a basic set of tools. First of all, this:
- drill and drill bits (taking into account the wall material);
- dowels and screws;
- screwdrivers of different sizes;
- indicator screwdriver (phase indicator);
- pliers and knife (for stripping wires);
- level;
- pencil;
- stepladder (not always needed).
A wall lamp is usually attached to the wall using a special fixing plate or a series of holes located directly in the housing. It is important to mark the holes as accurately as possible by aligning the lighting device in accordance with the level readings or using a laser level. The second option allows you to significantly simplify the process by quickly leveling both the sconce itself and keeping the placement points of electrical fittings around the perimeter of the entire room at the same height.
At the preparation stage, it is worth stripping the wires, and it is also extremely important to turn off the electricity in the room.
Drilling holes
Since building materials have different strength characteristics, it is necessary to choose the right type of drill and tool. For example, a hammer drill is good for concrete, and an impact drill is good for a brick wall. If the wall is made of plasterboard, plastic or wood, then the optimal solution would be a conventional low-power drill. To reduce the amount of dust in the room, when drilling holes, you can attach the hose of a functioning vacuum cleaner to the area being treated. Then all small particles formed during the operation of the power tool will be absorbed by it and will not clog the surrounding space.
Fixing the fastener
The mass of a relatively small wall sconce is usually small. Therefore, it can be attached by using standard metal screws and plastic dowels, the dimensions of which must match each other. The diameter of the drill is selected taking into account the diameter of the dowel. When a self-tapping screw enters a dowel hammered into the wall, the latter expands, forming a reliable connection with the wall from the inside.
Often sconces are mounted in a plasterboard wall with an air cavity inside. In this case, a dowel of a special design – “butterfly” – is suitable. Outwardly, it is not much different from the usual dowel, but after the self-tapping screw is inserted into it, one end of the fastener is brought closer to the other. As a result, this fastening tandem is transformed into a super-reliable structure that ensures long-lasting fixation of the sconce in the wall.
As soon as the dowels are inserted into the wall through pre-drilled holes, a lamp (or its mounting part) is applied to it, through which the self-tapping screws are screwed. For this purpose, you can use a screwdriver, a battery-powered screwdriver, or even an electric drill. After the mounting part of the sconce is fixed, the remaining elements are attached to it. In fact, the wall lamp itself is nothing more than the original mounting hardware into which the lamp is subsequently screwed.