Structure falling out
How to fix a socket if it falls out? The reason for this phenomenon is simple - incorrect and careless use (sharply pulling out the plug). This can be avoided by tightening the entire structure more tightly. But this does not always help with frequent use. Some people install something solid under the socket, but such manipulation does not bring much results either.
It’s worth thinking about completely replacing the entire structure and purchasing a higher-quality socket box. What you need to have on hand:
- New device.
- Cement (or better yet, gypsum - it sets faster).
- Construction knife.
- Putty knife.
- Primer.
- A set of tools for installing a socket.
The electricity in the room is turned off and the old element is dismantled. It happens that the socket is simply in concrete - it is better to remove it and make a socket box. But this is done before purchasing the part so that the shape matches the existing base in the wall. There is a large assortment of such components on sale, and finding the right one will not be difficult.
How to fix an outlet in the wall? You just need to increase the size of the space in the wall using a chisel and hammer. Afterwards, the selected mixture for fixing is diluted, and the socket box is placed on it. Before this, the base is treated with a primer mixture to ensure better adhesion. If there is wallpaper, they are carefully removed and attached to the wall with pins. Some people recommend using tape, but it can ruin the surface.
After the mixture begins to set, the entire structure is formed according to the level. Next, the socket itself is fixed using the bolts or screws included in the kit. Now it's time to install the outlet. There is no difficulty, but there are quite a lot of actions - you should not skip a single step.
After any repair, the outlet is checked for functionality. To do this, connect a low power device for ten minutes. When working, it is worth controlling the phase. If it is present, do not start installation. It happens that the plug from the socket is broken. How to fix it? There are plenty of reasons for this - a burnt out or loose contact, careless handling during operation, etc. The plug can be easily disassembled because there is a fastening in the middle, in the form of a screw.
When the structure is untwisted, you get two halves with an internal component. There are also contacts there that will tell you a lot. If they have oxidized, darkened, or become detached, the plug will not work. Sometimes it is enough to tighten them, and the device will begin to perform its functions again. Today, many modern appliances have plugs that cannot be disassembled. In this case, you can try to completely replace it.
Recommendations on how to fix an outlet: 5 steps
The question of how to repair an outlet yourself interests many. Who wants to turn to professionals for small things. It will be useful to dwell on: how to repair a socket in an apartment if it falls out, how to fix the socket in the wall if it falls out, and how to insert the socket into the socket with your own hands. So, about everything in more detail.
Replacing sockets that have fallen out of their sockets is a simple process, but it requires attention and caution. You don't have to be a handyman to be able to fix minor breakdowns of electrical appliances in your home. It is important to follow safety rules and know how the outlet works. Let's look at how to make a device with your own hands, how to fasten it if it falls out. How to make repairs?
If the installation is poorly performed or the device is handled carelessly, it will fly out of the concrete wall without damaging the electrical wire.
You cannot use such an outlet, especially if there are small children in the house; besides, it looks ugly after a breakdown. This situation can happen to anyone, and therefore you need to know how to repair falling devices.
It’s easy to do the job, just prepare:
- Alabaster;
- Dry putty or liquid nails;
- Putty knife.
All of the listed building materials will allow you to properly secure the box in the concrete surface. Before starting repairs, you should turn off the power to the apartment, and then start putting the outlet in place. Alabaster or putty should be diluted in a small amount of water and actively cover the hole, placing the box in the middle, pressing down well. After the mixture has dried, you can put the plastic cover on and use the device as usual.
With liquid nails the situation is even simpler - they are applied to the edge of the socket and along the edge of the device. Then they press it into the wall and wait for the composition to set.
Tips: how to fix a loose socket
If the socket has not fallen out of the wall, but is only dangling, then it can be repaired by slightly spreading the legs that fix it inside the surface. After this, the device will fit most tightly to the socket in which it is located. What to do if the plug falls out of the socket? It happens that the plug, which should fit securely into the device, wobbles in it and even falls out. This is unsafe, as the socket may catch fire due to poor electrical contact.
To eliminate the situation it is necessary:
- Turn off the power supply to the apartment;
- Unscrew the socket using an indicator screwdriver;
- Tighten the bolts that hold the electrical contacts in place.
If the electrical contacts have oxidized and turned black, they must be cleaned with sandpaper and then returned to their place.
Instructions: how to fix the socket in the wall
The work is performed as follows. Turn off the power! To do this, in the panel, you need to set the auto switch levers to the “off” mode; according to the standard, this is the location in which the lever faces down. Which machine needs to be turned off, if they are not signed, is determined experimentally by turning it off one by one and checking, for example, with a screwdriver with an indicator, for the presence of electrical voltage in the electrical wiring of the outlet. If you don’t have time to check, it’s best to turn everything off. However, then you need to make sure that there is no electric current at the installation site!
After that:
- Next, you need to disassemble the device and remove the mechanism from the socket. There may be no socket box and the device may simply stand in a hole in a concrete surface, which is absolutely wrong; because of this, the fastener is not reliable. This situation can be observed in old houses. You can also often see a metal socket box installed that does not have fastening bolts, and the device’s mechanisms are attached only with the help of the original spacer mechanism, the reliability of which is questionable.
- The next step is to disconnect the device itself from the electrical wiring. Then take a standard socket box, if it is missing, and try it on the socket. If the depth of the nest is less than the depth of the glass, you need to cut off the back part of it.
- It may also be necessary to slightly widen the hole; the socket box should not be deformed during installation. If the socket box is made of metal, you need to carefully remove it, and if you work carefully, you can avoid significant damage and will not need subsequent repairs, since the frame of the device will disguise everything. We use the socket box, and if it fits, that is, it does not stick out from the wall and is not bent, we can continue to repair it.
- We smear the socket box; to do this, you need to dilute the gypsum-based mixture according to the instructions; you can also use simple alabaster and apply the mixture into the socket. Immediately after this, you need to insert the pre-prepared socket box into the socket strictly according to the level, the protruding excess composition must be immediately removed.
- Now you need to wait until the mixture sets, after which you can connect it to the electrical wiring and place the mechanism in the mounting box. To fasten the device, you need to screw the bolts in the socket box - this is the best solution for fixing the mechanisms of electrical installation devices. At the end of the repair, you need to install a frame and a decorative panel.
Preparing the old
If it is decided not to replace the old outlet, it is inspected for defects:
deposits on the terminals
It has high electrical resistance, so it is important to clean it with P200 sandpaper (fine-grained) or a personal file; traces of an electric arc on the contacts for the plug: carbon deposits, tubercles of molten metal. They interfere with the tight fit of the plug and thereby prevent high-quality surface contact of electrically conductive materials
The contacts are cleaned, but it is better to replace the socket; loosening of plug contacts. It happens when the plug is frequently plugged in/out or when the contacts overheat as a result of metal tempering. The element no longer presses tightly onto the plug and the quality of contact deteriorates (overheating, sparks). The contacts can be tightened for a while, but it is better to replace the socket.
An electric arc occurs when a switched-on appliance is connected to an outlet. To avoid its occurrence, connect the plug to the socket and remove it only after turning off the device with the button.
What happens if you connect a different plug to the socket?
If you decide to connect someone else's plug into the socket, then the following features may arise:
- Thick electrodes will push the brass blades apart more. Accordingly, the spring will stretch much more. Most often, the hole is not enough to install a thick socket and some craftsmen will use a drill to increase the diameter of the holes. If the load is insignificant, then there is nothing to worry about and the outlet will work. With a gradual increase in load, the contact may heat up and lose its elasticity. To connect electrical devices that have low power, you can use adapters.
Adapter from type A to European
The only drawback is that such an adapter can also only cope with minor loads. As the power increases, you may notice strong heating of the structure.
- Old standard thin electrodes in extended electrodes will also work. Appliances that have an older style plug usually have little power, so they will not cause heat. But as the load increases, factors such as reduced contact surface area and insufficient clamping of parts can create increased resistance. As a result, unacceptable heating of the structure will occur.
Contact overheating
High temperatures will burn the insulation layer, and this can subsequently lead to a fire. Based on this information, we can conclude that it is not recommended to use plugs and sockets that do not fit together, as in this case a fire may occur.
Why is this happening
There can be several factors for sparking an outlet. Regardless of the cause, sparking is the passage of current through the air from one contact to another, similar to lightning. As a result, the contacting edges of the wires heat up sharply and very strongly, often burn and melt, which leads to breakdown.
Sparking is caused by the following reasons:
- Inconsistency between the standards of the socket and plug of the connected device. For example, if the plug is from a Soviet household electrical appliance, and the socket is of a new standard. Soviet forks have a 0.8 mm smaller electrode diameter, but even such a small gap leads to sparks.
- Low quality materials used in manufacturing, poor quality assembly.
- Worn electrical wires supplying voltage to the socket contacts. The reason may be operation in conditions that do not correspond to the required temperature conditions and permissible current. This reduces the insulation resistance and, as a result, breakdown of the insulating layer occurs. A sign of an insulation breakdown is that the socket is short-circuiting.
- Loose clamps are the most common cause of sparking. The malfunction occurs during operation of the equipment and is caused by poor contact between the electrical wires and the elements of the outlet. This happens when clamping elements are used in the design of the device (the clamping spring weakens), or when the screws in the screw structure are loosened. A sign of loosening clamps is a crackling sound in the socket.
- Current overload often leads to sparking. Overcurrent occurs when connecting devices of greater power than allowed by the parameters of a particular model. For example, when tees or extension cords are connected to a single device. A sign of overload is sparking when the plug is plugged into the outlet.
- Mechanical wear, loose contacts. Occurs if the product is often used, plugs of different devices are inserted and removed. Without being able to replace the device, you need to disassemble the socket and tighten the contacts.
- Carbon formation. In this case, the socket often cracks. If the contacting surfaces are covered with a layer of soot, and it is impossible to replace the product, you need to clean them.
Reasons for heating
The problem is the plug
If the connection you are testing becomes hot again, you can be sure that the plug itself is faulty. It is he who needs repair or replacement.
- In a removable plug, the screws securing the wires to the contacts may become loose. Disassemble the device, repair it.
- The molded plug is integral with the electrical cord. Therefore, cut off the plug and install a new one.
- In an older product, the diameter of the plug pins is smaller than the socket holes. Consequently, they are not installed tightly when connected, which provokes heating. This plug should be replaced with a new one.
Problem with the socket
If the temperature of the plug has not changed since connecting to a working point, you should examine in more detail the device in which the problem occurred. The answer to the question of why the outlet gets hot can have several options:
- The actual load on the device exceeds that for which it is designed. If there are not enough connection points, special devices are often used - extension cords with tees. If the permissible power of the device is 2200 watts (10 amperes 220 volts), and the total power of simultaneously operating devices connected to it exceeds this figure, then the reason for the heating becomes clear. Before the outlet burns out, start installing new connection points. Or make sure that several devices powered from this place are not working at the same time.
- If the socket melts, sparks, or makes sounds similar to crackling, while the actual load does not exceed the permissible one, the failure lies in the mechanism. It is necessary to establish the exact cause, make repairs or install a new product.
Electrical standards
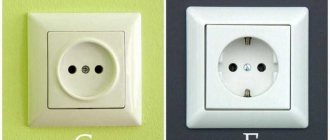
All electrical appliances that are present in everyday life are created by various manufacturers. At the same time, in almost every home you can find household appliances that were produced several decades ago. In the photo below you can see two main standards of electrical plugs.
The Soviet plug has an electrode diameter of 4.0 mm
Shuko plug and socket
After studying the photo, you may notice that modern electrodes will have a thick plug. Thanks to this, she will be able to cope with more powerful loads. According to the markings indicated on them, they can withstand a load of up to 3.5 kW. Sockets can also have a variety of connectors, and they are designed to carry specific loads. If you are interested, then read how to install a socket in the floor.
Repairing sockets with your own hands - detailed instructions
The need to repair an outlet often arises. The device may become loose in its fastenings, sometimes a short circuit may occur, and a number of other troubles may occur. Repairing an outlet can be done with your own hands if you strictly follow the recommendations.
Some malfunctions of sockets in an apartment are safe and easily fixed, while others threaten damage to electrical appliances or are generally dangerous to human life. The reason may lie in incorrect, poor-quality installation of the electrical outlet, or in the wear and tear of the old device.
Most often, the fastening of the contacts in the product deteriorates, which begin to wobble and weaken. Wires in the house are often made of aluminum, which is highly ductile and can quickly lose strength.
As a result, the contacts begin to hold poorly. Repairing the socket in this case is simple: you need to strengthen the contacts by tightening them.
If copper wire runs through the thickness of the walls, this problem is minimized or eliminated altogether.
A more serious problem that requires intervention is the device falling out. The product may fall out if the contacts were not secured in time. The electrical outlet may come out a little from the wall or fall out.
Other possible signs of device malfunction:
- bursting, chipping of the decorative cover;
- jumping out of the socket box;
- power cord burnout.
Sometimes the device does not look broken on the outside, but when turned on, the electrical device does not work. The electrical outlet may begin to spark, smoke or work intermittently, it smells like burnt plastic, and the body becomes hot. All these are signs of a malfunction; such a product needs repair.
How to fix an outlet? Types of socket failures and solutions
The socket was patented in 1904 by Harvey Hubbell. The American inventor presented the world with a unique adapter. The socket was screwed into the socket. All that remained was to plug in the plug of some device.
Socket falling out of the wall
The structure was attached to the wall, instead of being partially immersed in it. The method is still relevant today in wooden houses. By attaching the outlet to the wall, you minimize the risk of fire. After installation there are also risks, for example, sparking or short circuits. Therefore, the relevant question is how to fix an outlet .
In what cases does the outlet need to be repaired?
To repair an outlet, you need to be sure that it is the one that is broken. The problem may also lie beyond the connection point, for example, in the junction box. You should contact it if a working electrical appliance does not work from any outlet in the house. If only one “sinks”, the junction box has nothing to do with it.
What do you need to repair an outlet yourself?
Before you begin repair work, you need to provide yourself with the necessary available tools and parts:
- screwdriver (flat or Phillips, depending on the cover screws);
- pliers;
- vinyl insulating tape;
- indicator for determining the phase (and the presence of voltage in the network).
Important. The handles of screwdrivers and pliers must be rubber-coated - covered with insulation to prevent electric shock
- Before work, the line is de-energized. If you don’t know which switch should be turned off on the switchboard in the entrance, you can check with your neighbors or simply select the one you need by briefly turning them off (“off” is the position of the handle down).
- The presence of voltage is checked by an indicator. It is enough to insert a special indicator screwdriver into the socket connectors (one at a time) to make sure that the electricity is turned off. The indicator should not light up.
What to do if the socket itself falls out
There may be two main reasons for this - insufficient pressing of the fastening tendrils and the smooth inside of the socket box, along which the fastenings simply slip.
In the first case, the fasteners simply do not reach the walls of the socket box or the pressing force is insufficient to confidently hold the entire structure. This may occur due to wear of the fasteners or mismatch of models, when the socket itself is smaller than the socket box.
If the socket is still fixed in the socket box, but is then pulled out of it along with the plug, then it lacks quite a bit of pressing force. Here it will be enough to simply bend the fastening antennae a little - they are shaped like the letter “G”, but with the upper part slightly bent upward. If you bend it a little more, the pressing force will increase. To do this, you need to unscrew the adjusting bolt; this part will fall out of the socket itself and can be adjusted with pliers. Then everything can be installed in reverse order. To ensure a guaranteed result, you can make several notches in the place where the fastening antennae will rest, using a knife or a soldering iron.
When the socket itself, even if well fixed in the wall, is much larger than the socket, then it is necessary either to change it completely or, again, to make choppers and make notches on the inside.
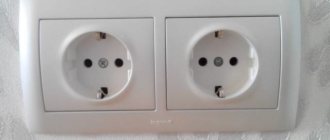
There are also often cases when the surface of the socket at the point of contact with the spacer antennae is simply licked off. An effective solution is to remove the socket box and then install it, but at an angle of 90° from the original position. It’s even easier to rotate the socket itself - double and triple ones are often installed this way - in a horizontal position.
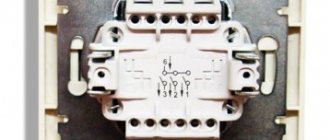
Before deciding what to do if the socket falls out of the socket box, you need to inspect the body of the latter - modern models have mounting bolts with which the socket is simply screwed to their body.
Arming ourselves with tools
In order to repair or change an outlet, you need to collect a set of necessary tools, which includes:
Phillips screwdriver
Flat head screwdriver
Knife
Pliers
File
You will also need insulation and a multimeter.
Using a multimeter, you can accurately determine the amount of work to be done. The device allows you to determine the cause of the breakdown and find out whether the problem is in the socket or in the wiring or package.
How to measure the voltage in an outlet using a multimeter?
In order to change the alternating voltage, you must first set the necessary indicators on the multimeter. To do this, you should set the limit for measuring alternating voltage by moving the knob to 750 Volts or 600 Volts (depending on the multimeter itself, because there are a lot of models).
Next, you need to insert the multimeter probes into the socket as shown in the figure.
In this case, it does not matter how to insert them there, because alternating voltage has neither plus nor minus
The expected 220 Volts may not appear on the device screen, but this does not mean that a voltage of 215 or 219 Volts indicates any problems. It is normal for the voltage to be a little unstable.
Safety regulations
After making sure that there is voltage and the problem lies in the outlet, you can begin preparatory work to repair or replace it.
Before starting work, you need to turn off the power to all circuit breakers on the meter and unscrew the fuses
In this case, maximum care must be taken not to touch live elements.
After this, you need to check the voltage in the outlet again using a multimeter: if it is absent, then you can start repairing.
Important! Everyone who is still in the house must be notified that repair work is underway, so that none of them turns on the appliances
Repair Tips
The socket is crackling
If crackling noises are heard, the outlet needs to be repaired. Usually a slight crackling indicates that the electrical contact has been broken and a spark appears in this place.
Contact is broken in various places:
- at the junction of the electrical wire with the contact clamp. In this case, to repair the socket, you need to turn off the power and tighten the contact clamps with a screwdriver. Upon completion of work, it is necessary to install the product in place and screw on the cover;
- at the point where the spring contacts come into contact with the plug. Before starting work, be sure to turn off the power to the outlet, then remove the protective cover. The reason for the weakening of the contact can be determined visually. If the sockets are deformed, but retain their overall elasticity, then they can be corrected by carefully adjusting them with pliers. When overheated, the contact plates lose their elasticity. Unfortunately, in this case, all that remains is to replace the socket with a new one;
- the wire is broken at the point of entry and there are literally a few millimeters left sticking out of the wall. Then you should inspect the current-carrying core; most likely, blackening or damage to the insulation will be found at the fracture site. If upon examination it was not possible to detect damage, then you can try to identify this place with your fingers “shifting”. A wire held by insulation alone is very easy to identify. To repair, the wire should be cut, a piece of insulation removed and fixed in the terminal.
Often, after a burnout, the wire turns out to be too short and it is not possible to secure it. But the wire can always be extended. To do this, the second wire must be cut so that it is the same size as the first. Solder two identical pieces of copper conductor to the wiring (be sure to clean the ends before work). After that, fix the joint with a heat-shrinkable tube and warm it with a lit match or lighter.
There is another, simpler repair method: wrap the wire using insulating tape and twist the connection. Clean the end of the wire with a sharp knife and connect it to the terminals.
Heating of the plug and body
If you notice heating of the plug or socket body, it means that there is a large contact resistance in it. This happens gradually. The contact first begins to loosen; over time, this place is constantly exposed to an electric arc and becomes overgrown with carbon deposits. In turn, carbon deposits become very hot when an electric current passes through. Accordingly, the contacts constantly overheat, and over time this can result in melting of the outer box of the outlet. Unfortunately, in this case it is no longer possible to repair the socket; you will have to buy a new one.
If you notice the heating in time, you will be able to save the socket; it will only be enough to clean the internal parts from carbon deposits.
No voltage at the socket
Before proceeding with the repair, it is necessary to determine that the problem is in the outlet, and not in the lack of voltage on the suitable wires. This can be done using an indicator screwdriver. If the problem is in the socket, it will be noticeable visually: a break, a burnt conductor, or burnt out contact plates. To eliminate the malfunction, you will have to change the electrical fittings or make repairs.
Case falling out due to loose fastening
Modern electrical installation products are mounted in the wall using a spacer mechanism, which consists of two plates and bolts with sharp teeth. When installed, these teeth cut into the concrete hole of the wall, thereby attracting the socket body to it. If the edges of the hole begin to deteriorate, this causes the fastening mechanism to weaken and the socket begins to fall out. In case of this problem, it is necessary to install a plastic socket box in the hole, covering the empty space between the edges of the socket box and the wall with cement mortar.
Connecting and installing a new
Installation of the old and new sockets is carried out as follows:
- the ends of the wires, cleaned to a metallic shine, are inserted into the terminals and secured with screws (in some models the terminals are spring-loaded). When using screw terminals, the ends of the wires are twisted into a loop;
- folding the wires like an accordion, the socket is placed in the installation box;
- by rotating special screws, spread the spacer legs until the socket is firmly fixed in the socket box;
- screw the socket to the box with self-tapping screws;
- screw the front panel;
- Check the functionality of the outlet by connecting a low-power device to it for a while.
Modern sockets sometimes have a support - a part that is screwed to the socket, to which the inner part and the front panel are then screwed.
Sequence of repair work
- Using a screwdriver, unscrew the bolt that secures the device cover. Remove the outer panel. This will give access to the internal parts.
- Check the status of the contacts. A greenish color on copper plates indicates oxidation. If these parts are gray or black, this means that the contact may not be constant. To bring the socket into normal working condition, it is enough to remove the dark coating using fine sandpaper or a needle file.
- Remove the electrical device from the cavity.
- Use a special screwdriver to tighten the screws and make contacts.
- Strip the darkened ends of the wire with a knife or cut off if the length of the wire allows.
- Wrap the joints with insulating vinyl tape.
- Check the quality of the wires and their condition at the connection point of the switchgear itself. If the connection has become less reliable, it should be tightened. Exposed wires should be wrapped with electrical tape.
- If the connector is movable during operation, be sure to tighten the installation screws, which are located on both sides of the front panel, with a screwdriver.
Having eliminated all detected problems, assemble the structure, install the device in place, and tighten the screw fastenings. Then turn on the power supply in the apartment and, connecting not the most powerful, but 100% serviceable device, check the result of your repair. Observe the operation of the device connected to the network for some time so that there are no unnecessary odors, sounds, sparks, etc.
Quickly check the voltage in the socket with a multimeter
To measure the magnitude of the 220V alternating voltage acting in any electrical circuit, as well as to determine the current strength in the load connected to it, special measuring instruments are used. They are called avometers, multimeters or testers. These products are fairly easy-to-use devices, the operation of which can be mastered by almost anyone.
According to the method of measuring and recording basic electrical quantities, such as current in a socket, voltage or resistance, all these devices are divided into analog (arrow) and digital. The article will be devoted to the second of these two samples of measuring equipment, most often simply called a multimeter.
Features of application
A digital meter of electrical parameters (or multimeter) is an electronic device that provides a digital indication of recorded values with the readings displayed on an LCD display.
Such devices are somewhat more expensive than pointer models. However, they provide more accurate measurements of electrical parameters and are much more convenient in everyday use.
In addition, digital multimeters have a wide range of additional functions, some of which are not available in analog models. With their help, it is easy to check the outlet in the apartment and make sure that the required voltage is supplied.
Additional functionality includes such capabilities of digital multimeters as checking the suitability of semiconductor elements, “continuity” of electrical circuits with simultaneous duplication of an audio signal. They can also determine the nominal values of capacitors (the latter function is found only in some models).
Please note that it is precisely because of this versatility that this device received its custom name. “Multi” translates to “many,” and “meter” means “to measure.”
The package of a purchased digital product includes the measuring device itself and two wires with special probes or “ends”, the lower part of which is protected by non-conductive plastic heads (holders).
Before checking the voltage in an outlet using a multimeter, you first need to correctly assemble the measuring circuit. To do this, use the input sockets available on the case and marked with the appropriate letters.
The end of a black wire is supposed to be inserted into the hole marked “COM”, which means “Common” in Russian. The connector tip of the red cord is connected to the second (signal) socket.
Additional Information. If there is another input connector on the device body, marked “10 Amperes,” you can measure currents with an amplitude within the specified value.
In some models this limit is increased to 20 Amps. When measuring currents within the limits of the indicated values, the connecting connector of the cord with a red color marking is inserted into this socket.
Step-by-step instruction
After connecting the wires, you can begin the measurements themselves, the sequence of which is as follows.
First, the required operating mode of the multimeter is set using the central circular switch. The mode corresponding to AC voltage measurement is located in the sector labeled “ACV” or “V~”.
Possible consequences
For those who are delaying the repair of a sparking socket, we recommend that you read this section carefully and then begin immediate repairs.
Without eliminating the cause of the sparking, the home master puts himself and everyone who lives with him at risk. A problem plug can cause a fire in your home. Sometimes a weak spark is enough for a fire to engulf a home.
The plastic of high-quality products is not subject to combustion, but this does not mean that it will not melt and if you try to pull out the plug, you may be exposed to the harmful effects of electric current.
You should not blindly rely on the operation of circuit breakers, especially if they were installed 5-10 years ago and were not checked after that. Connecting a high-power device or extension cord with equipment connected to it may cause the wiring to catch fire due to overload, and the AV may become faulty. In practice, such cases are not uncommon; it is especially surprising when a plug is inserted into a sparking connector, since it is located very conveniently.
To repair an outlet or replace it, it will take no more than 10-20 minutes, a maximum of twice as long if you lack the skills. But with a reliable electrical contact, the danger will no longer threaten your home.
Safely checking a live outlet
Electricity poses a real danger to human health and requires skillful handling. All actions in household wiring must be performed by trained personnel using special protective equipment.
The multimeter and voltage indicators are designed for safe operation. Using them allows you to understand why the outlet in the apartment does not work; you can simply find a fault in the network. You just need to imagine the principles of its education.
Where does the phase, neutral and PE conductor wire come from?
The voltage in the socket is the difference in the potentials of the phase and the operating zero, which come from the winding of the supply transformer substation of the transformer substation. They are supplied via cables and wires.
In a modern three-wire network, an additional potential line of the protective PE conductor is used, running parallel to the working zero from the ground loop of the transformer substation. It is characterized by increased reliability, durability, and the absence of any switching devices and protective disconnecting devices.
Its task is to remove randomly generated potentials from the metal casings of household appliances.
The potentials of the phase, zero and PE conductor come to the apartment panel, and from it they are distributed among sockets and switches in one of four ways:
- Radially, due to individual connection by a separate line to each circuit breaker;
- Consistently;
- Parallel;
- Combined method.
If somewhere in any place there is a break in the electrical circuit of a phase or zero, then one of the potentials will disappear: a situation will arise when the outlet in the apartment does not work. This place needs to be found.
First, they check the presence of phase potential with energized indicators, and then call the working zero and PE conductor circuits after it is turned off.
How to check each potential on the contacts
It should be noted that we carry out the checks inside the apartment, and the voltage comes from the transformer substation. Our site consists of highways from the input circuit breaker of the apartment panel to each socket or switch.
Search for phase potential
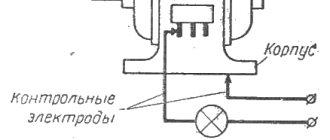
The work is performed with a capacitive indicator, applying its bare end to each contact socket of the socket.
By creating an electrical circuit through the operator's body, the indicator light will light up. Its glow indicates the presence of phase potential.
Sometimes the indicator light of a capacitive indicator may glow on both sockets of the socket (two phases). This is a specific case of zero loss, which is described in another article.
The two-pole voltage indicator creates current between the phase and zero contacts through a built-in current-limiting resistor with a neon bulb. Its glow is a sign that the outlet is working properly.
How to ring a socket with a multimeter
As you understand, by ringing an electrical outlet, you can only determine the integrity of the circuits and lines. This is not yet a guarantee of full functionality of the electrical installation equipment, but it is a very important stage in diagnostics. Taking into account the fact that physical damage makes up the majority of all breakdowns and malfunctions, dialing is the most effective.
Below, I will describe the most optimal algorithm for testing sockets, following which you will certainly be able to quickly detect the causes of their breakdown.
Determining a faulty socket using a multimeter - measuring parameters and continuity of supply lines
First of all, I advise you to carry out a set of simple measurements - the presence of voltage, phase, zero or grounding . This will greatly simplify the diagnostic process.
If for some reason you do not have the opportunity or do not want to do this, immediately proceed to the next step - dialing.
Voltage measurements
First of all, a multimeter determines the presence of voltage and its magnitude. Follow the link to find detailed step-by-step instructions on how to measure the voltage in an outlet yourself.
— If the multimeter shows about 230 Volts, then the electrical outlet is working . It is worth checking the electrical equipment that you connected to it; perhaps it is not working and the mechanism has nothing to do with it. Also, often the connector contacts may not fit well with the pins of the electrical plug due to deformation, oxidation or contamination.
Here it is enough to clean the contacts and tighten them. So that everything functions correctly again.
- If there is no voltage, move on to the next stage
Determining phase, zero and grounding in a socket
I have already written in some detail about how to determine where the phase, neutral and ground are. I will not dwell on this in detail in this article; follow the link and carry out the set of simple steps described there before continuing the diagnosis.
There are usually three main options why it may not work:
1. No phase
2. No protective zero
3. No phase and zero
The absence of a protective zero - grounding - does not directly affect performance - this is only a safety element. But since it is very important, I always recommend checking it as well. The absence of grounding can be noticed only by indirect signs; for a long time you will not know that it is missing. But you must remember that it is this that can one day save the life of you and your loved ones.
If during the diagnostics you have determined exactly which of the lines is faulty, it will be much easier for you in the next step.
How to ring a socket
Now, having a sufficient amount of information about the faulty socket, you can start calling the wiring. Usually, at this stage you already know for sure that, for example, a Phase is missing and you need to localize the location of the electrical circuit damage. But, as I wrote earlier, diagnostics can be started immediately with dialing, it’s just that this method is less effective and, accordingly, longer.
Attention!!! A continuity test with a multimeter or tester does not require the presence of electric current in the network to carry out measurements. Be sure to turn off the automatic protective equipment, de-energize the controlled line before starting diagnostic work, and make sure that there is no voltage in the outlet.
Turn off the dialing or resistance determination mode on the tester (which is basically the same thing) and proceed according to the following plan:
How to determine a short circuit in an outlet
First of all, we call for the presence of a short circuit between phase and zero.
To do this, follow the following step-by-step instructions:
1. The electrical current supply is turned off at the test site
2. Select the Vertebrae mode on the multimeter
3. The red probe is placed in the left socket of the socket, and the black one in the right. It can be the other way around; there is no fundamental difference for the purity of the experiment.
Then there are two possible results:
You will hear a multimeter beep and the display will show a value close to “0”, or anything other than one. This means the socket is faulty! The contacts of the mechanism or the electrical wiring that goes to them are shorted in some place.
Most often, in this case, your circuit breaker for this group probably triggered and did not turn on, signaling a short circuit (link to article). In this case, it is necessary to look for the place where the neutral and phase conductors are closed.
If there is no sound signal, and “1” is always displayed on the screen. This is a good sign, it means that parallel wiring lines do not intersect and most likely, one of them has broken somewhere. Proceed to the next step.
How to ring an electrical line from an outlet to an electrical panel
Next, each line from the electrical outlet to the electrical panel is checked separately. If you have already determined that, for example, you only have a phase conductor, check it. If you haven’t done this, ring all the circuits.
Usually, I call the entire electrical circuit from a place where it is known for sure that all indicators are normal. Usually this is the electrical panel of an apartment or house, so here we use this particular circuit as an example.
Methods: how to make a socket in a plasterboard wall
Installing a socket box in a plasterboard partition is very simple. Here you can already do without mortar and knocking out the core of the groove with a chisel. As already mentioned, there is a standard glass on sale with presser feet, which can easily be fixed to the socket box in the gypsum board.
In most cases, installing sockets in drywall does not take much time and can be done independently
In order to independently place a glass in a plaster wall, you need to do the following work:
- Apply markings on the wall (egg shape) in the place where you plan to make a rosette.
- Make a hole in the bottom for the electrical wires and insert the device inside the groove.
- Tighten the bolts on the sides until the device sits well inside.
That's all you need to do to install the socket box into a wall made of gypsum plasterboard sheets yourself. And after the socket box has been installed, you can install the socket using the technology described above. As it became clear, everything is very simple.
Testing the circuit after repair
A common mistake that an electrician makes is turning on the outlet for voltage without assessing the electrical characteristics, when, at best, the voltage is measured.
This operation is clearly not enough because the circuits were reconstructed, the resistance of the contact wires and clamps changed.
The quality operation of the assembled circuit can only be judged by the thermal conditions of the outlet and the conductors connected to it at the maximum permissible load.
For example, if the outlet is mounted to power 16 ampere electrical appliances, then devices with a power of 16x220 = 3520 W or 3.5 kW should be connected to it. Then maintain the working time for at least half an hour, turn off the voltage, and evaluate the heating of the elements of the entire supply circuit.
If it is normal, then we can conclude that the case when the outlet in the apartment does not work has been successfully resolved, the fault has been eliminated, and the equipment can be put into operation.
When the heating is excessive, it is necessary to continue to understand the reasons for its formation and look for remaining defects.
The influence of a poor contact in an outlet on the development of a fire in home wiring is well described in the video by the owner of “Electrician’s Notes.” I advise you not just to watch it, but also to analyze it in relation to your situation.
I recommend that work to restore electrical power be carried out in 4 stages:
- Assess the condition of the housing fastening.
- Perform electrical measurements using a voltage indicator.
- Completely remove power from the apartment and check the internal circuitry.
- Test repaired equipment for maximum thermal loads.
Useful products
- Souvenir coin for decision making
- Pocket folding knife
- Pitcher for baristas
What to stew with?
If the outlet is energized, an excellent option for extinguishing would be to use a fire extinguisher - carbon dioxide, powder or chemical foam. But, unfortunately, this device is not available in every home, and at the most necessary moment it simply may not be at hand. Therefore, it is necessary to know about other effective methods that will help extinguish the fire. To use them, you must first relieve tension. The easiest way is to use a shield, as discussed above.
If this is not possible, you can simply cut the wires going to the outlet. But again, assess the situation; you can only do something if the flame is still small and has not gone beyond the outlet. Also, for this you need to use a suitable tool, the handles of which are insulated. You need to cut the wires one at a time, avoiding contact.
The most drastic way is to cut the wires with an ax. It is important that the handle is made of wood and not wet. Before you hit, turn away to avoid getting sparks in your face.
However, turning off the power does not always work. What to do if the socket still continues to burn? Try to extinguish it in any way possible. In this case, you can even use water, but only if you are 100% sure that the device is disconnected from the power supply. And, of course, the most important rule is not to touch the molten parts with your hands, as this can cause serious burns.
We hope our tips will help you if the outlet catches fire. But it is better, of course, to avoid such situations. To do this, use only serviceable devices, follow safety rules and under no circumstances ignore signs of breakdown, even if they are not clearly expressed. To fix the problem, call a specialist immediately.