For this purpose, the intercom has a function such as an electromechanical lock.
Let's look at the installation of an intercom system in detail from A to Z, so that any user, after reading these instructions, understands how this is done, what mistakes should be avoided during the installation process, and most importantly, make sure that this is completely doable at home with your own hands.
Materials and cable selection
First of all, we list the materials that you will need to install and connect the video intercom system:
- low-current cable KSPV 4*0.5mm2
They will connect the calling panel and the electrical lock. It will also supply 12V power.
You can also use a cable for video surveillance - KVK.
But KSPV is more convenient to cut and connect.
The 12V voltage is generated by the intercom itself. In our case, no additional power supplies will be installed.
- video intercom
- calling panel for it
- electric mechanical lock
- BUZ block (Lock Control Unit)
- HDPE pipe for cable laying
- flexible connection (corrugation) for connecting the cable from the fence to the gate
Mistake #1
The main mistake is that they remember about the video intercom at the very last moment.
The paths have already been laid out, the outside of the house is finished, and only after that the owner thinks, why don’t I make a convenient bell.
Remember that this “bell” is accompanied by excavation and slotting work. Your intercom will be located inside the house, and the calling panel will be behind the gate, a few meters from the front door.
Therefore, installation of such a system in a private house is slightly different from installation in an apartment. In a high-rise building, these two devices are separated by just one wall or entrance door, but in a cottage, between them there may be a landscaped area in which you have already invested tens or hundreds of thousands of rubles.
Therefore, it would be right to think through all this and lay the appropriate cables at the design stage. Do not forget that wireless analogues of such systems are several times more expensive.
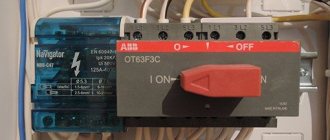
Popular schemes for connecting an intercom
This subheading will describe standard intercom connection diagrams; it is best to install them if you are versed in electrical engineering; if not, you can simply ruin the recently purchased device. If you don’t understand what you’re doing, it’s better to contact a specialist.
Before you start installing the intercom, carefully read the instructions from the seller, you can highlight a lot of useful information there.
This is what one of the ways to connect a regular intercom with a calling device, as well as an electromechanical lock, looks like:
Notice that here the normal open contract that controls the lock is inside the speaking handset.
Also make sure that the output voltage and power of the control unit or power supply correspond to the lock parameter.
This figure shows a model for connecting a video intercom; here the contact that controls the lock is located inside the calling panel:
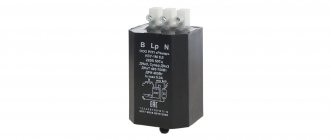
Often, in order to install a power supply, you have to run 220 V wires to it, and this is not always convenient, here the BUZ, which was already mentioned above, will come to the rescue, here is a picture that shows how to connect an intercom with a BUZ:
The BUZ itself is small in size, so many experts install this drive inside the lock itself.
When installing this option, you should understand that it will function only if the voltage of the call block matches the voltage parameter of the opening lock.
The last one will be a diagram of how to connect an intercom that has an electronic key reader and a controller for working with an electromagnetic lock:
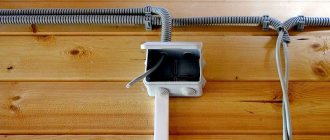
Installation of cable for video intercom
The order of work here is as follows. Determine where to install the calling panel on your fence.
As a rule, it is placed on the side of the lock, and not on the side of the gate hinges.
Mistake #2
In this case, you should avoid installing it on metal structures that may be influenced by stray currents.
To this place you will need to dig a trench to lay a communication and power cable. It will be the same cable - KSPV.
The recommended trench depth is 0.7 m.
The cable itself must be laid in a HDPE pipe. Including in the basement, and especially along the surface of the fence.
The tube will protect the insulation not only from the mechanical and chemical influences of the soil, but also from the ultraviolet rays of the sun.
The intercom should be installed at a height of 1.5-1.6 m. Accordingly, route the KSPV cable to this height with a small margin.
Make passages in the foundation and through walls through a protective sleeve.
Mistake #3
Do not lay the cable from the intercom to the calling panel in close proximity to 220V power cables.
Often inside the house this is done in one plastic channel, and outside, in an attempt to save money, they stuff everything into one tube, both 220V wires for street lighting or retractable gates, and the low current for the intercom.
When laying different cable lines in parallel, the distance between them must be at least 100 mm.
Also, through a protective sleeve, the cable is led out into the fence column to the outside.
It is advisable to provide for this mortgage at the stage of construction of the fence and installation of the gate.
Mistake #4
After installation, the cable must be backed up.
As a rule, the stage of work on laying HDPE pipes and cables in them is significantly ahead of the work on directly connecting the intercom. Sometimes the interval between them stretches for several months.
Therefore, the ends of the cable should be securely sealed so that it does not absorb moisture and fail.
Content
- How does a video intercom work, what does it consist of?
- Choosing an electronic video intercom lock
- We decide on functionality for specific parameters
- Wired or wireless way to connect an intercom
- Video intercom monitor: color and black and white
- What else should the owner pay attention to when choosing
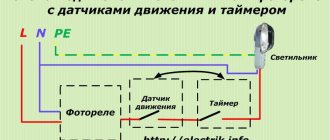
- Video intercoms with motion sensor and recording for a country house
- Call panels
- High-quality IP video intercoms
- If you don’t know where to start choosing, look on the Internet
To understand how to choose a video intercom to protect your home, which will meet all the specified parameters, it is important to understand the principle of its operation and the main features of this device.
Connecting an intercom monitor
When the moment of connection comes, the insulation is removed from the end of the cable, and the wires are marked as follows:
- core for transmitting audio signal – “A”
- for video signal transmission – “V”
- Call panel power supply – “B+”
- ground or minus – “GND”
Follow the same markings, guided by colors, on the back of the cable near the video intercom.
To ensure reliable contact connection, the cores can be crimped with lugs.
Next, through the column and along the gate, you need to lay the second section of cable - from the calling panel to the electrical lock. Along the fence wall, the cable can be protected with a plastic channel, and a flexible transition can be made at the gate.
You also remove the insulation from this section, and sign the cores as follows:
- two wires - “lock”
- ”B+” – power from the calling panel
- “GND” – ground, aka minus
The same designation is made on the second end of the cable near the lock.
After this, you can fill the trench and carry out finishing work.
In the house, the video intercom is connected to the nearest outlet. If it is not nearby, you will have to lay a VVGng-Ls 2*1.5mm2 cable and install it nearby.
Let's move on to directly connecting the video intercom panel.
Attach the support bracket to the wall and connect the four marked wires to your terminals: audio output, video output, power, ground.
Some monitors do not have such terminals, but there are pin connectors designed to connect several devices simultaneously - video cameras, intercom, and several other panels.
Plug the plug connector into its socket, and connect the wires by pressing or soldering.
If you have not four wires coming from the plug, but five, most likely you have a model with a built-in ECU. The fifth wiring is a separate power supply.
Such devices work tolerably only at short distances, when the distance from the monitor to the gate is no more than 5 meters. Therefore, it is always better to use a separate BUZ, and you can throw away the excess wire or bite it out.
After connecting, fix the monitor on the bracket.
What else should you pay attention to when choosing
The housing of the external panel also plays an important role. The material from which it is made affects not only the appearance, but also the durability of the device. It would be better if it was high quality plastic. As a rule, this option cannot be cheap.
There are models with and without tubes. Which one to choose is a purely personal matter. Some people like to talk to guests on speakerphone, while others don’t need loud conversations.
You also need to carefully select network equipment for connection.
Call panel connection diagram
We return to the street to the calling panel. Mount the mounting bracket on the column where the cable exits and proceed to connecting the wires.
Often a special corner is included with the bracket. It allows the panel to stand at an angle of 30 degrees, so that the video eye looks at the incoming visitor, and not at an empty road or at the sky.
The connection diagram for the calling panel wires is indicated on the back of the case. The cable cores of a certain color come out from there.
Four of them are responsible for communication with the intercom, and two control the lock. All the cores of the three cables (coming out of the panel, laid from the intercom in the house to the street, separately going to the gate lock) are connected through crimping followed by insulation with heat pipes according to the colors and diagram indicated on the back of the panel:
Connect all the “GND” wires to each other, and connect the two “B+” power wires to the +12V wire.
Connect the wires labeled “lock” in any order.
If you are using a KVK cable or another video cable, then here is the purpose of its 4 cores:
Mistake #5
Try to avoid twisting here, followed by the use of electrical tape.
This degrades the signal, and after a year or two leads to the inoperability of the entire system. If you do twist the wires, be sure to solder them and protect them with heat shrink.
Scheme options for other types of video intercom kits
Above, we examined the most typical connection diagrams for video intercoms, and also described the basics of placing wires and other elements that can be used to guide the installation of other types of similar equipment.
Let us briefly describe other schemes.
Connecting a coordinate analog product. In this example, additional calling panels with cameras are connected directly to the main module with a screen:
Connection via a controller or patch panel is often used. The process of installing wires is not complicated, since the instructions always indicate the pinout of the terminals of this element.
Scheme with switching panel:
Below is another diagram with a controller. This element allows you to connect an increased number of components in a more convenient way. The wires of the parts are connected to its terminal part, and from it to the apartment module there is not a bundle of conductors, but a reduced number of them.
You can include a recording device or video recorder in the circuit:
Why do you need a BUZ?
After all the operations done, all that remains is to connect the electromechanical lock.
Mistake #6
Never connect the 12V generated by the intercom directly to the terminals of a lock without a control unit. What does this mean?
If there is 12V only from the monitor, without an additional power supply, a strong voltage drop occurs when the lock is opened. Accordingly, the sound is lost and interference appears in the video. And that's the best case scenario.
At worst, the lock simply will not open, and this mode of operation will gradually kill the calling panel and monitor.
You can, of course, use a circuit with a separate power supply, for example this:
However, not everyone wants to hide an extra box in their fence, and even connect a separate 220V cable to it.
That's why BUS is used. Roughly speaking, it accumulates voltage from the intercom and at the moment the lock open button is pressed, it briefly supplies much more than 12 volts to the coil of the electromagnetic device.
The lock opens without any problems. Moreover, thanks to the trigger decoupling inside, there is no impact on the remaining electronic components of the system.
Mistake #7
At the same time, do not forget that many BUZ accumulate tension precisely at the moment of the call. Without a preliminary call on such intercoms, the lock simply will not open.
That is, they wanted to go outside themselves and open the door from the house, pressed the intercom button, went to the gate, but it was closed. This happened due to the fact that no one pressed the call panel on the back side.
We decide on functionality for specific parameters
To choose the right video intercom for a private home, you need to correctly allocate the purchase budget and decide on the necessary parameters.
If there is a need to monitor the entire perimeter of the local area and there are several entrances, then it is worth considering video intercoms for a private home with the possibility of adding two or more video surveillance cameras as an option. The owner will always be able to track:
- Everyone who came;
- Who moved through private territory and when;
- Incidents on the street;
- Suspicious vehicles;
- Lost animals.
Important!
If several video cameras are installed to monitor the main entrance, the first of them is installed above the gate or door, and the next one is slightly higher and offset to the side relative to the first. This is done to make the viewing angle wider.
Video intercom monitor
Another important aspect that determines the functionality of a video intercom is the monitor. When choosing, you should pay attention to the screen diagonal. The larger the diagonal inches, the better you will be able to see the guest. For people with poor vision, it is recommended to purchase monitors of at least 7 inches.
A black and white monitor costs an order of magnitude less than a color monitor. Such models also do their job well, like their colored counterparts. If the budget is limited, then a black and white monitor will be a suitable solution.
There are device models that support HD resolution, which allows you to see even the smallest and smallest details in the video. Most often, such monitors are equipped with many additional useful functions. For example, the ability to take a screenshot or record a video of a conversation.
In addition, many video intercoms have the function of playing music from a memory card, a calendar, a clock, have a photo frame mode, and come with sensor recording and memory. Thus, the home protection device becomes not only an element of the security system, but also an entertainment center.
By placing such a device in the kitchen, the housewife will be able to listen to music or view photos recorded on a memory card while preparing food, and when a call comes in, open the door without being distracted from preparing food. Therefore, you need to choose an indoor unit based on the tasks assigned. Will it be just a screen for communicating with the visitor or will the monitor also perform additional functions.
Installing additional devices
Door closer
This device is usually not included in the standard set of video intercoms, but its use has become mandatory almost everywhere.
The cost of the structure is not too high and its installation is not particularly difficult, but the advantages when using a closer are very noticeable.
Reducing vibrations and impulse shocks has a beneficial effect on the electric lock mechanism, circuits and contacts of the calling panel, extending their service life. You can be sure that the entrance door or gate will always be closed.
A convenient, economical option to secure property for individuals is wireless video surveillance in the apartment. The system consists of a network of devices that transmit and record video signals using analog, digital, and GSM communication channels.External anti-vandal IP cameras have a durable metal casing and are installed out of human reach. They are usually installed on the walls of buildings, poles or other structures. More information about vandal-proof IP video cameras can be found here.
Intercom
There are increased aesthetic requirements for the quality of installation of video intercoms in apartments. Electrical and other wiring should not be visible.
The device itself must be attached securely and exactly at a height of 1500-1600 mm from the floor level, then the screen will be at eye height. The device should be located not far from the power source in a sufficiently spacious place, which will make it possible to install additional devices.
The boxes through which wires transmitting information will be supplied must be larger in cross-sectional area to allow for the installation of additional cables.
Amplifiers
If one of the signal transmission points is too far away, image quality problems may occur. To solve this problem, you can use special equipment.
There are two types:
- cut into the cable line in one place;
- have a receiver with a transmitter, and are located at opposite ends of the transmission line.
These devices provide high quality transmitted signals over long distances from several hundred meters to 3 kilometers. They have adjustable signal transmission levels, do not require separate power supplies, and are compact.
They provide suppression of absolutely all interference arising along the transmission line. Many of them have a built-in lightning protection system. The only negative is that to install a transmitting device from a pair, an additional switching cabinet is required.