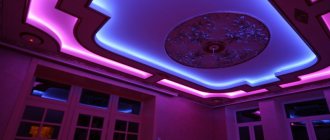
A well-designed interior is one that combines comfort and functionality, but at the same time has a beautiful appearance. For example, modern lamps not only provide light and save energy, but also often become decorative elements, giving a completely unusual look to ordinary things. All kinds of lighting today can be used to decorate curtains functionally; one of the popular options is a night light for curtains.
Curtain lighting is an indispensable part of the interior of modern apartments.
This is one of the best, non-trivial and bright ways to improve the design of an apartment or private house.
Option to suit your taste
There are indeed quite a few ways to “illuminate” curtains and make an original night light. Among the most popular:
- Garlands,
- LED curtains,
- lighting built into the cornice,
- curtains, which themselves are LED “waves” (they are also called “waterfall”).
Often the method of illuminating curtains is used in administrative centers, sports or shopping areas.
But first things first.
Making cornice lighting from LED strip
So, the most common lighting option is the use of LED strip. To install lighting cornices, you must:
- choose a mounting location;
- select the tape and additional equipment;
- install an improvised lamp.
Where can you attach the LED strip?
LED strip can be fixed:
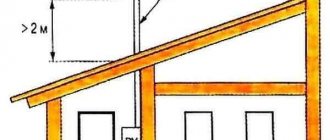
- on the ceiling above the cornice. This method of fastening allows you to illuminate not only the cornice, but also the ceiling, and also highlight the structure of a figured or two-tier type;
Cornice and ceiling lighting
- behind the cornice. The lighting is dim and can only be used to decorate the room;
LEDs are located behind the cornice
- below the cornice or in a special niche on its lower part. In this situation, the cornice and the space located below will be illuminated. With the correct selection of the power of lighting equipment, it can be an additional source of light.
Downlighting for cornice
Selecting tape and connection equipment
How to make ceiling cornice lighting yourself? The next stage is the selection of materials.
Illumination can be made using different types of tapes:
- white plain. Allows you to simultaneously solve the problem of additional and decorative lighting;
- colored monochromatic. Backlights are available in red, blue, green, yellow and so on. Each buyer can choose the most suitable option for themselves, taking into account the design of the room;
LED with diodes of the same color
- multicolor. When installing additional equipment (controller), it becomes possible to independently change operating modes by analogy with Christmas tree garlands.
LED with diodes of different colors
To choose the right tape, you also need to consider:
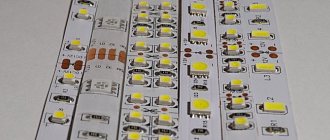
- equipment power. The power parameter is influenced by factors such as the number of LEDs placed per 1 m and the brightness of one LED;
Difference between tapes according to lighting intensity
- level of protection of the tape from moisture. For rooms, corridors, kitchens and other rooms with a minimum level of moisture, it is enough to provide lighting with a minimum level of protection (IP20).
The parameters of the tape, including brightness, number of diodes, level of moisture protection, are indicated in the product labeling and are required to be included in the accompanying documentation.
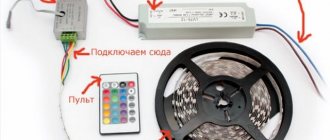
To connect the LED strip you will need to purchase additionally:
- power unit;
- connecting wires;
- controller (if multi-color tape is being installed);
- connecting clips, if assembly without soldering is intended;
LED strip assembly options
- fastening clips, if the tape is not equipped with an adhesive base that facilitates quick fastening.
Devices for fixing LED strip
Types of garlands
You definitely won’t encounter a paucity of choice in this matter; there are very, very many varieties of garlands and lighting structures that can be used to illuminate curtains. Let's list some of them.
An additional light source that consumes minimal electricity visually enlarges the room.
- universal linear garland (lamps arranged in series on a long wire)
- curtain garland (long wires not connected to each other)
- fringe garland (branches of different lengths from the main wire)
- mesh (looks almost like a fishing net, only with small lamps)
- duralight (flexible cord with LEDs, especially suitable if you need to give the light picture a certain shape)
Cozy and comfortable rooms in small spaces will become much more spacious and brighter thanks to LED lighting.
Advantages of illuminating curtain niches
niche for curtains with lighting
The flexibility of the LED strip used to create illumination makes it possible to repeat and match the curves of even the most complex reliefs. Thanks to the compactness of the tape, the backlight can be hidden even in the narrowest openings and hard-to-reach places. The LED strip does not heat up the fabric, due to the fact that it practically does not heat up during operation. LED lighting has very wide possibilities for creating high-quality and completely unique lighting, among which we can highlight:
- cost-effectiveness of electricity costs;
- flexibility and compactness in use;
- easy installation.
When using an LED strip to illuminate curtains, there is no longer the problem of replacing burnt-out light bulbs in difficult-to-reach places, since the LEDs practically do not burn out. And thanks to the use of LED strips, such lighting can be an excellent addition to any room design. Indeed, it is rare these days to find a room design that does not use LED lighting for curtains and curtains.
Just a few years ago, creating such lighting was considered quite complex and troublesome. Today, with the help of LED backlighting, you can obtain pure and even colors that qualitatively transform the atmosphere in any room. Modern lighting systems are equipped with controllers and special panels, which make it possible to create different lighting scenarios, as well as change the dynamics and image of the entire interior. Thanks to the use of such lighting, it is possible to convey millions of shades, and some colors can smoothly flow into others.
Garland for curtains
How much the garland will fill the curtain area is up to you to decide. Some prefer the curtains to be illuminated in their entirety and look like brightly glowing curtains, for some a couple of single garlands are enough, while others get creative by laying out a light pattern on the curtains.
Such systems are qualified according to two criteria - the direction of the glow and the location of the backlight.
What to attach it to?
The method of attaching the garland to the curtains depends on its weight and your idea.
Various installation methods are used, and they are all correct in their own way: the consumer has the right to decide which tape to use and how to install it.
- If the garland is not very large and light in weight, then you can attach it simply - with double-sided tape. Moreover, if you decide to use a window as the basis for fastening, first wipe the desired area with alcohol. You can install lighting on the curtain itself, both in front and behind it on the window.
- A more reliable option is to fix it with a hot glue gun.
- If the basis of the fastening is a cornice, hooks for tulle or thread can be used.
- Are you attaching it to a wooden window frame? Drive a small nail into it not completely.
- If you want the curtain to be backlit, you can attach it directly to it.
As for the location, the lighting of the curtains can be lower or upper.
Connection
There are also differences in connection types. If there is a free outlet near the window, choose a garland that runs on electricity. If there is none, it is better to choose a battery-powered garland. By the way, it’s better to stock up on the latter for future use, so as not to be left without a magical mood at the most inopportune moment.
The top mounting method is the most preferable, since on a subconscious level a person always pays attention to the upper half of the room.
The effect of dynamic lighting is possible when using an RGB strip with several hundred shades.
Options for lighting curtains with diodes
The LED window curtain garland has 2 types of glow: end and side. It is compact, thanks to this property it can be installed even in very narrow window openings. In addition, the tape is practically invisible when turned off.
Ideally, residents should not observe the glow provided by the operation of LEDs, but rather diffused (reflected) light that is pleasant to the eye.
Scattered (reflected) light
It is advisable to hide the cornice for such curtains in the ceiling niche or cover it on top with a polyurethane cornice so that the light source is hidden.
Related article: Using turquoise wallpaper in the bedroom
Decorative lighting of curtains with diodes is performed in 2 options:
- Below the curtains.
- On top of the curtains.
The most common way of illumination is from the top of the curtains, pointing down onto the fabric. To do this, a box is mounted near the edge of the curtain; a diode strip is placed in it, which supplies light tangentially.
Sometimes, to get a bright accent of light, it is enough to illuminate not the entire curtain, but only the lambrequin, which in the light of the diodes acquires a unique aura.
In some cases, LED curtain lighting is not hidden in a box, but is used to illuminate blinds. To do this, choose a tape with the most dense arrangement of diodes to create an interesting point-light decor.
Hypodynamic interior lighting is provided by full-color RGB diodes, which are controlled using a remote control and can change the shades of light. After pressing the control button, the tape takes on the selected static color, which can completely change the visualization of the curtains. If blue curtains are illuminated with yellow diodes, you will get diffused greenish illumination for the curtains, and if blue diodes are directed at red textiles, the curtain illumination will be purple.
Low-power diodes turn transparent fabrics into light and weightless ones. The lower the density of the diodes, the more airy the organza tulle, muslin or thin curtain will look.
For thick and heavy curtains, more powerful and closely spaced diodes are often used, because such textiles transmit little light and therefore require stronger lighting.
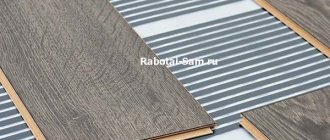
LED Strip Light
Illuminating curtains with LED strip creates a different visual effect. If the garland fills the area of the curtains, then the ribbon fills the space at the cornice, spreading its light in a gradient: bright at the top and calmer towards the bottom.
By switching from one shade to another, you can change the perception of the fabric.
Types of tape
There are several models of LED strips. They differ in the types of LEDs and the frequency of their installation. Do not choose a tape with too high a light intensity; it will dazzle your eyes and “eat up” an unreasonably large amount of electricity.
For thin and transparent curtains, low-power LEDs are used, turning them into a light haze - it looks simply great!
To illuminate the ceiling, experts recommend installing an SMD 5050 strip (from 30 warm white LEDs per 1 meter).
Mood color
The advantage of LED strips is that they can emit light of any color, you can choose the one you need to suit your mood. Warm home gatherings? – use soft white or yellow. Small party? Neon blue or purple will create the atmosphere.
This method will allow you to realize any design ideas.
We make lighting for ceiling cornices. 5 rules for choosing LED strip
1. Choose a tape of the required power. Typically, a strip with a power of 4.8 - 9.6 W is used to illuminate cornices because they do not require additional cooling. If you need to use more power, then you need to use a radiator in the form of a long aluminum profile. 2. Use tapes with a constant voltage of 12 or 24 Volts. Such power ensures the most durable operation of the system, and the light will be “even,” that is, without ripples. Under no circumstances should you use an LED strip for your interior that is directly powered by a 220V network. Since this solution was originally designed for street decoration, usually for the New Year, such a tape has high pulsations and a low service life.
3. Consider the power reserve when selecting power supplies. The reserve must be at least 20% of the total power of the tape. 4. Select the desired degree of protection from dust and moisture. There are tapes that are waterproof (usually class IP65) and some that are not waterproof (class IP20). Waterproof tape is necessary for use in rooms with high humidity (bathrooms, showers). This tape is also more convenient to install because The diodes are protected from damage by a silicone compound and can be ironed along the entire length with your hands, and during general cleaning you can easily wipe off dust. Tape without moisture protection is cheaper, it is convenient in cases where it needs to be cut into a large number of small pieces, to which wires are then soldered.
5. Take care of the uniformity of the glow colors. LED strips from different supply batches may have different shades of glow, so to be sure not to miss the light, pay attention to the supply batch. On each reel of tape, as a rule, the batch or bin is indicated. A bin is a code for more precise parameters of light intensity and color coordinates. Therefore, choose single batch or single bin tapes.
Source
LED curtains “Waterfall”
LED garland that creates the effect of “falling” waves due to the play of light from top to bottom. Each wire looks like a separate stream of water.
During long-term use, the product practically does not heat up.
Installation materials
To make installation as hassle-free as possible, stock up on everything you need in advance. Don’t forget about measurements; you need to know the width of your window before you go to the store.
The backlight creates an original and unique effect of falling sunlight at any time of the day.
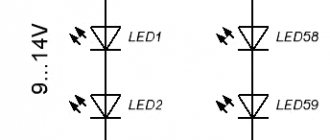
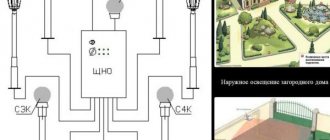
- Transformer. Necessary for the LED device to function. The fact is that the LEDs will not be able to work if the standard network values are set. In our case, a lower voltage and current of a different quality are required: voltage input - 220V with a frequency of 50 G, output - 12 V and direct current.
- The waterfall itself. The length of the waterfall must match the length of the distance you want to illuminate, and the values must match the parameters of the transformer.
- The wire. We also remember about timely measurements. The cross-section of the wire suitable for the transformer must be at least 1.5 mm2, on the side connected to the tape - 0.75 - 1 mm2. The wire must have 2 different colored cores.
- Single-pole switch (standard will do) and RCD (for additional safety).
- Plastic boxes for wires. This point and the following are for those who want to hide the mounting location and install a waterfall under a suspended ceiling.
- Drywall. You can use it to make a niche in which unnecessary wires will be hidden.
- Heat shrink tubing or insulating tape.
Let's start installation
Naturally, you need to start work by turning off the voltage, otherwise the consequences may not be the most favorable. Well, to do everything right, follow a certain sequence.
Illuminating curtains visually enlarges the living space.
- Install a plasterboard box as close to the curtains as possible. If you need it, of course. If you are installing lighting under a suspended ceiling, you can safely skip this point.
- We attach the transformer. It is better to install it where the LED waterfall will come from. You can attach it directly to the ceiling using standard dowels.
- We installed the transformer - we supply voltage. This is where the nearest outlet or junction box will come to the rescue. Connection diagram: a wire with red insulation is connected to the phase, a wire with blue insulation is connected to zero. To determine phase and zero, use an indicator screwdriver.
- Now you can start attaching our LED garland. To do this, you can use construction adhesive (we wrote more about fastening methods at the beginning of the article). The place where you will attach the waterfall must be cleared of debris and dust.
- And finally, we connect our waterfall curtain through a transformer. There are 2 terminals on the transformer: V+ and V- from them to the corresponding terminals on the garland, connect a wire with a cross-section of 1.5 mm2.
- Well, to control all this beauty, install a switch. Make sure that it is not set to zero, only to phase.
LED products consume a minimal amount of electricity, which cannot be said about conventional incandescent lamps.
Installation of LED curtain lighting
The installation procedure for ice lighting for curtains consists of three main stages:
- A box/cornice with a cavity facing the curtain is installed on the ceiling opposite the curtain. It is necessary for hidden installation of tape, wiring and transformer.
- The transformer itself is attached to the surface of the wall or ceiling using self-tapping screws or dowels (using clamps if there are no special holes in the housing), depending on the location of the box and curtains, as well as the architectural features of the room.
- All conductors are connected and connected according to the electrical diagram, observing the polarity of the contacts (V+ and V-). The power supply is turned on and the functioning of the installed curtain lighting is checked.
Illuminated cornices
Another spectacular and at the same time practical lighting option is cornice lighting. In the previous part, we considered the option of attaching a waterfall curtain, including under the cornice; you can also attach other lighting options to it.
LEDs are much more durable and fireproof compared to all other lighting devices.
You can highlight any cornice:
- ceiling,
- wall-ceiling,
- wall.
Since the backlight requires low voltage, it does not damage the fabric of the curtains or the material of the blinds.
It is better to choose those models in which the part that is glued to the wall will be much wider than the ceiling part. That is, classic and decorative skirting boards will not work; it is better to choose a wide molding. But even in this case there are some nuances: make sure that the upper part of the molding is not positioned horizontally and is not slanted down from the wall, otherwise it will eat up the light.
The most suitable option is a polyurethane curtain rod for lighting; it was originally designed for convenient placement of light inside.
Choosing a lighting fixture to illuminate the cornice
Traditional lamps will definitely not be suitable right away. They can direct the light in a fairly powerful beam, and therefore fall unevenly. It is better to use LED strip or various types of garlands with LED lamps. It does not heat up as much and is more economical.
Lighting is selected in accordance with the curtains used.
Installation of cornice lighting
The person looking at the curtain should not see the tape. Ideally, it should be hidden inside the box.
- Glue the cornice onto the prepared wall.
- The cornice should be installed at a distance of 5-10 cm from the ceiling.
- Glue the corners of the baguettes together (corner to corner).
- We glue the LED strip to the wall or install lamps. Or we “invest” it in the space behind the eaves.
- We attach the power supply next to the wall or below. It is better to place it where access to it will be as convenient as possible, in a place where your hand can reach.
- Ready!
It is advisable to direct the light along a tangent line relative to the curtain.
Advantages
By using this modern high-tech decor, users receive the following benefits:
- Illuminating the curtains creates an interesting effect of soft sunlight penetrating.
- An LED curtain visually changes the dimensions of the room and the geometry of the interior space of the room.
- The diodes favorably emphasize the window composition of curtains with tulle, while looking attractive from the inside and outside of the room (it creates a second light from the curtains).
LED lamps are much more economical than conventional incandescent lamps, are fireproof and almost do not heat up during operation.
The electricity consumption of such light sources is minimal, and their operation is durable and stable.
Curtain rod lighting operates on low voltage and does not damage the fabric, as it produces little heat.
Once again about the main thing
In order for the lighting decoration to really please you not only with beautiful effects, but also with ease of use and safety of operation, be sure to think through all the details before going to the store and starting installation.
Try to create smooth lighting, and no curtains or curtains should interfere with the light.
Installation and connection of a transformer for LED strip
Illumination of windows and curtains can fully function only when connected to a transformer module, during installation of which two conditions must be met:
- Reliability of fastening.
- Availability of contacts for wiring connections.
At the same time, it must be hidden from the observer. Therefore, first of all, you need to carefully consider its location, and then mark the holes in its body. Next, if the wall or ceiling material is stone or concrete, you need to drill holes in them. After this, you can fix the power supply to the dowels.
Features of tape fastening
The traditional method of attaching ice strips to illuminate curtains uses a factory-made adhesive base on the side opposite the diodes. However, in practice, the durability of this method of fixation leaves much to be desired - the tape falls off quite quickly.
The reason may be either a manufacturing defect or unscrupulous adherence to the instructions of the installer himself.
Expert opinion
Smirnova Ekaterina Anatolevna
7 years of experience in interior design, professional architect
In such a situation, high-quality super glue may be the solution. Before installing the strip, the gel must be applied in dots at a distance of 5 cm to the base to which the tape will be attached.
Then, with the self-adhesive side, place the ice lamp itself on such a surface. Curtains or blinds with lighting installed in this way will last as long as the diode elements themselves work.