There are usually a lot of household appliances used in modern houses and apartments. Therefore, the standard 1-2 sockets per room are not enough for property owners these days. Accordingly, in most cases, owners of apartments and houses install additional connection sockets in their homes. Of course, such a procedure should be carried out according to all the rules, observing certain standards. For example, during installation you should, among other things, maintain certain distances between socket boxes.
Why group
Of course, you can place sockets in the house in different places. However, too many of them over the entire wall area will most likely greatly spoil the appearance of the room. Therefore, in modern apartments, sockets in most cases are simply placed several times in one place. This allows you to maintain the attractive appearance of the walls and make the connection sockets less noticeable. Also, this installation method makes the subsequent operation of sockets more convenient. After all, most often different kinds of household appliances are located in apartments not far from each other.
Grouping rules
We’ll talk about what distance between socket outlets in a group should be chosen below. First, let's figure out what technologies can be used to install connection sockets in the block.
In a house, you can, of course, install several separate sockets in the same place, simply by placing the sockets close to each other at the same level from the floor. However, electricians rarely use this method of installation. When using this technology, it will most likely not be possible to mount the connection sockets absolutely evenly and neatly.
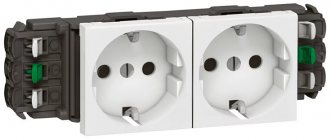
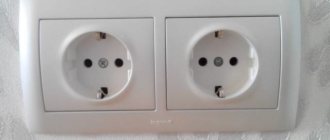
Therefore, in most cases, before installation, electricians group socket boxes into a single structure. Subsequently, such a block is simply mounted into the wall in one step. In a similar way, installers achieve a neat appearance of nests installed in the house. Sockets are usually collected in groups of 2-5 pieces. For industrial premises, blocks with a larger number of connection sockets can be used.
Installation Rules
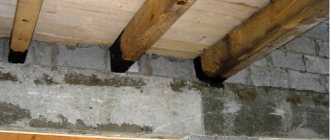
The distance between the sockets in the block should be such that using the connection sockets in the future would be as convenient and safe as possible. But such groups themselves in the house, of course, need to be placed in accordance with certain requirements. For example, regulations do not allow installation of connection sockets closer than 50 cm to sinks and sinks. Also, such elements are not allowed to be installed at a distance of less than 60 cm from gas pipes.
Sockets are usually installed in the house at a height of 30-40 cm from the floor. Previously, such elements of a household network were most often installed higher - at a height of up to 90 cm. However, a whole group of sockets, as opposed to 1-2, mounted at such a height, will most likely spoil the appearance of the wall. Connection sockets installed closer to the floor are not so noticeable. In addition, it is more convenient to use sockets with this installation in the future. The comfort of the apartment owners will not be hampered by wires stretched everywhere.
From the slopes of windows and doors, such groups should be installed in such a way that the distance from them to the first socket is not less than 10-12 cm. It is better if it is the same in all rooms.
Groups can gather both from power outlets and from regular ones. According to the regulations, it is impossible to combine these types in one frame. Otherwise, powerful cables will interfere with the operation of regular outlets. It is also recommended to place power groups from ordinary sockets on one wall at a distance no further than the diameter of one socket box. This is also necessary to ensure that power cables do not subsequently interfere with the operation of normal connection sockets.
Marking walls for installing socket boxes
Installation of socket boxes in drywall begins with marking the partitions
A pre-compiled electrical wiring installation diagram will help with this; here, special attention should be paid to the distances to the floor and the nearest wall. These parameters are calculated as follows: the height is taken from the floor to the center of the product, the distance to the walls is determined from the central part of the group of socket boxes
If other landmarks are taken into account during the calculation, there should be corresponding marks in the diagram about this. For example: the distance to the wall is calculated not from the center, but from the edge of the frame.
In order to illuminate the marking procedure as much as possible, we will analyze the process using the example of installing a block of four socket boxes from Schneider Electric. Note that the above diagram is also relevant for products from other manufacturers.
First, mark a horizontal line at the required height from the floor level. To do this, we use a tape measure and a simple pencil. Then we determine the location of the socket boxes, taking into account the symmetrical location of the structure relative to all sections of the wall.
Now we retreat 71 millimeters from the central part of the first socket box and mark the center of the second box, and so on, at equal intervals.
Of course, if you need to install one socket box, then you just need to mark the point on the wall in the right place and at the right height where you need to install the box. This point will be the center of the future outlet or switch.
Please pay attention to one important nuance: the distance between the centers of the socket boxes should be exactly 71 millimeters, without exceptions or errors. Otherwise, problems may arise with installing the overhead frame: the structure may not fit, or, on the contrary, will leave gaps
In addition, it is necessary to take into account the location of the metal profiles that serve as support for the plasterboard sheets. Otherwise, when drilling a hole, you can damage the profile, which will make the partition less stable.
After these manipulations, four points appeared on our wall, which define the central part of the socket boxes. Now you can start drilling holes.
What is a socket box
Connection sockets for electrical appliances are mounted into the wall in a special hollow housing. Such an element is called a socket box. The dimensions of this type of product are standard in our country. Their diameter is almost always 68 mm. The distance between the socket boxes is 68 mm, therefore, will also be standard.
Such cases are usually made of plastic. On the sides of each socket box there are special mounting ears. Through such elements, these buildings are assembled into groups. The socket boxes can also be attached to each other using the tongue/groove system.
There are two main types of such housings on sale today: those designed for installation in brick or concrete walls and those used on drywall. The latter type of socket boxes have special elements that allow them to be tightly secured to the gypsum board. Also on sale these days you can sometimes find housings for recessed sockets. They differ from ordinary socket boxes only in their longer length.
Diameter of the socket box, its dimensions and installation features
Such a concept as the diameter of a socket box is not entirely correct when it comes specifically to installation. If the dimensions of the socket and the socket box match each other, then you need to calculate the diameter of the hole that needs to be drilled in the wall. Here you already need to look at its material (for example, there are many nuances when installing it on ceramic tiles), what number of sockets will be installed and how close they will be located to each other.
What you need to know about installing a socket box to select the hole diameter
Installation, with some nuances, can be made into walls made of any materials. There are main differences between drilling holes in concrete, bricks, plasterboard and wood, and installation in walls made of other materials will be carried out in a similar way to those listed.
There is a significant difference between installing one single outlet and a block of them consisting of two or more connection points. In the second case, in addition to the location, it is necessary to calculate the distance between the centers of the socket boxes, however, this is not difficult, since it will be equal to the distance between the centers of the decorative overlays of the socket covers.
What distance should be between socket boxes?
How to properly mount connection socket housings in a group? These elements are connected in such a way that exactly 71 mm of free space remains between the centers of their axes. The enclosures are installed into the wall in special mounting sockets, previously made using a hammer drill and a special crown. The distance between standard socket boxes should be 71 mm, and this is how the recesses in the wall for such elements are knocked out.
The diameter of nests built in concrete, brick or, for example, drywall can be different. Usually it is 68 mm plus 1-1.5 mm. In this case, gypsum mortar is subsequently hammered into the gap between the socket box and the walls of the nest. After hardening, the latter firmly holds the socket body in the wall. Experienced electricians do not recommend leaving a gap that is too large for the solution. In this case, the sockets may subsequently fall out of the wall along with the frozen mixture.
Requirements for socket boxes
There is no single set of rules describing the installation of boxes for hidden installation of electrical outlets. Rules for electrical installations require compliance with general fire and electrical safety requirements. In this sense, installing a box under an outlet is no different from installing a distribution box. There are building codes and regulations (SNiP) that determine the geometry of placement of sockets in a room. Well, common sense has not been canceled.
We will try to combine all the conditions under which the installation of socket boxes will not cause problems during the operation of electrical equipment.
- The material of the boxes must be strong enough to withstand the force with which the plug is removed from the socket. In addition, the housing itself should not be pulled out of the wall along with the socket. For this purpose, socket boxes intended for installation on building mixtures (usually gypsum or alabaster) have ribs, grooves and hooks cast on the outer surface. Technological holes for wiring also work as fixing elements.
- A paste-like solution gets into these cracks; after drying, you can pull out the housing only by destroying part of the wall or breaking the plastic.
- The vast majority of socket boxes are made from various types of plastics. On the one hand, it is cheap, on the other hand, plastic is a dielectric and does not collapse under the influence of moisture.
- On the inside of the boxes, ribs should be molded for attaching sockets. Many people remember Soviet-built apartments in which sockets fell out of the wall with the slightest effort. Previously, socket boxes were made of metal. Not only is this unsafe, but the spacer guides on the socket could not catch on the smooth surface.
- In addition, the socket boxes are equipped with mounting holes for screw fastening.
- The plastic from which the socket boxes are made should not support combustion. From the point of view of the wall (concrete or brick), this requirement is meaningless. But a faulty socket can ignite wallpaper on the wall or nearby furniture.
An optional but useful requirement is the ability to connect several sockets together using standard clamps. This allows you to assemble a structure of any length.
What difficulties may arise during installation?
As you can see, the technology for installing groups of sockets is extremely simple. However, in practice, when installing such elements, craftsmen usually, unfortunately, encounter certain difficulties.
The distance between two socket boxes in a group is usually only 71 mm. This is certainly not too much. However, the close arrangement of the elements still practically does not impart rigidity to the blocks. Groups assembled from cases usually bend in different directions.
Because of this, when installed in sockets with a solution, the socket boxes begin to shift relative to each other. In addition, they can be very difficult to install at the same level with the plane of the wall. To ensure that a group of sockets subsequently looks neat and attractive, experienced electricians advise beginners to use a special template during installation. You can make such a device with your own hands in just a few minutes.
Sizes and types
Special electrical boxes are classified into several categories:
- Form. Round products are more common. Less often - square. The second option is used when installing non-standard power points.
- The type of wall into which the part is mounted. Here are the following types of socket boxes - for concrete, brick, block walls or products for plasterboard. The latter are equipped with special fixing tabs. In addition to gypsum plasterboard panels, such socket boxes are installed in walls and partitions made of chipboard, plywood, and SML sheets.
- Part type. There is a single socket box, and there is a block element of 2-5 boxes connected to each other by a common frame. Using blocks, you can mount several sockets or switches at the same time, arranged in a row vertically/horizontally. For any block boxes and single elements, the center distance is always 71 mm, which complies with the standards.
Additionally, socket boxes are classified by size.
How to make a template
The distance between the socket boxes for the group should therefore be 71 mm. To mount the block as accurately as possible, you need to purchase 1 aluminum corner 40x40 mm. To make a template, you will need a piece of such material approximately 60 cm long (depending on the number of socket boxes in the group). On one of the shelves of the corner segment, you need to draw a straight line exactly in the middle.
Next, along this line, holes are drilled for the fasteners of each socket box. A 3 mm drill should be used for this. At the next stage, all socket boxes should be connected into a group and attached to the corner on the reverse side with self-tapping screws. Such a template will be longer than a row of nests knocked out in concrete or brick. Therefore, with its help it will be possible to insert socket boxes in exact accordance with the plane of the wall.
The eternal question: install socket boxes before or after plastering
If the surface is covered with plasterboard, there is no such problem. What to do when installing socket boxes in a brick or concrete wall?
In fact, from a technical point of view there is no difference. You can accurately calculate the planting height: the main thing is that the socket box does not stick out, even by 1 mm. If the edge is recessed by 3–5 mm, this is not a problem. The mounting pad of the socket will rest against the wall, and use longer screws for fastening.
The problem is rather psychological - it’s a shame to drill into a plastered surface.
When choosing a sequence (before or after plastering), one nuance should be taken into account: if the edge of the installed socket boxes protrudes above the plane of the wall, how will you apply the plaster evenly?
Therefore, the best option is to drill out niches, then plaster the walls (there will be holes for sockets with uneven edges), and then carefully clean the edges of the holes. Before installing the socket boxes, you will have to restore the markings.
Next - nothing new. We mount the socket boxes on alabaster and wait until it dries. All that remains is to trim the edges a little.
Simple advice for beginning craftsmen: To prevent alabaster or plaster from hardening too quickly, add PVA glue to the water. After mixing, the solution takes 2–3 times longer to crystallize.
True, you will have to wait several hours for final drying. But the mixture will be many times stronger.
How to drill sockets
Seats for socket boxes, as already mentioned, are usually knocked out using a hammer drill and a special attachment for it - a crown. First, of course, you need to make markings on the wall by drawing a circle for each socket. Next, the crown is placed against the wall and, first at low speeds, and then at high speeds, the sockets are knocked out.
If there is no special attachment for a hammer drill in the house, sockets for sockets can be made in another way. To do this, according to the markings, first drill a series of holes as close to each other as possible. Then the nest itself is knocked out with a chisel.
How to mark up correctly
This operation can be performed with an ordinary simple pencil. Under each circle on the wall, you first need to draw approximate horizontal and vertical lines. Next, using a compass, you should apply circles on the wall with a slightly larger diameter than the diameter of the socket boxes. Experienced craftsmen advise drawing approximate lines in such a way that they protrude beyond the circle. In this case, drilling the wall exactly according to the markings will be easier in the future.
Sometimes craftsmen, when installing a group on a template, do not even drill a hole for each socket box. In this case, one common long nest is simply made in the wall. After installing the sockets, it is simply sealed with gypsum or cement putty.
Installing a socket box in concrete
Before installing socket boxes in concrete, you should prepare. You need to collect all the necessary equipment, namely:
- Tools for making holes . This could be a hammer drill with a diamond core and a set of impact bits, or an angle grinder with a small-diameter disc.
- Auxiliary tools . Construction level, hammer and chisel. You will also need a knife, a narrow spatula, and a pencil for marking.
- Components of the solution . Plaster or alabaster, water and mixing container.
When everything is ready, you can move on to drawing guide lines and dots.
Marking
Proper marking speeds up the installation process of mounting boxes and eliminates the risk of errors. Each element must be in its place, so there are recommendations that electricians try to adhere to:
- Sockets in residential areas - 30 cm from the floor.
- Switches and dimmers - 90 cm from the floor.
- Any wiring nodes - 10 cm from the door frame.
The only restrictions for the location of sockets and switches are listed in the regulatory documentation PUE 7.1.48 - 1.50 : at least 50 cm from the gas pipeline and 60 cm from the doorway of the shower stall.
It’s easy to make markings - just mark the points for drilling on the wall, which will become the basis of the guide dimensional grids, aligned to the level.
The contours for a round socket box can be outlined using a compass, but there is an easier way: attach the mounting box to the surface, aligning the center with the marked marker, and outline with a pencil.
The diameter of the contour marks must be larger than that of the socket box, otherwise there will be difficulties with installation: the box will not fit into the prepared hole.
Hole preparation
A recess in the wall can be made in three ways, using:
- Pobedite or diamond bit for concrete . It is necessary to rest the centering drill of the crown against the mark of the center of the future hole and cut out the “core” a little more than the depth of the socket box, then chop off the remains with a chisel or hammer drill bit.
- Drill with pobeditovy drill bit . You need to drill a lot of holes along the marked perimeter: the more, the better, then knock out the concrete in parts using a hammer, chisel or hammer drill.
- Bulgarian . You should select a disk of small diameter and cut through the concrete along the marked contours. A chisel will help you deal with the remaining parts.
Fitting the socket box
Before final fixation, you need to check the depth of the socket box: its edges should be “recessed” into the hole by about 5-6 mm . This is necessary in order to “reserve” space for the solution. If everything is in order, all that remains is to make a groove for the wire and start mixing the solution.
The wire must be left with a reserve : the contact areas may burn, then they will have to be bitten off, and the length will not be enough .
Fixation with solution
At the final stage, you should clean the finished hole from dust, moisten it with water and wait 3-4 minutes (this measure will increase adhesion), then insert the wire into the socket and begin mixing the solution.
The proportions for diluting gypsum and alabaster are approximately the same: 2 parts dry powder require 1 part water. The solution hardens very quickly - within 5-20 minutes , so there is no need to prepare it in advance.
When the mixture acquires a thick consistency, you need to put part of it into the hole using a spatula, then insert the socket and fill the side gaps. The remaining mortar can be removed after it has completely hardened.
A high-quality concrete socket box made of polypropylene will perform its tasks for 25 years . This is an inexpensive structural element that will not only securely fix the socket or switch, but also prevent fire in the event of a short circuit.
How to install enclosures
Thus, the distance between socket boxes mounted into the wall should be 71 mm. After the nests are punched, grooves are made in the wall for the leash. They are usually pierced using a grinder. At the next stage, the cables themselves are laid in the grooves and brought out into the sockets for the socket boxes. At the next stage, the procedure should be as follows:
- The socket boxes are installed into the sockets using a template and leveled;
- the template is fixed on the wall;
- the nests are covered with gypsum or cement putty.
After hardening, you just need to unscrew the template from the wall and remove it from the sockets. Next, you can begin installing the sockets themselves.
How to install in drywall
On walls sheathed with gypsum plasterboard, the distance between socket boxes should also be 71 mm. For obvious reasons, attaching the housings with putty to such material will not work. However, the procedure for installing socket boxes on drywall is no different from installing them in concrete or brick. That is, the masters in this case:
- first make markings on the wall;
- drill holes in the sheets with a diameter of 68 mm plus 1-1.5 mm;
- insert socket boxes into the holes and secure them to special fasteners available in their design.
When installing plasterboard sheets, experienced craftsmen advise attaching sheets of plywood to them on the reverse side in those places where sockets will be installed in the future. The distance between the centers of the socket boxes, as we found out, in a group is usually small. But drywall is still a rather fragile material. Therefore, during installation and operation, the socket boxes may subsequently be broken out of the wall due to negligence.
If there are sheets of plywood behind the gypsum boards, the load when turning on/off electrical appliances on the socket boxes will be distributed over a larger area. This, in turn, will prevent breakage. In any case, the distance between socket boxes in plasterboard should be 71 mm. Installing this way will also extend the life of the connection sockets in the future.
Everything you need to know about socket boxes for drywall
Three boxes are combined into one unit without compromising installation strength
Installation of socket boxes in drywall is the most important stage in the installation of various electrical equipment, such as sockets, switches, regulators, etc. The strength of fastening of the listed equipment to the wall surface depends on the quality of installation of the socket box.
Consequently, the stability and safety of the electrical network in a house or apartment depends on how well the installation of socket boxes in plasterboard is done.
Mounting boxes from different manufacturers may differ in color and shape, although standard sizes are used
A socket box, or as it is also called, a glass or mounting box for a drywall socket, is a hollow cylinder closed on one side with standard sizes. Closer to the bottom of the mounting box and at the very bottom there are 4-6 input holes through which cables are inserted inside.
A large number of input holes is necessary for sequential connection of several devices in one circuit or to make it more convenient to connect the wires from one side or another.
The following materials are used for the production of mounting boxes:
- Polyamide – melting point above +960 °C (does not burn);
- Polypropylene – melts at +650 °C (does not burn);
- Polyvinyl chloride – melts at + 220 °C (does not burn well);
- Polystyrene (ABS) – melts at +180 °C (burns with the release of toxic gases).
The price of products made from polystyrene is the lowest, but I do not recommend buying such glasses, since they are guaranteed to melt if there is a short circuit.
Design and dimensions
| Illustrations | Standard sizes |
| Installation diameter . The installation diameter is the size of the circle cut in the slab for installation of the mounting box. |
When purchasing boxes, make sure each box contains two connectors.
Installation of a single socket box
| Illustrations | Step-by-step instruction |
| Let's drill a hole . Mark the center of the hole. Place the drill exactly in the center of the hole. We drill the landing socket with a cup of a suitable size. | |
| Insert the box into the hole . There is nothing complicated here, except that you need to clear the holes for the cable. |
Installation of a double socket box
| Illustrations | Step-by-step instruction |
| Marking for installation of double sockets . We draw the horizon. We apply a glass to the line so that the mounting holes align with the line. We mark the holes and thus get the centers of the adjacent sockets. | |
| We drill holes . Drill two holes at the marked centers. The jumper between the drilled holes is cut out as shown in the photo. | |
| We connect the boxes into one block . In the side of each glass we find plugs made in the shape of a connector. |
We break out the plugs, since the cable will be pulled through the connector.
How to install a glass flush with a wall surface
| Illustrations | Description of actions |
| The result of a normal installation . If you put the spatula close to the glass, you can see a gap - this means that the edge protrudes 2 mm above the drywall. The socket will not hide this gap! | |
| Chamfer cutting . Using a sharp knife, a chamfer is cut 2-3 mm deep along the contour of the hole. As a result, the entire border is installed flush with the surface. |
Installation of sockets in glasses
| Illustrations | Description of actions |
| Connecting sockets . We remove wires no more than 10 cm long from the glass. We strip the insulation to 1 cm. We insert the wires into the appropriate terminals and tighten them with screws. |
All electrical installation work is carried out with the voltage turned off!