Device and principle of operation
The sound sensor for automatically turning on the light is a microcircuit whose main components are an audio receiver, an amplifier, an electric relay and a controller. The device operates according to the following principle:
- In the room where the sound detector is installed, a sound is heard (footsteps, voice, clapping).
- The audio receiver records the acoustic wave.
- The resulting signal passes through the analyzer.
- Next, a command is sent to close the electric relay.
- Electric current begins to flow to the light bulb - the light turns on.
- At the same time, a timer is connected to open the circuit (depending on the settings specified by the user - from several seconds to tens of minutes).
- While the light is on, the sound sensor is actually turned off and does not in any way affect the operation of the backlight system.
Modern detectors of this type are quite sensitive. Therefore, in order to exclude false alarms in a specific application location, it is necessary to perform the correct settings for this parameter.
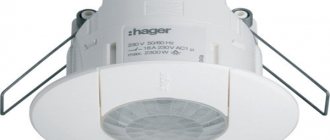
For this purpose, there are two regulators on the body of the device. One of them sets the threshold of perceived sound. The other programs the operating time of the lamp after switching on. As a rule, a limit of 50 dB (equivalent to clapping your hands) is sufficient indoors.
Optical-acoustic principle of operation
An optical-acoustic switch or lamp is equipped with two sensors: optical and acoustic. An optical sensor reacts to the light level in the room and turns off the lamp when there is sufficient natural light. The acoustic sensor reacts to sounds created by a person, for example: steps, closing or opening a door, ringing keys, speech. When noise appears in the area, the acoustic sensor turns on the lighting for a short time. This time is enough to walk, for example, from the elevator to the front door and open it. After the set time has elapsed and if there is no noise in the sensor response area, the lighting lamp turns off. If there is noise, the light does not turn off.
Varieties
Acoustic light switches are available to the average consumer in the following modifications:
- Classic. These are standard models with two regulators - sound level and operating time. They react to any rustle depending on the configured sensitivity threshold.
- Hybrid. Optical-acoustic . The devices combine two types of detectors - a sound and a light sensor to turn on the light. In addition to the standard operating mode - based on sound, the device turns on depending on the level of daylight. It begins to function only at dusk or other conditions in the absence of natural light.
- With additional motion sensor . Thanks to this, the light bulb lights up not only when sound waves are detected, but also when a moving object - a vehicle, person, animal, etc. - enters the viewing sector.
Each modification has its own characteristics, technical characteristics and operating nuances. This must be taken into account when choosing a device for a specific application.
We also recommend that you familiarize yourself with the light control relay, which can be used not only separately, but also in conjunction with a sound sensor.
Other types of sensors for lighting devices
The list of useful devices does not end with acoustic and optical-acoustic devices. There are other options to consider. Such devices are called motion sensors.
Infrared sensors
These devices respond to thermal radiation. When a person appears within range, the light turns on; when he leaves, a command is given to turn off. Infrared sensors are divided into passive and active devices. The former only scan the thermal background, the latter generate radiation by analyzing the signal reflected by objects.
Infrared devices have serious disadvantages. They are highly targeted equipment that must cover the entire area. In some cases, it is simply impossible to find the optimal location for these sensors. The second disadvantage is a large number of false alarms for heat entering the house from the street or coming from radiators. For these reasons, infrared sensors are more suitable as outdoor equipment. For example, it is logical to install it near the front door of the house, at the entrance to the entrance.
Ultrasonic, microwave devices
The operating principle of these devices is the same. In both cases, the Doppler effect is used: any object reflects waves.
- Ultrasonic devices. They are “engaged” in emitting ultra-high-frequency waves that are not perceived by people. If a person appears in the reflection zone, the wave frequency changes and the sensor is triggered. There are two disadvantages to such equipment: short range, discomfort experienced by more sensitive pets.
- Microwave sensors have a similar principle of operation, but in this case radio waves “work”. This is the most undesirable option. The list of disadvantages of “microwaves” includes ultra-high-frequency radiation, which is unsafe for all living things, a large percentage of false positives, and also the highest price when compared with the cost of other types of “economy” sensors.
An acoustic sensor is not an essential device, but those owners who dream of making their home as comfortable, “obedient”, technologically advanced and economical as possible will like such a device. After installing a device to save energy, it is quite logical to expect another benefit - an increase in the life of light bulbs and lighting fixtures.
Prices for acoustic sensors can be found here:
To conclude the topic, here is an interesting video related to it:
Scope of application
The acoustic sensor for lamp operation is used in the following areas:
- In utility rooms with rare human presence - storerooms, attics, basements, garages.
- In public places - underground passages, entrances, alleys.
- At industrial and warehouse facilities.
- In hospitals, clinics and other medical institutions, when the use of a switch contradicts the requirements of sanitary and epidemiological inspection.
- In houses, apartments, offices as a smart home system.
- At protected sites and territories - to scare away intruders.
- In the local area, cottage, garden.
- If necessary, declare an alarm - at military facilities, ports, bases.
When installing sound sensors in a home environment, several goals are achieved at once - increasing household comfort, saving energy and increasing the shelf life of lighting fixtures.
Guide to selection
To choose the right sound detector for turning the light on and off, it is recommended to follow the following rules:
- The level of moisture protection must correspond to the conditions of use. For example, if the sensor is planned to be installed in an open space, then the indicator must be at least IP55, and when installed in a bathhouse, sauna, or swimming pool - from IP67.
- Total power of connected luminaires. The detector should have a slightly higher power than all the light bulbs connected to it.
- Range - depending on the distance at which the device needs to detect sound. For rooms, corridors, passageways - this is only a few meters, for open spaces, halls - several tens of meters.
- Availability of photo relay. Thanks to the light sensitivity sensor, the sensor will turn on only when there is no natural light - in the dark, twilight, with the curtains closed, and so on.
When choosing a device, the manufacturer is not the last place in the list of criteria of paramount importance. The durability and quality of its work will largely depend on this.
INSTALLATION, MOUNTING AND CONNECTION
Acoustic detectors are installed on walls, ceilings or window slopes. This placement is possible for all models, you just need to take into account the following points:
- the distance to the farthest point of the controlled structure should not exceed the rated range of the detector;
- there should be no foreign objects such as curtains and blinds between the sensor and the monitored surface;
- access to the detector should be convenient, the indicators should be clearly visible - it still needs to be serviced.
A little advice - if the detector cover is fixed with a latch, then provide for the possibility of subsequent convenient access to the latch. This is not a trifle, since, for example, installing a sensor on the wall with a latch close to the ceiling will cause quite serious problems for yourself or those who will subsequently service the alarm system.
When connecting a wired sensor to the alarm loop, provide a small supply of wires - if you connect them “tightly” then:
- firstly, it will be inconvenient to do this when disconnecting/connecting the sensor;
- secondly, if the wire breaks off during installation or operation, then building it up will take a lot of your time and nerves.
Where can I buy
You can purchase sound sensors either in a specialized store or online in an online store. In the second case, the budget option for purchasing products on the Aliexpress website deserves special attention. For some products there is an option for shipment from a warehouse in the Russian Federation; they can be received as quickly as possible; to do this, when ordering, select “Delivery from the Russian Federation”:
| Sound Sensor Module for Arduino | Sound sensor for light control | Highly sensitive sound detector |
| Intelligent Acoustic Sensor | Touch switch with voice control | Automatic switch with sound sensor |
Sound Sensor Calibration
To get accurate readings from your sound sensor, it is recommended that you first calibrate it.
To calibrate the digital output (OUT), the module contains a built-in potentiometer.
By turning the potentiometer, you can set the threshold value. Thus, when the audio level exceeds the threshold, the status LED lights up and the digital output (OUT) is driven low.
Now, to calibrate the sensor, clap near the microphone and adjust the potentiometer until you see the status LED on the module blink in response to your clapping.
Your sensor is now calibrated and ready to use.
Advantages and disadvantages
The main advantages of a noise sensor for turning on lights:
- Significant reduction in power consumption of the backlight system.
- Reducing the cost of replacing burnt out light bulbs.
- Affordable price. Installing even expensive models quickly pays off based on the two above advantages.
- An acceptable range of action is such that the device hears the steps of an approaching person from the opposite end of a workshop, hall, or long corridor.
- Large selection of different models.
- Adjustable sensitivity and shutdown time delay settings.
Among the shortcomings of the equipment, incorrect operation in the presence of background sounds, including false alarms or a completely inoperative state, stands out. Such disadvantages most often appear in very noisy environments or in cheap models.
How to make it yourself
Not everyone has the opportunity to buy a factory sound detector that turns on the light. However, if you wish, have experience in assembling radio circuits and have access to consumables, you can quickly make it yourself. Let's look at the most affordable options.
On an acoustic relay and trigger
The simplest circuit using one transistor. It includes two acoustic relays and a trigger.
Acoustic component
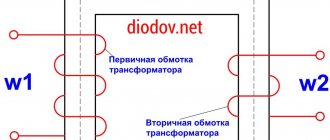
An affordable MP 39 in Germany is suitable as a transistor. It is easy to find in old equipment. Next you will need an audio receiver. This could be, for example, the microphone of an old rotary telephone.
The advantage of such an old carbon sound receiver is that it has a high sensitivity threshold, but at the same time has a minimum throughput frequency. This means that extraneous sound vibrations simply will not be picked up by the assembled device.
To power the circuit you will also need a 9-12 volt DC transformer. It is better to assemble and attach all components on a breadboard or printed circuit board. When assembled, it will function as follows:
- When sound appears, the resistance in the radio microphone decreases.
- Capacitor C1 begins to operate.
- From it, current flows to the transistor.
- Next, the signal is amplified.
- Component C2 then doubles the voltage using a transistor collector.
- Double voltage is supplied to the base of the transistor via R3.
- The open transistor functions as an amplifier.
- Finally, current is supplied to P1 to connect the contacts for the KP1 luminaire.
If there is no sound, the AC supply disappears and the transistor remains in a half-open state.
Trigger
The trigger performs the function of a switch according to the following algorithm:
- When entering a room, the user makes a sound - the light bulb lights up.
- Coming out of there, he makes a sound again - the light bulb turns off.
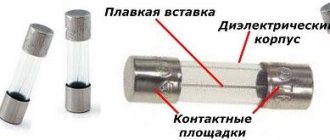
When selecting circuit components, it is better to choose versions that can withstand 220 V. This rule applies to diodes and capacitor C1.
The circuit operates according to the following algorithm:
- A sound occurs - contact KP1 closes.
- Capacitor C1 is charging.
- The electric current passing through it changes the position of the armature to the opposite position.
- L1 lights up.
- The relay is blocked under the action of diode D1.
- At the same time, D2 is ready for use.
- When the sound reappears, the second diode D2 is triggered.
- Thanks to it, the armature is placed in the zero position and the light goes out (L1).
If the operation of only one light bulb is required, instead of L2, you need to install a resistor and capacitor in the circuit.
Three transistors
For more experienced users, it is possible to manufacture a homemade sensor using a somewhat complicated scheme. Its peculiarity is that it itself both turns on and off the lighting at the first sound signal - at the second.
The circuit uses transistors such as KT818 and KT315. You can get them at any radio parts store. The range of the device on them reaches 2 meters - provided that it is powered by a 9-volt voltage. However, when it increases or decreases, the sensitivity increases or decreases, respectively.
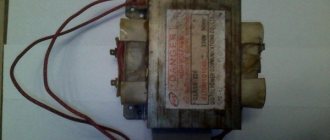
An electrodynamic microphone is used as an audio receiver. In this case, the relay and capacitor must be designed for 220 volts. Assembly is carried out in the same way as in the version described above, on a board - printed or breadboard type. A 9–15 volt power supply is used to supply power.
With microcircuits
This is the most complex, although interesting for experienced radio amateurs, version of the sensor circuit. It is based on a microcircuit. Two significant differences from the versions discussed above are the absence of an external power supply and the installation of a thyristor instead of an electromagnetic relay.
Advantage
Unlike a relay, a thyristor has no restrictions on the number of operations. In addition, it has significantly smaller dimensions. This means the device will be more compact, lightweight and versatile. The range of the device is stronger - up to 6 meters. In this case, the optimal lamp power is 60–70 watts. In addition, the equipment is protected from background interference.
How to increase power
As you can see, the detector is designed for medium-power lamps. If this is quite enough for home needs, it will not be enough in production, in a workshop or in a public place. Therefore, when using high-power light sources, diodes VD2 to VD5, as well as the thyristor VS1 itself, must be installed on radiators. This will reduce their heating and make it possible to service more powerful lamps.
In this case, radiators must have electrical insulation! In addition, the places where they come into contact with other components of the circuit must be protected. This will ensure the best electrical conductivity and quality of operation of the device.
Circuit operation
In the original versions of the circuit, the relay was triggered by a person’s voice or another sound signal, for example, clapping. However, it is more convenient when the device responds to a given sound level. To provide it with such a function, you will need to slightly change the relay circuit:
- The output from the 1st trigger is connected to transistor VT3, and the output is made so that the other half of the circuit does not work (pin 13 is connected directly to R7).
- Next, the vibrator generates a half-second pulse. It is for this period of time that the light is turned on.
- Now, to solve the problem of backlight stability, you need to start smoothly changing the capacitance of capacitor C4 or the resistance of resistor R6. To increase the delay time it is necessary to increase the indicators, to decrease it - to decrease it.
- The procedure is performed until the result obtained is satisfactory under the given conditions.
To make the setup easier, you can use the well-known calculation rule: T=C×R. Where T is the delay time in seconds, C is the capacitance of the capacitor in F, R is the resistance in Ohms, × is the multiplication sign. For example, to calculate the required resistor value for a given delay time, you need to perform the following calculations using the formula R=T/C.
Let's say T = 90 sec., and the capacitance of the capacitor is 200 μF (or 200 × 10−6), then, according to the formula, - 90/200 × 10−6 = 450000 Ohm or 450 kOhm.
How do acoustic lighting control sensors work?
The main purpose of an acoustic relay is to save energy
It is necessary to keep the lighting on only if there are people present in the room or area where it is installed. The only exceptions are emergency lights designed to make it possible to notice unauthorized entry into the territory.
It does not apply at home. In order to detect the appearance of people, and to ensure that the lamps work only in their presence, acoustic sensors are designed for lighting.
Conventionally, sensors can be divided into two types:
- triggered by any noise , these are the vast majority of industrially manufactured acoustic relays;
- responding to sound commands , there are fewer such relays and more often they are homemade.
Let's look at each type separately.
Noise responsive
Most often, for lighting, an acoustic sensor is mounted on landings and corridors. It is useless to install them in the house, except in combination with a shutdown delay relay in bathrooms and bathrooms (we will also consider this option).
If a person moves, then he definitely makes sounds, even if they are quiet, of course, if there is no task to pass silently. This is the sound of a door opening or closing, the noise of footsteps, conversations (and even a locked lock). The sensor records them.
Collaboration with lighting is based on the following principle. For example, a noise sensor for lighting is mounted on the landing (we’ll talk about where it’s best to install them and where it’s undesirable below), two options are possible.
First option
- A man entered the door.
- The acoustic sensor heard the noise and gave the order to turn on the lights.
- While we are walking (unless we are trying not to hide our steps like a ninja), he hears a noise and leaves the light on.
- The last sound is a closed door, the lights are turned off.
Second option
- The relay hears a sound (steps, lock, door creaking, conversation), a command is sent to the time delay relay and at the same time the lighting turns on.
- After the time set in the delay relay has passed (one should be sufficient to pass through a corridor or landing), the lighting turns off.
The delay function can be built into the acoustic relay itself (most models), or performed using additional components.
It should be noted that in the first version of the relay operation a delay relay can be included, but not turning it off, but turning it on. This is done to protect against false positives. That is, the lighting does not turn on due to short-term noise (for example, a thunderclap on the street or a car horn), but the sound must continue for some time.
A relay that responds to noise has both advantages and disadvantages.
Advantages
- The relay is usually simple, which means its price is low.
- Unlike motion sensors, it does not respond to the movement of pets and rodents or to electromagnetic interference.
Minuses
- To avoid turning on the lighting during daylight hours, it must be turned on either manually or using a timer. It is possible to install the light sensor outdoors.
Advice. It is better to install, together with the acoustic relay, not a simple timer that turns it on and off, for example, at six in the evening and eight in the morning, but an astronomical relay. This device takes into account the movement of the sun with the entered geographical coordinates. For example, it allows you to turn on the sound relay half an hour before sunset and turns it off a quarter of an hour after dawn, regardless of the time of year.
- An acoustic relay cannot be installed in living rooms, since the lighting will turn off, for example, after you settle down with a book on the sofa and do not make any sounds.
- The relay does not work well, or rather, it constantly turns on, if there is a high level of background noise. For example, you cannot install it in an entrance that faces a noisy street.
Relay responding to commands
In the simplest case, this can be a sound much louder than what can be heard with the normal presence of people in the room. For example, clapping your hands.
The author of this article assembled a similar structure in childhood, visiting the home of the pioneers. Such a relay is actually a regular noise relay, only its response threshold is higher and it distinguishes at least two commands.
For example, they clapped once, the light came on, and went out twice. It is quite possible to install it in residential premises, however, it is still probably more convenient to use a regular switch than to constantly clap.
In a more complex version, you can assemble a device that will distinguish between voice commands. That is, the relay will distinguish speech, just as the browser distinguishes “OK Google”. True, industrial versions of this relay are not yet commercially available.