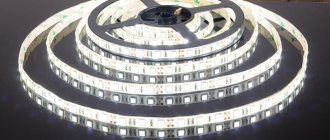
Power supplies can be used not only to connect LCD monitors, laptops and lamps. LED strips can also be connected to these devices. Typically, LED lighting is used for decorative lighting.
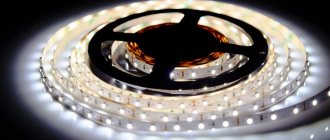
What is LED strip? This is a flexible board with LEDs and resistors placed on it. It does not impose any special requirements and its length can be changed using simple scissors.
12V power supplies provide strip LEDs with the electrical energy required for the required parameters. They stabilize voltage and protect against interference and burnout. When used outdoors, the glow elements are mounted in sealed housings.
Some advantages:
- Minimum energy consumption;
- Surge filters, which makes it possible to operate in a wide variety of conditions;
Blocks rated at 24V are used to connect SMD5050 LEDs with a calculation of 120 pieces per 1 meter.
Description
Switching power supply units are a small device with a housing of 180x96x38 mm.
Specifications:
- The input current is 1.5 - 2.5 amperes.
- Input power – 115 – 230 V.
- Frequency – 50 – 60 hertz.
- Operating voltage – 220 volts (our standard networks).
- Output voltage – 12 V.
- Output current – 15 A.
- Power – 180 watts.
- Safety features: overload and short circuit protection. Some types are moisture resistant.
This is one of the most common types. The size of some models differs from each other.
Here are some examples:
- 165x65x40;
- 115x80x37;
- 165x100x44;
- 255x75x45;
Other differences in some species:
- The current strength has a decent range: from 1.25 to 41 A.
- Power ranges from 1 to 1000 W.
Safety and compliance with standards is guaranteed by the manufacturer. Therefore, before purchasing, familiarize yourself with the characteristics of the equipment.
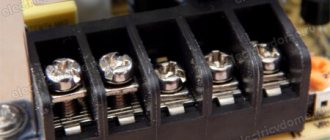
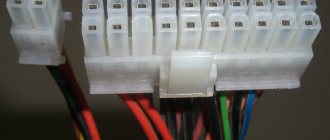
To make installation of the block easier, it is equipped with a special connecting block with holes. In addition, the blocks do not allow the wire to involuntarily be pulled out and disconnected from the block with screw terminals, thanks to which the wire is connected.
Power supplies are cooled due to natural air convection. Some of them are made with built-in fans, similar to computer coolers, which prevent the device from overheating during long-term use.
These fans allow you to increase power. The only negative is the noise, which only increases over time. If you use this type of device, be sure to clean it regularly, lubricate the rotating mechanism, and remove dust from it.
Purpose and principle of operation
The power supply or adapter is designed to connect equipment to power sources for its normal operation. The power supply for the LED strip serves as a converter of the input voltage to the required output voltage. In this case, we are talking about twelve volts.
The use of such a power supply requires certain competence. If the device is used for its intended purpose, it will not pose a threat to the health of the owner or the equipment.
Pulse adapters level out voltage surges using a special filter. Therefore, an electrical network with unstable voltage critically needs such a device. Voltage surges can not only negatively affect the operation of electrical equipment, but also damage it.
Fluorescent lamp ballast
Each energy-saving light bulb contains a small circuit that prevents flickering when turned on, and also helps to gradually warm up the device's coils. Its name is electronic ballast. It is with the help of it that gas can emit a glow (frequency 30−100 kHz, and sometimes 105 kHz).
Due to the fact that the device can have such high frequencies, the energy consumption coefficient increases to unity, and this, in turn, makes energy-saving lamps economically beneficial.
A significant advantage of such devices is the absence of any noise during operation, as well as the absence of an electromagnetic field, which negatively affects the human body.
An important role in the ballast circuit of an energy-saving lamp is played by an electronic choke . It is he who determines whether the device will light up immediately with full force or warm up gradually over several minutes. It is worth noting that the manufacturer never indicates the heating time on the packaging. This can only be checked during operation of the device.
Those ballast circuits that perform the function of voltage conversion (and most of them) are assembled on semiconductor transistors. In expensive devices, the circuit is more complex than in cheap light bulbs.
From a burnt-out energy-saving lamp you can make blanks for a future switching power supply. You can also take a working device for this.
The compact fluorescent light bulb (CFL) contains the following elements:
- Bipolar transistors with protective diodes. As a rule, they can withstand voltages of 700 V and currents of up to 4 A.
- Pulse current transformer.
- Electronic throttle.
- Capacitor (10/50 V, as well as 18 V).
- Bidirectional trigger uncontrolled diode (dinistor).
- Very rarely the device contains a unipolar transistor.
When making a power supply from an energy-saving lamp with your own hands using expensive housekeepers, it is enough to supplement the source with some details. You can also use a driver for LEDs, which are often installed in flashlights, as the basis for the future block.
It is important to note that to implement a UPS, it is not recommended to use a circuit with an electrolytic capacitor. This is due to the fact that it will not last long in the device as a power supply. Also, electronic ballasts, which contain special small boards, are not suitable for this purpose.
Kinds
Types of power supplies for LED strip
Designations in the photo:
- Compact and sealed.
- Sealed in aluminum housing.
- Open.
- Compact network.
12-volt units come in two main types:
- Voltage stabilized - 12/24 volts. Twelve volt ones are used mainly for connecting G4 and MR16 LED lamps.
- Current stabilized - direct/alternating.
In addition to these differences, the following types are available:
- Sealed . Protection degree – IP66 and 67. The small case protects the device from dust and water. Has a built-in potentiometer that functions as a current adjustment. Units with low power are produced in plastic housings, while high power units are sealed in aluminum.
- Semi-hermetic. Degree of protection – IP54. Suitable for outdoor use as the adapter body is metal and moisture resistant. Power varies from 10 to 360 watts.
- Leaky. For indoor use only. They are made in a metal or plastic corrugated casing.
Since each model differs from each other in properties, characteristics and purpose, you should carefully approach the choice of device.
The power supply unit for LED strips is selected according to the following principles:
- Power consumed by the tape.
- The voltage required to power the tape.
- Protection against moisture ingress.
Power calculation
Be sure to pay attention to the power consumption of the adapter.
When calculating the data, add 25 percent to the available belt capacity. Thus, the power supply will not operate under heavy loads. This is important to do to extend durability and trouble-free operation.
Example: 1 meter of LED strip with a power of 15 watts requires a connection of 5 meters.
We carry out the following operations:
- You need to multiply 15 by 5. The output is 75 W.
- Now add ¼ of 75. This is 18.75.
- Add to 75, we get 93.75 W. This is the minimum power of the block in our example.
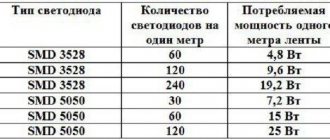
Calculation of power supply for LED strip:
| LED type | Quantity | Diode power per meter |
| SMD 3528 | 60 | 4.8 W |
| SMD 3528 | 120 | 7.2 W |
| SMD 3528 | 240 | 16 W |
| SMD 5050 | 30 | 7.2 W |
| SMD 5050 | 60 | 14 W |
| SMD 5050 | 120 | 25 W |
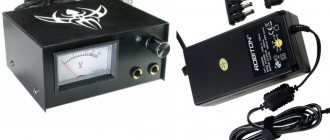
The average price for a 12V power adapter is 500-1000 rubles. Many older men who were once closely associated with technology take their devices to the flea market. You can buy an inexpensive, time-tested adapter from them.
Types and types
Before connecting the LED strip, you should understand their types and markings. This way you won’t make a mistake when choosing a power supply and will accurately calculate the required glow intensity, tape length and other parameters.
The most popular in interior lighting are strips made of single-color—monochrome—crystals. The constant change of colors is too stressful and does not allow you to relax. This is illumination, not lighting. Therefore, universal tapes are used to create advertising, illuminate cars - where it is necessary to attract attention. When decorating interiors, SMD tapes are mainly used.
Degree of protection
Since the scope of application is wide, the degree of protection varies. For dry rooms, regular open ones are available - without a protective coating. There are waterproof ones - they can be used in damp areas - in bathrooms, for example. They are filled with a layer of varnish. There is another option - moisture resistant. They are sealed in a sealed housing and can be mounted directly in the water - in an aquarium, pond or pool. They can also be used for outdoor lighting.
Sealed tapes for illuminating aquariums, swimming pools or decorative ponds
For exterior car styling, LED strips placed in a transparent polymer tube are most often used. It protects not only from moisture, but also from mechanical damage, but their cost is also higher.
LED sizes, brightness and density
Let's figure out the sizes. If you take several strips, you can see that they are made of LEDs of different sizes. In addition, they are sometimes located tightly next to each other, in some - at a fairly decent distance, and there are also strips with LEDs in two lines.
Most popular LED sizes
It is not difficult to distinguish the sizes of elements externally, but how can you tell by the markings? Dimensions are displayed in numbers that appear after the letters indicating the type of LED. For example, LED-R-SMD3528 (red) and LED-RGB3528 (universal) are assembled from elements measuring 3.5 * 2.8 mm, LED-G-SMD5050 (green) and LED-RGB5050 (universal) - 5.0 * 5.0 mm.
These are the two most common types, although there are larger ones - 56 * 30 mm, and smaller ones - 20 * 20 mm.
The larger the crystal size, the greater the light intensity they produce. For monochrome crystals the indicators are as follows:
- size 3.2 * 2.8 mm produces a luminous flux from 0.6 to 2.2 lm;
- size 5.0*5.0 mm - from 2 to 8 lm.
Universal LEDs of the same size have lower intensity: three small crystals of different colors are sealed in one housing, and therefore the RGB glow intensity is lower:
- 3.2*2.8 mm produces 0.3 to 1.6 lm;
- size 5.0*5.0 mm - from 0.6 to 2.5 lm.
All values are given for crystals without protective coating. Any of them reduces the intensity of the glow and this must be taken into account when calculating the brightness of the glow.
Length calculation
Above we talked about each individual LED on the strip, and there are many of them on the strip and they are arranged with different densities, and accordingly they can produce a stream of light of different intensities. The minimum number of crystals per meter is 30 pieces, the highest density in one row is 120 pieces/m, in two rows—240 pieces/m.
Depending on the number of crystals, the total intensity of the glow and electrical power consumption change. For the convenience of calculating the required lighting intensity and electrical parameters, the technical data is summarized in a table.
Power table of LED strips with different LED densities
Using this table you can determine how long the lighting strip is needed. For example, you want to illuminate the room with a medium-intensity glow. Two 80 W incandescent lamps need to be replaced. It is necessary to organize a luminous flux of about 140 W (two 80 W lamps will never give 160 W).
If for these purposes you take SMD3528 with a number of LEDs of 120 pcs/m, you will need about 5 meters of tape (we take it with a margin of 20%), SMD5050 with an installation density of 60 pcs/m will require 4-4.5 meters.
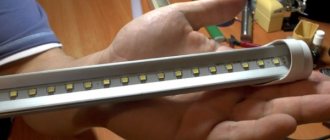
In general, LED strips are sold by the meter. It comes from the factory in 5 m reels and a piece of that length is not always necessary. Therefore, it is possible to cut off the required amount: along the dotted lines with the image of scissors. Strictly along these lines you can cut.
Cut the LED strip with scissors strictly according to the markings
If the scissors are not drawn, then there must be a dotted line. Also, the cutting line can be determined by the presence of contact pads on both sides of the line.
How to do it yourself?
To make your own power supply you will need:
- A lot of time.
- A few details.
What we may need to assemble the LED strip power supply:
- frame;
- tape of the required length;
- pay;
- cord;
- screwdriver;
We present to your attention the assembly diagram for a 12V power supply:
Designations:
- C1 – ballast capacitor.
- C2 – anti-aliasing filter.
- VD1 – VD4 – diodes.
- VD5 – zener diode.
- R1 – R3 – resistors.
Step by step guide:
- The best option would be a transformerless power supply with a ballast capacitor.
- The capacitor extinguishes the mains voltage , which is then supplied to a rectifier assembled using diodes. From the rectifier it goes to the smoothing filter.
- Resistors ensure fast discharge of capacitors. R1 limits the current when connected, the zener diode limits the output voltage, providing 12 volts.
- for the power supply depends on the value of capacitor C1
- You should not power the LEDs with the maximum permissible current.
DIY making
So, you have decided to assemble your own power supply for the LED strip. The size of the power supply depends on the power of the transformer (if a circuit using it is selected). For a simple device, you will need a transformer with a primary winding designed for 220 V. The output current should be about 1 Ampere, the voltage should be 12 Volts.
You will also need several elements:
- Diode assembly. You can use 4 semiconductor diodes connected in a bridge circuit.
- An electrolytic capacitor with an operating voltage of at least 25 V. You can use elements with an operating voltage of 50 V. The capacitance must be at least 470 μF.
- Zener diode or microassembly KR142EN. This is a voltage stabilizer, but it must be installed on the radiator.
Connection
Connection diagram of the power supply to the LED strip.
To connect the power supply to the LED strip, we need a cord with a plug. It is important to install a switch on the cord.
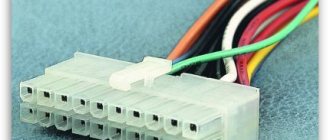
We take the adapter and find 4 contacts:
- Phase.
- Zero.
- V+ (output voltage).
- COM (the tape is connected there).
- We expose two wires of the cord and connect them to phase and neutral.
- Insert the plug into the socket. When the green LED lights up, it means that the power supply is ready for use.
Adviсe
- Any unit designed to power LED lamps must comply with lighting standards.
- It is not recommended to disassemble the case and try to make any changes. Re-soldering the adapter circuit is difficult and time-consuming. Even for an electronics engineer.
- Depending on the power of the power supply, several tapes can be connected to it. There is an RGB amplifier for this. It receives a signal from one tape and distributes it to others. At the same time, the synchronicity of color changes and brightness is not lost.
Attention! If you try to connect the tape directly to an outlet, it will start to smoke and, naturally, will not work after that.
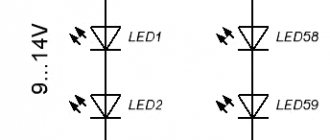
Connecting LED strip
Most LED strips operate on 12 V or 24 V. If there is only one line of crystals, 12 V is required, if there are two, 24 V. Any DC source that produces this voltage is suitable: battery, power supply, battery, etc.
Diagram for connecting the LED strip to a 220 V network via a power supply
To connect the tape to a 220 V household network, a converter or adapter is required (also called blocks or power supplies, adapters).
Recently, tapes have appeared that can immediately be connected to a 220 V network. They are all sealed in plastic tubes - 220 Volts is no longer a joke. They are also cut along the intended lines and connected using a special connector, which is inserted into the conductors. A cord with a built-in rectifier is connected to the connector (this is a diode bridge and a capacitor).
Connecting a special LED strip to a 220V network
This tape differs from the usual one in that small sections (20 pieces) with LEDs are connected not in series, but in parallel, and also in such a way that the diodes are directed towards each other. Due to this, we obtain the required voltage of 220 Volts or so. The alternating current is converted to direct current using a diode bridge, and the ripple is damped by a capacitor.
Connection diagram for LED strip without power supply
In principle, such a tape can be assembled from a regular one, but you will need to take care of the insulation: touching an element connected to a household network without an adapter is fraught with serious consequences.
How to connect several LED strips
Each of the tapes, depending on the modules used and the number of elements per meter, consumes a different amount of current. The average parameters are given in the table. Knowing how long you want to mount the backlight, you can choose an adapter that will deliver the required current.
Table of current consumption by LED strips powered by 12 V
Sometimes the required length of the tape exceeds 5 meters - when it is necessary to illuminate the room around the perimeter. Even if the power supply can supply the required current, two or more five-meter strips cannot be connected in series. The maximum permissible length of one branch is the 5 meters that come in the reel. If you expand it by connecting the second one in series, a current many times higher than the calculated one will flow through the tracks of the first tape. This will lead to rapid failure of the elements. The track might even melt.
If the power of the power supply is such that several tapes can be connected to it, separate conductors are drawn to each of them: the connection diagram is parallel.
How to connect several LED strips to one power supply
In this case, it is convenient to place the power supply in the middle, for example, in a corner, and two strips on either side of it. But it is often cheaper to buy several less powerful adapters than one more powerful one.
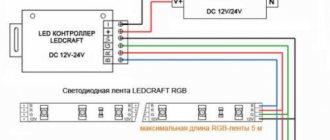
Connecting RGB strip via controller
First the power supply is connected in series, then the controller. They are connected to each other by two wires. There are already 4 conductors coming out of the controller, which are routed to the corresponding contact pads of the RGB tape.
Connecting an RGB LED strip via a controller
Exactly the same as in monochrome tapes, and in this case the maximum permissible length of one line is 5 meters. If a larger length is required, then two bundles of wires, 4 pieces each, depart from the controller, that is, they are connected in parallel. The length of the conductors can be different, but it is more rational for the power supply and controller to be in the middle, with two backlight branches extending to the sides.