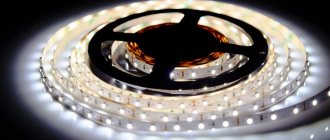
LED strip is a truly universal lighting source.
However, most of us simply stick it on the wall or ceiling, not even realizing that with its help you can easily create lamps that are amazing in form and functionality.
You definitely won’t buy these in any store. All you need to do is get a couple of inexpensive materials from the nearest hardware stores and be creative.
Desk lamp
The first lamp looks the most unusual, but at the same time it is very useful for those who spend long hours at their desk doing small, painstaking work.
The most important material on which everything is assembled is aluminum. You will need a thin sheet of aluminum from which you need to cut two long strips.
The sheet must be smooth, not corrugated!
Use a utility knife to press out thin grooves, and then repeatedly bend the strip back and forth to break it off from a single piece.
You can also use metal scissors.
These two strips need to be connected to each other. Otherwise, the lamp will turn out to be too small and it will not be convenient to work with it.
Move the strips end to end and place another short piece of the same width on top.
Drill holes along the edges with a thin drill and tighten everything with bolts and nuts (M4). The backing for the ice tape is ready.
Lamp base
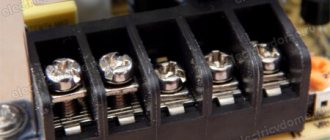
Let's move on to the connection diagram and wires. In order for the lamp to be able to adjust the brightness, you will need a 12V dimmer like this.
Where to hide it and what to secure it to? We will make special legs for this.
Two power wires with a plug connector and two free wires are pre-soldered to the dimmer, with which we will later connect the LED strip.
The dimmer itself will be walled up in a cement solution (don’t be surprised, you’ll see everything later). Therefore, it needs to be insulated as best as possible by wrapping it with adhesive tape.
For greater reliability, the contacts on the board can be filled with a glue gun.
The legs of the lamp are made from two small plastic boxes.
Place a dimmer inside one, bring two wires out, and glue the power connector tightly to one of the walls.
To prevent this place from becoming clogged with mortar, it is better to cover the hole with something.
After this, fill the entire box with cement. Make sure that there are no voids left anywhere and that the cement fills the entire container tightly.
Until the solution sets and hardens, place one of the ends of the aluminum strip in the middle of the box.
So that it sits securely inside and then does not jump out, tighten a couple more screws at the end. They will increase grip.
To give a designer shape to the entire structure, place several pebbles on top of the solution.
You do the same with the other end of the aluminum, only without any wires and dimmers.
Once the cement has hardened, remove the plastic mold.
To give the pebbles a glossy look, apply a little varnish or paint to them. They will look like they were just pulled out of the sea.
As a result, you should end up with fairly heavy lamp legs. Don't forget to remove the plug from the power connector.
To prevent the legs from scratching the table, glue four rubberized pads on the bottom.
The general view of the lamp will look like this.
Next, stick the LED strip on the inside of the aluminum busbar.
For such a lamp, use only high-quality tape without flickering effect and with good CRI>90 parameters.
When the tape is glued, you can solder two free wires from the dimmer to it.
Do not confuse the polarity of the plus and minus output.
Connect the power supply through the connector in the leg and adjust the brightness. As you can see, the lamp looks very cool.
Everything under such a table “lamp” will be illuminated with soft light, with virtually no shadows.
This backlight is very pleasing to the eye and provides fantastic visibility.
What problems may arise
When making it yourself, the only problem may be a lack of experience; all other problems will pass you by thanks to the fact that you are reading this article. Please note that we have already said that the strip is powered by a power supply, so if the repair has already been done, we just need to hide it, and if it is just planned, we recommend that you lay a separate special wire to power the lamp.
This solution will allow you to place the LED strip controller and power supply in any place convenient for you. Also, something may not work out in the mechanical part of the design. For example, you know exactly how to make a wonderful lamp, but to do this you will have to drill something, and you have never encountered this.
We assure you that this will not be a problem. It is enough to go to social networks and find a qualified specialist or organization that will ideally quickly and clearly cope with the task, based on your sketch. Furniture craftsmen usually do this well.
The LED strip controller with power supply has small dimensions. Thanks to the use of the controller, you will have a remote control for the lamp.
If you are not sure that you can connect the LED strip to the power supply yourself, then you can find detailed information on our page.
Wall room lamp
For the second lamp we will again need a little aluminum. This is an ideal material for LED strip lights.
First of all, it's lightweight. And secondly, it removes heat well. Overheating is the main enemy of LEDs.
As before, using a stationery knife or metal scissors, cut a wide strip (about 10*30cm in size) from a single piece.
In addition to solid aluminum, you will need small corners. Cut two short pieces about 5cm long and drill holes in them.
Two small d-4mm for fasteners and large 8-10mm for power plugs (on one corner) + for a switch (on the other).
Select the diameter according to the size of the connectors. Insert two plug connectors and connect their contacts in parallel to each other as in the photo above.
To secure the whole thing to the aluminum sheet, use hex sockets with internal threads or extended nuts.
Screw one corner on top of the sheet, the other on the bottom.
Lead the power wires out on the other side.
As a result, the entire connection diagram will look like this:
Design features of the chandelier
When making a lamp from an LED strip with our own hands, we have complete freedom of action. You can use an old chandelier and throw away the old boring lamps, try your hand at weaving with steel wire, and even move into the carpentry kingdom and equip a wooden lamp with modern LEDs.
Don’t forget about antique bottles; making such a lamp will be as easy as shelling pears. We will look at several options, and you can show us what you came up with in the comments. The main feature will be the lighting element.
LED strip has good brightness, so it is well suited for basic room lighting. Another feature we note is the color scheme of the tape. Colored lighting is not suitable as main lighting, but is excellent as relaxing light.
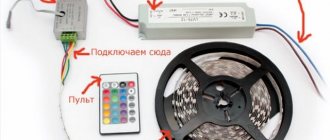
To realize such beauty, it was only necessary to supplement the old chandelier with an LED strip connected to the existing wiring. The tape power supply fits well into the device body. The tape has a sticky backing, so it won't be difficult to place.
Thanks to the use of modern RGB controllers, turning on the chandelier will be absolutely no problem. A remote control is included with the device; it allows you to adjust the brightness and switch the colors of the installed tape in a way that interests you.
Perhaps the only disadvantage of the chandelier is the fact that the LED strip is powered by a power supply, so there may be slight difficulties with the placement of the device. To do this, it is necessary to veil the device into the body of the future lamp.
Advice: first decide on the size of the power supply, and then make a lamp project from an LED strip.
In general, the use of LEDs for lighting is a competent and correct decision. This lamp will delight you for many years with its reliable lighting. The main thing is to pay attention to sufficient brightness. All LEDs have different luminous flux. We are interested in bright models.
A good solution would be a paper chandelier. Due to the fact that the LED strip does not emit a lot of heat, we can make literally any shape for the lamp and cover it from the inside with tape in the desired direction.
Connecting LED strip
Let's move on to the tape itself. Measure the LED strip of the required length according to the dimensions of your aluminum sheet.
In total you will need two segments. Solder them together in parallel.
Then glue it onto an aluminum backing.
Please note that for greater safety in places where contacts are soldered, it is advisable to place paper tape under the tape.
It will act as an insulator and prevent a possible short circuit to the housing.
Technically, the lamp is almost ready. You can apply voltage to it and turn on the toggle switch.
However, it all looks rather unattractive. Additionally, direct light from LEDs without diffusion is not very good for the eyes.
How to make a lamp from a ribbon with your own hands: diagram and photo
Below are photos and detailed information on how to make a lamp with your own hands.
Preparation of materials and parts
A chandelier or sconce can be made from individual LEDs (cheaper) or from an LED strip (you can buy one linear meter for 150–300 rubles). For beginners, it is better to use tape, since working with individual LEDs is more painstaking and requires great care. You will need the following tools and materials:
- A finished board or frame made of a heat-resistant material (not metal) that does not conduct electricity.
- Decorative elements.
- LED strip.
- Soldering iron.
- Tweezers.
- Power unit.
- A capacitor, the capacity and voltage of which must correspond to the electrical circuit used in the device and the number of LED elements used in this circuit.
Tip You can solder the tapes with a soldering iron or special connectors. Soldering with acid is strictly prohibited, as this can lead to damage to the elements or a short circuit.
Tape selection
The range of diodes is wide: there are budget and luxury options. The following types of diodes are popular:
- SMD 3528 - high brightness, since one linear meter of tape uses from 60 to 240 light elements located close to each other.
- SMD 2835 Premium - less brightness, but the same dense arrangement of elements (60-120 diodes per linear meter). This tape can be cut into small pieces of 5 cm. You can create spot lighting or highlight small interior items.
- SMD 3014 is an analogue of the previous model.
- SMD 5050 is a popular model with a reasonable price, where there are 30–120 elements per linear meter.
The strip with LEDs is sold in 5-10 m packs. It can be cut into small pieces with ordinary scissors. If the tape covers a large object, then for every 15 linear meters it is necessary to install one power supply. High-voltage boards have no restrictions on footage, they are sold in coils of 100 m. They are cut into 50 or 100 cm. The “IP” mark indicates how protected the board is from dust and moisture:
- IP 44 - good level of protection protection from dust and dirt.
- IP65 - protection from dust and moisture in low temperatures while maintaining elasticity.
- IP67 - there is a protective coating - silicone tube.
- IP68 - high level of protection. The protective coating is a two-layer silicone tube with filler.
Features and stages of installation work
The LED strip can be mounted on a decorated platform or in a lampshade. First, the platform and decorative elements are prepared, then the LEDs and power supplies. The type and shape of the future lamp or chandelier depend on the imagination of the master. How to collect:
- To reduce the voltage, the power supply is placed as close as possible to the diodes. The longer the wiring, the more voltage is lost, reducing lighting levels.
- If the platform is metal, then a layer of insulation is laid between the strip and the LEDs.
- If the strip for a DIY LED chandelier is connected via a capacitor to a 220 V network, then you will need to cover it with two layers of silicone sealant. Any installation operations with such a board must be performed with the voltage completely turned off.
- When connecting a home-made sconce or chandelier, it is better to use multi-core wiring. A 0.75 mm ferrule is placed on one end of the wire and connected to the controller, and the other is soldered to the ends of the LED board.
Diffuser
Acetate paper or guitar sheet comes to the rescue. This transparent film of different densities is used in cooking to create decor.
However, due to the fact that the sheets are initially transparent, you will have to sand them on both sides with sandpaper, thereby giving them a matte tint.
You will need two sheets in total. Bend their ends and glue them to the aluminum backing on the back side.
In this case, one sheet is bent a little further, the other a little closer. So that in the end they end up at different distances from the LED strip and there is a gap between them.
Now your lamp is really ready. With the diffuser sheets, it looks like an expensive wall lamp.
Drill holes in the back and hang it on any surface in the house. Vertical positioning is preferable.
In the dark, the lamp looks chic, modern and expensive. You can assemble not one, but two, three, four such lamps, connect them in series through connectors and completely illuminate the entire room.
Build process
Today, there are a large number of options for how to make a lamp using LED strip. The assembly method will depend on what type of lighting fixture you ultimately want:
- horizontal;
- vertical;
- on legs.
Making holes
Let's look at some of them in more detail. Half of the steps that need to be completed during the assembly process do not depend on the luminaire version. Therefore they will match. The LED strip product is assembled as follows:
- first measure the length of the corner required for assembly;
- We drill holes in it, with the help of which the device will be attached to the surface. Screws should be used as fastening elements here;
Note! It is also necessary to cut out a place in the corner to place the microswitch in it.
- we fix the corner in the place we need;
- we install the switch in the sawn place and solder the wires to the tape at the place where it is cut into separate pieces;
- degrease the LED strip with acetone;
Connection diagram
- then we attach the LED strip to the installed corner. In order for it to stick evenly, it needs to be attached lightly to the surface and then leveled. After this, you can run your hand along the tape, finally securing it in the chosen place;
- Next, we connect the wires to an adapter or power supply that has the power we need. Typically the power is 12V.
Note! Only with the help of an adapter/power supply will it be possible to connect the lamp to a standard power line, which has a power of 220V.
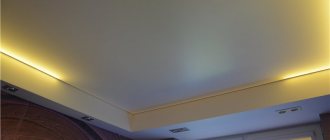
As can be seen from the assembly instructions, the final result should be a lighting device with a horizontal installation method. It can be effectively used in the kitchen to illuminate the cooking area, countertop or hob. Also, such a lamp will be relevant in a children’s room. Here it would be appropriate to place it above the desk under a hanging shelf or cabinet. But remember that the maximum lighting efficiency of such a device is achieved at a height of 70-80 cm above the working surface. At the same time, the light will not dazzle or irritate your eyes.
Powerful lamp for a large area
For the third lamp, take an aluminum tube 11cm long and approximately 1cm in diameter.
A screw should be screwed tightly into one end of the tube, and a hole should be drilled at the other end. Prepare 4 such rods in total.
After that, take two long angles (more than 1 meter each) and drill holes at its ends.
The rods are screwed through these holes to the corners. This will be the supporting base of the lamp frame.
Add a link to a discussion of the article on the forum
RadioKot >Laboratory >Analog devices >
| Article tags: | Add a tag |
Camping lamp made from LED strip
Author: Maxim1441 Published 02/19/2013 Created with the help of KotoEd.
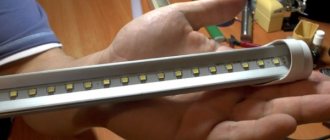
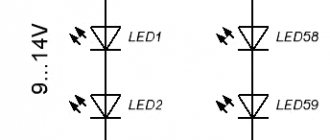
Summer is just around the corner - and there's fishing and outdoor recreation. Often - with an overnight stay. And for such “get-togethers” you can’t do without some kind of lighting source. And the most economical and reliable source of such lighting will be a lamp made from LED strip. The lamp in question can be connected to both a car battery and small batteries with just a couple of Ah. The main thing is that the battery has a nominal voltage of 12V. At the same time, such a lamp can burn from a car battery for at least a week, because... the consumption of one meter of LED strip is 0.4-0.6A. I used one meter of HT-5050W30E 12V sealing tape. It consists of 30 SMD LEDs on a flexible strip coated with a layer of epoxy resin. There is a strip of adhesive tape on the back side, so installing the tape will be a breeze. The tape has a degree of protection IP65, so a lamp made from it can be used directly in the rain, the main thing is to properly seal all connections in the structure. The current consumption of one meter of tape is 0.6A, power is 7.2 W. In terms of luminosity, it approximately corresponds to a 60W incandescent light bulb. Therefore, its effectiveness is 10 times higher! And the operating time can be up to 20-25 thousand hours. A meter of such tape costs 150-200 rubles. But you cannot directly connect the tape to the battery, because The battery is an unstabilized power source, and when fully charged, the same car battery can produce almost 15V, and when discharged, it can drop to 10V. The tape is designed for a specific voltage of 12V, and exceeding the voltage will kill it over time, because If the rated current is exceeded, it will overheat. Therefore, you cannot do without a voltage stabilizer. Ordinary cranks and LMs will not work here, because... The difference between the input and output voltages is too small. After reading the literature, I came up with a very, very simple stabilizer circuit, which consists of only four parts. The scheme is, in principle, standard. Zener diode VD1, you won’t believe it, stabilizes the voltage. And transistor VT1 amplifies the output current. Fuse FU1 at 1A serves as protection against short circuit. The “trick” of the circuit is the use of a powerful germanium transistor. You need to use a germanium transistor, not a silicon one, because The value of the voltage drop at the base-emitter pn junction for a transistor on a germanium crystal is only 0.3V, and for silicon it is 0.7V, which in relation to our design is already critical. The transistor must be placed on the radiator, because it gets very hot. To check whether a particular radiator is enough, turn on the lamp to a fully charged battery and wait 10-15 minutes. Then touch the radiator or transistor body - if you can hold your finger without “straining”, then the radiator is enough, if it “burns”, then you need a larger radiator. Instead of D814D, you can use any other zener diode with the same stabilization voltage and no less power dissipation. The transistor can be supplied with any of the P216-P217 series. Any resistor 0.125W or more. Here is my version of the stabilizer design. I placed it in an aluminum filmstrip can, having previously insulated its inside. Inside we place a transistor with a radiator, to which the stabilizer board is screwed. I applied the tracks with varnish, then etched them, and soldered all the parts directly on top. The result is this kind of “surface editing for the poor” :-). Keep in mind that the transistor body is the collector, so don't short it! I placed the fuse on tabs borrowed from an old computer power supply. You can also take a radiator from there, if you don’t have one like the one in the photo - just cut out a plate of the required size and drill holes for the leads. I made holes in the lid of the jar for the cables. The wire used is a 2x0.35 ball screw, which is exactly suitable for such purposes. The main thing is to remember to seal everything well! And this is what the assembled lamp looks like. Two cables come from the stabilizer can - one to the lamp itself, the other to the power source with “crocodiles” at the end. Let's take a closer look at the design of the lamp itself. It's made from a matching plastic yoghurt bottle. A tape is glued to the bottom of the spiral. Its end, where the cable is connected, is sealed with heat-shrinkable tubing. The end is also held in place by a wire tie. At the top I made a “handle” from a rope so that I could attach the lamp, for example, to a tree branch or a hook. Because I am fond of fishing, so I also provided this way of attaching the lamp - we take an ordinary fishing rod, secure it somehow on the ground, then extend as many elbows as necessary, and unscrew the cap on the bottle and place it “upside down” on the tip of the rod. For this purpose, I attached wires to the cover so that it would not get lost. It is also advisable to put a weight inside the jar so that it is more stable in the wind. But just one meter of tape illuminates a room of 20 sq.m. And all this with a power of only 7W! For illuminating vodka on a table while on vacation in nature, it’s enough for the eyes. Also consider your neighbors on the other side. And ships passing nearby will be able to reach your table like a lighthouse. I adapted a box from an old first aid kit as a case for storing the lamp. I tested the finished device for 24 hours - the stabilizer behaved normally - it stabilized everything that was needed; the lamp was shining just right and also didn’t seem to get too hot; a ten-year-old 45A/h battery was ready to provide current for another week for such a modest consumer. I tested the entire structure for tightness by bathing it in the bathroom under the shower (only the battery was previously covered with a bag) - everything works. I hope this will be useful to someone.
All questions in the Forum.
| What do you think of this article? | Did this device work for you? | |
| 61 | 28 | 22 |
| 1 | 1 |
Homemade diffuser
The next thing you will need is foil. It is sold in baking rolls.
Unwind the roll and carefully crumple the foil over the entire area to get the most crumpled, rough structure possible.
To avoid accidentally making a hole with your nails, wear gloves.
After this, the foil needs to be glued onto a large piece of cardboard. Take it from under some TV box or other household appliance.
Just do not smooth out the foil when gluing. It is very important to maintain the rough surface texture.
In the end, you should end up with a square like this. The dimensions of the square must match the dimensions of the two corners prepared earlier.
Along the edges of this cardboard with foil, attach aluminum corners with tubes to bolts and nuts.
This will be a blank for the lamp body.