Requirements for placing spotlights on a plasterboard ceiling
There is no one strict configuration for the placement of spots on a plasterboard ceiling; everyone builds it themselves. The main question: what kind of lighting should the spots provide - full or zonal? Based on this, the layout of the lamps is formed. There are no restrictions, but usually one of three configurations is used:
- In several rows, perpendicular to the wall in which there is a window.
- Around the pendant chandelier along the periphery of the ceiling. Here the chandelier plays the role of the main lighting fixture in the room, and the spotlights play the role of additional ones.
Important! There are 2 rules. The distance between the wall and the spot closest to it is at least 60 cm, the distance between the rows is a meter.
When installing in a checkerboard pattern, the same rules are followed.
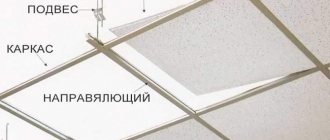
Installing spotlights in drywall
- In rows perpendicular to the wall on which the window is located. In this case, the distance from the wall to the first device should not be less than 60 cm. And the installation step of the rows is 1 m.
- In a checkerboard pattern. The same requirements apply here.
- Installation of spotlights in plasterboard is carried out along the periphery. That is, point light sources in this case act as additional lighting of the space. The main device here is the chandelier.
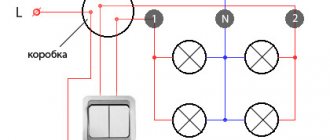
There are many connection methods, or rather, devices with which the connection is made. The simplest, but also reliable, are terminal blocks with clamping screws or modern WAGO terminals. In any case, the cables must be laid by passing them through a corrugated installation hose. This is additional protection that increases the life of the wires. Sometimes it’s not easy to do this by hand because the drywall itself gets in the way.
Therefore, experienced craftsmen do this - they tie the tendrils together with wire, and after installing the spotlight in the drywall, they cut it with wire cutters or pliers. The antennae straighten under the action of springs and rest on the outside of the ceiling, preventing the lamp from falling. All three schemes are quite simple and universal, but, as practice shows, today they are often not used.
Since there are no restrictions in the arrangement of spotlights, there are a huge number of variations in this case. This especially applies to plasterboard ceilings built in two tiers.
What to have on hand
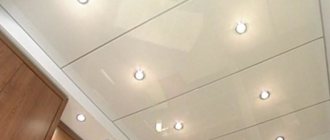
After marking the places for attaching the lamps and routing the wires, the next stage begins - cutting out holes for the spots. They are called strobes. Their shape is determined by the design of the lamp; it can be round, square, etc.
An example of ceiling gating.
To install spotlights in a plasterboard ceiling, you will need the following tools and materials:
- electric drill;
- crown for wood processing;
- thin and indicator screwdrivers;
- terminal block;
- pliers or pliers.
Installation Requirements
There are no general requirements for installing spotlights in plasterboard, but there are recommendations regarding some parameters. Firstly, built-in lamps must provide good visibility or local illumination in a certain area. Secondly, the choice of installation location and technical parameters must be consistent with other elements of the lighting system - hanging chandeliers, LED strips, sconces, etc.
Thirdly, it is recommended to maintain the distances between spotlights in the following ratios:
- If lamps are mounted in rows, then there should be no more than 1 m between them;
- Within one row, the distance between spotlights should not exceed 1.5 m;
- If there are several rows, then the point devices should be staggered relative to each other;
- The distance from built-in spots to walls or windows should be at least 0.5 - 0.6 m.
Types of fixtures and lamps for mounting on gypsum board ceilings
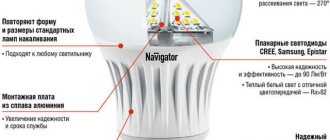
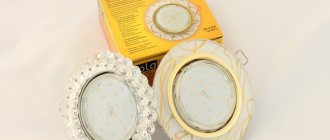
Spotlights for installation in plasterboard ceilings come in recessed and surface-mounted types. For recessed spots, the technical part is hidden above the ceiling, and the decorative part protrudes above the plasterboard surface. Overhead lamps are mounted on the surface, and their installation method is similar to that of a chandelier. In addition, according to the design nuances, spotlights for gypsum plasterboard ceilings can be rotary or fixed, single or block. Spots use different types of lamps - from incandescent to energy-saving fluorescent. LED lamps are the most popular now.
Types of spotlights
Spotlights designed for plasterboard ceilings are classified according to several parameters. Based on the type of installation, the following types are distinguished:
- built-in - inserted into a hole in the ceiling, after installation only the decorative part is visible;
- overhead - mounted on a hard surface, a hole in the drywall is made only for wires.
Structurally, lamps are:
- fixed;
- rotary.
Different types of lamps are used in spot lighting devices:
- halogen;
- LED;
- luminescent;
- incandescent lamps with a mirror reflector.
What color temperature lamps do you prefer?
USEFUL INFORMATION: GKL sheet - what is it? Dimensions and thickness, types of material
Everyone chooses them at their own discretion, guided by efficiency, price and other factors. LED lamps are the most effective, but many are put off by the price. However, if you buy lamps from reputable suppliers and manufacturers, they pay for themselves because they last a long time and produce the least amount of heat. The most inefficient are incandescent lamps: they get very hot and “eat up” the most electricity, although they are cheaper than others.
Selecting points for attaching spots, preparing for installation
When the scheme is chosen, you need to transfer it to paper in all details.
The exact location of the lamps must be drawn, the distance between them must be observed to scale.
After this, you need to mark the places where the spots are attached on the ceiling.
The next step is wiring. This can be done both after assembling the metal frame on the ceiling, and before it (the second option is more difficult). The main thing is to prevent the intersection of the lamp and part of the frame at one point; they should be dispersed. All cables must be insulated with a corrugated hose. It not only provides additional protection, but also extends the life of the cable. According to the selected spot mounting scheme, the connection can be serial or parallel. As for the wires, there is no need to torment yourself with cross-section calculations depending on the power consumption. A cross section of 1.5 mm2 PVA is suitable. Material: soft copper.
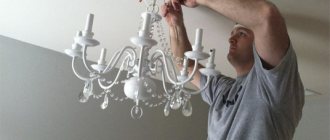
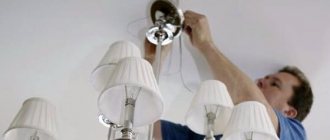
Installation of lamps
When starting to install lamps, you need to make sure that there is no current in the network. This is done by checking the socket or contacts on the ceiling with an indicator screwdriver.
Checking the socket with an indicator screwdriver.
If there is no electricity in the network, you can start drilling grooves.
You should always pay attention so that the hole does not fall on the section of the profile frame. If you do not take this point into account, all the work will go down the drain, and the ceiling surface will be damaged. To prevent this from happening, you need to make the most accurate ceiling markings, accurate to the centimeter.
When the groove is drilled, you need to connect the input wires from the junction box to the lamp. The best way is using terminal blocks (terminal blocks). They provide reliable fixation and insulation of the cores. In addition, such accession takes place quickly. Another advantage of the terminal blocks is the “clutch” of cores made of different materials and different sections.
After the input wires and the lamp are connected, you need to firmly fix the spot inside the plasterboard ceiling. For this purpose, the spring legs of the lamp are clamped, and the body is carefully placed in the groove.
Securing the spot inside the groove.
Advice! Instead of manually, you can secure the spring legs with wire, and after installation, bite it with pliers or pliers and remove it. This method is useful for fragile gypsum board ceilings, as well as expensive lamps. This reduces the risk of damage to the ceiling or electrical appliance.
If the spot has a threaded base, after the housing is seated, the light bulb is screwed in. Finally, the final step, which is also the simplest, is verification. It is enough to flip the switch, and it will become clear whether everything went well and whether the lamp is connected correctly. The absence of light, flickering, sparks - all this indicates a problem and requires rewiring.
Installation of built-in spots
It is worth mentioning separately about built-in spotlights - models consisting of decorative and technical parts. The order of their installation is as follows:
- Disassemble the lamp.
- Place the technical part into the hole using the same methods.
- Pull out the power cable through the cartridge and connect it to the wires of the spot.
- Push the wires back.
- Attach the decorative part to the technical part so that it is on this side of the plasterboard ceiling.
Video: Installation of lighting points in drywall
How big holes are made
Typically, installing spotlights in drywall begins with measuring the basic dimensions of the housing. For each of them you need to cut a mounting hole. To do this, you can use one of two special drilling attachments for an electric drill. The first one is a set of circular saws. A slightly larger blade is selected from the set to suit the diameter of the body.
Another device is a milling cutter on the rocker arm. It allows you to cut holes whose diameter is larger than the saws in the set. If you need to install large recessed lights in drywall, a milling cutter is the most suitable tool. These two electric drill attachments make it possible to quickly make perfectly round holes.
Measuring the diameter of the luminaire body
Set of circular saws and cutter with rocker arm
But if you don’t have a drill, you can do without it by using a short saw with a narrow blade. Before cutting holes, you need to make markings according to the template. The template can be selected from used rolls of adhesive tape, as well as any lids or boxes of suitable sizes and round shape. A template is applied to those places where the lamps should be installed in the plasterboard ceiling and outlined with a pencil or marker. This creates a cutting line.
Selecting a template for cutting a hole in drywall
Determining the exact position of the hole center
Applying a cutting line according to a template on drywall
Removing wallpaper
If there is already wallpaper on the ceiling, before using the saw, the surface inside the hole must be cleared of it so as not to accidentally tear it. This is done by cutting the mounting knife along the intended line. Inside the resulting circle there should be a hole large enough for the saw blade to fit into. Using it, you can easily get a round hole with fairly smooth edges. Once installed, the recessed lights will cover them. But still, working with a saw requires a certain skill and accuracy. You should not move it back and forth with a large amplitude.
Useful tips
In order for the installation of a spotlight on a plasterboard ceiling to be successful, it is enough to know some useful “life hacks”. For example:
- When starting installation, you need to make sure that the wires are color coded. As a rule, it is standard, but sometimes there are exceptions. Electricity is not something to joke about, so it is better to make sure that the connection is correct.
- Grounding wiring is a direct concern for health and life.
- Wires can be connected in many ways, not just using terminals. The most important thing is to reliably isolate and reduce to zero the possibility of metal oxidation.
The wires must be reliably insulated. - Consider the relationship between price and electricity consumption. For example, LED lamps are economical and durable, but they cost a lot; halogen lamps often burn out. The best solution seems to be energy-saving lamps.
- Installation of the spot should begin only after the gypsum board ceiling has been completely finished.
- It is better not to touch fluorescent lamps with your hands during the installation of the lamp. There is nothing dangerous about this, but it can have a negative impact on the life of the lamp.
- Even if the lamp has a square shape, it is better to drill the strobe with a round crown. Then you can make the corners by hand.
- Do not allow the lamp and ceiling to overheat. LED lamps heat up the least.
- In the lamp placement scheme, you need to combine the correct location with beauty. Excessive minimalism is not always appropriate here.
- If you are not confident in your own abilities, it is better to call a specialist.
What should you do if the lamp hits the profile on a finished ceiling?
Photo gallery
Here you can see some examples of making plasterboard ceilings with lighting yourself; perhaps you will like one of the proposed options:
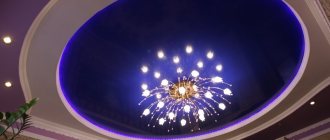
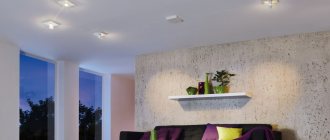
Neon lighting on the ceiling in the living room will be a great decoration
Strict forms will become softer with lighting elements
Soft gentle light will make being in the room more pleasant
Lighting serves as an accent on the ceiling
Unobtrusive lamps will not only be an excellent source of light, but will also decorate the ceiling
The ceiling structure in the shape of a snail looks exotic and attractive
Saturated lighting colors are not suitable for all rooms, but sometimes they are very appropriate
If you are a fan of hi-tech, then a ceiling in black and white tones with lighting elements will suit you best.
Straight lines and clear contours: this work will not cause difficulties even for a beginner
From rectangle to perfection or how to transform a room
A gentle line along the room resembles a flowing stream
A room in a youth style will appeal to everyone who adheres to a modern lifestyle
Rectangular shapes, standard designs can be attractive too
What mistakes should be avoided?
To prevent all the work from going down the drain and leading to dismantling or more disastrous consequences, you should avoid common mistakes.
- Work is carried out only with the voltage turned off.
- The absence of a corrugated hose on the wires can lead to ignition of the wiring and a fire. Not to mention the other advantages of corrugation: protection from moisture, extended service life, etc.
- It is necessary to avoid getting part of the frame onto the hole for mounting the lamp.
- If the spot is mounted in a gypsum board ceiling of a bathroom, its body must have a sufficient index of resistance to humidity and water ingress.
- Installation of spotlights in the bathroom.
Installation of spotlights in the bathroom. - The type of lamp must correspond to the required tasks. For example, dimmable LED lamps are suitable for a dimmer (light brightness control), since other types of lamps either simply do not support this option or quickly fail.