Remote controlled chandelier design
It consists of three groups of electronics: an LED lamp unit, a halogen unit, now with the output of a large number of LED lamps, now we can say an LED lamp too)) a lamp and a relay in the form of a control panel with buttons and a signal receiver, which is always sold together and tuned to its frequency . An LED chandelier contains many multi-colored diode lamps designed to switch lighting modes. Electricity comes from a capacitor located in the LED circuit. The halogen unit receives power from transformers that pulse the supplied voltage. The radio signal controller and control unit of the relay consists of electromagnetic relays that switch a current of a certain power. The remote control has from 2 to 4 buttons, control is carried out via infrared, more often via a radio channel.
Features of the structure of controlled lamps
LED lamps, which can be controlled using a remote control, have appeared relatively recently. To make this possible, devices of this type received additional elements of their design.
Chandelier controlled by remote control
As we found out, a standard LED lamp (for example, a ceiling chandelier) consists of a driver, a regulator unit and a housing. The driver has terminal clamps (terminals). Power is supplied to them. From the regulator block in a simple chandelier, wires run to the lamps. The number of such wires, depending on the design of the device, can be from 1 to 12. In models of LED lamps operating from a control panel, an additional antenna is built into the design, as well as voltage regulators and units that automatically adjust the glow of the product. At the same time, several drivers, as well as various types of LEDs, can be located in raster lamp models. Remember that DIY inspection and repair of LED lamps depends entirely on their type.
The chandelier does not respond to the remote control:
— check the batteries, replace them if necessary;
— test the buttons by pressing each button alternately. If one or more of them do not work, it is necessary to clean the contacts from dirt and dust: apply a drop of glue, crushed graphite on the glue;
- if the buttons and batteries are in working condition, the cause of the breakdown lies in the signal receiver - you will have to replace it along with the remote control. Sequence of work: turn off the power to the apartment, remove the chandelier, open its box, replace the power supply, hang the chandelier.
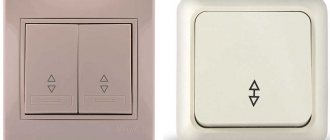
If there is no urgent need for remote control of the lamp, you can use the lamp directly with the switch. One press will change the number of lamps turned on one by one, until it turns off completely. Or put it on a two-key switch and it will switch the LED backlight modes, the second one will change the modes of the number of lamps turned on.
Major breakdowns of lamps
Repair of a chandelier with a remote control is required if characteristic malfunctions for such devices are discovered:
- the remote control suddenly stops responding, but manual control is fine;
- the stationary switch refuses to function;
- a certain number of lamps or LEDs do not turn on;
- the lights begin to blink, the chandelier itself switches between modes;
- The lamp turns off for no reason or does not work at all.
The most common problems are with the remote control. The first reason that comes to mind is dead batteries. But this is the simplest option. Often the problem is that someone else is “to blame.” All these faults often do not appear simultaneously. Typically, repairing a chandelier with a remote control involves soldering or replacing one or two elements. As a rule (according to Murphy's law), the most important of them go on strike.
Some of the lamps stopped burning:
- non-working halogen lamps should simply be replaced;
— if the LED backlight does not work, you need to replace all the diodes at once, or find the non-working lamp and replace it with exactly the same one, but this is often difficult to do due to the fact that chandeliers are quickly updated and the same LEDs that were previously installed will be problematic to find;
— if the halogen and LED elements work properly, the problem is in the transformer supplying the light bulbs. You need to purchase a similar model and make a replacement.
Source
Types of breakdowns and their causes
To repair LED ceiling lights with your own hands, you need to study the main types of breakdowns and the factors that cause them.
If the remote control does not respond to touches far/near and it is not the batteries at all, the following reasons for the malfunction are possible: failure of the remote control due to clogged contacts that need to be cleaned with alcohol; dysfunction of a low-quality Chinese device, requiring its complete replacement; poor operation of the device relay.
If the remote control works on the third or fifth attempt, and responds to touches only close, then the problem is a bad relay that needs to be replaced, an interruption in the LED loop as a result of missing contact or its melting. The reason may also be a breakdown of the lamp control unit. Often, repairing chandeliers with a remote control is limited to installing better batteries.
A stationary switch fails as a result of oxidation of wires, malfunction of the transformer, incorrectly selected electrical circuit, regular surges in the network, overheating and overvoltage. Often the cause of the phenomenon is a poor-quality switch and improper operation of the device.
LEDs with light bulbs do not light up due to a failure or failure of the power supply, the LEDs and lamps themselves, or burnout. Also sometimes the problem is network failure, high voltage, overheating of the device and poor-quality lighting fixtures. In any of the above cases, a complete replacement is required.
The LED chandelier does not turn on due to a poor connection, poor-quality wiring, or a failure at the level of the device itself or near the switch. Another problem is the lack of checking the operation of the lamp before purchase - a manufacturing defect is possible. Sometimes the reason lies in problems with the remote control.
Repairing a wireless switch
Many owners of Chinese chandeliers with a remote control are faced with the fact that after a year or two their chandelier begins to respond poorly to commands from the remote control. As a rule, the malfunction manifests itself as follows:
It turns on if the remote control is brought close.
Does not respond well to commands from the remote control.
Does not respond to turning off channels A, B, C individually. Only all modes can be turned off with the D button.
On the page about the design and repair of a chandelier with a control panel, I already talked about this malfunction. I learned about its reason from a comment from one of the site visitors. After some time, I encountered this problem personally.
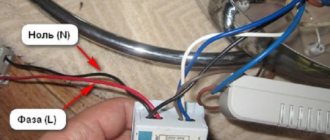
The reason for the poor response of the chandelier to commands is not related to the remote control (RC), but to this box with the inscription “Wireless switch”. This is a wireless switch (radio switch). He is the one responsible for receiving and executing commands. In my case, this block is marked Y-7E. This is a three-channel option.
As it turned out, the cause of the failure lies in the metal film capacitor, which is part of the power supply on the ballast capacitor. In the photo it is indicated by a red arrow.
Its capacity is usually 1
1.5 microfarads (µF). Operating voltage from 250V.
This circuit, using a capacitor that absorbs excess voltage, is actively used in Chinese chandeliers. The same circuit is used to power the LED part, if any.
The use of simple circuit solutions and the use of low-quality components leads to the fact that the chandelier quickly becomes unusable.
The problem is that after 1-1.5 years this capacitor loses its capacity. In this case, the supply voltage of the wireless switch is set to 12
13 volts drops to 6 volts
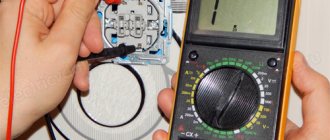
7 volts. I was convinced of this personally when I took measurements with a multimeter.
Electrical equipment, light, lighting
Thanks to the use of halogen lamps in lamps, it has made it possible to radically change the way people think about electric lighting in their homes. Halogen lamps with their amazing light will decorate any room, embodying the wildest dreams of home owners and the fantasies of designers.
It should be noted that halogen chandeliers cannot be connected to a regular 220 V electrical network without the use of special step-down transformers. Depending on the lamps used, the power source can convert standard household voltage into 6, 12 or 24 V. Since voltage that is safe for humans is used to power the lamps, such chandeliers can be safely installed in rooms with high humidity, for example, in showers and bathrooms. But to properly connect a halogen chandelier, you will need some knowledge of electrical engineering.
Installation of a halogen chandelier
A chandelier with halogen lamps consists of a decorative body, glass and plastic reflectors and lamps. The chandelier also comes with a transformer that reduces the household voltage of 220 V to the nominal voltage for the selected lamps.
Fig 1. Step-down transformer 220/12V
Fig 2. Halogen lamp
To connect the chandelier we will need:
— chandelier with halogen lamps;
— a step-down transformer with the appropriate output voltage;
- a tool for connecting conductors.
Attention! All work must be carried out with the voltage turned off to avoid electric shock.
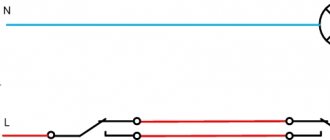
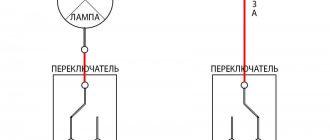
The halogen chandelier is connected to the network via a transformer according to the diagram:
Fig 3. Wiring diagram for a chandelier with one halogen lamp
This halogen chandelier circuit is designed to connect one lamp, but what if there are several of them? Then you should be guided by the diagram presented below.
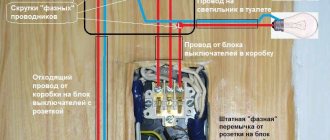
Fig 4. Wiring diagram for a chandelier with 6 halogen lamps
To deal with all the wires and make the connection without errors, you need to consider in more detail each step of connecting all the elements of the chandelier. In Fig. Figure 2 shows a diagram of connecting six halogen lamps to two step-down transformers powered by 220 V apartment wiring. According to the rules for the safe operation of electrical appliances, the phase conductor must be broken by a switch (it is brown in the figure). The neutral wire (blue) is connected directly to the terminal connections of the step-down transformers. For convenience, the clamping screws are marked with the letters L - phase and N - zero.
In fact, it does not matter how many lamps will be connected to the network, it is important to connect each group of lamps to a separate transformer, and, accordingly, connect them correctly in the distribution box.
You should not connect the wires somewhere above the suspended ceiling, trying to save a little on the length of the conductors. It may happen one day that a halogen chandelier does not turn on, for example, due to poor contact in the terminal connections. And because of this, you will have to disassemble the ceiling to strip the wires and reconnect them. Therefore, all switching should always be carried out in junction boxes that are specifically designed for this.
Connecting a halogen chandelier
We've sorted out the connection of step-down transformers, now it's up to the lamps. They are always connected in parallel to each other; they should not be confused with a Christmas tree garland, where the light bulbs are connected in series to each other. Since transformers are manufactured with a certain power, you should carefully read on their housings how many lamps can be connected to them at the same time. Otherwise, if there are more light sources than the transformer can withstand, the lamps will burn at half incandescence. In addition, the transformer will work with overload and eventually fail.
Fig 5. Connection diagram of halogen lamps to step-down transformers
Tips for installing and connecting a halogen chandelier
To prevent the halogen chandelier from breaking due to poor-quality connection, you should follow the basic rules:
- the wires going from the transformer to the lamps should not be more than 2 m long. Since the operating voltage of halogen lamps is quite low, losses may occur in the conductors, which will also lead to a decrease in the brightness of the light sources;
- It is highly not recommended to close transformers in small cavities in which natural ventilation and air circulation are limited. It is also prohibited to install them near heat sources and on flammable substrates. If it is impossible to comply with these conditions, the load on the transformer should be reduced by 25% of its rated power;
- To control halogen lamps, the use of dimmers (rheostats for manually changing the brightness of the light flux) is prohibited; incorrect operation of all equipment may result in its failure.
Repair of halogen chandeliers
A common reason why chandeliers with halogen lamps may not work is poor contacts on the connections. To repair a chandelier, it is often enough to strip the wires connected to the transformers and check the connections in the junction boxes.
If there are no visible signs of damage, the contacts are cleaned and crimped, and the lamps still do not want to light, then you need to arm yourself with a tester with which you can measure the output voltage. If the tester shows zero at the output terminals of the transformer, then you need to go to an electrical goods store and buy exactly the same one, not forgetting to remember or rewrite the markings on its body.
If you need to repair a halogen chandelier with a remote control, then you need to start with a simple check of the batteries. Then check the integrity of the lamps and the operability of the transformer and, if all elements of the halogen chandelier are in working order, the electronic control unit for the lamps remains. To repair it, you need deeper knowledge of electronics, therefore, if it is this that is causing the chandelier to break down, it should be replaced entirely. When disconnecting the wires from it, you should mark them so as not to make a mistake when connecting a new unit.
When all the operations to replace failed parts are completed, the chandelier should shine with all its lamps, delighting its owners.
Source
The chandelier with the remote control stopped turning on from the switch
In the age of automation, every person strives to make their home more “smart,” change the design and automate what previously was at a primitive level for many years. The main important aspect in the house is lighting, which should be of high quality and sufficient at the moment when we need it, and the best option would be to control it without getting up from your seat. In this article we will talk about a (LED) chandelier with a remote control, which has recently gained great popularity among consumers, which of course could not but affect the appearance of a large and varied number of all kinds of chandeliers and lamps of different types and designs. We will talk about malfunctions and repairs of remote controlled chandeliers.
The design of such chandeliers is not as simple as conventional ones and in order to assemble them, more time and knowledge is needed. Control, switching and dimming are performed using a remote control and a controller built into the chandelier. Such devices can be divided into three types:
- LED
- Halogen
- Combined
Regardless of the type, almost all chandeliers on the control panel have a modular design and consist of interchangeable blocks, which greatly simplifies their repair. What blocks does this chandelier consist of?
Radio control unit.
Radio control is carried out using a “radio relay” with a switching voltage of 220 volts and up to 1 kilowatt of power. Depending on the price and complexity of the chandelier, this unit can be multi-channel, that is, it can consist of several electromagnetic relays. Essentially, this unit is a wireless switch, commands to which are sent by a remote control. It is also called a “switch”, which is often marked on the block and in the instructions. In addition to load control, some models also dim the LED backlight or, more rarely, the halogen load.
Main types of repair work on chandeliers and lamps
| № | Name of works | |
| 1 | Diagnostics | Diagnostics are carried out after the goods are accepted for repair. Prices for all work are presented in table No. 2. When a technician comes to your home, diagnostics are not paid for. |
| 2 | Chandelier repair with remote control | Repair of a chandelier controller with a control panel or its replacement. We accept remote-controlled chandeliers of all types and manufacturers for repair: ceiling-mounted, Chinese, with and without LED lighting, halogen chandeliers with remote control, etc. We retain all the functionality and operating modes of the chandelier. |
| 3 | Repair of LED lamps | Repair of LED chandeliers, repair and restoration of LED drivers. Replacing the LED lighting of a chandelier if the LEDs do not light. Repair of LED chandeliers with remote control. We preserve the spectrum (color) and power of the diodes. |
| 4 | Table lamp repair | Repair of LED table lamps, restoration of operation of the touch switch, repair of the movable case (when the hinges do not hold), etc. We retain all the characteristics of the table lamp: spectrum (color) of LEDs, power of the touch switch, etc. |
| 5 | Floor lamp repair | Repair of a floor lamp with a dimmer (brightness control). Replacement and repair of the switch in the housing or in the base of floor lamps. We retain the power and functionality of the dimmer. |
| 6 | Chandelier restoration | Restoration of old chandeliers, lamps, Czech crystal chandeliers, bronze chandeliers: restoration and painting of the body, replacement of crystals, sockets, electrical wiring, welding, etc. We return your chandelier to its original appearance and functionality. |
| 7 | Repair of track lamps | Restoration, repair and replacement of LEDs or power supply. Repair of control gear unit for metal halide track lamps. We preserve the power and light spectrum of the lamp. |
| 8 | Replacing sockets in a chandelier | Replacement and repair of burnt cartridges in a chandelier. Most often we replace the following bases: E27, E14, G9 and G4. We will select and replace a cartridge that will not differ in color, size and power from the original. There are Russian, Chinese and Italian cartridges to choose from. |
| 9 | Transformer repair for halogen lamps | Restoring the functionality of chandeliers with 12V halogen lamps. Repair and replacement of electronic transformer, as well as repair of power supply for LED lamps. We will save the power of the transformer (power supply). |
| 10 | Replacing wiring in a chandelier | Disassembling a chandelier or individual horns to replace burnt wiring. We can handle any horn configuration and replace the wiring with a guarantee. |
| 11 | Dismantling, assembly and installation of the lamp | If necessary, the acceptance technician will disassemble a floor lamp or table lamp, remove a chandelier from the ceiling and sconces from the wall, and also reassemble, install and connect the lamps after repairs. The service must be agreed upon in advance. |
| 12 | Urgent repair of a chandelier, lamp | Repair on the same day. Let us know the desired date of arrival at our workshop or call of the receptionist so that we can free up time for you. |
| 13 | Departure of the acceptance specialist | The dates and time of home visits are agreed upon by calling 8 (977) 30-20-955! |
Malfunctions of chandeliers with PU and their elimination
So, most often the LED chandelier with a remote control simply does not turn on. What could be the reasons?
- The remote control itself does not work. You need to check the batteries, they may simply be dead. Replacing them with new ones can immediately solve this problem.
- If the first reason is excluded, and the chandelier still does not light, then you need to deal with the controller. This is the name of the receiver that receives signals from the control panel.
- Since our chandelier is an LED lamp, the light sources themselves cannot operate directly from a 220-volt network. An additional power supply must be installed in the chandelier design. This is a step-down transformer. Repairing such a malfunction consists of replacing the faulty device with a new one.
It should be noted that combined type chandeliers are halogens as the main type of lighting and LEDs used as backlight. So, you always need to pay attention to which halogen lamps should be installed in the lighting device. This refers to their power. If lamps of higher power were installed by mistake, then either the step-down transformer or the lamp sockets will definitely burn out. By the way, repairing cartridges in such chandeliers is the most difficult.
How to change the controller
Let’s immediately make a reservation that changing the controller to a new one is not a cheap pleasure. Such a device costs half the price of the LED lamp itself, so it’s worth first understanding the faults, and only after that deciding the issue of purchase and installation.
If the controller does not work completely, then the entire chandelier will not light. If some of the light sources are on, then you need to deal with groups of light bulbs separately. By the way, sometimes there are situations when the repair issue is solved by replacing the remote control.
So, let's consider the situation with the inability to turn on part of the chandelier. How to correct the situation, what repairs will be needed?
- To do this, first the controller is disconnected from the circuit;
- then each light group must be connected separately (in turn) to a voltage of 220 volts;
- if one of them does not light up, then you will have to deal with its power supply;
- if, on the contrary, all groups light up normally, then the whole problem is in the controller.
In the first case, you don’t need to think much, just install a unit from the neighboring group in place of the power supply. If in this case the light bulbs light up, you will have to buy a new device and install it in the lamp circuit.
In the second case, you will have to change the controller itself. If you do not have the opportunity to purchase it, then you can exclude the device from the connection diagram and transfer the switching on and off of the LED chandelier from a regular switch. This is not difficult to do, because the controller itself in the electrical circuit of the chandelier is connected by two wires: phase and zero. From it, the zero circuit is supplied to the zero contacts of the power supplies, phase to phase.
Replacing the controller is just as easy. Four contacts are disconnected: two input, two output. The device is dismantled, a new one is installed, and the connection is made according to the old circuit through four contacts. By the way, the connection diagram is usually indicated on the device itself (on the body), which is quite easy to understand.
In principle, it is possible to repair the controller itself. But you must first check it for serviceability, for which you use a multimeter set to check the voltage. The 220 V mode is set and testing is carried out. If the measuring device shows that 220 volts passes through the controller circuit, then the device is working; if not, then there is some kind of defect in it. As practice shows, most often all faults are in the board, other elements are normal. If you are not a specialist in this matter, then do not try to carry out repairs yourself. Because it is very difficult to find a defect, sometimes even experienced craftsmen, not finding it, simply change the plateau.
Sometimes the cause of the malfunction is capacitors, which can also be checked using a multimeter. Typically their capacity is at least one microfarad. If the meter readings are less than this value, then such a capacitor should be replaced.
Installation and repair of a radio-controlled chandelier
Here I will talk about the design and malfunctions of radio-controlled chandeliers with halogen and LED light sources.
Despite all their diversity, almost all chandeliers with a control panel have a modular design and are assembled from the same type of electronic components.
Here are the main ones:
Radio-controlled relay and control panel;
Lamp with halogen lamps.
Depending on the design, chandeliers can be either pure LED or combined with halogen lamps. Thanks to the radio-controlled relay, you can turn on either all the lamps, or only the LED or halogen part.
Where to buy parts and ready-made blocks for repairing a chandelier with a remote control?
Hereinafter I will refer to the well-known online store AliExpress. It is there that you can find all the necessary spare parts and units, which will be discussed further. My choice is due to the fact that there is a large selection and low prices.
In radio markets, as well as in electrical goods stores, similar products are more expensive - their prices are simply “inflated”, although the quality is the same. Therefore, for those who know how to buy on the Internet, I advise you to pay attention to this. The only disadvantage of such purchases is the rather long delivery (1-2 months), although this largely depends on the seller. I have already talked about how to search and order goods on Aliexpress here.
Radio controlled relay.
The radio control of the chandelier is organized using a radio relay, which is designed to be powered from a 220V power supply. Depending on the “steepness” of this block, it can contain from 2 or more electromagnetic relays, which are designed to switch a load with a power somewhere up to 1 kW.
This is what this block looks like. It is he who receives commands from the wireless remote control and turns on a certain section of the chandelier (halogen or LED lamp, or both). Pay attention to the inscriptions and typical connection diagram, which is shown on the unit body.
Here's what's inside this box.
Hidden under the green YDK-30 RF module is the HS153SP-J . The two black things that take up a third of the circuit board are electromagnetic relays.
Here is a schematic diagram of a radio relay for 2 control channels, model Y-2E .
The diagram is drawn by hand, so there may be errors. Similar radio-controlled relays powered by a 220-volt power supply also have the same circuitry.
A radio module is installed on the printed circuit board (labeled YDK-30 ). It is made on SMD elements and, apparently, has a fairly simple circuit design.
The radio receiver circuit is powered using a “quenching” capacitor circuit. Excess mains voltage is suppressed by ballast capacitor C2. This implementation of the circuit is simple, but very dangerous, since there is no galvanic isolation from the power supply. Voltage stabilization is implemented using zener diodes VD5, VD6 ( 1N4741A ) at 11 volts.
In addition, over time, many encounter incorrect operation of the radio relay. And it is connected precisely to the ballast capacitor C2.
Here is a message from one of the site visitors who encountered this problem and discovered its cause:
“These radio modules have a typical breakdown - after some time of operation (2-3 years), only 1 channel works normally, when you turn on the 2nd or 3rd remote control it stops responding to button presses, that is, you can turn on all channels, but after that it cannot be controlled only with a switch on the wall or by bringing the remote control closer than 0.5 meters to the chandelier.
This is due to the degradation of the film capacitor in the radio relay power supply. In the photo it is indicated by a red arrow.
The capacity of this capacitor is usually 1-1.5 µF, the operating voltage is not lower than 250 volts (marking: 105j250v , which means 10 * 10 5 picofarads or 1 µF). Replace with similar domestic or imported ones with a capacity NOT greater than that of the one you have installed (more is possible, but there is a high probability that the zener diode will either heat up wildly or burn out immediately."
Despite the good appearance of the radio relay, it sometimes causes the halogen part of the lamp to not work. The fact is that the place where the electromagnetic relay is soldered onto the printed circuit board degrades over time. Either because of poor soldering, or because of the high inrush current that is generated when the halogen lamp is turned on.
Wireless chandelier control panel.
The RF control panel is also quite simple. The printed circuit board has 2 transistors ( S8550 and S9018 CS5211AGP encoder chip . It encodes commands and transmits them to the sending node.
The buttons are designed in the same way as standard remote controls - there are no mechanical buttons, like tact buttons.
Since the chandelier is assembled from blocks, the radio-controlled relay can be easily replaced. You can look for a new unit at an electrical goods store or order it online. Here is the link.
The relay block can have several control channels. For example, one includes the halogen part of the chandelier, the other includes an LED lamp. In this case, the radio-controlled relay has 2 control channels (2 way). If you need a relay with a large number of control channels, then take the one that is required. Here you can select a module for 1, 2, 3 or 4 control channels.
In some cases, the radio-controlled relay unit can be completely disabled. This may be necessary when the unit itself is faulty and a suitable one is not available.
In this case, you can completely “throw out” the unit and turn on the chandelier using a regular power switch.
If you wish, you can assemble a chandelier with a control panel from an ordinary one. Or make the background lighting of the room, the main room and, for example, a street spotlight controllable from the remote control. To do this, you will need the same radio-controlled relay unit or, in other words, a controller with a remote control. At one time, at a wholesale store, I bought this ELEKTROSTANDARD unit for 3 channels (3 way).