When making renovations in the kitchen, the question very often arises: how exactly to connect the hob and oven so that it is safe and does not require a lot of effort and money? Manufacturers and sellers of electrical appliances always recommend entrusting the connection to professionals, but most often this service is expensive or is an additional option imposed by the seller on the buyer.
As practice shows, the issue of connecting an oven and hob can be solved independently even by a person who has never been involved with electrics, but who has a desire to figure it out and at least a minimum set of tools.
Next, we will look into this difficult matter: how to connect the hob and oven?
Task
First, let's understand the problem we will solve in this article. It so happened that in the kitchen there is one electrical cable to power the electric stove. And this happened not necessarily due to the mistake of the builders, who brought out one cable for the electric stove.
All kitchens in standard apartment buildings are designed to install a stationary electric stove for which there is no need to separate the power supply for the hob and oven.
Hence the quite common problem of how to connect a separate oven and hob to one power cable.
How to install a hob. Installation method
Cooktops are a type of built-in household appliances; therefore, before connecting an electric stove, you need to understand the technology of this very “embedding”, in other words, installation of the product in a kitchen cabinet.
To complete the task yourself, you will need a small set of hand tools:
- electric drill;
- jigsaw;
- screwdriver;
- knife;
- ruler, square, pencils and cardboard.
Installation is carried out in three stages:
Marking the future cutout for the panel. It is necessary to accurately measure the width and length of the installation space using a ruler.
Attention! Measure not the cooking surface itself, but the body underneath it. You can sometimes check the correctness of measurements using information from the instructions.
It is most convenient to mark according to a template, which is easy to make from cardboard. For some models, such templates may be included in the package.
Draw the lines of the future cut on the tabletop of the cabinet using a ruler and square. You can make an overlap of no more than 1 mm to ensure easy entry of the panel.
Installing a hob in a cabinet
Cutting a niche to install the panel. You need to start by drilling holes in the corners of the marked rectangle. The diameter of the drill must be at least 9-10 mm. Drill type - for wood or metal.
The next step is cutting out with a jigsaw. The jigsaw file should have a fine tooth and be intended for finishing cuts. To prevent the formation of small chips, future cuts can be sealed with masking tape.
Insert the jigsaw file into the drilled hole, press the sole firmly against the tabletop and then start cutting, carefully moving the jigsaw along the marking lines at low speed.
Installation and fastening of the panel. Insert the hob into the made window, and seal the junction of the working surface with the table top with a special sealant or silicone-based sealant. If necessary, the landing window can be expanded with a file or repeated cutting with a jigsaw.
At the bottom, securely fasten the panel to the tabletop using the clamps included in the kit. After fastening, remove excess sealant with a rag or cut off the protruding parts of the sealant with a knife.
Plan your purchases
Let's think about how a reasonable person would buy an oven and panel.
Option 1. There is wiring, no household appliances
The kitchen has electrical wiring, new or old, it doesn’t matter. There is one terminal for an electric stove, the cable of which has very specific core cross-sections and material.
If you do not know the cross-section of the cable, then turn off the power supply to the cable and, having removed 10 mm of insulation from one of the cores, you need to use a caliper to measure the diameter of the core and use the formula: S=π×d²÷4 (pi D square divided by 4) calculate the cross-section cable cores.
- If everything is not completely bad for you, then the cross-section of the cores will be 4 or 6 mm2.
- If the house is not older than 2001, then the conductors will be copper;
- If the house is old, then the conductors will be aluminum.
This data is quite enough to calculate the total maximum power of the panel and oven that you need to buy.
Safety precautions
Now let's say a little about the safety rules when connecting a built-in oven. Caution must be exercised not only when working with electrical wiring, but also when connecting a built-in or separate oven. First of all, we are talking about personal safety.
Considering the fact that an electric oven has a fairly serious energy consumption, additional electrical wiring should be installed under it, using an undamaged and undeformed wire with a conductor cross-section that will conduct a current of 2.5 or 4 square millimeters.
But this will be relevant if you have to work with an oven whose power exceeds 3.5 kilowatts.
The connection of the current-conducting wire must be carried out exclusively through a separate machine, where it is easy to connect a hob that runs on electricity. The machine itself, which will work at home, should be selected depending on the value of the entire load that is supplied to it, and add about another 10% to this indicator.
To ensure that the subsequent use of such a device is safe, grounding must be done correctly. And if the house is private, then this will not be a problem. But if we are talking about a room in an apartment building that was built several decades ago, then here you will have to ground the individual core itself to the bus of the common electrical panel. If we are talking about equipment with not very high power, up to 3 kilowatts, and the wiring in the house is quite good and can fully cope with the loads, then ordinary European sockets can be used for installing ovens.
Power calculation
Power calculations are carried out according to electrical wiring design recommendations based on basic tables from PUE 7 (electrical installation rules, ed. 7). Here is this table in a beautiful form.
As we can see from the table of cross sections and power:
An electric cable with 4 mm copper conductors works normally (does not overheat) if the maximum power of the operating devices does not exceed:
- A 6 mm² copper cable holds power: 7.4 kW with hidden wiring and 11 kW laid in a box or openly.
- A 4 mm² copper cable holds power: 5.9 kW with hidden wiring and 9 kW laid openly.
- Aluminum cable 4 mm² holds power: 4.6 kW and 7 kW respectively.
- Aluminum cable 6 mm² holds power: 8.5 kW and 5.7 kW.
Important! It is these calculations that should be the condition for choosing the power of the hob and oven.
If there was no choice of appliances based on power, and suppose they were given to you, then to properly connect the hob and oven you need to lay two separate electrical cables from the switchboard to the installation location of the appliances, selecting the cable sections according to the same table, only on the contrary, according to power we look at the cross section.
Which socket to install for the hob and oven? Tips for choosing
All sockets designed for a current of more than 25A are considered power sockets. According to the installation method, they are divided into:
- external, overhead. Installation of sockets of this type is carried out directly on the wall plane. They are convenient to use when laying cables in an open way. In addition, such sockets are the safest for installation in wooden houses and in rooms with high humidity. It is this type of sockets that has the best moisture and dust protection;
- internal, installed in special socket boxes, built into the thickness of the wall. They are most widespread in brick and panel houses, when finishing walls with sheet materials such as gypsum fiber board.
According to their purpose and design features, sockets are divided into:
- designed for operation in single-phase 220V networks;
- designed for operation in networks with three phases, 380V;
- having a separate contact for grounding or without it;
- with clamps that securely hold the connection to the plug. Fixation can be push-button or threaded, using a union nut;
- with integrated devices, such as RCDs, shutdown time relays;
- with curtains covering the outlet openings. It is very convenient to use this type in families with small children. It is impossible to insert any object other than a plug into such an outlet.
Before you buy a socket for an electric stove, you need to make a choice, which should be based on the following criteria:
- calculated maximum current. For ovens (power up to 3-3.5 kW) a value of 16 - 25A is sufficient, for a stove with a power of up to 7 kW - at least 32A, and for more powerful installations - 63A. In such sockets and corresponding plugs, the contact pins are thicker, the insulator material is more refractory;
- number of working phases. To connect to 220 V, a socket and plug with three contact groups are used, and for 380 V networks - with five;
- degree of protection. The protection of electrical appliances from influences is indicated by the IPXX code, where XX are numbers.
The first encodes the degree of protection against penetration of solid objects into the housing.
The second is the liquid ingress protection code. The higher the numbers, the higher the protection class.
For example, 00 - there is no protection at all, i.e. the contacts are open. And IP68 is the maximum degree of protection, which absolutely excludes the possibility of dust and water getting inside the socket and plug (even if completely flooded).
For household appliances operating in the kitchen, the minimum degree should be IP24 (it is impossible for objects larger than 12 mm (for example, fingers) to get inside and splash water, regardless of their direction).
The cable connects to the plug and socket in several ways.
The first method is to remove the cable core from the insulation by 0.5 cm, insert it under the clamp and clamp it with a screw. The second method is more reliable: the conductor is cleared of 1.5 cm of insulation, wrapped in a ring around the screw and pressed. The contact area will be larger, the contact will be more reliable.
If the cable core consists of many thin wires, then they must be processed with a soldering iron and tin solder or crimped with brass tubes.
The socket or terminal box should be attached to the wall close to the stove, securely, using screws or self-tapping screws, in such a way that the following conditions are met:
- liquid from the stove or sink should not come into contact with the socket or box;
- The socket (box) must be accessible to an electrician, but be hidden, not out of sight.
Practical connection of hob and oven with one cable
Suppose you already have a cable with copper conductors with a cross-section of 4 square meters laid to power your electric stove. mm. The power supply is 220 Volts, the cable has three wires (phase, working zero, protective zero). According to the same table, we see that such a cable holds a total power of 5.9 kW (table above).
At the same time, we will not be distracted by demand coefficients, that is, by the probability that the stove and oven will always work together and at maximum. We will assume that there will be and the demand coefficient is equal to 1.
Related article: Rules for installing kitchen sockets
Question. Is it possible to find a hob and oven with a total power of 5.9 kW?
If you do not have a professional kitchen, which is not discussed, a priori, the power of the oven will be less than the power of the panel.
- The average power of panels is in the range: 3.5-7 kW.
- The average power of ovens is within the range: 2.5-4 kW.
Obviously, if you try really hard, you can find a panel + oven pair with a total power of up to 5.9 kW.
Note: It's actually not that sad. It is unlikely that you will turn on all the circuits of the panel and the oven together all the time. Therefore, the demand coefficient for this pair is taken to be 0.7. This means that for our design cable 3×4 mm, the total power of our “pair” can be 5.9÷0.7 = 8.4 kW, which is closer to the reality of choice.
Option 2. There are household appliances, no wiring
You have a kitchen and a purchased or donated or won cooktop and oven. In this case
- Open the technical data sheets for the devices and see their maximum power;
- Sum them up and use the table above to see the required cable cross-section;
- Check the result with the cable available in the kitchen;
If the existing cable is suitable, great, you can connect the hob and oven to one cable.
If the existing cable is NOT suitable , leave it for the hob, and for the oven, lay a new electrical circuit with a cable according to the power of the oven (usually 3x2.5 mm is enough) from the panel or make a cable from another socket group, having previously made a similar calculation.
Related article: Table of power of household appliances for calculating the cross-section of an electrical cable
Oven socket
Many people have a question: is it possible to connect an electric oven from an existing regular outlet that was previously installed in the kitchen for a kettle, microwave, etc.?
It is possible, the main thing is that 3 conditions are met:
- the oven must have a power of no more than 3.5 kW
- The socket is connected with a three-core copper cable from the panel with a cross-section of at least 2.5 mm2
- in the electrical panel, replace a conventional circuit breaker with a thermal release with a differential circuit breaker with a rated current of no more than 16A
According to the third condition, some may experience inconvenience and minor problems. As a rule, many people still have one 16A-25A circuit breaker for the entire socket group, plus another one for lighting.
If you replace the only circuit breaker for sockets with a differential 16A one and connect the oven through it, it will be practically impossible to use other electrical appliances while the oven is working and food is being prepared.
Here you will have to make your own choice, either in favor of saving (not installing new wiring, a separate outlet, etc.), or in favor of comfort and convenience. It is not recommended to leave a regular modular machine in the panel without protection against leakage currents when connecting the oven to an old outlet.
The height of installation of a new socket under the oven should be no more than 90cm from the floor. Although it is also often placed at the level of the kitchen legs.
The most important thing here is ease of use. For safety reasons, when wet cleaning and wiping the oven with a wet cloth, it must be disconnected from the power supply.
And crawling under the very bottom of the kitchen every time to pull out the plug is not always convenient. In addition, here you need to take into account possible situations such as water leaks and kitchen flooding. Therefore, the socket should still be raised 5-10cm above the floor.
The main requirement for placing the outlet is not to place it directly behind the oven. You can install it on the left, on the right, or as mentioned above - under it, directly near the floor.
Another safety point when installing an outlet: if there is a gas supply nearby, for example to a hob (let’s say yours is gas and not electric), then the outlet should be at least 60cm away from it .
When you have decided on the location of the outlet, you need to connect it.
Connect the phase and neutral cores of the cable to the outermost contacts of the socket. In this case, it does not matter at all where the phase will be located, and where the zero is - on the right or on the left. Connect the grounding conductor (yellow-green) to the grounding terminal (usually the middle one).
Replace the frame or decorative cover.
Connection practice
Important! If the panel and oven have electrical plugs on their power cords, they cannot be cut. By doing this you will violate the warranty rules and lose it. Therefore, there are two connection options.
Option 1. No electrical plugs
We have two household appliances, with cable outlets for connecting power. It is very correct to do this:
Prepare cables of household appliances for connection. Electrical cords, such as PVA, are used to connect panels and ovens. The cord cores are multi-wire. For better contact at the ends of the cores, you need to install crimp sleeves or contact terminals.
Installing the sleeves requires a special tool, but it is worth it to ensure a reliable connection.
High-quality panel connection
Ugly panel connection
To connect powerful household appliances, let's forget about twisting and soldering. We use special terminal blocks called barrier terminal blocks.
Barrier pad
If you need beauty, we hide the block in a distribution box, which we select based on appearance.
Related article: Repair of kitchen appliances and hobs
Is it possible to connect the oven cable to the hob socket?
The hob has a fairly powerful connection block. In theory, you can connect the oven cable to this block. But only in theory. In practice, it is better not to do this. The hob costs much more than the barrier block and does not need to be used to disconnect the wires.
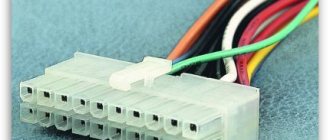
The result of connecting devices without plugs and sockets
We get this connection. The power cable is connected to the barrier block. Power cords from the hob and oven are connected to the same barrier block, observing the color of the wires. See the documentation for the correspondence of the colors of the cores to their purpose.
connecting the hob and oven
Note. Some models of built-in equipment are not equipped with power cables. For them you need to buy a flexible power cord of the required cross-section, for example, PVA.
Option 2. Electrical plugs (plug) available
Important! A plug-socket connection is permissible if the current during operation of the device is no more than 32 Amperes. If the device is more powerful, the contacts of the socket will heat up and a fire may occur.
In this case, we use daisy chaining of sockets. From the socket for the hob, we lay a cable with a cable of the same section, install the socket and connect the oven.
I repeat, the total power of the panel and cabinet should not exceed the capacity of the cable. First the calculation (above), then the loop.
Connecting the oven plug
If the oven comes with a factory plug, then it may not be collapsible, but solidly cast. And then cutting it off entails loss of warranty, be careful in this matter.
But as a rule, the latest models with an oven do not come with an installation plug, so you also need to connect it yourself. This is explained by the fact that in different countries, the oven can be connected to at least several types of completely different outlets.
And it is simply not profitable for the manufacturer to guess which plug will be needed where.
You strip the wire from the oven, crimp it with NShV lugs and pass it through the plug body. Phase and neutral (usually gray = brown and blue conductors) are placed on the outermost contacts of the plug.
Again, it doesn’t matter where it goes, phasing doesn’t matter here. Yellow-green grounding conductor - on the middle contact. To prevent the wire from dangling inside, secure it with a clamp and tighten the plug body.
Important note: when connecting wires to a plug, never rely solely on the colors of the core insulation . Be sure to unscrew the terminal block cover on the electric oven and check where the wiring is connected (the correct connection to the terminals is discussed below).
When for some reason there is no access to the terminals, or there is a warranty seal there, use a regular Chinese multimeter tester. The grounding conductor must be connected to the oven body.
And therefore, when connecting the probes in the insulation measuring mode to the core and to the housing, a sound signal should sound or zero should appear on the display. That is, resistance R=0 Ohm. This way you will find “ground”, the remaining two wires will be phase and neutral.
Buy a special twin socket
It’s very simple to connect the hob and oven to a common power cable; buy a paired socket like this. It comes complete with a steel plate that is attached to the wall.
socket for connecting the hob and oven
Summary of connection with plugs
If the hob and oven have electrical plugs, then to connect to a common electrical cable, we make an electrical cable from the outlet with the panel to the outlet for the oven. At the same time, the total power of the panel and cabinet should not exceed the capacity of the cable.
Connecting an induction hob
Let's look at the connection using an Electrolux induction hob as an example. Such a panel has high power; it is plugged not into a regular household outlet, but into a power outlet designed for a current of more than 16 A.
The power socket for connecting the induction cooker is selected according to its load. The total load of an induction cooker can be on average 25-32 A, depending on the number and power of burners.
To power the induction cooker, in this case, an individual electrical wiring line must be laid. The cable cross-section depends on the load of the induction cooker: for a current of 25 A, a copper cable with a cross-section of 4 square meters should be laid. mm, for a load of 32 A - 6 sq. mm.
For safe operation of the induction cooker, the electrical wiring must have a working protective ground. That is, for a single-phase network, a three-core cable must be connected to connect the induction cooker. Accordingly, the purchased power socket and plug set must also have a third grounding contact.
If it is not possible to purchase a power outlet of the required power, then as an alternative, you can connect the induction hob to the terminal block installed in the installation box. The terminal block must be able to withstand the rated current of the induction cooker connected to it.
As for the cable through which the induction cooker is connected, in this case it all depends on the configuration. If the power cable is included, then it is enough to connect it to the terminal block directly on the induction cooker, and then to the purchased power plug or in the terminal block, depending on the chosen method of connecting the induction cooker.
If the cable is not included, it must be purchased separately. When purchasing a cable, you must pay attention to its cross-section - it must correspond to the load being connected. It is necessary to purchase a flexible three-core cable with a cross-section of 4 or 6 square meters. mm for rated currents of 25 and 32 A, respectively.
To avoid errors, it is recommended to connect the cable to the stove itself, as well as to the plug, according to generally accepted color markings: brown or black - phase conductor, blue - neutral conductor, yellow-green - protective grounding conductor.
- If the cable is already connected to the terminal block of the electric stove, then you need to check that it is connected correctly. The following terminal markings are usually indicated on the terminals of an induction cooker:
- L - phase output or L1, L2 (L3) - phase outputs for two-phase (three-phase) connection;
- N - zero output;
- PE is the connection point for the protective grounding conductor.
Two-phase and three-phase connection of an induction cooker
Certain types of induction hobs may provide a two or three-phase connection to the electrical network. If the house has a three-phase input, then such an electric stove is connected as recommended by the manufacturer - to two or three phases of the electrical wiring with a four or five-core cable.
The electric stove is connected to a single-phase household electrical network with a three-core cable, and special jumpers between the phases, which are usually included, are installed in the terminal block on the induction cooker. If there are no jumpers, then the connection to two or three phase terminals is made with a wire of a cross-section corresponding to the load of the electric stove.
It should be taken into account that if the kit includes a cable for two- or three-phase connection, then it is not designed for single-phase connection, since when the induction cooker is connected single-phase, the load on the phase conductor increases to the total load of all phases.
Therefore, when using a four (five) core cable to connect to a single-phase network, two (three) phases on the plate are connected to the cable cores, and at the other end of the cable, when connected to a plug or terminal block, the phase conductors are short-circuited with each other and connected to one phase of the electrical network .
Or a new three-core cable is purchased, which has sufficient load capacity for a single-phase connection of an electric stove.
Hob electrical power kW
- The power of the hob is an important parameter when choosing a device for three main reasons:
- The speed with which your dishes undergo heat treatment depends on the power. Agree that it is better when it is possible to prepare dishes as quickly as possible.
- Modern stoves have burners of different power, and this is very convenient. If you only need a small amount of heat, why waste extra gas or electricity on uselessly heating the air in the kitchen. However, the other side of the issue should also be taken into account - the power of the largest burner should also be sufficient to quickly cook a large pot of soup.
- Modern kitchens often have air conditioning installed. When heat energy is released in too large quantities, the load on the air conditioner increases accordingly. At the same time, the extra costs for both heating the air and cooling it are completely unjustified.
So, it is worth choosing a hob with such power that the cooking time is fast, but the heat generated is optimal.
An electrical device of a traditional design consumes the most electrical power of all the types considered, so we will start the review with this option.
- The most common stoves on the market these days are those with four burners. Thus, the standard number of heating points has not changed over the decades of the existence of home stoves. The connection is also similar. However, manufacturers have gone to modernize the heating points, so they have different power:
- the first burner has the lowest power - 0.4-1 kW;
- two burners have an average power of approximately 1.5 kW;
- The fourth burner has the highest power - up to 3 kW.
An induction hob is the most modern type of equipment for heating food in the kitchen. Its average power is about 7 kW. However, please note that this is the consolidated power of the device.
Due to the fact that cooking on an induction surface takes a minimum of time, the simultaneous operation of all disks is almost impossible. And even if this happens, the short period of peak energy consumption is quickly replaced by inaction, since the cooking has already ended - the soup has finished cooking, the fish has finished cooking, the kettle has boiled.
Thus, although the power of an induction cooker is equal to the power of a conventional electric cooker, by heating exclusively the bottom and lower part of the cookware (and not the air underneath), electricity is spent only on heat treatment of the products. It is important to note that saving energy requires the use of special cookware in cooking.
The difference between an independent oven and a built-in one
Most apartments are equipped with an oven and hob suitable for cooking food. Furnaces are conventionally divided into independent and built-in. They have differences in mechanisms and installation. These are important points when choosing equipment.
Built-in electric ovens are usually built into a designated area. The electric stove is placed only above the stove itself, since they have the same power supply and control system. Together they create a complex. The stove has no buttons, and its modes cannot be adjusted. The burners will not be able to function without the control unit on the oven. To connect the oven, electric feeders are used, powered by central power grids. There is a large selection of different models of built-in ovens on the market. Having decided on the configuration and functionality, you can easily choose a good device.
Over time, built-in surfaces have begun to be replaced by independent domestic ovens that are easy to use and simple to place. Independent models allow you to place the oven anywhere in the kitchen, regardless of the location of the hob. They differ in that they have their own adjustment levers. Adjustment can be carried out using manual toggle switches, buttons and a sensor. These are independent devices, which makes their installation easier. The plug for the hob is separate, so they are connected to electricity separately.
The electric oven and electric stove can be installed in different places in the kitchen unit, and not under each other, as in the built-in version. For each device, you can choose the manufacturer that is preferable, selecting the functionality. Some people don’t need a hob at all if they regularly cook food using auxiliary household appliances, and the main cooking is done in the oven. In this case, you can buy a surface with a couple of burners, which will save money. Installation can easily be done with your own hands.
CS-CS.Net: Laboratory of the Electroshaman
Small boxes ABB components for organizing the panel in the kitchen plinth
Attention! Some of the comments from this post were moved to an archived post because there were a lot of them and the page took a long time to load. If you didn’t find something, please go to this archived post! There were many interesting discussions there!
The post was inspired by several topics on MasterCity.ru and a bunch of angry debates, for which they could easily get themselves banned on the forum. Because I almost had to move to the mat. All these topics are united by one question: how to connect the cooker and oven in the kitchen ?
This post is intended ONLY for the case when you (or stupid craftsmen) have already laid the wiring and cannot be moved. In other cases, ALWAYS place a separate cable for the cooker and a separate cable for the oven.
“Yopt!”, an inexperienced reader will say, “What is there to write about?! I twisted the cable into the cooker, stuck the plug into the socket and forgot about it!” Well, as always, our theory and practice differ sharply. This feature is like this: first do it, and then fuck half the forum residents’ brains on how to get out of what was done incorrectly.
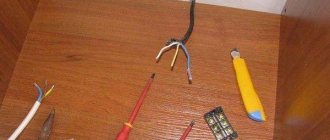
Situations often arise on forums when a person, thinking inertially due to the fact that he previously had one electric stove, lays one cable for a new kitchen during renovation. And then it turns out that the appliance being installed consists of a separate oven and a separate hob, which need to be powered somehow. And this is where the brain begins to INVENT. The very first solution that comes to mind is to cut the plug at the oven and attach its cable to the hob cable. This decision is completely wrong!
An example of a TERRIBLE connection of a cooker, oven and dishwasher to one cable (sent by izhplan)
Therefore, first we write it correctly. The following is correct. First, try to target certain models of cooker and oven in advance. You will still have to resolve this issue when ordering a kitchen. In general, the kitchen and electrics are sometimes indivisible things: before starting electrical work, you need to know where the built-in appliances will be (oven, dishwasher, microwave), how many there will be, what they are powered by. And only then design and lay the cables.
Secondly, study how these cooktop and oven models are connected. Typically there are the following options:
- Standard wire with plug. This is primarily typical for ovens with a power of up to 3.5..3.6 kW. They have a regular wire and a 16A plug. This plug should be plugged into a regular 16A outlet. Cutting off the plug usually results in complete loss of the warranty on the equipment. Conventional old-style electric stoves also have a wire and plug. Freestanding. The forks there are usually weak and barely hold on (remember those round black ones in the USSR?), and it is useful to replace them. Either on a solid cable (will be discussed below) or on an industrial connector =)
- A piece of cable. This is typical for some hobs. It seems that this is BOSCH - their cable is embedded directly into the panel, and it cannot be unscrewed or rearranged. You can either install an industrial connector on such a cable, or connect it directly to the cooker’s power cable via a terminal block (recommended). Some ovens come without a plug. If the oven power does not exceed 3.5..3.6 kW, a regular plug is placed on this cable and a 16A socket for the oven is used again. The exception is powerful ovens with a built-in microwave. They have a power of 4 kW, and they need to have a separate cable, like for a cooker. Well, also pieces of cables without plugs are equipped with gas cookers and ovens. Since their power is low, it’s understandable that we install plugs and don’t worry.
- Terminals or terminal block. This is most typical for cookers. This is the most convenient option. The power cable is routed directly under the terminals and left that way.
So. The correct cables for the cooktop and oven should be:
- For a single-phase cooker: cable 3x6, automatic C32 maximum. It should be released near the installation site of the cooker so that a tail of about 1.5 meters remains. And leave it that way. Later, it will either be connected directly to the hob terminals, or connected to its cable tail through the terminal block.
- For a three-phase cooker: cable 5x4 automatic C16..20 3P (minimum - 5x2.5, automatic C16 3P). The requirements are similar: release the tail and leave it.
- For an oven of normal power (up to 3.5..3.6 kW) - a 3x2.5 cable, a C16A circuit breaker and a regular 16A socket near the oven installation.
- For a high-power oven - a piece of 3x4 cable. However, there will not be a general option, and you will need to check the oven power locally.
It is important not to forget the following. ALL electrical, sewer, and water for built-in appliances (oven, dishwasher, washing machine) should NOT be located directly behind the appliances! Otherwise, the technology simply will not fall into place, but will run into communications. Conclusions should be drawn to the left or to the right of the technology. Power sockets are usually made in the kitchen plinth area - this is the space under the tables, usually no more than 100 mm high.
Now... let’s imagine that we (or our craftsmen) are stupid deer and laid only one 3x6 cable for the cooking room. What should I do now?
I already wrote about the wrong solution: cut the plug and place the oven on a powerful terminal block directly parallel to the hob. So what? The cable is thick, what will happen to it? And this is where the debate begins. An example can be found in this file: Varocnh.pdf (~500 kb) . I saved it as a souvenir, but the topic on the forum has already grown: https://www.mastercity.ru/showthread.php?t=176414.
My problem is that I can't even think of a clear example of why THIS is wrong. Well damn! It’s like wrapping a penis in stretch film instead of a condom and saying “what? The principle is the same - the shell is there! If you try to choose words so as not to get confused, then we are using a cable designed for a 16A plug and a 16A machine, and we are sculpting who knows what under a 32A machine. How will the inside of the oven behave? The cable itself? Maybe it will burn, maybe it won’t. Because it's short. And such a decision violates the guarantee.
Let this be an axiom! YOU CAN'T DO THIS! EVERY, EVERY branch from the main wiring, as soon as its cross-section has decreased, must have protection!
So how to implement this? It's simple! Set the machine to 16A. And next to it there is an outlet for connecting the oven. All business! However, we are specialists. And we do everything technically and carefully. Therefore, we need to solve several questions:
- How to make a branch from a 3x6 cable to the hob
- How to make a branch from the same cable with a reduced cross-section to an automatic oven
- How to close all this from unnecessary hands and eyes
- How to fit it all into the kitchen basement
The solution was proposed by one of the forum participants andrewkhv in the topic https://www.mastercity.ru/showthread.php?t=160262&p=3019415&viewfull=1#post3019415 (), but no one paid (or did not want to pay) attention to it. Addition from 2021. I pulled out the drawing and pasted it into the post, because MasterCity has completely gone bad and they lost a lot of information there.
The basic idea of connecting a cooker and an oven to one machine
Therefore, I will have to pay attention to this decision. In order to neatly place everything in the kitchen plinth, we take a small box for 2-4 modules from ABB. This series of boxes is very convenient for various small tasks. They are neat, and they have standard N and PE tires. Moreover, you can put two buses in one box at once, even if it only has two modules. Therefore, just in case, I will give the articles:
1SL2402A00 ABB LUC 12 402 Wall-mounted box IP40 2 mod. white without door 1SL2404A00 ABB LUC 12 404 Wall-mounted box IP40 4 mod. white without door 1SL2406A00 ABB LUC 12 406 Wall-mounted box IP40 6 mod. white without door
12502 ABB 12502 Zero tire for ABB boxes for 4-6 modules (12404-12406, 12424-12426)
UPDATE . ATTENTION! In 2015, such boxes are no longer available for order. And second ATTENTION: The zero bus is not normally attached to the “LUC 12 402” box (for two modules)! Fastening for the bus starts with a box for four modules. So if you took a box for two modules, then you can simply throw the PE bus to lie in it.
The essence of the solution is simple and terribly stupid! We use double clamps of ABB S200 series machines as a terminal block! These clamps can accept two wires on each side. This means that if we take a two-pole circuit breaker and clamp on its terminals the phase and zero from the incoming cable, and immediately the phase and zero from the cable going to the cooker, then all we have to do is put all the PE on the busbar (remember: PE cannot be switched, so about a three-pole forget the automatic machine!) - then all we have to do is remove the phase and zero with a smaller cross-section for the oven from the automatic machine ( ABB S202 16A ) and PE from the bus bar. And somewhere nearby, stick an overhead socket for the oven.
ATTENTION! This solution, shown below, ONLY applies if you made a mistake and forgot to run a new oven line when you did the new repair. Here I believe that in our shield, from where this line is powered, there is a correct circuit breaker for the cable (for 3x6 - 32A) and there is a residual protection device (RCD), which protects a person from electric shock.
If you want to hang the cooker and oven on an old wire/cable in an old house (Soviet panels with electric stoves), then there is no differential protection (RCD)! And in this case, you will have to make a small shield in the kitchen, where there will be an RCD for the hob and oven. In the same case, you can power other kitchen appliances from it, turning it into an RCD panel for several machines.
I didn't have quite what I needed on hand. But this is even more interesting. So, let's take this box for 4 modules. We take either a separate tire (if it’s difficult to get a regular one) or a standard one. And we take a two-pole machine. For me it turned out to be 25A, so attentive people, please do not swear! =)
And we shove everything into the body:
The simplest version of the workpiece for branching the cooking cable
Figuring out the connections. In extreme cases, machines from most manufacturers don’t care where to supply voltage. In the ABB catalog it is clearly written: voltage can be supplied from any side of the machine. Let's take advantage of this. Let our cooking cable fit so inconveniently that you’ll have to put it on top.
An example of cable installation for connecting a hob and oven
But one comrade from the comments even wrote a caption for the picture for those who are too lazy to think (many thanks to him; maybe there will be fewer questions):
Example of installation of cables for connecting a hob and oven (with captions)
And now the connections are closer. It can be seen that two wires were installed under the machine. And the PE was connected on a busbar. Voila! When using this method, you only have enough box for two modules! =)
Connections close up
In order not to climb with a ruler, I simply put such a box under my kitchen plinth. In my kitchen the legs are 100 mm. Please - a box for 4 modules will fit perfectly right under your kitchen plinth. And next to it is an overhead socket!
ABB LUC panel for 4 modules fits perfectly into a 100 mm kitchen plinth
If you have more free space under the kitchen (or somewhere in the shelves), you can take a box with 6 modules and get creative there.
A more spacious panel allows you to install an additional socket and another machine
For example, add another machine to a dishwasher, or socket a socket directly into the body of the panel.
Internal filling of the shield
But let's evaluate the MOST minimal version of such a device at Electric Installation prices. It will include: two tires for N and PE. Housing for two modules. And even one single-pole C16 circuit breaker. We count:
E1602 Box 1SL2402 mounted 2 modules without door without terminal block IP40 (ABB) x 1 pc = 175.38 E1611 Bus zero 12502 for 5 connections 80A for boxes 12424 12426 (ABB) x 2 pcs = 62.75 x 2 = 125.50 K6111 Automatic switch S201 C16A/1p/ 6.0kA on Din rail STOS201 C16 (ABB)x 1 pc = 199.23
Total: 500.11 ! Well, add here a PVS/VVG 3x6 meter for the cooking surface socket. Well, let's say it will be 1000 rubles in total. It’s because of a simple 1000 rubles that people on the forum are freaking out and starting a bunch of debates! But this is the price of their own safety. And, I note, no one is even forcing us to break tiles, walls, redo the backsplash or add a line to the oven. Although it would be necessary! It is enough to simply install one small box. And then they struggle!
UPDATE @31.03.2015 . But in the comment it so happened that I made a brief summary of the post. I'll add it here:
The task is to understand the MEANING of the whole idea. And when you understand the meaning, you don’t have to repeat literally the same thing.
The meaning is this: There is a fat cable. With a greasy guard that will protect just that greasy cable. How to attach a piece of a weaker piece to this cable? Directly? You can’t - the protection won’t work if the frail one burns: after all, it is designed for the fat one. This means we need to make some kind of protective device. Let's install AUTOMATIC! At 16A so that it protects our oven and its cable.
And then the installation tricks begin. Here we have a piece of LN-PE cable for 6 squares. The power supply to the cooker must be taken directly from this cable. And you also need to feed it to the machine, and from the machine take it to the oven. How can we do this? a) We can assemble a mini-shield. All zeros on one tire. All PE to another tire. Supply the phase to TWO machines. One is 16A for the oven, the other is 32A for the hob. That is, there will be an ordinary shield: a thick cable arrived and was divided into two machines. The machines supplied power to two loads.
b) Since our hob is already protected by an automatic device that powers its greasy cable (it is also designed only for the hob), one of the machines can be thrown out. Instead, branch the phase onto a busbar or terminal.
c) Let us remember that in small panels with 2..4 modules there is usually barely one zero bus. For PE. And remember that ABB and Siemens have double clamps on the contacts for two wires at once. And then we can connect phase and zero to the cooking zone through the machine immediately, directly. And PE through the bus.
Then we choose any of the three options. Or come up with your own based on the size of the shield, the availability of machine guns, tires and other things.
Attention! Some of the comments from this post were moved to an archived post because there were a lot of them and the page took a long time to load. If you didn’t find something, please go to this archived post! There were many interesting discussions there!