Design and basic operation
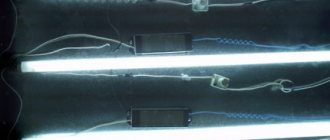
Design of an LED lamp
LED lamps are an electric arc ignited in a vacuum at the boundary of a pn junction. By controlling the voltage, you can regulate the arc light. The design of the chandelier includes a mounting unit with a control unit, a radio receiver, a lighting segment, a remote control, and decor. In addition, music systems with speakers and strip lighting are often built into the devices.
The fastening unit includes a bar with a cross, the control unit includes controllers with printed circuit boards and wires, and the lighting segment includes sockets with sockets for LEDs.
Why do lamps fail?
Most often, lamps stop working due to violations of the rules and recommendations for operating the device, overheating of the equipment, partial or complete burnout of the diode, incorrect compatibility of materials (LED lamps cannot be installed inside a suspended ceiling), high voltage surges and capacitor burnout, technical violations when connecting devices to the network .
Also, breakdowns occur due to short circuits, incorrect installation, errors in the construction of the electrical circuit and poor quality of the product itself.
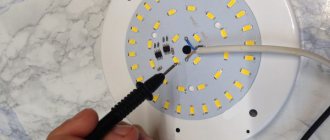
In order to assess and determine the degree of damage to the lamp, you need to look at its structural parts visually. You need to make sure that the board is in good working order before putting it back in, as well as that the soldering is working and that there is no carbon deposits causing the elements to melt. If there is no deformation, you need to look for the cause of the malfunction using a tester and a multimeter.
Types of breakdowns and their causes
To repair LED ceiling lights with your own hands, you need to study the main types of breakdowns and the factors that cause them.
If the remote control does not respond to touches far/near and it is not the batteries at all, the following reasons for the malfunction are possible: failure of the remote control due to clogged contacts that need to be cleaned with alcohol; dysfunction of a low-quality Chinese device, requiring its complete replacement; poor operation of the device relay.
If the remote control works on the third or fifth attempt , responds to touches only close, then the problem is a bad relay that needs to be replaced, an interruption in the LED loop as a result of a lack of contact or its melting. The reason may also be a breakdown of the lamp control unit. Often, repairing chandeliers with a remote control is limited to installing better batteries.
A stationary switch fails as a result of oxidation of wires, malfunction of the transformer, incorrectly selected electrical circuit, regular surges in the network, overheating and overvoltage. Often the cause of the phenomenon is a poor-quality switch and improper operation of the device.
LEDs with light bulbs do not light up due to a failure or failure of the power supply, the LEDs and lamps themselves, or burnout. Also sometimes the problem is network failure, high voltage, overheating of the device and poor-quality lighting fixtures. In any of the above cases, a complete replacement is required.
The LED chandelier does not turn on due to a poor connection, poor-quality wiring, or a failure at the level of the device itself or near the switch. Another problem is the lack of checking the operation of the lamp before purchase - a manufacturing defect is possible. Sometimes the reason lies in problems with the remote control.
The remote control for the chandelier is lost, what should I do?
Tell me, maybe someone knows, we recently bought an apartment, the ceiling is stretched in the living room, there are built-in lamps on one side and a chandelier on the other, in the middle. So, when we bought an apartment, the hostess showed that the remote control could be used to turn on the lamps on one side, all the lamps on the other, a chandelier separately, a chandelier with lamps separately, all the lights, in short, a lot of modes. But when she moved out, she took the remote control and said by mistake that she would return it. But in the end she said she lost it. Of course, you can alternate the light with a switch, but it’s very inconvenient until you find the desired mode. They were interested in the store to just buy a remote control, they started to push the block, like the remote control just won’t work, you need to change the block, but as I understand it, everything is under the ceiling. Maybe someone has come across, is a regular remote control really not suitable, maybe there is some kind of universal remote control, after all, there is a block, but they probably work from an IR beam.
Here you go. It's a completely different matter! https://www.unisspb.ru/pdu4.htm#univ My conscience is clear before Gulena!:flower:
Universal remote controls Photo
rub. Order https://www.unisspb.ru/ico/MAK2002.jpg (https://www.unisspb.ru/images/MAK2002.jpg) Remote control for TV universal. “MAK-2002” (https://www.unisspb.ru/images/MAK2002.jpg)680 https://www.unisspb.ru/ico/mak_focus.jpg (https://www.unisspb.ru/images /mak_focus.jpg)Universal TV remote control. "MAK-Focus" (https://www.unisspb.ru/images/mak_focus.jpg)970 https://www.unisspb.ru/ico/Moti.jpg (https://www.unisspb.ru/images /Moti.jpg) Remote control for TV universal. "MOTI" (https://www.unisspb.ru/images/Moti.jpg)695 https://www.unisspb.ru/ico/urc24b1.jpg (https://www.unisspb.ru/images/urc24b1 .jpg) Remote control for TV universal. "URC-24B-10" (https://www.unisspb.ru/images/urc24b1.jpg) 300
If you do not find the desired remote control model in the table, you can order it using a special form (https://www.unisspb.ru/order.htm).
See also remote controls from other companies: Company
- Price: 9.99
- Go to the store
Many friends began to see Chinese LED-halogen chandeliers in their interiors. Their designs are different, but they have one thing in common: a Wireless Remote Control...
For the first time I saw live control of light from a remote control back in the nineties. But somehow I didn’t really bother about it, but here everyone has it, but what am I? He’s a brunette. Yes, and the necessity of life pushes him. My daughter sometimes falls asleep only with the light on, and when she falls asleep, she doesn’t want to get up half asleep. In short, you have to take it.
Preparation for repair of LED devices
Digital multimeter
Preparing to repair an LED chandelier involves performing the following simple steps:
- Creating electrical insulation for each instrument. It is strictly forbidden to use pliers or pliers with bare handles.
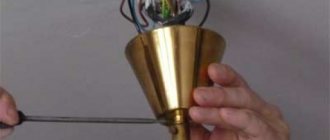
- Disconnecting the chandelier from the power supply and dismantling it using a screwdriver, pliers, knife and other available tools.
- Find the problem by visual inspection and a multimeter.
When preparing to repair a chandelier with a remote control, it is also important to refer to the operating instructions for the device. This is important for subsequent correct connection of contacts and faster detection of the problem.
Visual inspection
When carrying out a visual inspection before repairing a chandelier, it is important to understand its design and operating features. Complex lighting devices, for example, raster ones, contain drivers and lamps of different types, and some other varieties contain an antenna with several control units.
The sequence of repair of LED street lamps will directly depend on the design features of the product. Therefore, before inspection and repair, it is important to study the instructions to identify control units and subsequent repairs.
Checking the Lamp LED Circuit
To check the lamp LED circuit, you can take a jumper and place it one by one between the contacts of each diode using tweezers. If there is no jumper, you can connect the lamp to the network, take any wire and clean both ends by tinning the contacts. Then close the contacts of the burnt out LED and observe the reaction. If the device does not light up, several diodes may have burned out.
If there are more than 10 diodes in the circuit, you cannot replace the burnt-out element using a wire or jumper to avoid overloading the coils and burning out the lamps.
The most common breakdowns
If the lighting device does not turn on either from the switching equipment or through the control panel, the reasons for this may lie in a malfunction of the controller. You can check this assumption by removing this element from the diagram.
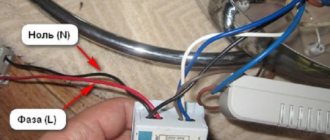
Design of LED ceiling lamp with PU
In this case, you need to connect the LED and halogen units directly to a 220 V network. If the light is on and each of the bulbs is working, the problem is in the controller. You will have to disassemble it and check all the elements of the board.
If this solution does not help and the chandelier with the control panel still does not work, you need to check the power supplies of LED and halogen light sources. It is easy to verify this if you test the filaments of light bulbs.
If each of the units works (diode, halogen), but when connected through step-down transformers the light still does not turn on, the cause of the malfunction lies precisely in the power supply elements.
But before you start dismantling the lighting fixture, you need to check the batteries in the remote control and also check whether power is supplied. These are the most common reasons explaining why a chandelier does not work. A multimeter is used to check the circuit elements.
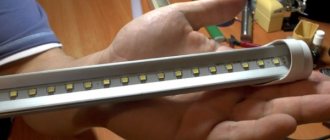
Replacing the LED strip in a lamp with your own hands
LED strips
It is not difficult to replace an LED strip at home with your own hands. It is important to know how it works, study the instructions and how it works. You are also required to have minimal electrical knowledge and skills. The best way to help with this is educational videos.
Typically, you can replace the tape by following these steps:
- Remove and disassemble the lamp.
- Inspect the structure from the inside for defects.
- Replace damaged elements or solder broken contacts.
Additionally, to repair and repair the device, you may need to tighten all the screws and repack the terminal blocks.
After repair, you need to check the operation of the device and its contacts. It is important to avoid overloading the capacitor and not to repair equipment if there are more than 10 LEDs.
How to unsolder an LED from the pad
To unsolder the LED from the pad, you need to take thermal tweezers, a razor blade and a soldering station. First you need to attach the LED strip to the table. Double-sided tape is suitable for this. Next follow these steps:
- Heat up the soldering iron and prepare half of the blade.
- Start melting the tin on any LED lead by sliding the blade between the lead and the print pad.
- Carefully clear the soldering area for the heat-sinking substrate, without touching the body with the soldering iron tip.
- Cut the tin and check the result by ringing all the tracks using a tester.
It is important to prevent damage to the track due to the loss of the topology of the pattern and possible damage to the entire product. You can also cut without heating the soldering iron.
Driver circuits for LEDs from a 220V network
The simplest diagram for connecting an LED strip to a 220 Volt network includes the values of Itot, I led and I vd. The resistance with the power of the resistor depends on the LED current. It is calculated according to Ohm's law. The dissipation power is calculated from the same formula.
In the second circuit, the current through the resistor includes the values L, VD, LED, N. The current flows two times less, which means four times less power is released. However, for this circuit you will need a diode with reverse voltage, for example, 1N4007 (KD258).
LED lamp driver repair
If the driver contains small SMD components, for repair you need to take a soldering iron and copper wire, and then identify the burnt-out diode and unsolder it according to the electrical circuit. If there is no damage, you should unsolder all the elements and test them with a tester. Having eliminated the unusable element, install a new one.
Typical malfunctions of LED lamps include problems with device components, overvoltage, overheating, improper operation and installation. It's easy to repair. The procedure is to perform a visual inspection, find the cause and correct it using appropriate instructions.
The design and principle of operation of a chandelier with a remote control
Lighting devices controlled by a remote control have a rather complex design. In order to assemble and connect them, you will need certain knowledge and skills in electronics and electrical engineering. The chandelier can operate effectively over a considerable distance, and the desired lighting mode is set using the remote control buttons by dialing simple combinations. The number of functions depends on the design and model of the chandelier.
All chandeliers with remote control are divided into several types:
- With LED lamps. The design includes several multi-colored LEDs that influence the gradually changing color of the backlight. Basically, these lamps perform a decorative function and break down quite often. The LEDs are powered using a capacitor, which reduces the voltage to the optimal value. The LEDs are connected in series, so if one of them burns out, the entire circuit goes out. As a rule, during the repair process it is not individual LEDs that are replaced, but the entire unit at once.
- With halogen lamps. To power such lamps, transformers are used that perform pulse conversion of the supplied voltage. In the event of a breakdown, each of the lamps is checked in turn with a multimeter. If the lamps are in working condition, all existing transformers are checked.
- With combined light sources. These chandeliers have the most complex design, combining LED and halogen lamps. They can be turned on one by one or all together. When broken, shortcomings characteristic of the first two types of chandeliers are revealed.