Selection and procedure for attaching the cable channel to the wall
The cable channel allows you to quickly troubleshoot hidden electrical wiring.
You don't have to drill into the walls to do this. Installation of electrical trays can be completed in the shortest period of time. This will require minimal costs. Let's consider the procedure required when installing a cable channel. Let's imagine their types, pros and cons of use.
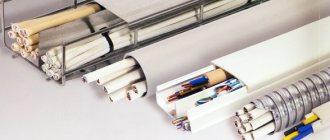
Using cable ducts for wiring installation
Fastening the cable channel to the wall using self-tapping screws.
If you decide to install a cable channel in a wooden house or apartment with plasterboard partitions, then the installation must be done with special wood screws. The fastening step depends on what load will be placed on the plastic box, or more precisely, how many wires need to be stretched inside, and what their cross-section is.
As a rule, to securely fasten a cable channel to a wooden wall or drywall, it is enough to screw screws every 40-50 cm. If the walls are uneven, it is better to reduce the fastening step, this will hide all defects and gaps.
You should not choose too long self-tapping screws for installing the cable channel. To securely fix the box in the wall, it will be enough to screw in fasteners about 40 mm long. For screwing, it is best to use a screwdriver with a Phillips bit.
Fastening the cable channel to dowel-nails.
You will need the following tools:
- Hammer.
- Dowel-nails.
- Sharp knife.
- Level and pencil.
- Screwdriver.
To begin, draw a straight line on the wall (ceiling) (for walls at a level) and prepare dowel-nails for work, from which you need to cut off the plastic cap with a sharp knife. This is done so that the channel fits tightly to the wall. We will use a concrete drill with a diameter of 6 mm and, accordingly, dowel-nails No. 6.
Next, attach the cable channel to the line and punch it with a hammer drill, going deep into the wall to the length of the dowel. Insert the cut plastic insert and screw the dowel-nail with a screwdriver until it stops. The next attachment point is located 40-50 cm, the extreme one 5-7 cm from the edge of the box. Insert the wire into the channel and snap the cover on.
How to attach a cable channel with glue (liquid nails).
Fastening with glue is not very reliable; it is used where others cannot be used, for example, for fastening to tiles. You can combine it with others - with fastening with self-tapping screws or dowel - nails.
To glue the box to the wall, glue is applied to it in a zigzag line, then pressed against the wall along the markings so that the glue is imprinted on the surface, and removed. After a few minutes, when the liquid nails have set a little (the time depends on the specific type of glue, this can be read in the instructions on the package), the box is pressed firmly against the wall again.
Remember that dismantling a cable channel glued to the wall with liquid air without damaging the coating or the electrical box itself is impossible. The cable can only be laid after the adhesive has completely hardened.
Fastening the cable channel to metal.
If there is a need to attach a cable channel to metal less than 2 mm thick or an aluminum profile, then we advise you to use metal screws, also called “bugs,” for fastening. There is nothing difficult about installing an electrical box on a metal surface; the main thing is to choose good screws and charge the screwdriver.
Preparation for installation, surface marking
So, so that you can install the cable channel correctly and at the same time quickly, we recommend that you familiarize yourself with the following installation nuances:
- First of all, carefully align the wall with the ceiling and prepare it for attaching the plastic box. The smoother the surface, the larger the pitch between fasteners can be. In addition, the absence of gaps will have a positive effect on the interior of the room.
- To connect the cable duct at corners (external, internal, the junction of a vertical route with a horizontal one), make special angles at 45 o. To do this, you can use a miter box, as shown in the photo.
- In addition to point 2 - in order not to bother with cutting out identical corners, use ready-made components from the manufacturer: internal and external plastic corners, T-shaped connectors, plugs, etc.
- The cable channel must be fastened evenly, both vertically and horizontally. To attach the box horizontally and level, use a building level. To level the route vertically, it is best to use a plumb line.
- Before installing a cable channel on the wall with your own hands, you need to mark these walls. There are certain standards on this issue, which we discussed in detail in the article - how to install open electrical wiring.
- If you need to mount a plastic electrical box on a plasterboard or wooden wall, do not drill holes in the surface in advance. The self-tapping screws will fit into the wall well without this. As you understand, this option for attaching the cable box will not work with concrete and brick.
- If possible, start laying the cable duct from a corner, so that later it will be easier to join sections and trim them if necessary.
- There is not much difference in when you decide to install the cable duct - before or after the decorative finishing of the walls. We recommend laying the product last, because... Installing a cable channel on wallpaper is much easier to do than gluing wallpaper, cutting it due to the already laid route.
- If you decide to place plastic wire protection on the ceiling, do not forget to prepare the ceiling surface in the same way as the walls. The cable channel is attached to the ceiling in the same way as on the walls.
That's all you need to know about how to attach a cable channel to a wall with your own hands. We hope that the provided detailed description with photos and video examples was useful for you!
Open installation imposes increased aesthetic requirements: everything must be “smooth and parallel.” In this case, the box is fixed along the preliminary marking lines. It is carried out using a level (laser or water, construction), a square, a tape measure, a marker, a ruler, a pencil (marker).
Installation instructions Install the box according to the marked markings
Here's how to properly divide the process into stages:
- Initially, a diagram of the optimal electrical wiring is drawn up;
- lines on the wall are drawn by tapping according to the level, all branches are strictly at right angles;
- on them, with a pencil, according to the existing plan, the location of distribution boxes, sockets, switches is marked;
- necessary adjustments are made as work progresses.
You can make turns and angles yourself
At the end, you should calculate the length of the marking stripes, the number of installation points, turns, and corners. This will allow you to order the exact amount of working material.
Turns and corners can be purchased either ready-made or made from cable duct yourself. Using the former leads to increased costs. But work on difficult sections is faster, and the appearance of the route is better than when using homemade ones.
Self-production will require the additional use of sealants to seal seams.
If you have a laser, you don’t have to make markings
Boxes for installation can be cut in advance (for a large area) or during the process. The first case begins with precise measurements using a tape measure along the marking lines.
Then they cut the working material into the required lengths in order to install it later. Accuracy of measurements is important here.
It is easier to carry out the work according to the scheme: try it on - cut it - fasten it.
The main advantage of a channel cable for open wiring is ease of installation. At the same time, the structure can be fixed on any surface: wall, floor or ceiling. The surface material is of greater importance: the method of best fastening depends on this. Let's consider the main installation options, as well as the types of surfaces to which the channel cable is attached.
Before you begin to attach the cable channel, you need to make markings on the surface: the location of the electrical wiring boxes is marked on the wall. This can be done with a pencil or chalk and a building level. It is important to maintain horizontal and vertical lines, since after installation the unevenness of the gasket will be evident.
Self-tapping installation
To secure the box to a wooden wall, use ordinary self-tapping screws. The recommended length is 2–3 cm. This method is suitable for wooden houses, bathhouses and other buildings. Self-tapping screws are also suitable for walls covered with wooden clapboard.
When performing installation, holes are pre-drilled in the bottom of the box, into which self-tapping screws are then screwed. In plastic structures, holes can be made directly with a self-tapping screw during fastening. The optimal distance between installation points is 30–50 cm, depending on the expected load on the cable channel (the number of electrical wires placed in the box).
Installing cable ducts on a concrete surface requires a more serious approach and additional tools. This will require plastic anchors and a hammer drill or impact drill to make holes in the concrete wall. This method is suitable for installing any profile: both metal and plastic, indoors or outside the building. The order of work is as follows:
- Holes for fastening are drilled at the bottom of the box. The distance between them, as in the previous version, is 30–50 cm;
- Then the cable channel is applied to the wall along the previously marked line;
- Using an awl or nail, the location of the fasteners is marked on the wall surface;
- Then, using a puncher, holes of the required diameter are drilled along the marks in the wall, into which plastic dowels are driven;
- After this, all that remains is to secure the profile using self-tapping screws.
We suggest you familiarize yourself with how to attach foil insulation to the wall. Foil insulation for walls - how to choose the right one and install it?
Glue method
Another option for securing the cable channel is to use mounting adhesive for fixation. Most often, the adhesive composition “liquid nails”, produced under the Moment brand, is used for these purposes. This glue is available in tubes for a mounting gun or in ordinary tubes for manual application.
The adhesive installation method is used for attaching cable channels to plasterboard, PVC wall cladding (plastic lining or panels), as well as in bathrooms on ceramic tiles. It is worth noting that only plastic wiring boxes are suitable for this method, since their weight is minimal. It is also desirable that the number of wires laid in the cable channel be minimal and do not create significant loads on the structure.
The technology of the adhesive fixation method is as follows:
- An adhesive is applied to the back of the profile. To ensure maximum adhesion area, the glue is distributed in waves;
- Then the cable channel is carefully applied to the wall along the marking line and immediately removed;
- After 2–3 minutes, when the glue has begun to dry, the strip is reapplied and pressed firmly for several minutes.
After the adhesive has completely set, additional fixation is performed in problem areas. For fastening, use small screws or hammer nails.
In conclusion, here are a few recommendations that will come in handy when installing cable channels.
To facilitate profile connection, use additional elements offered by the manufacturer: T-shaped and corner structures, strip connectors, various bends and other accessories.
To install sockets and switches, it is best to use overhead versions of these products or use box models with built-in structures.
Separately, we note that the installation of external electrical wiring is carried out last, after all finishing work has been completed.
Method No. 4 – Liquid nails
Well, the last way to attach a cable channel in an apartment or house is with special glue “liquid nails”. The need to glue the cable channel to the wall arises if another installation option is not possible. Most often, liquid nails are used when installing electrical boxes on bathroom tiles or a smooth metal surface. However, it is unlikely that it will be possible to secure the box well with glue alone. The adhesive mixture is often used as an additional fixation option. It can be combined with self-tapping screws or even quick installation.
There is a very important nuance in attaching the cable channel with glue - first you must apply the adhesive mixture to the surface of the box, and then lean it against the wall according to the markings. Once you have the back panel against the wall, remove it and wait a few minutes for the glue to thicken a little on both surfaces to be glued. After the liquid nails “grab” at least a little, press the cable channel against the wall as hard as possible, the main thing is not to break it. In this simple way you can attach the cable channel to glue with your own hands.
Scope of application of the cable channel
Why do you need a cable channel?
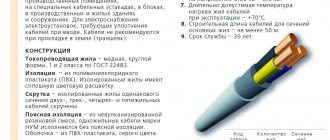
Cable channels are used to disguise electrical wires. They are usually used after repairs are completed. In addition to their camouflage effect, the channels provide free access to electrical networks. Cable ducts are mainly made of self-extinguishing PVC and are designed for a long service life. The channel is an oblong rectangular limiter with a lid with latches. The wires are placed in this limiter and closed at the top. The rigid design allows the channels to be mounted on any surface. The wires are protected from dust and dirt thanks to the cover. All cable channels do not conduct electricity, they are durable, flexible and resistant to chemical environmental influences. The scope of application of the cable channel is wide. Depending on the task, different types of cable channels are used. The following channels are distinguished by purpose:
- Modular cable channel
. The design has a large cross-section and is designed for sockets. - Trunk cable channel
. The design is also made in a large cross-section, as it is intended for laying wires over long distances. - Electrical cable channel
. Has a small cross-section for routing a small number of wires. - Floor cable channel
. This type is designed for running wires along the floor. - Plinth cable channel
. To carry wires along the junction of the wall and the floor, a plinth type cable channel is used. Outwardly it looks like a plinth and hides all the wires perfectly.
Classification of cable channels
Metal or plastic is used to produce the cable channel.
It can have a square, rectangular, oval or round shape of various sections. Products are available in a wide variety of colors. This allows you to choose the material for any interior. The design consists of a housing and a protective cover. The body bears the main load. Classification of the main types of cable channels:
- Mini - compact and practical. The main purpose is to hide cables for TV, computer and phone.
- Floor-mounted - used for laying hidden wiring directly on the floor covering. For their production, metal or reinforced plastic is used. Available in the form of an oval: this is necessary to prevent mechanical impact.
- Parapet - the most common type of electrical trays. Plastic is used for their production. They can have U, W, L-shaped shapes. The latter are used to create corner joints.
- Skirting boards are actively used in residential premises. They fulfill their main function and serve as a decorative plastic plinth for the interior.
- Perforated - the main difference is the reduced weight of the structure. This is ensured by special technological holes located along the entire contour of the product.
- Flexible - designed for laying electrical wiring on uneven surfaces. They are distinguished by an increased degree of protection from external factors.
- Corner - used to form hidden wiring under ceilings.
- Transparent with backlight - the main design feature is the transparent material of the box. This allows you to install lighting in various shades, which contributes to the beautiful design of cable trays.
- Industrial - they are a tensioned wire along which cable lines are openly fixed. This allows easy access to wires and minimizes dust accumulation.
Skirting board with cable duct and lighting system
What can happen if the cable channel is installed incorrectly
If technological and design violations are allowed during installation of products for laying cables, wires and other electrical cords, for example, telephone, the following may occur:
- Fire if a fastener element violates the integrity of the insulation;
- Short circuit, which can cause breakdown of household appliances;
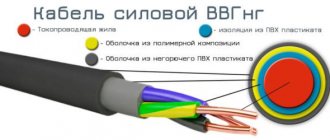
- Under no circumstances should power and low-voltage wires be placed in the same box;
- If there is contact with each other, adverse consequences may occur;
- Take into account the material and quality of the wall - this is a panel house, with wooden cladding or stone and brickwork. This is an important factor that imposes conditions on the choice of fasteners.
Under no circumstances should power and low-voltage wires be placed in the same box.
If the homeowner himself cannot cope with this task or is not confident in his abilities, then it is better to seek the help of professionals. They will be able to ensure the quality of installation work.
How to choose a cable channel
The selection of the required type of cable ducts for installation should be carried out in accordance with the material from which the wall is made. The next important factor will be the overall cross-section of the wires that are planned to be laid.
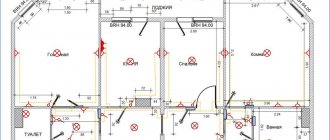
Design of electrical wiring for the interior of the room
The procedure for attaching a cable channel to the wall with your own hands
Since it is not difficult to attach the cable channel to the wall, you can perform this manipulation yourself. Here is the procedure to follow:
- First choose the right box. It fits the aesthetic characteristics of the interior and does not stand out on the wall.
- Please ensure that the installation is carried out accurately so as not to spoil the aesthetics of the room.
- Therefore, first a diagram is drawn up, taking into account the characteristics of the house and specific rooms. This way you can take into account the convenience and rationality of placing lines. Draw the shortest path of an electric line between two points.
- Only after drawing up the diagram is marking done, checking the parallelism and perpendicularity of future lines. A level will help here to check whether the line corresponds to the horizon and vertical.
- Lines are marked along the horizontal and vertical lines of writing instruments. At the same stage, the location of the distribution box and future connection points for household appliances are noted using plugs or switch buttons.
- If you have to make adjustments, then do this at the stage of fixing the cable channels.