Every year new and advanced frame technologies in construction appear. And even if you have not graduated from special institutes or trained as a builder, you will be able to build a house yourself using the frame-frame or frame-panel method. Electrical wiring in a frame house, first of all, must be safe and reliable. And in terms of aesthetics, it is desirable that it does not spoil the entire overall appearance, design and style inside the building. Therefore, we will consider all possible electrical options for a frame house.
Layout
As with any other building, first you need to carefully plan everything and diagram it on paper. Consider where the distribution panel and entrance doors to the rooms will be located, since switches must be installed near them. Decide on the location of lighting fixtures and household appliances so that the sockets are nearby, and you don’t have to throw carriers across the entire room.
Calculate the loads to correctly select conductors by cross-section and switching devices by rated current. Also, such a layout will help you decide on the amount of materials needed.
Entering the house
A branch line is made from the main power line to your home. Its installation is carried out by air or underground. Depending on what voltage is needed (single-phase 220 V or three-phase 380 V), the cable is selected; it will be three-core (for 220 V) or five-core (for 380 V).
The input cable goes to the electric energy meter, which, according to new requirements, must be installed on the outside of the house so that the controller can easily take readings at any time.
The meter must be located in a sealed shield or box to protect it from exposure to precipitation.
The cable from the meter must be led inside the house. To do this, a hole is drilled in the wall; if the house is two-story, then it is best to do this at the level of the interfloor ceiling. The cable is laid in a corrugated pipe, pulled through the hole made, secured in the interfloor ceiling and then laid to the input distribution panel.
Note! After the meter, there must be an automatic circuit breaker in the circuit, which will serve as protection for the cable running from the meter to the distribution panel in the house. If this cable is damaged or short circuited, the protection will work and the machine will turn off. Otherwise (if there is no automatic machine), the meter may burn out, and the entire main line somewhere in the transformer substation or at the substation will be disconnected.
Installing open wiring
You can install external wiring in the following ways:
The first option is more suitable for technical rooms or sheds, since the installation uses a rigid wire with double or triple insulation, which is subsequently mounted on the wall and ceiling using electrical clamps. Externally, such wiring looks simply terrible.
The second option is more interesting and was widely used by our ancestors in the 60s, which, by the way, can be successfully used when styling your home in retro style. For this method, a twisted cable is used, attached to ceramic rollers mounted on the wall.
The third option is to use a corrugated pipe, which is also not very nice, since the pipe can sag, which significantly spoils the appearance, and dust also collects on it, which is later very difficult to completely remove.
Cable ducts are the best way to install external wiring. In addition to the fact that such pencil cases are quite reliable, they are also aesthetically beautiful.
Installation of wires in corrugated cable ducts is as follows.
Each corrugated pipe has a steel string to which the end of the wire is attached and, with the help of this string, the cable is pulled to the required depth. To prevent the wire from “going away,” the ends of the corrugation and the cable are connected to each other using electrical tape. The corrugation is mounted to the wall using plastic clips or other special fasteners. It is necessary to space the pipe fasteners at least every 50 cm, this will help avoid sagging.
For additional protection of the wiring, you can use plastic cases that have fire-resistant properties. For the boxes, you must additionally purchase corners, plugs and joints. A wide selection of colors allows you to choose the shade that suits your home design.
Correct installation will be helped by the instructions included with the product.
Distribution panel
The input cable goes into the distribution panel and connects to the input circuit breaker, which should be the same in power as the one located on the street after the meter.
After the introductory circuit breaker, all switching in the switchboard is carried out according to the diagram. Outgoing line circuit breakers, RCD protection devices, and differential circuit breakers are connected. Ideally, each room in a frame house should have two circuit breakers (one for lighting, the other for connecting sockets). For rooms such as a bathroom or kitchen, it is necessary to install additional machines for energy-intensive household appliances.
What type of wiring should I choose?
Electrical wiring in such buildings can be done, as in ordinary houses, in two ways - external (or open) and internal (hidden).
The external wiring option involves installing wires on wall and ceiling surfaces using special cable ducts, electrical pipes or in an open way. Wiring is carried out when the main construction stages have already been completed.
Hidden wiring in a frame house involves placing conductors inside the walls and ceilings. Outside there will only be switches, sockets and wire ends for connecting lighting fixtures.
The installation of such wiring is combined with construction, as long as the walls inside the house are not covered with anything.
Video example:
Each method has its positive and negative sides.
The main advantage of internal wiring is that it is aesthetically pleasing, all conductors and connections are hidden, nothing spoils the appearance of the room. It has many more disadvantages:
- Any switching device (socket or switch) is permanently installed; you will no longer be able to move it somewhere new.
- It is not possible to periodically inspect and assess the condition of the electrical network.
- Internal wiring is more expensive in material terms than external wiring, and also requires considerable physical effort.
- Insurance companies do not risk issuing contracts for wooden frame houses with internal electrical wiring.
- There is no possibility of installing additional points (for example, if you need another socket in some room).
The main advantage of external wiring is its accessibility, that is, it is visible and its condition can be monitored. Accordingly, there is the possibility of repair; at the right time, you can replace not only the switch or socket, but also the wires.
External electrical wiring can be branched, adding points for connecting new household appliances.
The disadvantages of the external wiring option include the fact that it does not always fit organically into the overall interior of the premises. Also, when wires are visible, the risk of damage increases.
As you can see, all arguments tend to favor the fact that external electricians in a frame house are preferable. In addition, statistics show that fires occur more often in buildings with hidden wiring.
Laying methods
Options for open wiring
Installation of wiring can be carried out in any way that suits the property owners the most.
The open option involves placing cables and devices on the surface of walls and internal partitions. Plastic boxes, electrical pipes, ceramic insulators or steel strings are used to place communications. Installation is carried out after the construction of the building and finishing of the premises.
Open wiring is the best option for frame houses
Advantages of the open method:
- simplicity;
- high laying speed;
- low price;
- free access for inspection;
- possibility of repair, replacement of some parts and modernization.
The disadvantage is that communications spoil the style of the room and there is a risk of damage.
Hidden wiring in a frame house is installed during its construction; the lines are laid in the frame until it is sheathed with panels.
Hidden wiring
The hidden method has the following advantages:
- the ability to hide communications under the casing;
- maintaining the integrity and harmony of surfaces.
However, this solution has many more disadvantages:
- the switches and sockets are permanently fixed, it is no longer possible to move them or make new points;
- it is impossible to separate the wiring if the need arises;
- there is no access to cables and wiring boxes for checking and repairing them;
- complexity and high cost of work;
- high risk of fire due to short circuit or heating of contacts;
- refusal to conclude an insurance contract.
An analysis of the advantages and disadvantages of each method suggests that the right choice is the external option.
External wiring
Do-it-yourself external electrical wiring in a frame house can be done without any problems; there are several options.
Open cable
You can use a rigid cable with a double or triple insulating layer made of non-flammable materials. Such a conductor is attached to wall surfaces with special brackets. Between the wall and the cable it is necessary to lay an asbestos or metal substrate, which should be 1 cm wider than the conductor on both sides. This is a reliable and economical installation method, but not entirely aesthetically pleasing, especially if it is necessary to place several cables nearby.
When the design of the premises is made in a retro style, twisted wires on ceramic or porcelain rollers (insulators) will look nice and original.
Electrical pipes
When laying wires externally, it is possible to place them in electrical corrugated pipes, for the manufacture of which special non-flammable materials are used. Several conductors can be placed in the pipes at the same time; they are attached to the walls using special clips. This wiring looks compact, and the pipe insulates the cable from flammable wall surfaces and protects it from possible external damage. But the pipe does not look presentable at all, and besides, it collects dust too well, which is practically impossible to clean.
Cable channels
Cable channels will look much neater than corrugated pipes. Moreover, now on the electrical goods market you can choose them to suit any interior (they are available in different colors).
The disadvantage of cable channels is that they make the curvature of wall surfaces noticeable.
But since in a frame house you can hardly find crooked plastered walls (most often plasterboard sheets or lining are used), laying wires in cable channels is considered a good option.
Cable channels are plastic boxes that are attached to walls and ceilings using glue or self-tapping screws. Fireproof high-quality plastic is used for their manufacture. They come in different widths depending on how many cables and what cross-section are laid in them at the same time. When the conductors are laid in the boxes, they are closed on top with locking covers. An example of such wiring in the video:
Another disadvantage of using cable channels is that over time the frame house shrinks and the plastic boxes may crack. In this case, the electrical wiring will have to be redone. But at the same time, there are also advantages to this method of laying - it is cheap and easy to install.
Open electrical wiring in a frame house
Using cable channels
The next stage of work is the installation of electrical wiring in a frame house. The installation of basic equipment elements is also carried out: junction boxes, sockets and switches. In houses made of combustible materials, an open installation option is often used, which can be implemented according to one of two schemes:
- In cable channels.
- On isolators.
The technology for implementing the first option is quite simple. Along the routes marked at the planning stage, we install plastic boxes on the walls, the size of which allows us to lay the tedious number of wires coming from the panels and junction boxes. Some of the wires can be replaced with special plinths and baguettes - some models have niches for laying conductors.
We lay wires in cable channels or baseboards
We lay wires in cable channels or baseboards, trying to minimize their sagging - we use special latches to secure the conductors. We cover the cable channels/niches of the plinths with covers that almost completely isolate the internal space, protecting the conductors from dust and moisture.
On ceramic insulators
Another scheme according to which open electrical wiring can be installed in a frame house involves the use of ceramic insulators. Despite the fact that it looks somewhat archaic, if you follow the installation rules and select high-quality components, this scheme is not inferior in reliability to laying wires in metal pipes:
- Along the route of laying the wire, we install ceramic insulators on the walls (no more than 4 cm from junction boxes and shields, no more than 50 cm in vertical sections and 40 cm in horizontal sections).
- We fix the twisted wire in multilayer insulation on the insulators, capturing the ceramic fasteners with the coils of the conductor.
Often both options are combined, for example. Some of the wires are laid in hollow baseboards, and some are secured to insulators.
Ceramic insulators in retro wiring of a frame house
Wiring internal
The most important regulatory document for an electrician is the PUE (electrical installation rules). According to these rules, internal wiring (also called hidden wiring) in wooden houses must be carried out in metal pipes. Since frame house construction is made of wood, this requirement must be observed for them as well. Can you imagine the financial costs of such a number of pipes and their installation?
You can use metal sleeves or boxes, but if money allows, still use pipes. These auxiliary means must have a wall thickness of 2.5 to 4 mm (depending on the cross-section of the conductors) so that in the event of a short circuit the metal structure does not burn out. It is advisable that the pipes inside be painted or galvanized, this will protect the walls from rust. Video example:
Naturally, there will be bends and turns along the cable laying path; in these places, the pipes should be connected by welding or threading. It is very convenient to use copper pipes; they bend easily, but they are too expensive.
To avoid damaging the insulating layer of the cable, plastic bushings are mounted at the ends of the pipe.
Such installation is carried out during the construction stage, and, as you can see, it is quite expensive both in terms of finances and in terms of labor, time and effort. Therefore, the most correct choice for a frame house is still external electrical wiring.
Quality materials
Before you do the wiring, you still have to choose and buy materials. Remember that the reliability and safety of the power supply to your home directly depends on their quality.
If, in order to supply electricity to the house, a rigid aluminum wire (SIP type) is quite suitable, then it is recommended that all wiring inside the building be done with a flexible copper cable.
The best option would be NYM brand cable. It is marked 3x1.5 mm2, where the first number “3” means that this conductor consists of three conductors, one of which is phase, the second is zero, and the third is grounding (most often it is yellow).
The number “1.5” means the cross-section of each core. A cable of this cross-section is just right for all lighting wiring. To connect sockets, you will need a conductor with a larger cross-section (2.5 mm2), and for energy-intensive household appliances, such as an oven, water heater, it is better to take a cable with a cross-section of 4-6 mm2.
To install sockets and switches in a frame house, you should choose metal mounting boxes.
If you have time, energy, experience and knowledge for such an important decision as how to build a house yourself, then you will be able to handle the electrical wiring in a frame house. But if the slightest question arises, consult with specialists. Still, you should never go on a first-name basis with electricity; the safety of human life depends on it.
High-quality switching of electrical points
We install wires in distribution boxes to provide all rooms with electricity. There are two types of distribution boxes, some are designed for installation inside walls, others are mounted on the wall. And from them the electrical wiring in the frame house is directed to the necessary points, such as switches, sockets and lamps.
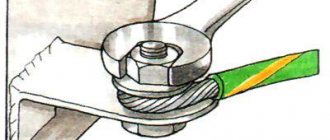
During installation, we pay close attention to the colors of the wires: for example, the phase cable is white, while the neutral cable is blue, and the grounding wire is green with blue stripes. It is recommended to use terminals from WAGO. This is a simple spring product. The insulation is stripped off on one side, and the end is inserted into the terminal, where it is firmly fixed with a spring. This connection is quite high quality.
The choice of sockets and switches should be based on the presence of a means for connecting grounding. Grounding is done first, after which the phase is connected and only then zero.