Which side should the hydro vapor barrier be laid on?
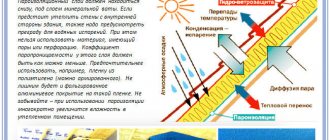
According to all the canons of physics, when the temperature decreases, vapor from the air always condenses, turning into liquid. In construction, this rule is always taken into account when arranging structures operating at the junction of the temperature difference between the room, insulation and the street, the ground. These include the roof, walls, base, and floor. Without high-quality insulation, a large amount of moisture accumulates on surfaces and in the structure of materials. This inevitably leads to deterioration of the properties of the foundations and their gradual destruction.
To avoid the negative consequences of the condensation process, when constructing critical structures, a specialized film is used - hydro-vapor barrier. Which side to put it on correctly is an important question.
Installation of water vapor barrier: which side?
There are several types of films. According to their structure they are divided into:
- Single-layer and double-layer (multi-layer),
- Diffusion,
- Anti-condensation.
The main task of builders is not to make a mistake on which side to lay a particular type of water vapor barrier, depending on the installation location. Incorrect application will lead to the opposite process: subsequent condensation of moisture on the surface of the membrane, as evidenced by the photo of improper arrangement of water vapor barrier.
Which side to lay a single-layer hydro-vapor barrier?
Simple single-layer films are made from polyethylene. Sometimes it is additionally reinforced with a polymer mesh to add strength. This material retains water, but allows steam in, in both directions. Therefore, the choice of installation side does not play a special role here .
It is only worth noting that such products have lost their relevance due to low efficiency and the emergence of membrane films.
Which side should the diffusion hydro-vapor barrier be laid on?
Modern film water vapor barrier for roofing is produced using a woven method from pure, 100% polypropylene. Its structure, if you look closely under a microscope, is a network of thin threads. Their interweaving forms microscopic cells. Their size is not sufficient for the unimpeded passage of water molecules in a vapor state.
High-quality diffusion hydro-vapor barrier for floors or roofs is made in two layers. Its specificity lies in its operation on the principle of a valve: passing steam from the air in only one direction (from an area of high pressure to an area of low). When there is oversaturation of moisture in the air in the room and under the influence of steam pressure (diffusion), water molecules literally seep through the film and excess moisture is removed outside.
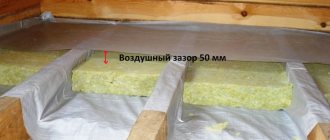
Such material is laid when organizing a system of ventilated facades, on top of mineral insulation with the obligatory arrangement of a ventilated gap. This water vapor barrier is suitable for floors and walls.
Diffusion films usually have markings for installation, which are different for each manufacturer. Before installation, you must carefully study the instructions. Often such material is made dark and rough on the back side, lighter and smoother on the outside.
Installation is carried out with the light (water-repellent) smooth side facing away from the room in the following cases :
- for insulation when arranging the under-roof space,
- under insulation when laying the floor on concrete, soil,
- external thermal insulation when installing ventilation facades.
When installing a floor under a screed, protecting walls and ceilings in wet rooms (for example, baths, saunas), the water-repellent side should face the inside of the room:
Which side should the anti-condensation hydro-vapor barrier be laid on?
To give the material improved vapor barrier properties, one side of the diffusion film is coated with a special moisture-absorbing hydrophobic coating, polyester fabric, or an aluminum reflective layer is applied. Such membranes are called anti-condensation and superdiffusion. Due to the absorption of condensate, this hydro-vapor barrier is best suited for cold roofs: pitched type with metal decking. The absorbed moisture prevents the formation of metal corrosion. The additional layer provides better thermal protection.
Antioxidant hydro-vapor barrier is installed in the same way as diffusion barrier: with the water-repellent side facing away from the material that needs to be protected from moisture .
Typically, manufacturers apply markings on the outer (water-repellent) side such as: “This side up”, a logo or brand designation.
Vapor barrier materials
Today you can find a lot of roofing materials on the construction market. Most of these are polyethylene-based films. They are waterproofing, vapor barrier and antioxidant. The latter are special in that they are covered on the inside with an absorbent fleecy fabric layer, which actively collects condensation, preventing it from getting onto the next layer of roofing cake.
Previously, the main material for roof vapor barrier was glassine. Today it is used only by extremely economical builders, but if you look at the performance characteristics of glassine and compare them with the qualities of modern materials, the benefits of the latter will be obvious.
Depending on the physical and technical parameters, three types of vapor barrier films can be distinguished:
- Polyethylene - used not only for steam, but also for waterproofing. There are perforated and non-perforated films. In any case, during installation it is recommended to reinforce it with light mesh or fabric. Perforated films mainly serve to provide waterproofing, non-perforated films serve as vapor barriers. It would seem strange, because the “holey” surface allows water to pass through, but the holes in the film are so small that water simply does not have time to seep through them. They serve for better ventilation of the roofing pie. There are also foiled polyethylene films, one side of which is capable of reflecting heat coming from below (from the house). Therefore, such material should be laid with the mirror side down. Polyethylene vapor barrier is supplied in rolls. During the installation process, sections of material are glued together with special seals and connecting adhesive tapes. Thus, a dense monolithic layer is obtained.
- Polypropylene - are characterized by higher strength compared to polyethylene films. They are used mainly for laying a waterproofing layer, but can also serve as a vapor barrier. On one side they have an antioxidant coating made of viscose-cellulose fabric.
- Diffuse is a material that appeared just a few years ago. It is a well-ventilated membrane that has increased vapor permeability, but does not allow moisture to pass through. The main advantage of such a “breathable” vapor barrier is that it does not require arranging a ventilation gap in the under-roof space. This way you save space and time. A diffuse vapor barrier film works very simply - when steam passes through it, it settles on the rough layer, is absorbed into it and dries evenly, leaving the insulation dry and unharmed. There are single- and double-sided films. Single-sided can only be laid in a certain way on the insulation, double-sided - in any way you like.
All film materials used for vapor barriers must have good elasticity, be tear-resistant and as comfortable as possible to use.
It is extremely important that the vapor barrier film does not tear during fixation, but wraps around the fastening element. Even if there is accidental mechanical damage to the roof, for example, due to a tree branch falling during a hurricane, the vapor barrier should maintain its integrity, minimizing losses. Ideally, the thickness of the roof vapor barrier should be such that the material can withstand the load of thermal and waterproofing, if the sheathing and rafters fail
Ideally, the thickness of the roof vapor barrier should be such that the material can withstand the load of thermal and waterproofing if the sheathing and rafters fail.
Vapor barrier with isospan
One of the most popular materials on the domestic market is isospan roof vapor barrier. It is relatively inexpensive, has impeccable performance characteristics, durability and ease of installation. Izospan can be used for waterproofing and as a vapor barrier at the same time.
The manufacturer offers several different modifications of Izospan, each of which is intended for a specific purpose, but there are also universal films
Therefore, it is very important to clarify the characteristics of the selected material before purchasing, so as not to accidentally buy the wrong variation of Izospan
Izospan B is widely used among professional builders and self-taught owners. It can be combined with any type of roofing. In addition to protecting the insulation from moisture, it does not allow microfibers from the cake to fall off inside the room, as is often the case with other materials.
Which side to lay the vapor barrier
The vapor barrier is laid according to the manufacturer's instructions, which must indicate which side it should be laid on. If there are no instructions, or there are no recommendations for choosing sides, you can be guided by the general principles of installation.
Which side are different types of vapor barriers placed on:
- Glassine. As a vapor barrier, it is laid on the inside of the insulation, with the black (bitumen-coated) surface facing the inside of the room.
- Single-layer polyethylene films. They are attached from the inside to the insulation on either side, since they do not have additional properties, but only perform the function of a vapor barrier.
- Polyethylene films reinforced with a polymer mesh. They also do not have specific instructions for laying; they are convenient to lay as the roll unwinds.
- Two-layer films for vapor barrier (fluffy on one side and smooth on the other). They need to be laid with the pile facing out, close to the insulation with the smooth side.
- Foil vapor barrier. It is attached with the shiny side inside the room, as it is also a heat reflector.
Content
Which side to lay the vapor barrier on the floor
You can lay a two-layer vapor barrier on the floor with the fleecy side on the floor beams. This option is suitable for brick houses with wooden floors so that the beams can “breathe”. If the film is attached to the ceiling under the beams, the wood may “rot”, which will lead to the formation of mold.
Which side to lay on the roof
By laying a foil vapor barrier on the inside of the roof with the shiny side facing the room, you can reduce the cost of heating the room. If you use glassine under the roof, you will have to lay it in several layers with the black side inward - due to its fairly high vapor permeability.
Which side to lay on the walls
Reinforced polyethylene films are attached inside to the walls with either side facing the insulation. They are preferable to ordinary polyethylene, as they are much stronger and, accordingly, easier to attach. No vapor barrier is used on the outside of the walls; instead, vapor-permeable wind insulation (waterproofing) is used.
Which side should I lay on the ceiling?
A vapor barrier based on a non-woven fabric is attached to the ceiling close to the insulation from the inside - with the rough side facing the room. It is important to ensure maximum tightness, for which the joints are glued with butyl rubber mounting tape.
How and with what to fasten
If a vapor barrier is used in a floor pie along joists, there are options for its installation.
- If the material is laid before installing the lag, it is simply rolled out, leaving it in the corners of the fold, connecting the sheets as indicated above. There will be logs on top that will hold the material. It does not require additional fixation. You just need to start it and fix it on the walls.
- If the logs are already installed, we wrap each of them with material, leaving a small fold so as not to tear. We attach it to the wood using staples and a construction stapler. Staples are needed with a leg of 8-10 mm. We place the fasteners along the joists (from above) in increments of 50 cm. But the staples make holes. Although they are small, they are there and break the seal. They are closed using wooden planks, which are mounted on self-tapping screws. Self-tapping screws are placed so that they do not fall into the brackets.
If the film has to be attached from below, the situation is similar to that described above, only there is no need to wrap the logs. We stretch the film and fix it with staples. When all the canvases are secured and glued, we nail the strips covering the brackets along the joists.
To be sure that no steam will pass through the holes near the brackets, foamed polyethylene or polypropylene can be laid between the film and the fixing bar. These materials are often used as a backing for laminate flooring. The material also does not allow steam to pass through, and due to its “foaming” it has considerable elasticity. It will definitely block the steam access.
How and with what to attach vapor barrier to walls? Any more or less serious manufacturer of vapor barrier films has specialized connecting tapes. They are available for different wall materials, so choosing is easy. These tapes themselves have double-sided adhesive. The gluing procedure is as follows:
- We glue the tape to the walls around the perimeter at the required level. In this case, we remove only one layer of the protective film. On the side that we will glue to the wall.
We roll out and fix the films on the floor, so that the edges overlap the walls and there is room for folding. When everything has already been laid, the joints have been taped, secured, we begin to glue the vapor barrier of the floor to the walls. We lay a fold at the base of the wall, remove the protective film from the adhesive tape pasted, and glue the canvas.
It's that simple. Once glued, the excess can be cut off. And finally, you know not only which side to lay the vapor barrier on, how to lay it correctly, but also how and with what to fasten it.
Which side should the vapor barrier be laid to the insulation?
The need for high-quality thermal insulation of premises arises very often. If you plan to insulate a wooden house with your own hands, then many questions arise about how to do it correctly. And one of the important questions concerns the need to use a vapor barrier, the place of the film in the thermal insulation “pie” and which side to lay the vapor barrier against the insulation on the wall.
Why do you need a vapor barrier for insulation?
Vapor barrier is always necessary when using moisture-absorbing insulation. The fact is that the characteristics of mineral wool are such that the material installed on the inside of the wall comes into contact with warm air, which contains water vapor. In the absence of a water barrier, moisture penetrates into the thermal insulation layer on the floor, where it condenses, turning into water.
As a result of moistening, the thermal insulation properties of mineral wool material are reduced; in addition, mold and mildew may appear in a humid environment. If the vapor barrier under the insulation on the wall is correctly laid, then it becomes an obstacle to moisture. Therefore, thermal insulation requires the installation of a vapor barrier between the warm air of the room and the insulation.
Types of vapor barriers for insulation
Among the modern materials for hydro- and vapor barriers presented on the construction market today, three main types can be distinguished:
The film is a blind vapor barrier that does not allow moisture to pass through. The main advantage of polyethylene film is its low price. Two-layer vapor condensate films are also produced - these are smooth on the inside and rough on the outside. Drops of water do not pass through the film, but are retained.
The vapor barrier membrane (energy-saving) film has a metallized outer layer that is resistant to high temperatures. The material is more often used when insulating the walls of baths and saunas, because the material additionally reflects infrared radiation (works like foil penofol).
If glass wool is not protected with a vapor barrier during installation, then as moisture is absorbed, the thermal conductivity of the material will increase.
Roll waterproofing - used to protect building structures from moisture. When using this material, it does not depend on which side the waterproofing is laid to the insulation, since TechnoNIKOL roll and coating waterproofing does not allow moisture to pass in both directions.
Which side should the vapor barrier be laid against the insulation?
At first glance, it seems that there is nothing complicated - attach the waterproofing film over the insulation on the side of the warm room and you're done. However, there are some important nuances in this matter that you need to be aware of. It is also important to take into account which side the vapor barrier is laid to the insulation on the ceiling and what the installation features are. This is where previously acquired knowledge about the types of film used comes in handy.
How to distinguish the inside from the outside
If the manufacturer’s instructions are missing or do not contain the necessary information about which side of the film is considered internal, then you should independently determine this based on external factors. Please pay attention to the following points:
1 . If the waterproofing film has a different color on both sides, then the light side of the isospan is laid against the insulation , 2 . The side of the waterproofing that faces the floor when rolled out is considered internal and should face the insulation, 3 . The outer side is made fleecy so as not to allow moisture to pass through, and the inner side is smooth and is laid towards the insulation.
Which side should the vapor barrier be placed on the insulation?
The polyethylene film is laid on either side, because they are no different from each other. The diffusion membrane (vapour-condensate film) is correctly laid with the smooth side on the insulation, and the rough side towards the warm room. Thus, it prevents the insulation on the ceiling or wall from getting wet, and excess moisture from the material can freely pass through the smooth side.
Also, diffusion membranes are mounted on the floor or wall with the smooth side facing the insulation. Vapor barriers with a foil side are attached with the reflective side facing outwards, as it reflects heat back towards the warm room. And it should be remembered that laying vapor-tight materials, for example, isospan, requires the installation of a ventilation gap to remove excess moisture.
If the internal cladding (false wall) is made closely without a gap, then it will be exposed to the influence of moisture settling on the film. If there is a gap, air movement will facilitate the unhindered evaporation of excess condensate from the surface of the film. It is important not only to know which side to put the isospan towards the insulation, but also to maintain the integrity of the vapor barrier itself.
Vapor barrier and waterproofing: what is the difference
As you know, water molecules are larger than steam molecules, so not every material that does not allow water to pass through does not allow steam to pass through. That is, not every waterproofing material retains water vapor, so waterproofing materials are divided into two groups:
- Vapor permeable waterproofing. This is precisely waterproofing, which retains only water without interfering with the passage of steam.
- Vapor barrier or vapor barrier. Water does not pass through these materials in any form.
Once again: vapor-permeable waterproofing conducts steam, but does not conduct water. The vapor barrier/vapor barrier does not conduct either steam or water. As you can see, they work differently, so they have different areas of application.
An example of the use of vapor barrier and waterproofing in a floor structure along joists
Let's give an example. Vapor-permeable waterproofing is used in floor construction along joists with mineral wool insulation. It is hemmed from the bottom and prevents water from penetrating into the thermal insulation, but does not prevent steam from escaping from the mineral wool. This allows you to maintain the insulation in normal condition.
In the same case, the vapor barrier is placed on top of the insulation - on the room side. In this case, it protects the insulation from both steam penetration and water penetration. How does the whole structure work? The vapor barrier does not allow water to pass through, which can be spilled on the floor in the room, and it does not allow steam to pass from the room into the insulation. But, all the same, some part of the steam gets inside the insulation through imperfect joints and other defects. Due to the fact that the bottom of the insulation is lined with vapor-permeable material, it can evaporate.
We advise you to read: Guide to choosing a heated towel rail for the bathroom
If such a floor is made above the underground, the moisture that penetrates into the underground from the soil through the vapor-permeable film enters the insulation. This is not very good, but a vapor barrier placed on top prevents moisture from entering the house. And wet insulation dries out if there is ventilation in the underground. So, in order for the floor to be dry and warm, it is necessary that there are properly arranged vents in the base.
Is it possible to replace waterproofing with vapor barrier in this cake or vice versa? No. If you lay a vapor barrier underneath, the water will be trapped in the insulation. There it will accumulate and either break through the film somewhere and spill out, or it will simply lead to the insulation turning into dust.
Vapor barrier in a concrete floor pie
In the case of an insulated floor on a concrete base, everything is exactly the opposite. Let’s say right away that a vapor barrier layer is not always needed. This layer is needed if:
- concrete is poured on the ground;
- unheated room below;
- below is a room with high humidity (bathroom, kitchen, swimming pool, laundry room, etc.).
If the concrete floor is above a heated room, neither waterproofing nor vapor barrier is required. You can pack them just in case, but you can also save money.
As you can see, a vapor barrier is laid below, and a vapor-permeable moisture barrier is installed on top. Why? Because the situation is the opposite. Concrete will not be harmed by high humidity, it will only become stronger, so it is very logical to lock moisture in concrete and this can be done with the help of a vapor barrier. It will cut off both capillary suction and prevent the vapor form from leaking into the insulation.
It is better to lay vapor-permeable waterproofing on top of the thermal insulation. It will prevent water from getting inside, but will help maintain the normal humidity of the thermal insulation, as it will not prevent evaporation. Is it possible to replace steam and waterproofing here? Again, no. Otherwise, everything will not work correctly.
Which side should the waterproofing be laid towards the insulation?
How to properly install waterproofing for floors and more
It is difficult to underestimate the importance of such a stage in the construction of a house or other structure as vapor barrier. This term refers to various methods and means designed to exclude or minimize the penetration of moisture in the form of condensation into structural materials. It is important to determine which side to lay the vapor barrier on, and the tips or instructions below will help with this.
Insulation materials are the most vulnerable to moisture. Under the influence of moisture, the structure of most modern insulation materials is damaged, and as a result, their thermal insulation properties decrease or disappear. However, this is far from the only threat posed by condensate penetration. In a humid and closed environment, fungal organisms, that is, mold, which is completely unnecessary there, begin to actively develop. They negatively affect the reliability and durability of load-bearing structures, especially wooden ones.
Vapor barrier material options
The modern building materials market has a wide range of vapor barrier coatings. They are divided according to many characteristics, primarily by vapor permeability, which is needed to select the location for installing the insulation. Also, vapor barrier materials have a fairly wide price range, which should also be taken into account when choosing a material.
The main types of vapor barrier are:
- Traditional vapor barrier film,
- Film with a layer of aluminum foil,
- Membrane film.
Unfortunately, there is no material that is equally acceptable for any area of vapor barrier, be it a roof, walls, one of the floors, or a foundation. Therefore, it is extremely important to take into account the structure of the materials being coated, the purpose of the insulation and the area of coverage, and based on this, choose the right specific material, as the instructions will tell you.
In addition, it is necessary to take into account the characteristics of each type of vapor barrier. If a vapor barrier film made of polyethylene is installed, it would be correct to leave gaps, because in addition to insulation from steam, the film is completely airtight, so condensation will form in a closed structure without air access.
Features of membranes
Membranes, in addition, are divided into pseudo-diffusion, diffusion and super-diffusion. They differ in vapor permeability coefficient, which is 300 g/m2, 300-1000 g/m2 and more than 1000 g/m2, respectively. Based on this characteristic, the suitability of membranes for insulating certain structures is determined. Pseudo-diffusion practically does not allow moisture to pass through, and is most suitable for vapor barrier of the outer layer under the roof. However, an air cushion is needed between the film and the insulation. And such films are completely unsuitable for insulating facades. The pores of the membrane become clogged with external dust, and condensation begins to remain directly on the material.
The remaining types are more versatile due to their larger pore diameter. This makes it difficult to clog them and allows you to avoid leaving air gaps.
Correct placement of material
A key role in achieving good insulation of structures is played by which side to lay the vapor barrier. The answer to this question also depends on the chosen vapor barrier material:
- Vapor barrier polyethylene film is laid with either side facing the insulation, but there are special vapor-condensate films with roughness for better evaporation of condensate. In this case, the film is placed with its smooth side facing the insulation. Such details are usually determined by the attached instructions.
- Laying a vapor barrier from a diffusion membrane, by analogy with a vapor-condensate film, is done with the smooth side facing the insulation.
- Materials containing energy-saving foil should be correctly mounted with the foil side facing the inside of the room, because it reflects heat.
Some general tips
It is important to consider the following features:
- Vapor barrier material, whether it is rolled or sheet, is laid only overlapping and secured with special tape that prevents the passage of air in the gaps.
- Under no circumstances should damage (breaks, cuts) to the insulating material be allowed, even if they were formed during the process or after installation they must be sealed.
DIY vapor barrier
Vapor barrier of a room is a procedure that can be done with your own hands. If you take into account the above rules, correctly determine which side the insulation is laid on, and choose the right material, then even without the help of professional builders, it will be done reliably.
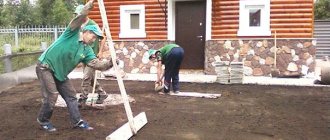
The most indicative would be a do-it-yourself floor vapor barrier. Before installing insulation and vapor barriers, it is strongly recommended to treat underground structures with compounds against wood rot and against insects. This treatment is of particular importance for structures located closest to the ground and foundation. After this, the logs are installed, and the subfloor of the first floor floors is mounted on top of them. This will be the basis on which the floor vapor barrier is laid.
The selected vapor barrier material is laid on top of the subfloor, with an overlap of 15–20 centimeters. It can be secured with nails or a construction stapler, but the most correct method would be the previously mentioned adhesive tape. Places that are difficult to reach, abutments to walls and raised areas of floors, require additional treatment with bituminous material, because it is almost impossible to properly lay film in such places. After laying the vapor barrier, the installation of thermal insulation begins. It is important to lay these materials (mineral wool, polystyrene foam and others) close to the joists.
The vapor barrier of the floor, however, does not end there. Moisture can get into the insulation from inside the house from the first floor. Therefore, when insulating, you need to lay another layer of vapor barrier, similar to the bottom layer. Any type of membrane insulation is most suitable for this purpose. This layer is also overlapped. You can confidently lay the main floor on top of it. In this case, you need to leave 1-2 centimeters as a gap.
Conclusion
With the correct choice of side, which insulation is laid to the insulation, as well as the correct choice of the vapor barrier material itself, reliable vapor barrier of the floor will be ensured. And it, in turn, is one of the important components of the overall reliability and durability of buildings.
Work process
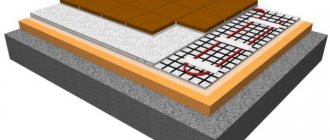
Floor vapor barrier
Performed directly in the premises on the ground floor. This operation is also carried out for rooms where humidity is significantly increased.
First, you need to carry out waterproofing - this is a set of protective measures against the harmful effects of water. Waterproofing is laid on the cement screed. For floors and walls, a coating material is more suitable - a special moisture-resistant substance that is applied in several layers to structural elements to prevent corrosion or other harmful effects of water.
A layer of insulation is laid behind the waterproofing layer, and it is covered with a one-inch thick board. A vapor barrier layer is laid on top of the board.
When the main material is film (perforated, polyethylene), it is secured with double-sided tape so that it does not sag.
Since a vapor barrier is necessary to prevent condensation from getting on the insulation, how to properly lay the material with the smooth side outward, then it will stop any moisture.
The same should be done with a vapor barrier, which is covered with aluminum on top; the shiny side should be in the room to retain moisture, and the rough side should be applied to the insulation.
The vapor barrier is always overlapped. The distance between the joints should be 15 cm. It is glued together with tape or special tape, and then secured with a stapler to the board that is located under it.
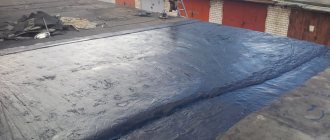
The best way to vapor barrier a floor is to use liquid rubber made from bitumen. How does it work? Liquid rubber is applied on top of the boards. When it dries, it becomes an elastic waterproof film that is very well glued to the floor and does not allow moisture to pass through.
We advise you to study - Types of corrugated sheeting: features of coatings and profile configuration
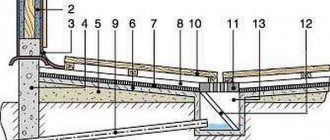
Vapor barrier of walls
There are two types - external and internal vapor barrier. The process itself is almost completely similar to the previous one.
For internal vapor barrier, a vapor barrier film is attached along the entire perimeter of the wall using a stapler or galvanized nails. The question often arises of how to properly install a vapor barrier. If the contents of the vapor barrier contain foil, then its shiny edge is located inside the room. When using foam propylene material, the rough side is applied to the wall.
The canvases are laid horizontally, starting from the bottom. The joints must overlap, and then, for reliability, they are glued with tape or mounting tape. Galvanized profiles are mounted on top, on which drywall is then laid. There must be ventilation gaps between the drywall and the vapor barrier.
External vapor barrier is a set of measures to protect insulation from the harmful effects of the external environment, which can come from both outside and inside, through damage to the wall covering.
To protect the insulation from the outside, it is necessary to use a wind-moisture-proof, vapor-permeable membrane, strong enough to protect the walls and insulation from wind and moisture, but with the ability to release steam out of the fiber insulation.
This material is laid starting from the bottom, along the outside of the insulation. The rough structure allows steam to pass through, so it should be laid correctly against the insulation, and the smooth, water-repellent side should remain outside.
They are mounted on a wooden frame with an overlap, there should be at least 15 cm between the joints. And then they are secured with a construction stapler. Wooden slats are installed on top of the covering, which carry the outer skin.
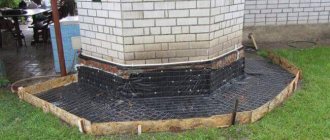
Another feature of the water-repellent material is that the lower edge serves to drain the flowing moisture to the basement drain of the building, otherwise the foundation may sag.
Which side to lay the waterproofing film
Proper waterproofing of a building is one of the most difficult and critical stages of construction or renovation.
If the waterproofing material is laid incorrectly, then within six months the residents of the house will be able to observe an unpleasant picture in the form of:
- high room humidity,
- getting the insulation wet, which will very soon collapse from such exposure,
- poor heat retention inside the house due to a wet insulating layer.
To avoid the above problems, it is initially important to lay the waterproofing correctly, namely on the side recommended by the manufacturer. Below we will answer the question of which side to lay waterproofing under different types of building materials and in different parts of the building.
Under metal tiles
Under the layer of metal tiles, the waterproofing film is laid with the markings up, horizontally from the ridge to the eaves, with an overlap of 15 cm. The film should only be attached to the joists or rafters using a stapler. It is important to remember about the film sag, which must be under the metal tile layer (about 2 cm). It will help air circulate freely and protect the film itself from premature destruction.
Waterproofing floors in rooms such as bathrooms and kitchens requires maximum precision in laying the moisture barrier layer. In this case, the waterproofing film is attached with the unmarked side to the insulation.
The roof waterproofing stage begins with laying insulation. Then a waterproofing film is spread over it in an even layer at the joint. The film is laid with the logo facing up, with the adhesive layer directed towards the insulation. Be sure to take into account the ventilation gap for normal air circulation between materials.
To waterproof walls inside the house, the film is mounted with the logo facing up, with the unmarked surface facing the insulation.
Laying the waterproofing film on the walls outside the house is carried out on the insulation, with the markings facing up. The film is secured with a construction stapler with an overlap of 15-20 cm.