Types of harnesses
The tops of the pillars are connected by strapping into a single support system.
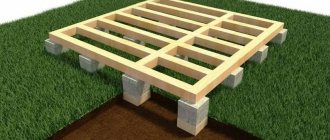
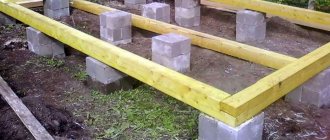
The type of strapping depends on the material of the structure of the building itself. For wooden, panel and frame buildings, the strapping is made of timber. When forming support pillars, a vertical metal pin with a threaded end is placed in the upper part. The harness is secured by screwing a nut onto a metal pin threaded through a hole in the beam. Under heavy walls, a frame made of monolithic reinforced concrete is placed, usually supported by pillars of the same material. The strapping and pillars are prepared simultaneously in a single formwork. When forming columnar foundations from prefabricated reinforced concrete blocks, the frame is made of reinforced concrete beams (rand beams) resting on pillars.
We recommend watching a video on how to properly install the trim to avoid the main drawback of the grillage - cracks.
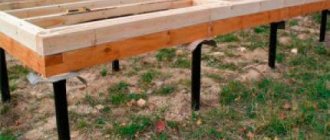
Embedded parts are attached to the heads of columnar foundations. A channel or construction corner is welded to them. As a result, a grillage made of metal profiles is obtained, which has high strength and reliability.
The frames of columnar foundations are very sensitive to the displacement of each columnar support. As a result of the support being pushed upward by the frozen soil, and when the pillar settles downwards, a violation of the geometry of the structure of the harness structures may occur. This can cause cracks to form in load-bearing walls. This is the main disadvantage of tying columnar foundations.
Support columnar foundation - pros and cons, advantages and disadvantages
Structurally, a columnar foundation consists of separately located recessed supports connected to each other by grillages or foundation beams. For the construction of the underground part, various materials with high strength characteristics are used. The pillars are installed in the corners of the house and at the points where the external walls meet the internal ones. The intermediate distribution of supports is carried out with the design step specified in the project. The foundation elevation is taken taking into account the depth of soil freezing, and the section size is taken depending on the accepted permanent and temporary loads.
Laying depth
Based on the depth of foundation, foundations are divided into two types:
- Shallow;
- Deeply buried.
Shallow columnar foundation
For light, small buildings, a shallow columnar foundation is laid. A shallow foundation is considered to be pillars laid at a shallow depth (0.5-0.7 m) in the zone of soil freezing.
Shallow foundation design
To ensure that the supports are not pushed out of the soil under the influence of heaving frozen soils, a number of measures are taken. This is the insulation of the blind area and enclosing structures of the basement. The lateral surfaces of the foundation are covered with materials that significantly reduce the lateral forces of soil friction.
The construction of monolithic reinforced concrete supports, unlike other types of pillars, incurs additional costs for the manufacture and installation of reinforcement cages, the preparation and laying of concrete mixture, as well as the assembly and disassembly of formwork.
The disadvantage of a shallow foundation is its sensitivity to the effects of heaving in frozen soils. Buildings on such foundations require additional costs for insulating the blind area and basement.
The advantages of such foundations certainly include the cost-effectiveness of their construction compared to a deep foundation.
Deep columnar foundation
Deep supports are located below the soil freezing zone. Reinforced concrete pillars, metal and asbestos-cement pipes are used to construct supports. A sand cushion or concrete preparation is made at the bottom of the pit. At greater depths, the formwork for monolithic pillars is made wider towards the base. The conical shape of the support trunk increases the resistance to being pushed out by heaving soils.
Columns with a section of 400 x 400 mm
On the base of some pillars, concrete preparation or masonry of stone and brick is made in the form of ledges, which gives the same effect as the cone shape.
The dimensions of the minimum cross-section of foundation pillars are determined by their material:
- Reinforced concrete – 400 x 400 mm;
- Rubble concrete – 400 x 400 mm;
- Natural stone – 600 x 600 mm;
- Flagstone – 400 x 400 mm;
- Brickwork – 380 x 380 mm.
The disadvantages of deep columnar supports include the complexity and labor intensity of excavation work to arrange pits for formwork. The advantage of constructing such supports is the saving of material resources and labor costs compared to other types of foundations.
Advantages and disadvantages
Pile and support foundations
Each solution was initially created with the expectation of use in a specific situation.
- Monolithic foundations - for the construction of heavy multi-storey buildings;
- Strip foundations are an intermediate option when building on moving soils;
- Support-column foundations - for independent construction of small residential complexes.
In view of this, some of the disadvantages present in the support-column base can be considered insignificant in the construction of target buildings.
The list of disadvantages includes:
- Low load-bearing capacity. The supporting foundations are not capable of supporting heavy multi-story structures;
- Fragility of the structure. Initially, the structure of supports was intended for construction in frozen soils. Use in moving soils or loosening the soil yourself reduces the stability of the pillars of the structure.
- In the future, it is impossible to create a cellar or basement. The distance between the pillars does not allow digging a room wide enough to serve as an underground extension.
If you build a building taking into account these restrictions, then in return you can use all the advantages to the maximum:
- High speed of foundation creation;
- The ability to make the foundation yourself, without the use of additional equipment;
- Cost of work. Apart from the lack of additional equipment, the cost of materials is half that of constructing a strip base. The price ratio between columnar and monolithic foundations is 1:10;
- No additional training. When erecting buildings on a supporting base, there is no need for additional thermal and waterproofing.
- Possibility of use for the construction of buildings on frozen soils.
- The service life of the foundation with proper operation is 80-100 years.
The support-column base is easily repaired. And even in case of major problems with the foundation, its restoration will not take much time and resources.
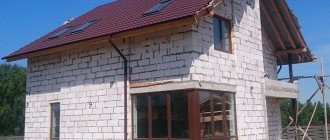
Brief information about the structure of a columnar foundation
A columnar foundation consists of supporting pillars, free-standing or connected into a single system by a grillage.
Posts are installed at each outer corner of the building and at the intersection points of the walls. Heavy walls and areas of concentrated load should also be supported by supports.
The following materials are used for the construction of pillars:
- stone - flagstone or rubble;
- brick – well baked;
- concrete grades B15-B25;
- tree;
- pipes (steel or asbestos-cement) filled with concrete;
- prefabricated reinforced concrete products.
The best soil for building a building on pillars is sand.
Diagram of a columnar foundation.
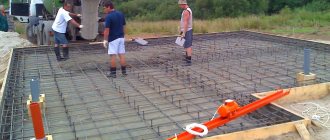
Calculation
You still need to start laying the foundation by making calculations. And it is better to act according to the following (albeit very approximate) method:
- To begin with, using the design documentation, you will need to determine the weight loads from the structures of the future building.
- Next, using Russian maps of zoning climate loads, we need to find the necessary indicators for snow and wind.
- Afterwards, you need to independently determine the operating loads. They depend on many factors: the number of residents, as well as guests who will come to the residents; equipping the house with household and other appliances; residence of pets (and which ones) and the presence of an aquarium; number of plumbing fixtures, etc.
- Then, according to the relevant documents (SNiP 2.02.01-83 “Foundations of buildings and structures”, SNiP 2.08.01-85 “Structures of residential buildings”, SNiP II-B.1–62 and other SNiPs) you will have to calculate the total weight of the house. The essence of the operation is to reduce absolutely all loads to the weight imposed on the foundation.
- Then it will be necessary to determine the RPG - the estimated depth of soil freezing at the construction site. Here you need to focus on the maximum value of this parameter on the map for a given area. And it would be better to consult on this issue with specialists - geologists and builders.
- At this stage, you can proceed directly to calculating the size and nature of the pillars’ depth:
- for a depth of up to 1 m, you need to take standard soil load-bearing capacity indicators of 1.7 kg x sq cm or 17 tf x sq m;
- for a depth of more than 1 m, you will have to take other indicators - 2 kg x sq cm and 20 tf x sq m;
- on dense soils (dry loams and clay, gravelly or rocky), freezing more than one and a half meters, the value obtained as a result of the above calculations must be multiplied by a factor of 1.15;
- Next, the supporting area is calculated for the pillar based on the size of its heel. The limit value for concrete pillars in hand-drilled wells is 0.28 sq. m.
- Then the value of the bearing capacity of the soil must be multiplied by the value of the supporting area. As a result, the load on one pillar will become known.
- Afterwards, the combined weight of the building must be divided by the load-bearing capacity of the pillar to calculate the number of pillars for a specific foundation.
- From the resulting number of pillars it is then necessary to subtract the number of corners formed by the load-bearing walls, as well as the number of floors of the load-bearing walls.
- The total length of the perimeter of the building and internal load-bearing walls must be divided by the value obtained as a result of steps 10. The result will be the pitch of the pillars (the value should be in the range of 1.5-2.5 m).
- Next, you should calculate the weight of the foundation together with the rand beam or grillage, depending on the type chosen for design (if additional structures are provided for in the sketch at all). In this case, you need to proceed from the standard density:
- reinforced concrete (27 tf/cubic m);
- wood (8.7 tf/cubic m);
- or brick (4 kg per brick with mortar).
- Then the weight of the foundation will need to be added to the total weight of the building.
- The next stage of calculations is the distribution of pillars. Each corner and crosshair should be identified by a pillar, and the remaining pillars should be evenly “spaced” throughout the entire foundation area. In the most loaded spans (this is where the stove or, for example, bathtub will be located), the pillars will have to be combined in twos.
At this point, the calculations can be considered complete and move on to other activities.
Columnar foundation design
Columnar foundation made of concrete blocks
Due to the variety of structural materials, poles can be manufactured using several technologies:
- masonry – brick 38 x 38 cm, block 40 x 40 cm, rubble (usually 60 x 60 cm) without reinforcement;
- monolithic - concrete (20 cm side or diameter of the column), reinforced concrete (30 - 40 cm diameter or side) or rubble concrete.
When choosing a rubble concrete structure for pillars, it is necessary to take into account that the upper 0.5 m are made of concrete with reinforcement of the pillar head with a frame of 8 - 14 mm vertical rods, bent at right angles for connection with the grillage. For monolithic pillars, panel or tubular formwork is used. In the first case, shields are mounted on the widening, supported against the walls of the pit. In the second, large-diameter asbestos-cement or polyethylene pipes are placed on the reinforced frame, providing a protective layer of 2–4 cm.
Columnar foundation made of baked clay bricks
Without waterproofing, concrete structures operating in soil have a service life of 30–50 years (brick, reinforced concrete, respectively). Therefore, it is not recommended to pour concrete into boreholes drilled in the ground, which is related to the hanging pile technology.
Reinforced concrete columnar foundation
The only option to reduce the construction budget and labor costs when manufacturing a columnar foundation using pile technology using the above method (for example, the TISE option) is to add penetrating additives to the concrete (Admix mixture from the manufacturer Penetron). In this case, the structure of the structural material receives water-repellent properties throughout its entire depth. However, insulation of the blind area and drainage at the level of the base of the pillars are mandatory for an underground structure.
Thus, a columnar foundation with a metal grillage is the best option for a log house, half-timbered structure, or “framework.” When using a low monolithic grillage on reinforced concrete pillars with a widened base, you can support a two-story brick cottage with an attic on it. If necessary, a cellar can be made inside the lattice grillage.
Good publicity
Application area
A columnar foundation is not suitable for projects with a basement/basement floor in the coastal zone. In addition, it is not recommended to use pillars when the depth of the bearing layer is more than 3 m. This is explained by the sharp increase in excavation work.
For normal access for workers when waterproofing the outer surfaces of pillars and making a drainage system at the level of the base of the foundation, it is necessary to dig large holes or trenches. The construction budget will be closer to the estimate for a slab foundation, in which soil excavation is minimized and floors on the ground are obtained by default.
Therefore, a support-column foundation is in demand in the following cases:
- number of storeys – 2 + attic;
- walls - brickwork 38 - 51 cm, calibrated logs, timber, SIP panels, panels, frame structure, half-timbered timber;
- soils – stable, without organic matter, from slightly to highly heaving;
- groundwater level – below 1 m;
- relief – slopes with a height difference of within 2 m.
In case of complex geology in the building area, the columnar foundation is widened due to slabs. They are poured separately, reinforced with one belt of reinforcing mesh, to which a frame of vertical rods connected by horizontal clamps is attached. The design turns out to be quite strong; it is further strengthened later by tying it with a grillage.
Features of the construction of a columnar foundation
Details:
- Cutting off the fertile (green) layer of soil is required for the following reason - moisture is required for green growth. Plants will actively pull it out of the ground and atmosphere, accumulating it in themselves and the soil. Moisture under the floor of a timber house is detrimental to any construction material, so it is better to exclude the possibility of its formation in advance. The thickness of the cut layer is up to 30 cm.
- Markings for holes are applied on the leveled area. They are guided by the following calculation: the distance between the pillars of a columnar foundation is equal to 1 m of the length of the object’s wall. To work, they use wooden stakes and twine stretched between them.
Installation methods further vary due to differences in foundation types from each other.
Columnar foundation
Using a garden auger, holes are made. They must be wide enough to accommodate posts, masonry or block structures. The depth of the columnar foundation must exceed the level of soil freezing + 30 cm for adding sand and gravel - a shock-absorbing cushion. A hole more than 1 m deep must be strengthened along the walls so that the soil does not crumble inward. To do this, you can use polystyrene foam boards, which will play the role of insulation. Finished holes for filling are reinforced with steel rod - 3–4 pcs. They simply dig into the ground inside the hole. If a prefabricated columnar foundation with a reinforced concrete grillage is provided, the ends of the reinforcement protrude from the foundation by 25–30 cm. To connect the foundation to the embedded crown, a pin protruding from the middle of the column is sufficient - the reinforcement in this case is not visible. Laying bricks or installing ready-made pillars is not a difficult task
It is only important to check the height of the pillars according to the building level. Concrete is poured slowly, using a vibrator to eliminate voids in the thickness of the solution.
If the weather is hot, then the finished structures are spilled with cold water until white foam (milk) appears on the surface. Foam indicates complete subsidence of concrete.
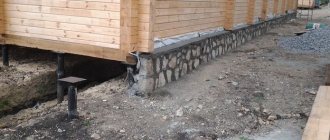
Installation of a columnar foundation
It is distinguished by the design of a concrete “shoe” - a stand for brickwork or a monolithic pillar. Procedure:
- After removing the top layer of soil, it is necessary to prepare a pit. The depth of the columnar foundation is different; there are: non-recessed, recessed and slightly recessed options. The average value - from 0.7 to 1 m - is typical for the climate of central Russia.
- On a leveled and compacted surface, areas for installing “shoes” are marked. This could be single brick masonry, monolithic pouring 10–15 cm thick, or ready-made concrete slabs - see photo above.
- After installing the stands, the pillars are assembled or poured. In the latter case, formwork from boards is built and reinforced. The work is carried out in calm weather - the concrete is less enriched with air, and as a result, there are fewer voids. The formwork cannot be removed until the concrete has cured.
When the pillars are ready, they are waterproofed. The pit is covered with layers of sand and gravel 15 cm thick. The remaining space is covered with excavated soil. The ends of the pillars extend out of the ground by at least 30 cm.
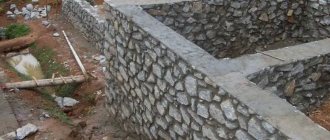
Construction of a columnar foundation with a grillage
This columnar foundation resembles a monolithic strip. The work is carried out in two stages:
Construction of a columnar foundation with a grillage
- First, holes are dug for the pillars. The dimensions of the columnar foundation and the installation description are similar to the construction of a simple columnar foundation.
- Then wooden formwork is made to pour the concrete grillage. It is pre-reinforced with a large amount of special wire. Rods cannot be welded together. High temperature will affect the strength of the knots. Therefore, the reinforcement is knitted by hand. To select the correct rod and knitting pattern, it is recommended to refer to GOST standards or specialized literature.
- Pouring is carried out slowly using a vibrating rammer. You can also use a reinforcing rod, piercing the thickness of the concrete and expelling the air, but the quality of automatic assistance is better.
Types of columnar foundation
Depending on the requirements for the building, the skills of the builder and the financial factor, the following variations of the columnar base are used:
Wooden poles
The cheapest solution for the foundation. If possible, suitable logs can be cut down and prepared yourself. Has the following features:
- The minimum set of tools for preparing logs is a saw and an axe.
- Low durability. A wooden support foundation will last from 50 to 80 years, if the operating requirements are met.
- Waterproofing and protection from pests is ensured by burning wood.
This type of columnar foundation is used exclusively for the construction of summer houses and small wooden buildings. With a correctly calculated load, it is possible to create a two-story wooden structure.
Brick base
Somewhat stronger than a wooden base. Despite the ease of installation, it requires significantly more time and effort in the process. It is distinguished by:
- Average price. A brick foundation is somewhat more expensive than a wooden one, but much cheaper than a monolithic one;
- High load-bearing capacity. On a brick foundation, it is possible to erect serious structures - not only panel buildings, but also other variations without a serious threat of subsidence;
- No additional training. Unlike wood, brick does not need to be fired and trimmed before installation;
- Simplicity of construction technology. Even a person who has not previously been involved in construction can cope with a brick foundation.
Brick solutions were popular before the use of metal foundations. Nowadays they are used to build summer cottages.
Bricks can be found in almost any hardware store, and they can be transported in small quantities, which will save on renting trucks.
Monolithic columnar foundation
It is an ideal solution for the construction of two- and three-story houses. The load-bearing load on a monolithic foundation means there is no fear of subsidence due to overload. The monolithic base is different:
- High cost. For construction it is necessary to resort to additional equipment. The cost and consumption of materials also exceed the previously considered options;
- Durability. If all precautions are taken and the load on the pillars is correctly calculated, such a foundation can last more than one century.
- Significant load-bearing capacity. Each monolithic pillar can withstand a load of up to 100 tons.
- Complex construction technology. Among the classic solutions used to create a columnar foundation, the monolithic design is the most labor-intensive. In most cases, it is impossible to cope without special skills.
- Scrupulousness in the choice of soil. Due to the high weight of the finished structure, subsidence of the building along with the foundation is possible.
A monolithic support base solution is used to create large suburban buildings intended for permanent residence.
With the advent of new technologies, its use is becoming less and less feasible from a price-quality point of view.
Metal and screw bases
With the development of technology, new solutions have emerged that combine the best of all classic designs. The use of metal piles made it possible to reduce the cost of constructing a structure without losing its load-bearing capacity. Screw piles are a logical and technological continuation of the use of metal for foundation pillars.
This technology made it possible to get rid of some of the disadvantages of support foundations, without losing the main advantages, which made it possible to expand the profile of use.
Such solutions are used not only in low-rise construction, but also for frame structures. The latest breakthrough was the use of screw piles to create permanent buildings.
The design has the following features:
- Increased load capacity. Metal piles can withstand loads of up to 100 tons, reinforced screw models - 250 tons;
- High construction speed. When using metal, you can prepare the foundation for a house with an area of 100 m2 in 3 days. In the case of using screw piles, the construction speed exceeds the use of wood;
- Price. Using a metal support base is not much more expensive than a wooden one and much cheaper than a monolithic and brick one;
- The need for additional waterproofing.
- Ease of repair;
- Possibility of subsequent strengthening for the construction of additional floors in the building.
However, the most important advantage of screw piles over all other types of foundations is the ability to use them on swampy soils with high water levels.
Due to its low dead weight, even in the event of floods, the foundation will not change its characteristics.
Columnar foundations have found their application in the construction of low-rise buildings. At the same time, the use of modern technologies has made it possible to eliminate shortcomings and expand the scope of application. To create a base of pillars you need a relatively small set of tools, including:
High speed of construction, relative ease of installation and high performance (especially when using screw piles) make the columnar foundation one of the most used.
At the same time, it is important not to forget that if constructed incorrectly, the service life of the base can be greatly reduced, as well as its load-bearing capacity.
In the video available below, you can get comprehensive information regarding the advantages and disadvantages of using a support-column base. It also addresses issues of foundation installation, including pouring, marking, etc.
Installation work
The process begins with the installation of markings on the territory
The process begins with the installation of markings on the territory. This is a fairly responsible process that requires correct calculations and accurate markings. The main rule for laying is a vertical design, taking into account the even line of the pillars. To achieve maximum results, you should use ropes and sand to mark the lines of the building. It is also worth considering the distance from one pipe to another, which should be approximately 2 meters.
Next, drilling of wells for pipes begins. If your finances allow you to hire a drill. Then use the service, but if this is not possible, then you can do them yourself. The width of the hole should exceed the diameter of the pipe by 10 cm. It is worth noting that the length depends on the type of base. When building a bathhouse, the pipe is installed directly into the hole, and if it is a more complex structure, then a cushion should be made under it. All these nuances must be taken into account before creating wells.
Formation of the foundation
Form a pile foundation on asbestos-cement pipes according to the following algorithm:
- Using a garden drill or special equipment, drill holes that exceed the length of the pile by 0.2 m and the diameter by 0.1 m.
- Extend the lower part of the canal using a manual or automated device.
- Fill the cavity with sand, forming a cushion 0.2–0.3 m thick, and spill with water.
- Line the top of the channel with plastic film or roofing felt to ensure waterproofing.
- Lower the hollow piles into the prepared well and secure them around the perimeter with reinforcement or wooden planks.
- Place sand around the protruding part of the support to ensure the column remains stationary.
- Assemble the reinforcement cage using 4 solid steel bars with a diameter of 1–1.2 cm and securing them with reinforcing jumpers.
- Place the assembled reinforcement in the asbestos-cement channel, ensuring its immobility during pouring using spacers.
- If necessary, install anchor pins along with the reinforcement to secure the elements of the lower trim.
- Prepare concrete mortar by mixing cement, sand and gravel in a ratio of 1:2:2, adding water to ensure the required consistency.
- Fill the internal cavities of the piles with pre-prepared concrete mortar.
- Allow the concrete to reach serviceable strength within four weeks.
- Check the horizontal position of the upper parts of the supporting columns by making preliminary markings using a building level.
- Waterproof the protruding part of the support with roofing felt, fill it with sand and compact it.
- Make a frame of reinforced concrete or beams, following the recommendations of the design of the building being constructed.
When performing work, pay attention to the following points:
- control of the verticality of wells during the drilling process is ensured using a level that allows you to determine the correct position of the tool after plunging several revolutions;
- Roofing material rolled up when performing work along the perimeter of the upper part of the canal will help prevent soil from falling into the well;
- on soil containing inclusions of fine gravel, there is no need for arranging a cushion;
- treatment of the underground part with bitumen mastic before immersion will ensure reliable waterproofing of the supports;
- You can remove air bubbles from a concrete support using an internal concrete vibrator or a metal rod.
Having completed the construction of the pile foundation, begin to build the walls of the building.
Variations of the pillar base
What the columnar foundation will be like is decided based on the amount of finances and the ability to independently engage in construction.
Block supports
A columnar foundation can be made up of concrete or reinforced concrete blocks, manufactured separately and installed directly when arranging the supporting structure for the building.
Each pillar of the structure can be assembled from separate blocks - a very reliable material
GOST states that the blocks that will be used for the construction of the foundation must be made from concrete of a grade not lower than M-100. As for the size of the blocks, private developers are accustomed to taking raw materials with parameters of 20*20*40 cm and a weight of 32 kg. Foundation blocks made of expanded clay concrete, a material that is resistant to thermal influences, are considered relatively light.
Most often, for independent construction of a columnar foundation, light small blocks are taken, since it is possible to build supports from large raw materials only with the use of technology
The best depth for fixing a block pillar in the ground is from 50 cm to 1 meter. If the type of soil and the weight of the building dictate other requirements, then it is more reasonable to build not a block foundation, but a foundation made of asbestos-cement pipes filled with concrete. Laying blocks to a depth of more than 1 meter is too difficult.
Brick pillars
Having decided to build a columnar foundation of brick, you need to purchase only red solid ceramic building raw materials. This material meets all the necessary requirements: it is waterproof, extremely durable and frost-resistant.
To build the foundation, it is customary to use red solid ceramic brick, because it is the most durable
Bricks can be used to construct both a shallow and recessed columnar foundation. The depth of the first version of the foundation varies between 40 and 70 cm. And the buried foundation is always installed below the freezing level of the soil by 30–50 cm.
To make the foundation reliable, the brick supports of a columnar foundation need to be created in 2 bricks
The main foundation pillars (supports located in the corners of external walls and at the intersection of internal partitions) are usually made of 2 or 2.5 bricks. In other cases, the pillars are allowed to be made of one and a half bricks and placed at a distance of one and a half or two meters from each other.
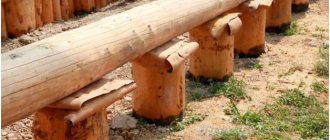
"Legs" made of wood
A base made of wooden “legs” is the most economical option. Logs suitable for the foundation can be easily cut down and processed on your own.
Wooden poles are intended only for the lightest temporary structures, as they can break under excessive pressure
The best raw material for creating wooden supports is pine, oak or larch wood. “Rods” are cut from the butt part of a log with a diameter of 2 to 40 cm. When placed in holes, the wood posts are secured on the sides with bricks, stones or a compacted embankment of crushed stone.
Sometimes wooden supports are fixed in place with concrete mortar. In this case, the pillars are immersed in liquid concrete by 10 cm. Another good fixation for wooden supports can be a cross made of two plates 0.8 meters long, arranged in a crosswise position.
To securely fasten the pole in the ground, use a cross and jibs.
Wooden supports must be protected in a special way from rotting. First, they are covered with clay to form a layer 1 cm thick, then burned with hot coals. The last task is performed slowly, making sure that literally 1.5 cm of wood is charred. The burned pillars are treated with heated bitumen or tar and dried.
Under the outer walls, wooden supports are immersed in the ground to a depth of 70 to 120 cm. And pillars to support partitions inside the house are placed at a depth of 50 cm.
The main pillars of a wooden foundation should be immersed to a depth of 70–120 cm
Monolith
It is preferable to construct buildings with 2 or 3 floors on a columnar monolithic foundation. Such a foundation will not sag even under significant pressure.
Monolithic foundation is considered the most popular design compared to other columnar foundations
A monolithic base of pillars is created from concrete, reinforced with metal rods and poured into special forms - pipes or formwork. This foundation turns out to be unusually durable, as it is completely devoid of seams.
DIY columnar foundation
After the project has been developed and approved, work can begin on the site. It is quite possible to make a columnar foundation with your own hands, although if you have little experience in construction, it is better to involve professional builders. It is important to complete all the steps listed below.
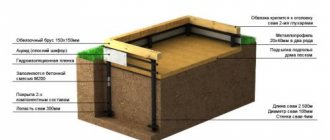
The recessed version of the foundation on supports is optimal for soils prone to heaving. In this case, the laying depth is set to 30 cm below the soil freezing level. If the density of the soil on the land plot is high, then it is allowed to form recesses for the pillars in the diameter of the pillar itself - with this approach, the walls of the pit will serve as a natural support. The formwork is placed only above the ground. If the soil is loose, then it is necessary to make holes 1.5 times wider in order to mount the formwork to secure each pillar.
A mandatory pillow is placed at the bottom of the pit. As a rule, this is a mixture of sand and gravel (crushed stone), which has a thickness of up to 20 cm. It is compacted and wetted.
The walls of the pit, when used as natural formwork, as well as the above-ground part, must be covered with waterproofing. This is necessary to maintain the integrity of the structure over time. A little concrete should be poured onto the cushion at the base, and after hardening, several small diameter reinforcements should be poured for fastening. The frame is tied with thin wire and thus creates an important supporting element of the entire foundation.
After the final formation of the frame, concrete is poured into each hole. At the same time, the grade of concrete used must be at least M200. To prepare a solution for a supporting foundation, the composition most often used is in the following ratio: cement-sand-fine crushed stone in proportions 1-3-5.
To carry out work on concreting the base for a support block foundation, it is best to contact specialists - this way you will ensure high quality and avoid annoying mistakes. When building the foundation of a future home, even small details should not be overlooked.
The formwork can only be removed after the mixture has completely hardened. The hardening time of concrete is determined by many factors. Among them are humidity and ambient temperature. The minimum period is 3-5 days. If the holes were dug larger than the diameter of the support, then after hardening it is necessary to backfill the soil.
Construction of a columnar foundation in stages
Brief step-by-step instructions for building a columnar foundation.
- Carry out a set of surveys before drawing up project documentation. After developing the project, accurately mark the pillars along the perimeter of the future building.
- Make wells (pits) in the places where the supports are installed. The diameter of the recesses must be larger than the future supports - waterproofing and formwork will be required.
- Compacting the base of the pit. This ensures reliable installation of the support. Be sure to lay a pillow for the base of the post. It is better to use sand; some structures will require a mixture of gravel and crushed stone.
- And only after this, each pillar is installed, depending on the individual requirements of each material.
Depending on the conditions of a particular site, individual requirements are imposed during the work.