Often a concrete screed is not the best solution for arranging a floor. Especially if it is an old concrete pour with multiple defects and chips. But before laying the floorboards, it is necessary to correctly select the fastening of the joists to the concrete floor. The quality of installation of the floor along joists on a concrete base depends on the chosen scheme and method of fixing the beams.
Scheme of forming a base from short beams
Do I need to attach wooden joists to a concrete floor?
In any construction work there is always a temptation to save materials, to do everything your own way, not as the neighbors or the master advised. The same goes for laying a wooden base. It is clear that nothing prevents you from installing the joists directly on the concrete floor without any attachment to the screed. Make sure to properly insulate the concrete so that moisture is not transferred to the wood. It is believed that with this fastening scheme, the beams are in a freely sliding state, so the situation with arched beams would seem to be avoidable.
In fact, such savings on fastening elements result in problems:
- Beams, under the influence of cold and damp air at the surface of the concrete slab, begin to “ride”, the wood either expands or contracts depending on the temperature or humidity level;
- Direct installation of joists on a concrete base significantly impairs thermal insulation and sound absorption. A layer of mastic or roofing material fused onto concrete does not eliminate cold bridges. Due to the large contact area between the timber beams and the concrete slab, with direct fastening, sound and noise penetrate the room with virtually no loss;
- Direct fastening of the joists to the concrete floor completely closes the internal underground space; as a result of such fastening, any air movement under the wooden floor is eliminated.
The last circumstance can be considered the most important. Installation of a wooden floor on joists must provide a rise above the concrete base of at least 10-15 cm. This is the only way to ensure reliable drying of the underground space.
Important! Only the presence of ventilation cavities under the wooden floor and gaps under the joists guarantees the normal condition of the wood and eliminates the risk of fungal infection.
In addition, the ability to attach the joists to the concrete floor on supports partially mitigates the requirements for the condition of the concrete. In private houses, rough cement-sand screed rarely comes out even and smooth, without holes and bumps. Therefore, for the floor of the first floor of an apartment building and in a private household, fastening a wooden floor to joists is considered one of the most proven and reliable options.
Universal support for cold floors
In an apartment, logs on a concrete floor can be installed according to a simplified scheme, since the rough foundation is formed from the same type of floor slabs. But even in this case, surprises are possible, for example, the presence of a threshold at the junction between two slabs, so mounting on supports can be considered a universal solution for plank flooring.
Step width between joists
High-quality installation of a wooden floor on joists depends on the pitch between them, as well as on the materials used for the finishing coating. The thicker and stronger the material for the finishing floor, the wider the pitch between the joists can be. In order to save money, you should determine the optimal distance in advance so that you can calculate the material consumption and not buy too much.
With a board thickness of 20-24 mm, the installation step of the joists should not exceed 30-40 cm, while a 50 mm board can be laid on the joists in increments of 1 meter (more details: “Correct installation of floor joists - installation instructions "). According to experienced craftsmen, laying the floor on joists with your own hands should be done in increments of 70 cm using a 40 mm thick board.
Don’t forget that the joist that is furthest from the wall should not be adjacent to it, but it also cannot be at a distance greater than the main step. It is enough to leave a gap of 30 cm.
We recommend: How to lay linoleum correctly
How to attach joists to concrete
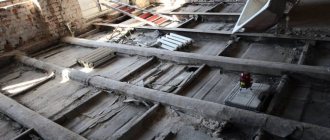
In practice, there are a variety of schemes for attaching joist beams to a concrete slab. From a box frame made of timber, mounted on height-adjustable supports, to columns made from leftover bricks. The latter fastening options are usually found in old Soviet-built Khrushchev-era buildings, and even after a planned overhaul.
There are several ways to lay joists on a concrete floor;
- Using plastic adjustable coupling supports;
- Screw the joists to the concrete floor with anchor fasteners;
- Fastening to concrete using self-tapping screws on scoring bars;
- Install on brick supports;
- For small rooms, you can make logs on a concrete floor by fastening them to metal corners.
The latter option, in an improved form, is often used for balconies and loggias of apartments. The U-shaped fastening is easily attached to the concrete slab of the balcony and at the same time makes it possible to quite simply align the logs horizontally even with a large drainage slope. One of the options for such fastening is shown in the video
Installation of beams on self-tapping screws
Fastening the joists using intermediate wooden blocks may seem like the simplest and most affordable solution. At first glance, self-tapping fasteners look really simple. It is enough to cut short pieces from 70x90 mm timber, you can even use a package of several pieces, and lay the base on a concrete floor, approximately as shown in the diagram.
Fastening with self-tapping screws looks ideal, especially if the concrete floor was poured the day before and it was possible to place wooden plugs in the concrete screed. The only difficulty is aligning all the beams in the same plane. You can do this in three ways:
- Pouring the concrete floor in several layers, and the finishing screed is formed from a polymer concrete pouring mixture. In this case, we obtain mirror alignment due to the high fluidity of the mixture;
- Adjust the height of each wooden support by selecting a package of several pieces of boards of different thicknesses, with mandatory control of the height and horizon of the joists using a building level;
- By tying the room with an initial contour made of timber.
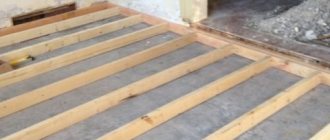
In the latter case, you will need to lay a wooden frame made of timber along the perimeter of the concrete floor, as in the diagram, level it with the horizon, and only then lay the logs on the concrete floor. The wooden support for attaching the beams to the floor is cut from the timber, guided by a pre-measured height at a specific point where the post is installed.
You can assemble the harness and adjust the height by supporting packages of boards
Installation of logs on anchors
Not the easiest fastening option, but one of the most reliable ways to install joists on a concrete floor. It differs from the previous one in that instead of a wooden post, a powerful M10-M15 anchor bolt is used to hold the joist, which is screwed into the body of the beam and into the concrete of the floor.
The beam can be easily tipped over
The installation height of the logs above the floor level can reach 150 mm. But this is rather an exception, since anchors can withstand vertical loads well, but cannot always keep the logs from moving laterally. This must be remembered if you plan to place heavy furniture or equipment in the room. Therefore, the height is limited to a maximum of 70-80 mm.
The advantage of this method is the ability to unscrew the bolt to the desired height, thereby making it possible to lay the logs on an uneven concrete floor without any problems.
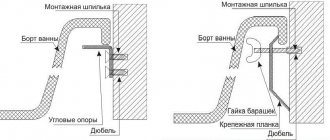
Mounting on coupling supports
This is a method of installing joists for a concrete floor in an apartment or on an insulated base. Attaching the joists to the concrete floor is done without drilling, which is very convenient, especially if the base is a hollow reinforced concrete floor slab. Under the anchor you need to drill a hole to a depth of at least 4-5 cm, and it is not a fact that when working with a hammer drill you will not stumble upon the reinforcement.
In this case, instead of anchor bolts, coupling supports are used. The upper part is screwed into a coupling pressed into the body of the log, the lower part is a metal support plate.
Using supports is more expensive, but this method of fastening also has its advantages:
- There is no need to rack your brains with marking and drilling the concrete floor; just drill holes in the joists;
- It is possible to adjust the installation height of joists;
- There is no need to assemble a timber frame for a concrete floor.
In addition, the use of screw supports significantly reduces the complexity of the process. In this case, you can attach the logs to the concrete floor in a few hours, while other installation methods will require at least two full working days.
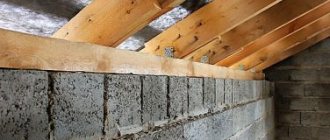
Logs on bricks
This fastening method looks rather archaic, but today it is the only possible option for wooden floors installed at a high height above the level of the base screed. The height of brick supports stacked in a column on masonry mortar can reach 50-60 cm or more, without loss of stability or fastening strength.
In this case, installing a floor along joists on a concrete base can be done with two-level insulation and classic ventilation of the underground space. The only drawback is the large weight of the brick pillars, so the method is used mainly for private houses.
Log laying technology
The method of laying floors on joists varies somewhat for different types of base. In any case, if you strictly follow the further instructions with the photo, you can organize a warm, durable and high-quality coating at home.
How to lay logs on the ground
When building a private house, you can begin laying the floor on joists on the ground base during the laying of load-bearing structures, or during interior finishing.
The sequence of actions is as follows:
- The ground under the floors must be thoroughly compacted using the end of a wide log or a vibrating plate.
- A layer of granite chips 5 cm thick should be poured on top of the soil, which will serve as drainage, after which it should also be compacted.
- We install wooden formwork under the support posts, which we fill with a layer of cement mortar reinforced with mesh. Thus, we organize the foundation for the pillars.
- When the concrete hardens, it needs to be covered with a layer of roofing material and the columns removed from the brick.
- The upper part of the columns must be insulated with two layers of roofing material and covered with bitumen mastic.
- The logs should be secured to the resulting posts.
- Between the joists for laying the subfloor, cranial bars are installed.
- An economical unedged board will serve as a subfloor. It should not be fixed to the joists; let it lie freely.
- Roofing felt or plastic film is laid on top of the boards to protect against moisture, and the material should extend 15-20 cm onto the walls.
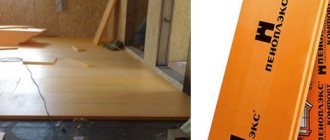
- The next layer can be laid with any selected insulation. This can be polystyrene foam, mineral wool, expanded clay or any other insulating material.
- A vapor barrier layer is laid between the finishing coating and the insulating layer.
If a double-sided membrane is used as a vapor barrier, then the finishing floor can be laid directly on it. However, all other materials for vapor barrier provide a distance of 2 cm or more to the finishing floor.
Method of laying joists on a wooden floor
Since wood floor joists are thick rectangular logs, in some cases it is possible to lay the finished floor directly on them. However, this is only possible if they are perfectly level and spaced no more than 80 cm from each other. In all other cases, logs will be needed under the covering.
We recommend: Filling the floor in an apartment
The first lag is fixed 20-30 cm from the wall, controlling the level of it and all subsequent beams relative to the horizon. The joists must be firmly fixed to the joists for the floor to be secure.
Before laying the insulation, you need to attach cranial blocks for the subfloor to the joists. Expanded clay, polystyrene foam, mineral wool and other materials can be placed on this flooring. The method of laying insulation is similar to that described above.
How to lay joists on concrete
The advantage of this masonry method is its simplicity and speed. Knowing how to lay joists on a concrete floor, you can solve several problems at once - leveling, insulating the floor and protecting the apartment from noise from the lower floors.
The list of tools for working with such a base includes: a hammer drill, anchors, dowels and screws for wood with a diameter of 6 mm. In addition, a hammer, plane, hacksaw and building level will come in handy.
To fix the joists to the concrete floor, use either self-tapping screws or anchor bolts. The latter fix the bars much more firmly, although they are much more expensive.
Before laying logs on a concrete floor, the base must be treated with a primer mixture and covered with a protective film or roofing felt. Impregnation of wood to protect against rot, fire and insects is highly recommended.
The concrete base may have significant level fluctuations. In this case, the horizontality of the beams can be adjusted with special plywood pads or pegs. A more technologically advanced adjustable floor on joists can be made by evenly tightening the screws at the base of the joists (more details: “How to make adjustable floors on joists with your own hands”).
The sequence of work looks like this:
- The screed must be free of debris and dust, after which it must be treated with a primer and left to dry completely.
- A layer of waterproofing must be laid on the concrete with an overlap of 15-20 cm on the wall. The seams between individual sections of rolled material, laid with an overlap of 15 cm, are sealed with tape.
- Prepared logs should be placed over the entire area of the room. The gap between the outer bars and the walls should be no more than 20-30 cm, and all other logs should be evenly distributed over the entire area, usually 30-80 cm from each other.
- The outermost logs are secured first, and a thread is pulled between them as a level beacon.
- Short joists can be built end to end, keeping in mind the displacement of seams in adjacent joists. If the cross-section of the beam is large, the logs should be connected halfway across the tree.
- Holes should be drilled in the floor and joists for fastenings, and then dowels or spacers should be inserted under the anchors.
- Next, the logs are fixed with bolts or self-tapping screws. There should be 2-3 anchors per lag, fixed 60-80 cm from each other.
- Before final fixation, check the horizontal position of the lags, after which the fastenings are screwed to the end.
- Insulation can be placed in the spaces between the joists.
- The last layer before the finishing coat is a vapor barrier.
After laying the logs in compliance with the technology, all that remains is to make the base for the finishing coating, be it laminate, parquet or tiles.
Thus, in essence, laying a floor along joists is not a very difficult process, and almost every strong man can cope with it. In addition, this coating allows you to significantly save on repairs.
What tools and materials will be needed
First of all, to lay the logs you will need a measuring tool. For a small concrete floor, you can get by with a set of paint cords and a bubble level. To attach joists to the floors in modern apartments, you will need to use a laser level; if the length of the room is more than 6 m, the accuracy of the cord is no longer enough.
Bubble and laser levels required
In addition, you will need a good hammer drill, a hacksaw for wood, a carpenter's corner, a set of regular and carbide-tipped drills, bits for screwing in self-tapping screws or a key for anchoring.
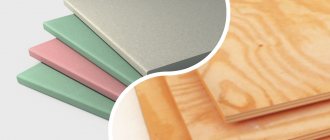
For logs, 70x90 mm pine beams are used, usually taken with a reserve. From the remains, you can cut out transverse inserts in the most loaded areas of fastening. You will need roofing felt or roofing felt and a curved knife to cut it.
Step width and joist size for concrete floor
The parameters of the joists and the distance between them are selected based on the thickness of the wooden floor and the material laid on the joists. According to the standards, one square meter of plank flooring must withstand a static load of at least 300 kg, so the distance between the joists is reduced to 30 cm for thin inch boards and increased to 100 cm for two-inch floorboards. Accordingly, the width of the logs can vary from 40 mm to 70 mm.
If the floor is made of plywood, then the choice of attachment points and the distance between the lags is carried out according to the diagram below.
What to put under joists on a concrete floor
For any method of fastening, load-bearing joist beams must be isolated from concrete. Typically, mastic is used or, more often, pieces of roofing felt with peeled gravel. As a result, it is possible to significantly reduce the level of vibration and noise transmitted through parts and fastening elements.
In private houses, the concrete floor under the joists is covered with a vapor barrier membrane or film. It is clear that in the place where the corners or anchor bolts are installed, the insulating material is glued with tape.
On stone and wooden supports you can use coating mastic insulation; it will protect the joists from moisture and reduce the risk of squeaking.
Laying a wooden floor on joists
This method of floor installation has great advantages, including:
- High strength;
- Good heat and sound insulation protection;
- Allows you to obtain an ideal, flat floor surface, hiding all the imperfections of the rough base;
- Perfectly hides all utility networks under the floor.
But this method is not suitable for rooms with low ceilings, since its total thickness is 10 cm.
We recommend: Joint of tiles and laminate: options and design methods - (photo+video)
The logs are installed on a concrete base or soil.
Installing a concrete base under wooden joists
Concrete must be cleared of construction debris and all potholes and cracks removed.
Next, a waterproofing layer is installed, which protects the logs from moisture and extends their service life.
The waterproofing material is pinofol or thick polyethylene film, which is laid with an overlap of 20 cm.
Afterwards the laying of wooden logs begins.
Preparing the soil for wooden logs
If you need to lay a wooden floor on the ground, then the preparatory work will be quite labor-intensive than installing it on a concrete base.
Initially, a layer of soil needs to be removed along the entire perimeter of the room, while going deeper below ground level by 20 cm. Next, a layer of crushed stone is poured, and then river sand.
Each subsequent layer must be moistened with water and compacted. It is also necessary to lay a waterproofing layer to protect the joists and wooden floors from moisture. And after that, they immediately begin to install wooden logs.
Key points when laying wooden joists
Laying pipes under the floor
Before installation, the logs are treated with a special water-repellent compound and left to dry for several days. The supports for the logs are brick columns, about 40 cm high and 2 bricks wide. They are installed on cement mortar and must be made identical throughout the entire height.
For more accurate control, use a level. There are two outer posts on one lag, and if the board is long, an additional post is placed in the middle.
And the step between adjacent wooden logs is determined by the thickness of the boards being laid, for example:
- For 40 cm boards, logs are installed every 80 cm;
- For 30 cm thin boards, the step will be 50 cm;
- With a board thickness of 40 cm, the step will be about 1 m.
It is necessary to place the logs perpendicular to the sunlight.
Initially, you need to lay two logs at opposite ends of the room. The correct installation is checked using a building level. Afterwards, you need to stretch the fishing line between the two logs and, using it as a guide, install all the other logs.
Fill all the voids between the joists with special insulation. You can use mineral wool, which has high sound insulation and thermal insulation.
After installing the logs, you need to lay chipboard or plywood as a rough base. All sheets are attached to the joists using long nails, and the heads must be recessed.
Next, proceed to laying the wooden floor.
Laying a wooden floor on a screed
A wooden floor can be installed on a concrete base. In this case, laying the floor is much simpler.
A waterproofing layer is laid on the concrete screed; to do this, take a thick polyethylene film and lay it with an overlap of 20 cm on the concrete base.
Before installing a wooden floor, moisture-resistant plywood is laid. In order to hide all the nail heads, it is necessary to slightly widen the holes pre-drilled in the screed through the plywood sheets from above.
Do-it-yourself flooring in a wooden house
Laying floors in a wooden house is quite simple. As a rule, the first board is attached opposite the entrance to the room, although installation can start from any wall.
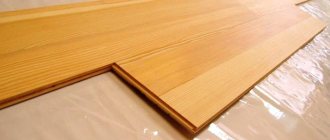
The first line of boards is installed along the wall, their ends should be pressed tightly together. The use of a tongue and groove board allows you to rigidly fasten the planks together, because this material has a tongue on one side and a groove on the other.
When installing, you need to step back from the walls by 10 mm, that is, make a certain temperature gap.
All boards are nailed. Having installed the first row of planks, you may be wondering how to lay the next wooden floor? Everything is quite simple. The joint of a pair of boards of a new row must be located approximately in the middle of the board from the previous row, i.e. the boards will be installed almost in a checkerboard sequence.
On wooden posts
Do not hit the board with a hammer - this may cause it to split. Just take a piece of board about 20 cm, and it will serve you perfectly as a cutter.
Having installed the board, fasten the plinth around the perimeter of the room, covering a special technical gap. If you use a board for installation, the wooden floor will need to be sanded and coated with a special varnish or paint. To remove possible cracks, you should use putty designed specifically for wood.
DIY tips for laying wood floors
If this is your first time laying a wooden floor, then by following these simple recommendations, you will quickly master this easy method:
- The annual rings of all adjacent boards must be placed on opposite sides;
- Before starting work, number the boards - this greatly simplifies the process;
- Drive all nails at an angle so that you can easily drive all the heads deep into the wood;
- The last board will have to be sawed against the wall. It will need to be glued and nailed well.
A wooden floor, laid according to all the rules, will serve you for many years and provide a good microclimate throughout the house.
How to level joists on a concrete base
If an adjustable type of fastening is used for joist beams, then leveling the plane is quite simple. You just need to stretch the painting cords in a cross between the corners; another cord is rearranged when adjusting the height of each support. The position of each log is additionally controlled by the building level.
For non-adjustable supports, packages of metal pads are used, or more often the heads are simply cut with a saw to the required level
How to properly lay and secure joists to an uneven concrete floor
Before laying the logs on the concrete floor, it is necessary to mark the lines for laying the beams. Along each marking, a sanitary zone is selected, within which sagging and lumps of concrete are knocked down, cracks are sealed, or debris is removed.
Laying and fastening joists to the concrete floor with anchors
For a small room, a direct installation method is used. The logs are first laid out on the concrete floor and the marks for drilling are transferred to the beams and to the concrete floor. Next, holes are drilled in the timber and sockets for installing plugs are punched separately using a hammer drill. The latter sometimes even have to be glued into concrete.
Recommended dimensions for drilling
All that remains is to align the beam with the holes in the concrete floor and tighten the anchor bolts. Next, we lay a building level on top of the log and tighten the anchors so that the beam takes a strictly horizontal position. We start the adjustment from the center and continue to adjust the mounting height alternately on the right and left.
For large rooms, threaded rods are used; they are immediately embedded in concrete, aligning each of them vertically. Next, the heads of the fasteners are coated with paint and the timber is applied evenly. Imprints from the studs remain on the joist, along which the holes are drilled.
Advice! If the concrete floor turns out to be weak and does not provide reliable fastening, you can blow out the space between the concrete and the beam with ordinary foam.
Laying and fastening joists to the concrete floor with corners
Installation of load-bearing joist beams with metal fasteners is practically no different from the anchor fastening scheme. Instead of anchors, metal corners made of steel with a thickness of at least 2 mm are used. Holes for self-tapping screws are drilled on the vertical mounting shelf.
After applying the markings, the logs are laid out on the concrete floor and a contour is drawn on the concrete on the left and right sides with a pencil. The beam is removed and placed on the floor at the corners. All that remains is to lay the logs, level them horizontally and secure them to the corners with self-tapping screws.
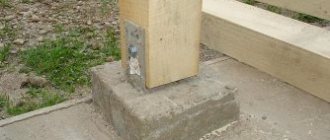
Mounting on bricks
Instead of an angle or an anchor bolt, you can use regular red brick of good quality, without cracks or cavities. It is better to use a single or one-and-a-half stone.
In this case, the marking line on the concrete floor is pre-primed to improve adhesion, and after 3-4 hours the bricks are laid out using ordinary masonry mortar. It will be possible to attach the logs no earlier than after three days.
Next, using a template, we drill holes in the beam for fasteners, lay the beam on the bricks and use a carbide drill to drill through the brick support to a depth of 4-5 cm. Remove the beam and drill a hole in the brick to a diameter of 25-30 mm.
All that remains is to hammer wooden or plastic plugs into the bricks and secure the logs with ordinary carpentry screws.
On adjustable plugs
For relatively weak plywood floors, adjustable support plugs are used. In this case, holes are drilled in the joists according to the template and tubular supports are screwed in. By turning the plug, you can easily align the logs in height and horizon, after which you only need to attach them to the concrete floor.
For these purposes, it is best to use a dowel-nail or a wedged fastener. In the first case, it is screwed in with a screwdriver, in the second, you can simply hammer it in with a hammer. One of the options for such fasteners is presented in the video
Recommendations
Modern methods of fastening joist beams significantly simplify the process, making it easier to align and fix the beams on concrete, but the strength of the supports is not too high. Therefore, it is better to reduce the distance between the logs to 25-20 cm, even if the floor is plank.
The best option for installing joists is considered to be those with the largest area of contact with the concrete floor. If possible, it is better to attach the logs to wooden blocks or bricks. This system is more difficult to level the surface, but at the same time guarantees reliable operation of the wooden floor in any conditions.